
Image Credit: Image #1: GBA / Ell Aire
More Musings of an Energy Nerd


When the owners of an old wood-framed building say that they’re doing a “gut rehab job,” that usually means that they’re demolishing the lath-and-plaster walls to expose the studs — the first step of renovation work that usually includes new wiring, new plumbing, and new insulation.
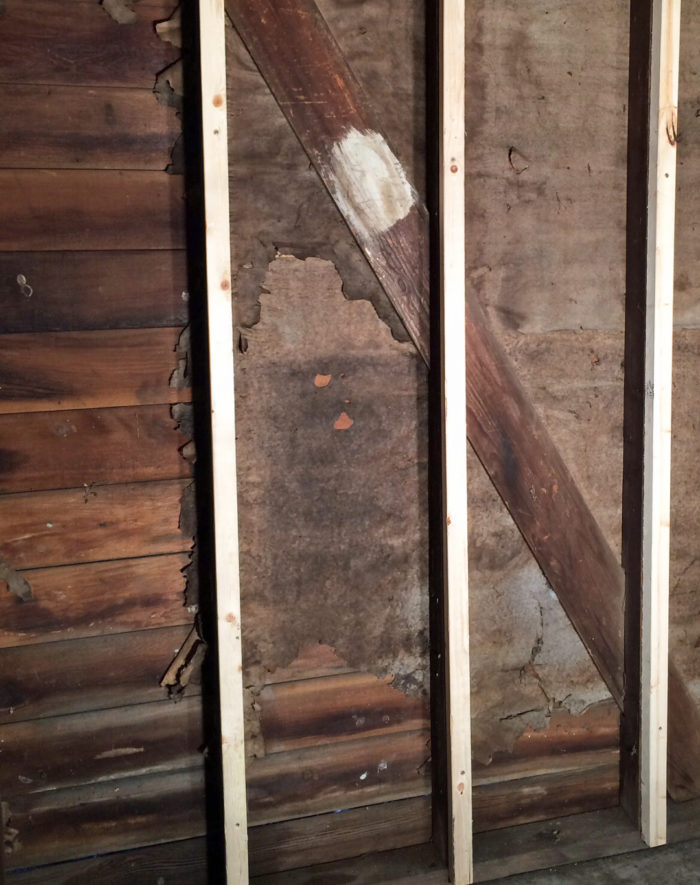
Uninsulated stud bays are common in older homes, so workers who pull down the lath and plaster expect to see the back side of sheathing boards on the exterior side of the studs. But in some cases, there isn’t any sheathing: the workers find themselves staring at the back side of the siding (see Image #1 on the right).
So how do you insulate stud bays from the inside if the building has no wall sheathing or water-resistive barrier (WRB)?
Maybe I can I install spray foam against the siding…
One “solution” to this situation is to install spray polyurethane foam insulation directly against the back side of the siding. Why is this is a bad idea?
- Spray polyurethane foam — especially closed-cell spray foam — will cling tenaciously to the siding, gluing everything together. This will make future siding repairs — for example, replacing a cupped or split piece of siding — almost impossible.
- The spray foam may ooze out of cracks between the siding as it expands, forcing the siding pieces apart. If this happens, you’ll end up with an unsightly, hard-to-clean-up mess.
- The spray foam will limit the ability of the back side of the siding to dry. When a rainy day is followed by a sunny day, the exterior side of each piece of siding will be dry, while the interior side will be wet. This condition leads to cupping and splitting.
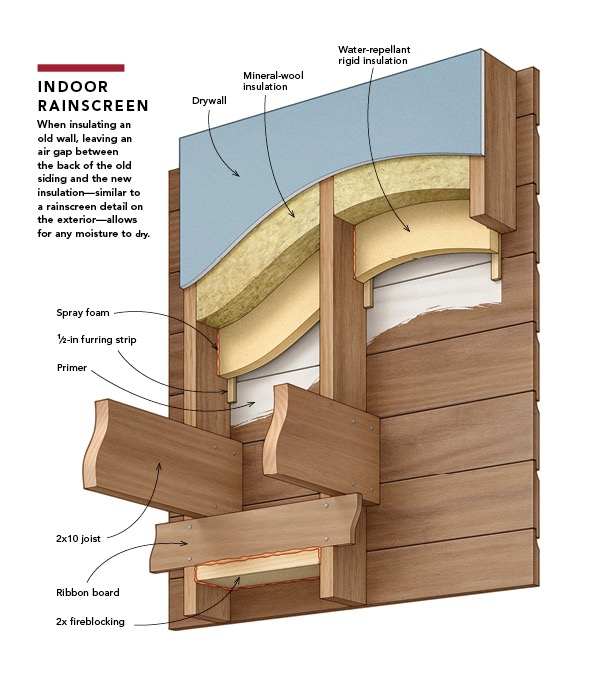
You’ve got to have an air space
There are several possible ways to insulate this type of wall. No…
Weekly Newsletter
Get building science and energy efficiency advice, plus special offers, in your inbox.

This article is only available to GBA Prime Members
Sign up for a free trial and get instant access to this article as well as GBA’s complete library of premium articles and construction details.
Start Free TrialAlready a member? Log in


173 Comments
How about coming in from the exterior?
With all this work: demo lathe and plaster, cobble together an air gap and insulation layer, then refinish interior... I'm tempted to go the other way and remove exterior siding in this instance and reinsulate, resheathe, and refinish exterior.
I'm working through this on a historic house at the moment. The original wood siding needs to be maintained and restored. The state Department of Historic Rescores won't approve replacement. The wood siding additionally has lead paint so proper removal is an involved process. This is fairly common in historic rehab.
Response to E.T.
E.T.,
The article discusses strategies for insulating open stud bays from the interior. Of course, if you're willing to remove the siding and install new sheathing, this article is irrelevant.
I'm left wondering how many
I'm left wondering how many houses like this have been blown in from the outside with cellulose or fibreglass by ignorant insulation contractors... scary
I'm in the process of restoring an 1860's home without sheathing. Over the years, stud cavities on the main floor were filled with cellulose, behind lath and plaster, and newer sections have fiberglass. I'm nearly finished with removing lath, plaster, any drywall, and all of the insulation. Overall the bones are good but had a leaky roof. It's a good thing we removed the walls and ceilings because electrical is bad and mold is an issue.
Peter
My sister's for a start...
We do encounter these walls
We do encounter these walls from time to time but they are quite rare in our area, mostly confined to vacation cabins that are being converted for year-round use. In my experience, the various approaches Martin describes all work well. As a foam contractor my preferred method is 15# felt between the siding and the foam; it is much faster than using foam board so it makes sense when labor cost is a factor.
Cellulose Retrofit with no Sheathing/WRB
Not to beat a dead horse, but here is Joe's case study on investigating a house that was retrofitted with cellulose in the stud bays, but had no sheathing or water resistive barrier/water control layer (i.e., clapboards on studs). Yep, the clapboards got wet from interior-sourced moisture (also possible exterior-sourced precipitation), resulting in paint blow-off and siding moisture damage.
BSI-028: Energy Flow Across Enclosures
http://buildingscience.com/documents/insights/bsi-028-energy-flow-across-enclosures
Kohta
Not meaning to hijack this discussion, but have you come to any conclusions as to what approach might be useful to combat the damp roof sheathing problems you've been looking at in Vancouver roofs.
air gap for DP cellulose
For health and climate reasons I try to avoid foam. If done right cellulose could work well here I think. A product like Mortairvent, though designed to be used in masonry walls, can be used to create an air gap against siding (or a roof deck in a cathedral ceiling.) It combines a spongy spun polypropylene matrix with an insulweb-like backing and comes in various thicknesses from .25-.80. Seems like it would work just as well with spray foam if it was important to have that larger air gap.
And if there are not structural considerations, cross strapping the added interior 2Xs would nearly eliminate thermal bridging.
Response to Bennett Sandler
Bennett,
Thanks for sharing your helpful suggestions.
Board sheathing
So if you pull the plaster and lath off and find board sheathing behind the clapboard, is it safe to blow cellulose- up to 12" with a new stud wall built to the interior? Or would you still suggest an air gap and/or air barrier against the sheathing? I like the ventilation of the Mortairvent idea, but its expensive and isn't an air barrier.
Response to Jean Terwilliger
Jean,
That's a tricky question. It depends on the siding -- vinyl siding is safer than stucco; the climate -- warm climates are safer than cold climates; and the roof overhangs -- wide overhangs are safer than stingy overhangs.
Applying rigid foam on the interior
I will be renovating a house with clapboard siding and no sheathing as described in this article.
I plan to create the airspace as recommended and install fiberglass batts.
I may also want to install a layer of rigid foam insulation on the interior before applying the drywall.
In another article I believe Martin recommended using polyisocyanurate rigid insulation, as the most environmentally friendly, for this type of application.
Is the foil membrane that encases the polyisocyanurate insulation a problem for an interior application, or
can I purchase polyisocyanurate insulation without the foil membrane?
My main concern is the "breathability" of the wall.
Will the foil membrane create a moisture problem?
Response to Wayne Percifield
Wayne,
Here are links to two relevant articles:
Walls With Interior Rigid Foam
Choosing Rigid Foam
Q. "Is the foil membrane that encases the polyisocyanurate insulation a problem for an interior application?"
A. No. I addressed this question in my article, "Walls With Interior Rigid Foam." I wrote, "Will there be any problems if your walls can’t dry to the interior? The answer is no — as long as your walls can dry to the exterior."
Q. "Can I purchase polyisocyanurate insulation without the foil membrane?"
A. Yes. But you don't have to.
Q. "My main concern is the breathability of the wall."
A. Your concern is misplaced. As I wrote in How to Design a Wall, "Many green builders think that a wall has to “breathe.” While “breathing” is a poorly defined concept, it usually refers to a wall that is vapor-permeable. ... There is no truth to the belief that vapor-permeable walls perform better than walls that include a vapor barrier. In fact, limiting the flow of vapor through floors, walls, and ceilings is often essential."
Q. "Will the foil membrane create a moisture problem?"
A. No. Again, a fuller explanation can be found in my article, Walls With Interior Rigid Foam.
RE: Applying Rigid Foam on the interior
Thank you, Martin.
You have a wealth of information.
I am much more comfortable about attacking my project now.
Southern California
I am in a similar situation with a home in Southern California. Outside is stucco. Would geography change the answer?
Thx
Response to Matt Wade
Matt,
You wrote that you are "in a similar situation." That would be similar to who or to what?
I'm guessing that you have a stucco-clad home without any wall sheathing. If so, the advice in this article applies to your house -- even in southern California.
Keeping the plaster!
Martin, I have a 100+ year old house in Detroit, Michigan, plaster lathe walls, balloon framed, shiplap 1"x10" sheathing, some type of partially degraded water barrier (builders felt?), cedar bevel siding covered in lead paint. I was planning to insulate with rigid foam polyiso on top of my roof, and rigid roxul comfortboard on my walls on the outside right over the existing siding. Here is my current plan, from the outside to inside, cementitious siding, windscreen furring strips, tyvek, rigid mineral wool board @ 8"-10", existing siding/felt/sheathing, empty stud bays for fishing/running mechanicals, existing plaster.
In my understanding this creates a wall that is vapor permeable in both directions.
I am concerned about water getting trapped where in a similar application with Polyiso
Do you think my plan is a good idea or do you think some type of Polyiso application could work better?
Response to User-6933276
User-6933276,
First, can you tell us your name?
Your idea will work, as long as you figure out a way to flash your windows. It's easier to get the window flashing details right if you replace your existing windows with new windows. If you can afford that step, it will allow you to install flashing (including sill pans) in the window rough openings.
Polyiso would also work. A wall with exterior polyiso doesn't need to be able to dry through the polyiso. All that is necessary is for the materials on the exterior side of the polyiso to be able to dry outward, and the layers on the interior side of the polyiso to be able to dry inward. So you can use either mineral wool or polyiso for your wall. Most contractors find polyiso to be easier to deal with, because it doesn't compress as much as mineral wool when the furring strips are fastened down with screws.
User-6933276
Hi Martin,
My name is Kevin Hood. Thanks for the recommendation.
P.s. I tried updating my name in my profile earlier but it doesn't seem to be working yet.
What about doors?
Hi there,
This has been a tremendously helpful article, so thanks for that. I’m currently converting an attached carport to additional living space in a 1953 wood frame house in central Texas, and will be employing your foam-and-fiber method on one of the walls with existing shiplap siding without any sheathing or underlayment, as I wanted to avoid tearing it out.
I’d like to add a new door to this existing, sheathing-less wall, but I realized today that all of the waterproofing methods I’ve seen rely on having sheathing on which to apply a membrane and appropriately layered felt paper.
Would y’all have any recommendations on how to flash for an exterior door in this situation? I’ve cobbled a few ideas together but nothing that seems sufficient or code-correct...yet!
-Chris D.
Chris
You may find this blog from a long time GBA contributor, who built a house without sheathing, helpful:
http://ourhouseuponmoosehill.blogspot.ca/p/details.html
Malcolm
Thanks for the link!
Looking through his posts, it seems that the strategy he employed was to place the underlayment directly on the studs. Unfortunately, my siding is already installed on the studs, so that wouldn’t be an option without removing the siding (at which point I could just install sheathing!).
Response to Chris D.
Chris,
You'll just have to do the best you can under the circumstances. You'll need a sill pan in the rough opening, of course -- that's a code requirement. Install housewrap or asphalt felt on the rough jambs, with the material lapping over the vertical legs of the sill pan, and then install your door. The exterior door casing will simply be installed with caulk -- not ideal, but the best you can do.
The best detail to protect this door is an adequate roof overhang. If your building has a stingy roof overhang, make sure that you install a special roof directly over this door to protect it from the weather.
Thanks, Martin
That makes sense, thanks for the affirmation!
Luckily, there's a decent overhang (~18" +/-) as well as a covered patio extending off this section of the roof line that provides good coverage for about 90% of the doorway, but I'll plan to re-evaluate the integrity of said roof (the previous owner appears to have been handy, but not the best steward of good building science) now that It'll be playing a role is keeping the house dry.
Thanks again!
Hot Humid Climate
I recently bought a house built in 1949 in Austin, Texas with clapboard over felt paper on the exterior and no insulation in the cavity. The interior drywall is at the end of its lifespan so when I replace it, I'd like to take the opportunity to add insulation to the cavity. It has been a cold winter!
I'm intrigued by the closed cell spray foam/felt paper option listed above because it seems to be the fastest to install while offering the best air sealing and I wouldn't need to add spacers to increase the cavity's depth. But, I'm worried that since closed cell is a vapor barrier (or retarder? I'm not sure) that it'll trap moisture in the gap between the siding and the new felt paper. Am I completely off base here, or will this assembly work in my hot-humid climate?
Thanks!
Response to Megan Matthews
Megan,
You didn't tell us whether your walls have any sheathing. Because you chose to post your comment on this page, I'm guessing that your walls don't have any sheathing.
If you install strips of asphalt felt between the studs, followed by closed-cell spray foam, you won't trap moisture. Everything on the exterior side of the spray foam will be able to dry outward, and everything on the interior side of the spray foam will be able to dry inward.
The spray foam is an air barrier as well as a vapor barrier, so it will prevent moisture from finding any cold surfaces. It's a safe wall.
Re: Hot Humid Climate
Hi Martin,
You're correct - we have no sheathing. Our assembly from inside to outside is drywall, studs (no insulation.. yet), felt paper, and wood clapboard.
Thank you!
1930s home in Northern California
Hi Martin,
First off, thank you for your post. I know it has been a couple of years now, but the topic is still relevant, and there is surprisingly very little information about retrofitting very old homes without insulation--or at least it's difficult to find.
There was a video posted recently about this very subject, found here: https://youtu.be/jhoQ_f9ZnzQ
The method used in that video seems very similar to what you recommend, with some improvements and specific materials. Basically, to maintain the air gap, the author is using Dorken's Delta Dry rainscreen (dimple mat), and on top of that, their Delta S product, which is a waterproof/airproof material. They drill through the floor and ceiling studs and add tubing through it to provide airflow into the crawlspace/attic. Their recommended insulation is closed-cell spray foam to seal and meet code requirements, but also provide alternatives--either rigid foam+canned spray foam to seal around the gaps, or strong tape to seal the Delta S material to the studs and rockwool to fill between the studs.
I have a 1930s home in Northern California (East Bay area), and am considering using this method to insulate during a kitchen remodel where the walls have been exposed. The wall layers from outside in consist of stucco -> metal lath -> building paper (crumbles when touched) -> wood cladding -> studs. I'm told a vapor barrier is not needed in this climate; and anyway, I couldn't find any in stock at local hardware stores. Would the method in the video be appropriate here, and would you use closed-cell spray foam or stick to rockwool or fiberglass? I'm hesitant to go with the rigid foam because of the amount of blocking, cross-bracing, etc. Are there additional steps you recommend taking?
I'm in the process of looking for but am also hesitant to use "professionals" in the area. My next door neighbor had spray foam blown in without any consideration of the age of the house and how the exterior walls were constructed. I worry about the mess he might have in the future. This topic doesn't seem to be one of common knowledge amongst folks here, and since the home prices are so high, there is a tendency for some to ignore potential long term issues with the excuse that "we could always just sell" (good luck).
Thanks!
Response to Willie Paul (Comment #28)
Willie,
Q. "Would the method in the video be appropriate here?"
A. I disagree with some of the elements of Matt Risinger's approach in the video. The air flow created by drilling holes in the plates is unnecessary and possibly counterproductive. For example, pulling air from a crawlspace is risky -- that might be humid air. More importantly, the wood siding shown in the video dries readily to the exterior, so it's unlikely to stay wet and need ventilation drying behind it. Finally, air flow between the studs might result in enough wind-washing of the insulation to reduce the thermal performance of any fluffy insulation installed between the studs (if fluffy insulation is used).
In short, stick with the advice provided in this article.
Hey Martin! Thanks for this post!
I know this isn't exactly what your writing about, but many parts seem similiar.
My 1920's English Bungalow, in Dallas TX, (zone 8a) from exterior to interior, is Brick Vaneer, small air gap, shiplap, studs, empty cavity, shiplap, sheetrock. I'm currently performing a remodel on an exterior corner of the house and have removed the sheet rock and the first layer of shiplap, leaving exposed wall cavities. The gaps in the outer layers of shiplap are pretty large in some places. There seems to be signs of some water entry, mainly under the window, and possibly from the kitchen that used to be there. There will be a shower in the corner, with plumbing on the exterior wall. I'm also (foolishly perhaps) installing a wall mounted toilet in the wall cavity under the window. As this is a difficult place to keep dry, i'm a bit baffled by what steps I should take to both keep it dry, and keep it from freezing in the winter time. There is about a 1/4" gap between the wall carrier (frame and toilet tank)and the shiplap. The toilet tank is partially covered with styrofoam from the factory. Obviously not doing the plumbing fixtures here would be ideal, but that's not whats happening. I might be able to add 1/2"-1" additional cavity space, but there's problems with that too. (tiny house). The tyvec as been up in there for a couple years with the door locked while I mustered the courage to tackle this project, I understand that's not the best idea? Thanks again for all you do!
Marc,
You are at risk of suffering water damage to your house.
1. You need to address the "signs of water entry, mainly under the window" by removing the window(s) and installing flashing in the window rough opening, followed by the installation of a new window (or re-installation of the existing window). You can perform a search on "flashing a window rough opening" if you don't know how to do this work.
2. It's insane to install a toilet tank in an exterior wall cavity. That wall cavity needs to be filled with insulation, not plumbing. Move the toilet. The record low temperature for Dallas, Texas, is -8°F. If you get a cold spell like that again, your toilet tank will be frozen solid.
Thanks for your quick reply!
1. Yes. It's not going un-adressed. I bring it up because I understand that airflow in these walls is what has kept this thing from more serious water damage. Once the window has been addressed, I've got to insulate these walls in a manner that doesn't cause more problems. What would you do differntly in this situation? Do I have different choices because there are bricks? Is felt still the best option, or could I adhere something to the ship lap? If the Brick Vaneer keeps the moisture off the shiplap, will I still have condensation to contend with?
2. Got it. There's been plumbing there for over 80 years, a sink to be exact. Yes a toilet tank in the wall is not ideal, perhaps insane, but when we have cold spells like you mention, we open the cabinets and leave the water running, etc., the same thing could be done with this toilet tank, remove the cover, maybe even adjust it so it runs a bit for the duration of the cold spell, or empty it and turn it off. The alternative to having a toilet here, for me, is no toilet. I'd prefer to turn it off and let it sit empty for a couple weeks then not have it here. This is why I didn't ask you, "do you think I should put a toilet here". Specifically, I'm looking to maximize my chances at having success in this difficult situation.
Hi Martin,
Would vinyl siding over the old wood siding have any bearing on this method of insulating the cavities? I hope to one day remove the vinyl and restore the wood, but that might be a ways off.
Thanks, Leanne.
Leanne,
If your walls lack sheathing, and if you "hope to one day remove the vinyl and restore the wood," then you should follow the advice in this article.
Hi Martin, Thanks for addressing this issue. I currently have our 1906 farmhouse gutted with open stud cavities, backside of original pine sheathing exposed. Unfortunately the situation gets more complicated at the exterior. Working out from pine sheathing: Tar paper, asbestos shingles, a very thin (1/4" or less) yellow foam board insulation, then vinyl siding. We intend to replace vinyl in next few years (It is well past useful life), but will have to leave asbestos. Does the asbestos change recommendations in article? Rock wool is my "fluffy" insulation of choice. Any recommendations for new exterior siding over asbestos after vinyl replacement? Thanks
Gary,
The advice in this article doesn't apply to you. This article is about houses without wall sheathing. Your house has wall sheathing.
In your case, you're just talking about installing new siding on an older house. All you need to do is install a water-resistive barrier -- housewrap would be the usual choice -- and verify that there is good flashing at windows and doors. Then proceed with the siding of your choice.
Possible upgrades include the addition of a continuous layer of exterior rigid foam and a rainscreen gap.
Thanks for the quick response.
I was confused about the sheathing, as my 1x6 pine looked a lot like the pictures. It's an old house with many repairs/additions over the years. One section of the house actually had wood siding and no sheathing, but we were able to remove it as no asbestos was present. At least 3 different scenarios on exterior walls, so far. Trying to strip back as much as we can, and do it right this time. Good to hear the suggestions for the asbestos. Your suggested upgrades are on my list.
My name is Ryan from Vassar, MI.
Thanks for this post all of the other great posts.
My wife and I purchased a 1950s brick ranch home a few years ago and have been doing reno projects from day one. I was hoping someone could help us come up with a wall assembly that will work for our house. We've rebuilt a couple of our exterior walls where we had access to the interior and exterior sides of the wall. These 2x4 walls were constructed of some type of fiberboard sheathing, see attached photo of our bathroom walls, and interior foil faced paper batt insulation. The old insulation barely filled half of the stud cavity depth. We did new unfaced batt insulation, sheathing, wrb, and exterior rigid xps foam insulation with a lot of attention to air sealing. The new walls came in with an r value just under 30. We are now doing a reno in our full bathroom and are trying to figure out an insulation solution for the exterior wall. The old fiberboard sheathing is very air leaky and we'd like to seal up the cavity. Its not very feasible to remove the original brick and old sheathing to install new sheathing and siding. I've reviewed this article but I'm not sure if it applies to my situation. I was wondering if I can use 2 inch XPS foam to air seal the cavity then fill the rest of the cavity with rockwool batt insulation? If so I'd plan to seal the edges with canned spray foam and high performance tape. I'd like to avoid any solutions that I'm not able to complete on my own such as spray foam or packed cellulose. I'm concerned about how this approach will perform given we have fiberboard sheathing then about a 3/4 inch to 1 inch air gap before the brick. Do you have any ideas on how to best air seal the sheathing side of the cavity? We live in zone 5 but border 2 counties that are in zone 6. I've read about the Bonfiglioli wall assembly and am hoping to incorporate it into our house to achieve an thermal stud break and increase cavity insulation values.
We appreciate any help.
Thanks,
Ryan
This is Anukene from Oakland, CA. We have gutted walls with nothing but the back of the beautiful redwood siding. The studs are 2"x3.5", 16" apart, diagonal bracing running between.
I am trying to decrease costs and complication. Being in Zone 3, can I skip the cobbled WRB recommenced in this article? My hope is to put mineral wool in the cavity ,which will should allow the siding to dry out, and do an air seal with the interior drywall. No freezing in this part of the world.
Thoughts? Better ideas? Thanks for the time.
Anukene,
The need for a water-resistive barrier (WRB) has little to do with the climate zone. Factors that affect whether you can get away with omitting the WRB include (a) if your climate is very arid (low levels of rainfall), or (b) if your roof overhangs are very wide, or (c) if your house has one story (a factor that allows the roof overhangs to work better than if the house had two or three stories).
Water entry into walls can cause rot, which is why houses without a WRB can be risky. Assessing all the risks at your house is a matter of judgment, but you should start by assessing the factors I list. It would also be a good idea to see if there are any signs of mold or incipient rot at the lower corners of the window rough openings -- something that is easier to assess when the walls are open, as yours are.
Thanks Martin.
Regarding my climate zone, I was just saying that (I think) I don't need to worry about condensation.
Re: WRB, my understanding is that water that does enter the siding will either be wind-driven or moisture moving through the wood. If given a rainscreen, it will drain along the back or dry out, as it has in this house for a hundred years. My understanding is that the moisture will not travel to the drywall/plaster, or effectively wet any future fibrous insulation that might be pushed against it. If this is the case, I'm not sure what the WRB is protecting. Please set me straight.
All of this being said, I am likely going to go with the recommendation in this article. But I just want to make sure I understand what the WRB is doing in this case.
The assembly I'm thinking is 3/4" spacers on corners, 1/2" polyiso, canned spray foam, batt insulation, gypsum.
Martin,
Hello and thanks for all the information on your articles. I’m looking for some direction. I’m in the midst of adding insulation to a 1920 home. Zone 4. Never any insulation in the walls. Reading this article makes me wonder if this approach to the rehab is something I should heed?
The walls are 2x4 studs, balloon framed, that had plaster & lathe on walls. Somewhere in the 1990’s someone placed 3/8 drywall over the walls. Which I took all down to put mineral wool insulation in.
Like the interior walls. Someone has resided the home without removing the original siding. When looking at pic. You can clearly see large gaps between the boards on the exterior. There appears to be roofing/ felt paper on the other side of these boards. Then the aluminum siding on top of the original siding. What I can’t tell is if the boards are the original siding or just old time sheathing the siding is attached too.
I have to extend the studs out to meet the hardwood floor which is one of my girlfriends favorite parts of the house.
Do I need to follow this Articles path or can I air seal the cavities & then place the batts in there? I’d rather do this once. Not sure if in the future we will do exterior of the house yet.
2nd I was contemplating running furring strips & comfortboard at right angles across studs to help with thermal bridging and than capping with MemBrain & drywall. To bring the wall out to meet the hardwood floor. Any suggestions will certainly help me keep my girlfriend from the deep end of the pool. Thanks again!
Sincerely,
Dan
Dan,
Those horizontal boards you see are sheathing boards, not siding. The felt paper on the exterior side of the sheathing boards are your water-resistive barrier (WRB). So your house has sheathing, and you can ignore the advice in this article -- since the advice in this article does not apply to houses like yours.
Martin, can you refer people with a situation like this (old, gapped board sheathing) to any articles on how to insulate from the interior? Thank you.
Johanna,
In general, you would insulate such a wall the same way you would for new construction: choose your favorite insulation, and pay attention to airtightness during installation.
If you're worried about thermal bridging through the studs, you might want to consider installing a continuous layer of interior rigid foam: "Walls With Interior Rigid Foam."
Note that if this type of wall has a water-entry problem due to the lack of a WRB or bad flashing, the problems can't be solved from the interior. In some cases, there is no substitute for siding replacement.
Hello Martin,
Thanks for the article and replies to posts. I'm going to read it all again, but I'm not clear on a couple of things.
My single story creole cottage (located NW FL) needs full infrastructure reno (still has live knob and tube wiring!) so I decided to demo the lathe and plaster in most of the exterior walls to do that and add insulation. There are lots of crazy angles and added 2x4s to furr out walls for sheetrock and to support termite damaged framing so whatever I do, it will be labor intensive.
The lap siding has lots of large gaps and the floor plates inside walls were practically nonexistent (3-5" holes looking down to the ground). House is on an open crawlspace. I *really* don't want the walls to provide access to critters so GC recommended we block them (and maybe seal with foam). In hindsight, maybe leaving it more open and screening would be better for drainage and airflow?
I haven't seen definitive info on why stone or rockwool can't just be used (with nothing else or possibly vapor barrier on the sheetrock side?) or does that not allow enough ventilation and evaporation inside the wall?
If that's the case, how about furring strips, foam or asphalt barrier, and then the stone wool?
I'm getting so much conflicting advice, it's boggling my mind. Thanks so much for any clarification!
Robin
Robin,
In no case do you want to encourage air flow into or out of your stud cavities. Your walls need to be air sealed.
Nor do you want a path for insects or rodents to enter your stud cavities.
So your contractor is correct: You want blocking, not insect screening, at the base of your stud cavities. Each piece of blocking should be installed in an airtight manner.
In an old house like yours -- a house without sheathing -- you should follow the advice in this article. The main reason that you don't want to just stuff the stud cavities with rock wool and call it good is that your house lacks a water-resistive barrier (WRB). That means that wind-driven rain can easily enter the stud cavities. You need a plan to address that problem.
Martin: What's the difference between the pics in #42 & #43? Aren't they the similar?
Leonard,
The reader who posted comment #43, Robin, explained that the photos showed "lap siding." I took Robin's word for it -- although admittedly, if you are looking at the back side of either sheathing or certain older types of siding (especially shiplap siding), it can be hard to tell what you are looking at.
In the case of comment #42 by Dan, the situation was different. Dan explained, "You can clearly see large gaps between the boards on the exterior. There appears to be roofing/ felt paper on the other side of these boards. Then the aluminum siding on top of the original siding." Combining Dan's description with an inspection of Dan's photo, I concluded that the boards are sheathing boards, not siding boards.
Martin,
Thanks very much for the clarifications! This has been very helpful.
Robin
Hi Martin,
Me again... I provided my GC with the details of the approach outlined in your article. Fyi, I am leaning away from spray foam for a number of reasons so we were focusing on the rigid barrier etc. option.
He consulted with a number of insulation and waterproofing experts (one of whom serves as an expert witness on construction lawsuits related to this general area apparently). The group deviated from the air gap plan with the following alternative recommendation, which I want to run by you and others for input. I believe their consensus was formed around the fact that our location is prone to a lot of storms and hurricanes that can produce a lot of windblown rain.
Their proposal is to use fiberglass tape over any large daylight gaps in the siding and sealing them with BASF AWB900, and then going over the entire inside of the siding with a Synergy wood waterproofing product. Followed by rigid foam also sealed in with AWB900, and lastly filling the remaning air cavity with net/blown in insulation.
If that doesn't sound like a viable alternative to the air gap approach to you, can you give me some points to further discuss with them or other sources I could contact?
I was comfortable with the approach outlined in your article and now this throws a wrench into it that I'm not sure about.
Thanks again,
Robin
Robin,
I don't think that it's possible to make lap siding watertight from the interior by the use of fiberglass tape and elastomeric sealant. The siding moves too much. (Moreover, spreading elastomeric sealant on the back side of lap siding will probably interfere with the ability of the lap siding to dry out.)
That said, I've never tried it.
I would be reluctant to attempt the approach suggested by your GC. I would use one of the methods described in my article. But the decision is yours.
I am concerned about the flammability of rigid foam. Would it be practical to replace the rigid foam with comfortboard 80, or would that fail to provide an adequate air barrier? If a separate air barrier is needed, would a plastic film like Membrain suffice?
thanks
Nicholas,
If you don't want to use rigid foam, you could use asphalt felt, as explained in the article. The disadvantage of the asphalt felt is that it isn't an air barrier. If you choose to install asphalt felt on the exterior side of your insulation, make sure that the interior side of your insulation has a good air barrier. (Usually, that means carefully installed drywall -- installed according to the Airtight Drywall Approach -- along with airtight electrical boxes.)
Martin,
Thanks. I had concerns as well so we went back to the drawing board. We will replace siding to reduce daylight gaps, use the 1" air gap and rigid foam, plus add some venting since we are otherwise sealing the attic and floor plates. Given the high humidity here and "rising damp" issue, I'm considering encapsulating and dehumidifying the crawlspace (which is an open, pier foundation) but that is TBD due to all the added expense (of everything). Apparently, quite a few historic homes in the area have done that to achieve better control over that weak point.
I appreciate your input.
Robin
Hi all,
So, per my last post, the encapsulation of the crawlspace is possibly a good idea but is adding $6500 to an already over budget project. Any ideas?
I'm replacing some rotted subfloors (but not all), the house is on an open pier foundation (but less than 30" clearance required for spray foam). Just doing a barrier (no dehumidifiers) is still like $5k.
Is this necessary, worth doing, and/or is there an alternative?
The premise is by doing all the rest, the HVAC will pull moisture up through the old floors which will cause issues, odors, and reduce overall efficiency and proper conditioning.
Thoughts?
Thanks,
Robin
Robin,
Q. "Just doing a barrier is still, like, $5 K."
A. I'm not sure what you mean by "barrier." If you mean "air barrier," then my advice is, "All sides of your house need an air barrier -- including the floor assembly." The air barrier isn't optional -- you don't want air leaks.
You have rotted subfloors. Why did they rot? Where did the moisture come from? Is it exterior moisture (water vapor) that collected on the subfloors that were made cold by air conditioning? You have to understand the mechanism for the failure before you can repair the problem.
If you house is built on piers, with less than 30 inches of clearance to grade, there is no perfect solution (although jacking up the house to provide better clearance is often a good idea -- it's just expensive). You may get some ideas from this article: "Crawl Spaces vs. Skirts."
“[Deleted]”
Hi all, we're getting closer to a plan for the historic cottage. But, the devil is in the details still...
Using the advice here with 1" air gap and rigid foam approach, my question is about venting. The GC plans to block lower wall floor openings with pressure treated lumber (per the photo) and then cut weep holes in the bottom of each stud bay. Since the attic will be spray foamed and we will be sealing the top wall plate off from the attic side, we're also planning some venting to the outside at the top of the walls too.
Questions:
1) what size and spacing is recommended for the weep holes?
2) product recommendations for bug screening over the holes? I know I've seen some in blogs, but I can't find them. I want something with small grid that isn't easily chewed or rusted
3) per articles on rigid foam and ants, should we tape the raw edges of the foam? (we don't have lots of risk factors for carpenter ants, but they could be a possibility)
4) recommendations for the upper vents (size, products, etc.)?
As always, any feedback is much appreciated!
Robin
Robin,
If I were you, I wouldn't include vent holes. The assembly can easily dry to the exterior, because the sheathing, WRB, and siding should all be vapor-permeable. There is no need for vent holes.
Hello Martin –
I recently uncovered a water infiltration problem in a mid 90’s built house in Minnesota. The wall construction from outside in is stucco on metal lath, 2 layers of felt, 5/8” fiberboard sheathing, 2x6 wall studs. I discovered that water had been infiltrating the wall cavity at the roof level and getting trapped between the WRB against the stucco and the vapor barrier placed behind the interior drywall leading to dry rot of the structural framing and mold on the framing and insulation. The wall is a 2 story space with no windows and no cracking in the stucco so I’m confident the water source was from the roof and has now been properly sealed off. The felt and fiberboard sheathing on the first floor level are brittle and cracking and need to be removed. I have replaced the structural framing and I’m trying to determine the best way to reinsulate the wall that no longer has viable exterior sheathing. I’ve read the suggestion of placing a WRB against the stucco and spray foaming the wall cavity with a closed cell product. I don’t know if that will work with my situation, the inside face of the stucco is littered with staples and nails that are embedded in the stucco, I’m fearful of removing them and causing cracking to the stucco.
Is a WRB required if I were to apply a closed cell spray foam insulation directly to the inside face of the stucco?
Is a product like Mortairvent applied to the stucco and then apply closed cell spray foam a better solution?
Can I install a GreenGuard siding underlayment to the stucco and then spray foam?
I’m trying to save the stucco from being removed and the entire wall rebuilt in the winter months.
Any suggestions would be greatly appreciated.
Thanks
Adam
Adam,
In Minnesota, you absolutely need an air space between the stucco and the sheathing -- no exceptions. In my opinion, you'll have to remove your stucco and correct the problem. For more information, see this article: "To Install Stucco Right, Include an Air Gap."
Update and question re: final insulation
We are a month in and the air gap and R5 rigid foam are in place. The GC decided to use BASF AWB 900 to seal the edges to the studs instead of spray foam.
The plan was to then fill the rest of the cavity with BIBS. Now, the insulation contractor says there isn't enough space (I don't think he accounted for the 1" air gap) and he wants to use open cell spray foam.
I really want to avoid that unless it is the *only* option. I have concerns VOCs if not done 100% correctly and fire also. Building out the stud bays is also not feasible.
Any other options or am I stuck with spray foam?
Thanks,
Robin
Robin,
Open-cell spray foam will work. So would fiberglass batts. (A 3.5-inch-thick batt can be split into two batts, each about 1.75 inch thick. Remember that fiberglass is compressible, so the insulation can start out thicker than the space you are filling.)
Martin,
Thanks, I'll discuss that alternative with my GC.
Regards,
Robin
Martin,
Still researching... are there any reasonable alternative spray-in options for this shallow application other than open cell SFP?
I'm looking at Rockwool Premium Plus or cellulose... I am really uncomfortable with surrounding myself with the SPF. I have chemical sensitivities and if anything goes wrong, I am sunk. And, I have already used both the XPS and some closed spray so that's enough chemicals.
With that said, I am willing to give up some thermal performance for a truly healthy green option (if the code insp will let us). I know fiberglass batt is an alternative, but I'm just hoping there is something better to fill all the irregular shapes and depths of the old stud cavities and a spray other than foam makes sense to me.
I know the Rockwool PP also has good sound and fire ratings which are also important to me but not sure about a minimum depth for that product or how bad the adhesive is yet (undisclosed chemical makeup).
Is there anything else to consider doing?
Thank you,
Robin
Robin,
You can look into the use of either Spider insulation (spray-applied fiberglass insulation) or damp-sprayed cellulose.
For more information on Spider, see "Getting to Know Spider Insulation."
For more information on damp-sprayed cellulose, see "How to Install Cellulose Insulation."
Terrific, I'll check them out.
Hey Robin,
Fiberglass is the Rodney Dangerfield of the green building community ("It gets no respect...") But, BLOWN-IN fiberglass is a great product. I used it for my own home and have no regrets. It's not itchy like fiberglass batts and is far less dusty than cellulose. The stuff literally feels like little cotton balls. Mineral wool has a huge carbon foot print compared to cellulose and fiberglass.
Blown-in Fiberglass ranks high in terms of "healthy insulation" and is similar to cellulose and Rockwool for flame spread. Rockwool ranks poorly for health due to its formaldehyde binder.
https://www.treehugger.com/green-architecture/whats-healthiest-insulation.html
https://www.youtube.com/watch?v=snlhECzj1E8
That all being said.... cellulose is still the 'greenest' insulation and would be perfect for your shallow, irregular walls cavities. Borate treated cellulose will not burn and pests hate the stuff. I've never heard of anybody having issues with borate. My wife has extreme sensitivities to spray foam but had no issues at all with the 3 tons of cellulose in our attic.
Rick,
Thanks for your reply and info. I really like the idea of the blown fiberglass product. I'm looking into whether there is anyone in proximity to NW FL who installs it but there may not be.
As I mentioned before, the original plan was to use BIBS so I was hugely disappointed when that was no longer an option. I'll check out cellulose if I can't find a Spider installer.
Regards,
Robin
Hello... me again. An update and new conundrum on my historic reno project...
We decided to go with the same open cell foam inside the remaining stud cavities after rigid foam and air gap. Turns out they are too shallow. Some test areas revealed that the foam peeled off during the trimming.
Ok, so options are do nothing, another layer of rigid (not preferred) or perhaps use thin batt insulation separated down to 1-2" (most are about 1.5-1.75" deep but it varies). My preference is to use batt but mostly due to my concern over street noise over actual r value. It would be no worse than where the house was before removing plaster, with the exception of soundproofing which could be.
That brings me to natural sheep wool. I have two suppliers - one uses borates and the other uses Thorlan IW for pest control. I'm okay with either, but the Thorlan may hold up better over time (from what I've read, with grain of salt on source). It's more expensive than borate treated.
I am not finding much info on use of these products in the US. There are old articles and blog posts from 10 years ago. Are there any new thoughts?
It's used extensively in Europe and there are nightmare stories about moth infestations but they were mostly about early providers that did not properly treat the material. Not much new there either.
I can post a new thread for sheep wool insulation but thought I would begin here since it relates to the whole wall system for rebuilding a historic property.
Comments are much appreciated!
Robin
Robin,
I've never used sheep wool insulation, but I'm skeptical about its usefulness. It's basically a gimmick. It costs more than fiberglass or mineral wool, it's hard to source, and it there's probably a long lead time if you order it. If you want a fluffy air-permeable batt, I suggest that you use fiberglass or mineral wool. If blown-in insulation is an option, cellulose is best.
Martin,
I can appreciate that claims on its usefulness may be coming from the manufacturers, but there are lots of green/sustainable building orgs in the UK that endorse it. It does seem widely used there and elsewhere. Similarly, there are lots of lawsuits and defunct companies that didn't treat with insecticide that caused infestations of "biblical proportions." Obviously, I want to avoid that!
But, there also seem to be some compelling reasons for me to consider it - can standard fiberglass batts be easily separated down to a 1-2" ply and would that afford equal sound deadening?
According to insulation sub, no blown or sprayed product is available that would work in such a shallow cavity at this point.
One scientific article discussed the pest issue, that Thorlan salt seems to address. And the other is marketing info on one product available here in case you feel like revisiting the material.
https://www.mdpi.com/2075-4450/10/11/379/htm
http://www.blackmountaininsulationusa.com/products.php
Thanks again,
Robin
Ps - if you know of any colleagues that have used it with positive or negative results, I would be very interested in further input.
I'm renovating a shed that has no sheathing, but does have an intact WRB of two layers of asphalt building paper between the studs and the siding, which is some kind of painted high-density fiberboard embossed to look like wood grain. The paper is very thick, heavy stuff and isn't compromised. I also live in a mixed-dry high desert climate (zone 5) with less than 7 inches of water a year so generally things that get wet dry very quickly.
In this situation, would it be safe to call the existing double-layer building paper WRB an air gap such that I could safely fill the cavities with mineral wool? I know that it doesn't qualify as an air barrier, but could the interior drywall be the wall's air barrier, so long as all the penetrations like electrical boxes were scrupulously air-sealed per the airtight drywall approach?
Nate,
Q. "In this situation, would it be safe to call the existing double-layer building paper WRB an air gap such that I could safely fill the cavities with mineral wool?"
A. Yes, I think that would be safe -- as long as the flashing details at windows, doors, and penetrations seem adequate. This is somewhat of a judgment call, so careful inspection of the house is important.
Q. "I know that it doesn't qualify as an air barrier, but could the interior drywall be the wall's air barrier, so long as all the penetrations like electrical boxes were scrupulously air-sealed per the airtight drywall approach?"
A. Yes.
Thank you Martin!
The old flashing details (nonexistent, of course) are not adequate, and I am re-doing them.
Very helpful article! I’m looking for recommendations on insulating/air sealing the exterior walls as part of our home remodel in San Diego, CA zone 3. We are doing a gut remodel and our exterior walls are made up of stucco, lath, and Plaster Kraft building paper attached to 2x4 studs. It’s a 1961 home that had no insulation in the stud bays previously. It looks like the stucco ripped through the building paper in some spots and is partially degraded and torn in other areas. The house has a roof overhang of 21-23 inches around the house. Is cut and cobbling rigid foam in the stud bays in order to insulate and gain air tightness the best option for me or should I follow the airtight drywall approach?
If I cut and cobble with rigid foam which type of rigid foam should I use, should it be unfaced, and will I get sufficient r-value using at least 2.5-2.75 inches thick rigid foam given the guidance of using 1 to 3/4” thick sticks in the stud bays or will I need to beef out the studs as well?
I’m open to all recommendations that you think would be best for my situation, although I would prefer to not use spray foam. The only other recommendations I’ve gotten from general and insulation contractors thus far is to put fiberglass batts or rockwool in the bays with little thought or attention to air sealing or the rips in the building paper. It seems like following that advice would be a missed opportunity to improve the building envelope and efficiency of the house.
Thanks for the articles and guidance you provide!
Michael,
You face three tasks:
(1) Installing a substitute for a water-resistive barrier. The article on this page explains your options.
(2) Addressing air leaks. Either spray foam, a careful cut-and-cobble job, or the airtight drywall approach will work. Of the three options, cut-and-cobble is the fussiest and most labor-intensive.
(3) Insulation. How you insulate will depend in part on you decision for addressing airtightness.
A few general comments: The climate is San Diego is among the mildest in the U.S., so doing a perfect job of air sealing and insulation is far less important than it would be for a homeowner in Minnesota or Houston. Most homeowners would do almost anything to avoid the task of a whole-house cut-and-cobble job.
Martin,
I’ve been trying to come up with the best options for air sealing/insulation and it’s been tough to decide given the fact that air sealing/insulation isn’t as critical in my mild climate as you mentioned and the seemingly lack of ROI for insulating, which is why I haven’t just gone the seemingly easier route of using spray foam. Nevertheless I’m still trying to make the smartest insulation choice given the three tasks you outlined.
I was able to find 2.6” thick polyiso available near me for a reasonable cost. With a 3/4” stick this would nearly fill the 2x4 stud bays with the polyiso. I’m thinking this will 1) provide a substitute for the worn out water resistive barrier while giving the stucco an air gap, 2) address air leaks if properly sealed, and 3) provide sufficient r-value in the walls. I would have to figure out how to best workaround plumbing and electrical in a few of the stud bays but overall it seems like a manageable task.
If I were to go this route, does the foil facing on both sides of the polyiso present an issue for me given it’s very low permeance? We do run our forced air conditioner somewhat often in the summer and heater in the “winter”.
Please let me know if you think this is a viable plan or if I’m setting myself up for potential issues.
Many thanks,
Mike
Mike,
It's a viable plan. The foil facing won't cause any problems.
Going from a wall that could dry in basically any direction before with no insulation and no vapor barrier to foil faced polyiso panels in the wall cavities is quite a change and I do keep getting told about the vapor impermeability of the polyiso. Why is it that the vapor impermeability of the polyiso will not be a concern for me?
As I understand it, any water that gets in the wall cavity between the building paper and polyiso will dry to the exterior. I’m less sure about what having a vapor retarder on the interior side of the wall will do, given I’m in climate zone 3.
Thanks again,
Mike
Mike,
Moisture can be from rain, but rain is unlikely on the interior side of the polyiso. Moisture can also be condensation, but condensation occurs when hot, humid air encounters a cold surface. That won't happen with your wall, because polyiso has R-value. So why are you worried?
I think it’s really just a lack of understanding of vapor retarders. I read or have had contractors tell me that we don’t use vapor barriers in my climate zone or that walls here should be vapor permeable in both directions so moist air created inside the home can dry through the walls if needed. I get stuck thinking that if it’s ideal for a wall to be able to dry in both directions what makes it ok for polyiso to be right behind the drywall. There is a bathroom on one of the exterior walls and I came across the article by Allison Bailes on his underinsulated exterior wall where he was striving for some permeability in both directions.
The combination of those things drives my questions but more so desire for understanding of how the vapor impermeability of the polyiso plays in the wall cavity.
Thanks for the help,
Mike
Mike,
For more information on the issue of whether walls need to be vapor-open in both directions, see this article: "Fine Rules for Wall Design."
I am in the process of finishing the interior of a shed that was built with wood siding attached directly to the studs (there is no sheathing). Currently the walls do not have any insulation or drywall. I live in Fresno, CA. I am planning to insulate the walls cut and cobble style as described in this article. The shed currently has two windows that were installed to the inside of the frame. I would like to replace the windows with new windows that follow a more typical construction, attaching to the outside of the framing. The siding currently covers the entire rough opening. I'm assuming i'll need to remove some of the siding to attach the windows to the studs but one question i have is regarding how to flash the window in this type of installation.
Any insight would be greatly appreciated
Thanks,
Mark
Mark,
You have two choices: (1) Do it right, which will require siding removal, or (2) Come up with details that are less correct than for a new installation, but which might work if the wall where the window is installed is protected by a wide roof overhang.
Here are links to articles and resources on doing it right:
"All About Flashing"
"Window Installation Done Right"
Mike Guertin's video series on window installation
Martin,
Forgive my stupid question here. This article hits near home for me as I'm evaluating my old house reno.
I live in a 120 year old house in climate zone 4A. In the 80s, the home owners stuccoed the house against the clap boards without a WRB. The interior has no insulation. The house is drafty in the winter with drops of 10-20 between thermostat and walls in quite a few places. I don't want to break down the walls with all the old lead paint and plaster and lathe. While that might be cheaper, I don't want to have my young kids breathe it in. So, I'm thinking of ripping off the stucco, adding WRB, rigid foam, and hardie plank. We had an addition done with spray foamed walls, Tyvek and hardie plan. The new part of the house use 1/3 of the energy of the old part for a similar square footage. But in general I won't get my money back. @45K for 28 squares, the pay back is 37 years. I'm not sure if blown-in from the interior would be as effective. 45K is a big chunk of change but I'm tired of the drafty, over cooled, over heated cycle. I will do the blower door test as you suggested (strangely hard to find around here), but based on the thermal readings, every wall has an issue. Is ripping of the stucco overkill? I have two goals: stop air infiltration and prevent moisture build up with whatever solution I settle on.
Thanks!
Leonard,
If stucco was applied directly to the clapboards without an intervening WRB, it's unclear that you can remove the stucco without also removing the clapboards. If you strip the wall down to the studs from the exterior, then you can insulate, sheathe, install a WRB, install a rainscreen gap, and install new siding.
Is it worth it? Only you can decide, since the answer depends on your financial position.
My previous contractor said that he was was able to take the stucco off without damaging the clap boards. Seems like the stucco chipped of wood easily. He also said it much cheaper to add the foam boards on top of the clapboards, tape seal it and then apply WRB over the foam boards and then add siding on top of that. The R value will be lower that spray foaming the exterior stud bays but I wouldn’t pay as much and I would get the air sealing I’m looking for with the boards and WRB.
What kind of foam board should I go for in 4A climate zone?
Leonard,
In Climate Zone 4, codes require at least R-20 wall insulation. That can be achieved with about 5 inches of EPS or about 3 or 4 inches of polyiso. I don't recommend the use of XPS, which is manufactured with blowing agents that have a high global warming potential.
hey leonard where are you at? this sounds pretty similiar to me in Roanoke Va climate zone 4a with stucco on 1x6. have you made any final decisions?
We may be living in parallel universes. Sound identical same age house as well. Records say 1920, old owner says 1900. Basement looks 1700s :) I see dead people. Outside Philly.
My contractor is charging me $1500 a square to remove stucco, foam board, wrap and Hardie plank. Not sure if that’s a good price but seems kinda in the ball park of another quote.
hey martin-i feel like this article should apply to my situation. House built 1920 in roanoke VA. Wall assembly from outside in= pebble dash stucco, 1x6 pine sheeting with grooves routed horizontally to accept stucco, studs, lathe , plaster. Although there is "sheething" technically i feel like this articlle still applies, and if so, what about any water that may get in or condense? does there need to be vents and drains in each top/bottom plate?
Spencer,
In your case, the 1x6 boards are the sheathing, and the stucco is the cladding (or siding). So this article doesn't apply.
No, you don't want to install any vents or drains in the top and bottom plates. Airtightness is always a good idea. For more information on this issue, see "Are There Any Reasons to Make Homes ‘A Little Bit Leaky’?"
Because your home lacks a water-resistive barrier, you may want to approach your walls as suggested in this article (assuming you are working from the interior). If you are working from the exterior, you may want to add exterior rigid foam and a WRB on the exterior side of the existing stucco.
Martin,
I'm renovating a 1962 house in Central Texas with (mostly) no insulation.
The walls are: clapboard, felt paper (looks like double layer), studs, then drywall.
Would the felt paper be sufficient to allow the exterior to dry if I put fiberglass batts for insulation?
I understand it's not an air barrier so I'd need to do airtight drywall.
Spray foam is out of the question for this remodel, to keep costs low.
Given that we’re only adding insulation to the part of the house, is it even worth it? Or should I just rip out the old fiberglass insulation in the kitchen (only place that has it) and skip it all together?
Thanks,
Alejandro
Alejandro,
Q. "Would the felt paper be sufficient to allow the exterior to dry if I put fiberglass batts for insulation?"
A. Yes.
Q. "Given that we’re only adding insulation to the part of the house, is it even worth it?"
A. Yes.
Q. "Or should I just rip out the old fiberglass insulation in the kitchen (only place that has it) and skip it all together?"
A. No.
Thanks for the quick response Martin.
The part I'm struggling to understand is:
"If you’re planning on filling the stud bays with air-permeable insulation (fiberglass batts) the material you use to create the air space ... needs to be an air barrier."
In my case, I would have a WRB but not an air barrier. I assume this is suboptimal but still makes the insulation worthwhile.
There are also some places where the tar paper is compromised, but fortunately not a lot.
My GC wanted to add "housewrap" between the studs in these cases (bathroom mostly) then add fiberglass batts. Should we just stick to felt paper? This area (bathroom) seems to have moisture issues in the past (probably due to improper window flashing, compromised WRB).
Alejandro,
The best thing to do is to follow the advice in this article.
Since you don't want to do that, you'll have (as you say) a suboptimal situation.
If you have areas that have had "moisture issues in the past," any advice from internet sources (including me) would be suspect. The only way to analyze and fix that type of moisture issue is with a on-site inspection.
Good luck.
Martin,
Really appreciate your thoughts so far. I'm thinking I'll try the rigid foam approach.
Just one question, given the double layer tar paper, do I need the spacers to leave a gap behind the siding? I noticed the way the tar paper sits, it already forces a bit of an airgap.
Just trying to cut as much labor of this as possible...
Best,
Alejandro
Alejandro,
Research suggests that two layers of asphalt felt, conscientiously installed, can indeed provide a small air gap that is adequate for drainage. One key aspect of this discussion is ascertaining whether or not the asphalt felt on your walls was consistently installed (with two layers, properly lapped, in all locations).
If you think that the asphalt felt is doubled everywhere, and is in good shape, you may (to limit the amount of fussy labor) want to omit the air gap between the insulation and the sheathing.
It's essential, though, that you determine the source of the moisture that caused the "moisture issues" you mentioned.
Hi, I am converting the upstairs of an old Vermont barn into a studio apartment. Climate zone 6A. (I have no construction experience and can't explain why, but I've enjoyed reading GBA blogs off and on for years. Please forgive any lingo mistakes.) The downstairs will remain pure storage without any renovation other than sistering the (upstairs) floor joists and rebuilt stairs. The footprint of the barn, ignoring roof overhang, is 16' 8-3/4" x 31' 6".
This post is very helpful since it is a post-and-beam barn with nothing to the walls other than the vertical siding. The difference I face from your post is that there are no studs. See the attached photo. The beams are rough hewn. The lower beam carrying the floor is roughly 6 x 6. The upper beam supporting the roof is roughly 7.5 x 7.5. The log rafters are on 32 inch centers.
For the walls, I have three thoughts. (A) What if I install rigid board to the interior edges of the beams, then studs to their interior? That will give me roughly a 6 inch rainscreen gap. Is there such a thing as too much of a gap? The advantage is ease of installation: less cutting and cobbling.
(B) Alternatively, I could cut and cobble, attaching 3/4-inch furring strips to the rigid boards before installing them into the spaces. That would give me the more-standard gap, plus begin the insulation nearer to the exterior, which might mean losing less floorspace to the new interior walls.
(C) Alternatively, I could use the asphalt felt + spray foam trick you write about, in which case I am thinking I should install a bunch of 2" (nominal) strips against the siding to support the felt and preserve the air gap.
I've been wanting to avoid spray foam, but also am concerned about making alternatively insulated walls that are so thick they steal too much useful floorspace.
The roof is standing-seam metal on the exposed (to the interior) boards visible in the photo. Do I need an air gap for those roof boards also? GBA postings addressing insulating a roof like this?
I figure to insulate the floor by putting down rigid board (polyiso? comforboard 80?), two or three layers overlapping with taped seams, then a subfloor (OSB?) then flooring. Since the floor is entirely protected from rain by the shell of the building, am I right that I don't need to give an air gap to the existing floor boards which will carry the new layers? GBA postings on making a 2nd story floor part of the thermal envelope?
Many thanks!
Jonathan
Jonathan,
Have you read this relevant article? "Insulating a Pole Barn"
Martin, thank you, I had not seen that article. The details of my situation seem to me to fit this article somewhat more than the pole barn situation. At least, I think this article helps me more with regard to how to insulate the walls. In my case, I don't have girts like in the pole barn -- unless I consider the beams to be like girts. But that brings back the question of whether I create problems by having too much rainscreen gap. Is that much space begging for rodents?
The pole barn article addresses head on the question of "air leaks at the floor/wall intersection." But the situation there is pretty different for me since the pole barn solution, a concrete slab, is not a solution for my 2nd story wooden floor.
Here's a construction basics question: do I build up my floor first--up through subfloor--and then build out my walls on top of them, or walls first, then floor? Ongoing thanks.
Jonathan,
Q. "What if I install rigid board to the interior edges of the beams, then studs to their interior? That will give me roughly a 6 inch rainscreen gap. Is there such a thing as too much of a gap?"
A. No. As with all insulation methods, you need to pay attention to airtightness, and you need to screen openings to exclude critters.
Q. "Since the floor is entirely protected from rain by the shell of the building, am I right that I don't need to give an air gap to the existing floor boards which will carry the new layers?"
A. Yes, you're right.
Q. "Do I build up my floor first--up through subfloor--and then build out my walls on top of them, or walls first, then floor?"
A. Either way could work.
Martin, my sincere thanks!
Thank you, Martin, for all the information! We're fixing up an 1880s farmhouse on the coast of NC and this article is a big help. I did have some questions on a few unique aspects of our project, though.
Quick background. We're removing the interiors walls and are looking at the back of the exterior wood siding. No existing insulation. The exterior wood siding is currently covered with a styrofoam board and then aluminum siding, though our intention is to remove that in the future and repair/restore the wood siding. The studs are true 2"x3", so not much depth. I'd like to avoid building up the studs to create more insulation space.
1) In this article, you mention creating an air gap with asphalt felt and then filling with spray foam. In response to a related question on this site (https://www.greenbuildingadvisor.com/question/retrofit-insulation-in-walls-with-no-sheathing-or-wrb), you indicated that the asphalt felt can be "up against your siding. Then you can install any type of insulation you want." If that comment is accurate, then it would allow be to line the bay with felt and then place 3" thick mineral wool (which is the insulation we're hoping to use) into the full depth, without worrying about air gaps. Does that seem like a good approach? (We really like the other benefits of mineral wool insulation.)
2) Are there any concerns with off-gassing or smell from asphalt felt? It seems it was designed for roofing, though I've seen that it's also used under flooring. I've also read about silicone vapor shield (SVS) that's used under flooring instead of asphalt felt. Could that work as an alternative in the wall? Or, would asphalt felt be a safer bet, since it's been around so long and its long-term performance is well known?
3) When we do address the siding in the future, if we decide to remove the wood siding boards and install sheathing and wrap (or foam board), should we remove the asphalt wrap as we expose it from the outside? Or can those two coexist?
4) One final question that might be slightly off-topic, though it relates in regards to potential moisture issues. The interior walls were beadboard attached to the studs and then later covered with drywall. We're removing both layers, but keeping and cleaning up the beadboard. One option would be to install the new drywall (for air seal, fire safety, moisture barrier, etc.) and then beadboard over that. I've also read about using plywood behind beadboard to assist with face nailing. It could also add some structural stability to the house, since the studs aren't well or evenly spaced. I think doing just plywood and beadboard would be problematic, though (fire, moisture). Any thoughts on doing three layers? For example, could I do plywood, then drywall, then beadboard, or drywall, then plywood, then beadboard? Would 1/4" for the drywall and plywood suffice if I did do three layers? Or maybe 1/4" for the plywood and stick with a thicker drywall? Or, is it just a terrible idea overall?
Thank you again! This site is a fantastic resource on so many topics!
Jasiu,
Q. "In response to a related question on this site, you indicated that the asphalt felt can be 'up against your siding. Then you can install any type of insulation you want.' If that comment is accurate, then it would allow be to line the bay with felt and then place 3 inch thick mineral wool (which is the insulation we're hoping to use) into the full depth, without worrying about air gaps. Does that seem like a good approach?"
A. The answer depends in part on what type of siding you're talking about. If it's clapboard siding, you end up with more of a gap between the asphalt felt and the siding than you do if it's tongue-and-groove siding or shiplap siding. (The gap is good. No gap is not so good.) If you are using spray foam, you end up with an air barrier. If you switch from spray foam to mineral wool, you don't have an air barrier. So there are two factors here that matter.
Q. "Are there any concerns with off-gassing or smell from asphalt felt?"
A. No. Remember, you want an interior air barrier (probably drywall), and that interior air barrier separates you (to a significant extent) from any potential odor.
Q. "If we decide to remove the wood siding boards and install sheathing and wrap (or foam board), should we remove the asphalt wrap as we expose it from the outside? Or can those two coexist?"
A. No need to remove the asphalt felt; it can coexist with housewrap.
Q. "Any thoughts on doing three layers? For example, could I do plywood, then drywall, then beadboard, or drywall, then plywood, then beadboard?"
A. Installing three layers doesn't raise any building science concerns. But if you are able to remove the siding, then the best place for the plywood is on the exterior side of the studs. In any case, discuss local code requirements with your code official -- you may need interior drywall (rather than just plywood and beadboard) on the interior for fire safety, depending on local interpretation.
Thanks so much, Martin! I really appreciate the quick response and info! It is clapboard, so it sounds like I'll be good with the air gap.
One last question, if I may, on the drywall/plywood question. Would plywood operate as a suitable air barrier on the internal wall, and it's just an issue of fire safety? Or, does drywall provide benefits in regards to moisture/vapor? (The beadboard over the plywood would also be painted, so perhaps that would serve well enough as a barrier.) I just want to be sure I'm not introducing any unforeseen problems, even if code allows it. Since we're coastal, moisture is always something I try to keep in mind!
Jasiu,
The plywood won't be an air barrier unless you tape the seams, deal with perimeter leaks, and do a careful job of installing airtight electrical boxes.
Unlike drywall, plywood is a vapor retarder. In your climate, however, the vapor permeance of the interior layer isn't very important -- what really matters is airtightness.
Thank you again! I really appreciate it!
Sorry, if you don't mind, I have another question! For the asphalt felt paper, would #30 be more beneficial than #15, or would the difference be insignificant in this application?
Jasiu,
Either one will work.
Martin
I posted under pro help but have had no response
Looking for a solution
climate zone 2 Houston Tx
See Pix detail, inside pix, outside planter
Problem, note planter box brick work touching gyprock, the entire 20′ long area just above and below is damp with light mold, the rest is in pristine condition and the studs have no rot. This wall was built in 1952 and the house has 2’ overhang.
This is a kitchen gut remodel and I have added a second 2x3 inner wall for additional insulation.
What would you recommend to protect the studs and gyprock from moisture if
1) 1" ccspf then cellulose or spider
2) skip the ccspf
3) some other solution
I plan to water seal the planter box which I think is part of the source of the moisture
I plan to vent the space between the cabinets and sheetrock
Thanks for any advice you can give me
Mike
Mike,
This construction is so flawed that it may be difficult to salvage. For information on the required flashing for a brick veneer wall -- flashing that your house lacks -- see this article: "Flashing Brick Veneer."
The planter is obviously disastrous. If you want to try to save this wall, you need to either (a) cap the top of the planter with durable flashing (probably 16-ounce copper with soldered seams) so that no rain water can enter the planter and no plants can grow there, or (b) remove the soil in the planter and line the cavity with a soldered copper liner, making a waterproof bathtub of the whole mess.
Even if you succeed in keeping rain out of the planter -- and that will be tough -- there is still a problem: the bottom of the air gap that separates the brick veneer from the gypsum sheathing apparently lacks flashing to direct leaking water to the exterior. This is a tough situation.
Martin
Your opinion on this idea
cut out gyp at areas where bricks touch it and seal back of exposed studs and edges of gyp and bottom plate-slab joint, insert new gyp with 1/2 inch gap between bricks that contacted old gyp, air seal it then insulate stud cavity.
second Q: would you go with cellulose which is very vapor open and can buffer a lot of moisture or spray fiberglass.
I will water seal the planter. and still have open back cabinets with air gaps behind them.
I think the reason the wall has survived the last 70 years is the cabinets had no backs and the bricks have been painted preventing bulk water from being absorbed by the bricks
thanks for all you do for all the people looking for solutions to their problems
Mike
pix refed from above
Martin
Then there is plan B
Just seal up the existing holes, air seal everything, replace the old 2" kraft papered rock wool bats with 6" of DP cellulose or JM spider if I can find it or ???, sheetrock with vaper open laytex and be done with it.
I mean this wall did survive 70 years with a leaky planter
I am going for something between very good house and passive house with high tech hvac, conditioned attic, fairly high performance windows and doors, extreme air sealing - target 1 or better ACH50 (fingers crossed) all of which means I should be able to keep the RH on the low side which will help keep the Kitchen wall dry
Michael,
I'm not sure what you mean by the verb "seal." What product do you intend to use to "seal" the edge of the gypsum or to "seal" the studs?
I can't visualize how you intend to work in the small air space between the bricks and the studs -- working from the interior.
Martin
I would just use a brush to apply some sort of liquid flashing to the back side of the exposed studs where the gyp was removed and seal the edges of the gyp in case any water drips off the protruding brick ends. Then cover the hole with a piece of gyp [ this would leave a 1/2" space between it and the brick ends ] then caulk or foam seal it around the edges. This would put it all back as original but with the 1/2" gap for the capillary break.
after 70 years the only mold was where the bricks touched the gyp.
Michael,
I can't comment on the likelihood that your plan will keep everything dry. Of course, desperate situations sometimes call for desperate measures. Good luck.
Martin
Given the current configuration air and water barrier being the gyprock would you recommend a reservoir insulation such as cellulose or a non reservoir ins such as JM spider?
Also would there be any point of flashing the cavity with ccspf to air seal the cavity and reduce vapor movement to the insulation ? Not sure this is a good idea since I will be relying on inward drying from the cavity behind the gyprock.
I do believe that once the planter is sealed up and with the painted brick, solar vapor drive should not be a factor here.
Again thanks for any suggestions you have
Mike
Mike,
I'm hesitant to provide advice. There are lots of variables, and your current situation isn't good.
First, painting "some sort of liquid flashing" on the surfaces under discussion -- from the interior, trying to manipulate your paint brush to reach surfaces facing the exterior -- won't result in a long-lasting barrier to liquid water.
Second, you are mistaken that the gyprock is now a water barrier. The gypsum is not a water barrier.
Concerning your specific questions, my instincts tell me that the difference in performance between cellulose and blown-in fiberglass wouldn't be significant -- your problem stems from water entry and insufficient drying paths, not with the characteristics of the cavity insulation. And I don't recommend filling the air gap between the brick veneer and the sheathing with spray foam. The air gap is important.
Martin: against my better judgement during this pandemic, I did the crazy. I’m in the process of stripping the walls on two of the bedrooms down to the stud in my 120 year old house. What I’ve noticed about the makeup is the following.
The stucco was laid on top of building paper, followed by wood boards, no insulation in the bays, followed by lath and plaster. The building paper looks ok. Seems to be great in most spots except for the corner where it’s degrading.
Based on that do I need to put in an air barrier?
Thanks,
Leo
Leo,
Every exterior wall needs an air barrier. Board sheathing is not an air barrier; nor is kraft paper. Stucco is sometimes a "fair to middling" air barrier, but stucco cracks and penetrations reduce the effectiveness of stucco as an air barrier.
I would certainly strive for airtightness if I were you -- the Airtight Drywall Approach is one possible way to proceed.
Note that your wall lacks a decent water-resistive barrier (WRB), and it also lacks a rainscreen gap. Whether or not these issues will matter depends on your climate (especially your expected annual rainfall) and the width of your roof overhangs.
My roof overhang isn't much. It's a dutch colonial style roof. Also I live outside Philly zone 4A.
So I need some advice on the best path forward. What should I consider from a cost benefit stand point; foam board + insulation or felt paper + spray foam. Labor might be more that spray foam.
Leonard,
These decisions aren't really cost/benefit decisions -- at least if you are thinking about energy costs. For a house without a WRB or a rainscreen gap, the risk is water entry and rot. One clue to help you make your decision is to look carefully at your sheathing boards for evidence of water entry (discoloration, mold, perhaps rot), especially near the bottoms of your windows.
If there is no evidence of water entry, that's good. That said, insulating your walls will reduce the walls' drying ability, raising the risk of future problems.
Ideally, you would strip the stucco and install a WRB, rainscreen strapping, and new siding. But that's expensive. Good luck with your decision.
Does this method (air gap, rigid foam, and batts) apply to all climate zones? I'm in a marine climate zone in Northern California where winters are very mild but we can get a good amount of rain. My old house has wood siding no insulation. Thank you!
Berkeley,
The methods described in this article are intended to address water entry (rain) in buildings that lack a water-resistive barrier (WRB) and sheathing. Here are the factors that increase your risk of water entry: high annual rainfall, high average wind speeds, and stingy roof overhangs.
Obviously, risk is reduced in areas with low annual rainfall, low average wind speeds, and in buildings that have generous roof overhangs.
The risk is also higher in two-story buildings than in single-story buildings (because roof overhangs are less protective of two-story buildings than single-story buildings).
As with most issues related to remodeling, applying these principles requires judgment.
Thanks Martin for responding so quickly. I should have clarified my walls are wood siding (tongue and groove) no sheathing, no wrb, no insulation. The overhangs look about 16 inches. I haven’t seen a lot of evidence of rot in the siding but we haven’t gotten much rain in past few years.
I’m in the process of finishing our above grade basement (It’s a 2 story house). Our contractor wanted to put in batts insulation directly into the 2x6 stud cavities, close with plywood shear wall for seismic strengthening, and hang drywall. Then I came across your article so I’m curious should I press for my contractor to add the air gap and rigid foam air barrier between the bays before insulating with batts?
Annual expected rainfall where I live is 25 inches.
Thanks
Berkeley,
As I wrote in my previous post, it's a judgment call. The air gap and rigid foam air barrier will do no harm, and may help prevent future problems. But if your windows are well flashed, and the walls are well protected by roof overhangs, you may not need to do the work.
Hi,
Thank you all for sharing. I recently purchased a New England colonial circa 1880. I'm doing a "gut rehab job" as the article describes. My first instinct was to apply SPF (1") to the wall cavity before capping off with cellulose.
The current wall assembly is such, from exterior > interior....vinyl siding, two layers of EPS foam, wood siding, clapboard, interior cavity n/a. I will attach an image to illustrate.
1. Should I focus on air sealing with tape and liquid flash and insulate with cellulose in the wall cavity?
2. Should I leave the exterior portion and insulate with a combination (SPF and cellulose) in the wall cavity?
3. Should I do a combination of air management and dual insulation?
Should I be concerned with possible moisture build up between the EPS and the SPF on the exterior half of the wall profile? Will the original wood siding and clapboards still breath to the outside through the seams and top/bottom edge?
Thanks in advance!
Cody
Cody,
1. When you listed the layers in your wall, you wrote, "wood siding, clapboard." Does this describe one layer (wood siding, also known as clapboard) or two layers (wood siding like cedar shingles or tongue-and-groove boards, followed by another layer of siding, namely clapboards)?
2. What does "interior cavity n/a" mean? Does that mean that there are no studs (and therefore there is no interior cavity) or does it mean that you house has studs, with no insulation between the studs?
Your two concerns should be air sealing (I'm not sure what you mean by "liquid flash," but probably either suggested method of air sealing you mention will work) and addressing water entry from the interior (which means that you need to verify the flashing on the exterior of your house, especially around windows and doors, and you need to assess the width of your roof overhangs). Good luck.
Martin,
From what I could see without removing any parts, it looks to have two layers, the first being tongue-and-groove boards and the second being what appears to be the original siding.
The interior or wall cavity insulation is currently unknown. As I find this out, I am working to create an insulation / air sealing plan. Instead of removing the vinyl siding to air seal at the exterior insulation layer-- I was hoping to utilize the moment when the wall cavity is open during demolition. Would SPF applied to the tongue-and-groove interior side be an okay move? I am open to either. SPF seems convenient but I like options
(What I meant by "liquid flash" was fluid applied flashing)
Mack,
The article you are commenting on ("Insulating Walls in an Old House With No Sheathing") concerns houses without wall sheathing. Your house has wall sheathing -- namely, tongue-and-groove board sheathing, a type of sheathing that was very common 100 years ago. So the advice in this article is irrelevant to your situation.
Q. "My first instinct was to apply spray polyurethane foam (1 inch) to the wall cavity before capping off with cellulose."
A. The method you describe, called "flash and fill," will work fine. For more information on the flash-and-fill approach, see "Flash-and-Batt Insulation."
Q. "Should I be concerned with possible moisture build up between the EPS and the SPF on the exterior half of the wall profile?"
A. As long as there are no signs of moisture damage to the sheathing (which you will have inspected during your gut rehab work), there is no reason to be concerned. EPS is somewhat vapor-permeable, and will allow some outward drying (albeit at a slow rate). But you still need to address basic water-entry details -- which means that you need to verify that window flashing details are done correctly.
Martin,
Thank you for clarifying that the tongue-and-groove is a sheathing style. This helps a lot and I'll go on to research the Flash-and-Batt post.
Hi Martin,
Thanks for such a great article, it has been extremely helpful. I am currently doing a gut reno on an 1805 New England colonial. It is a cedar clapboard siding with a balloon framed post and beam construction (see attached image). I am considering going with the felt paper and closed cell insulation as illustrated in your article. The old siding is in fairly good shape however it is quite irregular, if I site my eye directly over the siding there is a lot of daylight coming through between each piece in many areas. Will this details still be effective? Is there any other drawback other than pests getting between the siding that's not a tight fit ? Do you think in this particular case it is work considering taking the siding down and sheething the house? It is something I am considering but its a huge expense and I am worried about losing some of the character the old siding as the newer stuff has a more precise engineered look. Thanks so much!
Joe,
Q. "Do you think in this particular case it is worth considering taking the siding down and sheathing the house?"
A. It's impossible to answer that question without a site visit. The answer depends on the condition of the siding, the width of the cracks, and your tolerance for irregularities. Good luck!
Martin,
Thanks for taking the time to answer my question. My tolerance for irregularities is pretty high, its kind of why I like the old siding (see image below). The gaps are between 1/8"-1/4" wide. I would imagine there is the potential for driving rain to get behind the siding. Do you think there would be any benefit in using the tyvek stucco wrap instead of the felt paper? Cheers!
I recently bought a house with wood siding, no exterior sheathing, but has 1” rigid foam over siding and behind vinyl.
Interior has 3/4” horizontal shiplap. Siding is in bad shape and I plan to remove and sheath exterior of framing. How would you suggest insulating?
User 7457253,
Before considering what type of insulation you need to install, you need to develop a plan to include an air barrier. Your wall is probably extremely leaky, especially since the interior finish consists of shiplap boards.
One way to provide an air barrier is to fill the stud cavities with spray polyurethane foam. That has the added advantage of providing R-value. Of course, that approach is expensive. If you go that route, choose one of the environmentally friendly foams that doesn't use a harmful blowing agent. (Open-cell spray foam would work in this application).
If you choose instead to use fiberglass, mineral wool, or cellulose, you'll need to include an air barrier -- perhaps taped Zip sheathing -- and you'll need to verify the performance of your air barrier with a blower door test.
Martin
Thank you very much for your time.
Could I go with the Zip board and also insulate from the exterior or do I need to remove the shiplap on interior?
There's probably an obvious answer but: if going with Option 1, what's the best way to handle window frames? Presumably they're 2" narrow, now--correct?
Skyler,
What is "Option 1"? Are you talking about the method that requires the installation of 3/4" x 3/4" sticks in the corners of the stud bays?
If that's what you are talking about, I don't understand your question about windows. If you leave the existing windows in place, you don't have to install this type of stick in your window openings. Nor do you have to install these sticks in the window openings if you are buying new windows.
Perhaps you're asking a different question -- something like, "I'm worried about window flashing issues"?
I need help figuring out how to insulate a project house. We are completely restoring a single-story house built in 1958 (northern california; 2800ft above sea level). The exterior is cedar board-and-batten (the seam where the edge of the battens meets the boards has not been sealed). They used 1/4 to 1/2 inch furring strips to create a gap between the board and batten and the fiberboard sheathing. The house is sheathed with something called "Johns Manville Weathertite" sheathing. There doesn't seem to be any type of vapor barrier, and there are actual places between the sheathing where you can see the outside which I'm guessing I will have to seal.
Insulating this house correctly is my top priority as the structure is old but in great shape. I don't know if I should seal the board-and-batten on the outside. I don't know if I should seal the inside of the sheathing to seal off water getting in. I don't know if I'm being hyper paranoid and can just put in fiberglass batting. My biggest worries is creating a situation where moisture gets trapped causing rot.
Help!
Nate,
First of all, your walls have sheathing, so the advice in this article doesn't apply to your house. What your house lacks is a water-resistive barrier (WRB). It also sounds like it has air leaks.
How far you go to address the fact that the house lacks a WRB depends on (a) your budget, and (b) the exposure of the walls to rain, which depends on site conditions and the width of your home's roof overhangs. If your walls don't get much rain, the lack of a WRB isn't fatal.
You certainly want to pay attention to the usual exterior water-management issues. That means that you need good flashing at your windows, doors, and all penetrations.
To reduce air leakage, you might consider insulating your walls with spray foam.
In no case do you want to caulk the seams of your board-and-batten siding.
We're planning on building an addition on our 1975 southern California home, and part of the project will involve painting the entire exterior of the existing and new construction. Our current home has no sheathing and is just stucco->tar paper->2x4 with fiberglass batts->drywall. The stucco has a fair amount of cracks particularly around the corners of windows and doors. I was considering using elastomeric paint to help better seal those areas.
Would elastomeric paint be considered an air barrier in this case? I am trying to improve the air tightness of the building envelope and think this might be a win/win opportunity if so.
That said, would this introduce risk of trapping moisture within the walls? I thought the exterior air barrier would allow the wall cavity to dry to the inside, but did not realize tar paper was considered a water barrier until reading this article.
Travis,
For a technical discussion of the advantages and disadvantages of elastomeric paint over stucco, see the attached document from NWCB titled "Painting Stucco." The document argues in favor of keeping stucco vapor-permeable -- and therefore not using any elastomeric paint over stucco.
Asphalt felt is a smart vapor retarder. As it gets damp, it becomes more vapor-permeable.
I don't have enough experience to tell you whether elastomeric paint applied over cracked stucco can reduce air leakage. Even if it does, it raises a new question: "How long will the effect last?"
Thanks Martin. My initial reaction to reading your comment and its attachment was that elastomeric paint probably isn't a good idea. However thinking about it more, if the felt is a smart vapor retarder then it would still allow drying to the inside if any moisture were trapped. Since I wouldn't be using the paint to solve a water penetration problem, this might actually work out.
That said your provocative question about how long it would last is pertinent, as it most likely isn't a permanent/reliable change I probably won't pursue it given the potential downsides (mostly complexity in repainting later if we desired).
Hi Martin, I recently bought a 1905 house in VA zone 4a, and have spent the last 3 months gutting the first floor interior down to the studs. Among other things, the goal is to put mineral wool back into the cavity and I was curious on your reading of our existing wall assembly.
from the exterior:
- Asbestos shingles
- Asphalt siding (made to look like brick) on particle board
- Original clapboard siding
- Empty cavity, 2x4
- Many different things, all now gone!
The walls cavities have been open from the inside for about 2 months now, through some major rain storms, with no sign of bulk water intrusion or dampness.
Does my existing wall buildup constitute one without sheathing, or, is asphalt/particleboard siding acting as sheathing and water barrier for the asbestos shingle siding? I am struggling with understanding the best practice for the insulation and air-barrier.
Really appreciate your thoughts and input!
Hugo
Hugo,
Your walls have no sheathing, assuming that you are using the phrase "particle board" correctly. The particle board layer isn't sheathing; it was installed under the asphalt siding to create a smooth substrate and to provide some minimal additional R-value to the assembly.
At this point, your wall has no air barrier. It also sounds as if your wall as no water-resistant barrier (WRB).
What you have is three layers of siding. Because you have three layers of siding, water penetration into your stud cavities is unlikely -- especially if your house has adequate roof overhangs. The potential water entry sites are at windows and exterior doors, where lack of adequate sill flashing might still cause problems. (That said, perhaps your house has adequate sill flashing.)
The three layers of siding also reduce air leakage, even though you don't have a true air barrier.
How you proceed depends on your goals and your budget.
Martin,
I really appreciate your quick response!
From what I gather from google, the asphalt product is an Interlocking Asphalt-Saturated Wood Fiber Panels (https://www.askthebuilder.com/inselbric-asphalt-siding/). There is a single +/- 12"x12" piece of felt paper behind each vertical seam of the asbestos shingles, but it sounds like the multiple layers of siding are just making a more complicated path for water not stopping water. And no, the house has no evident sill flashing at any of the windows. We will be replacing the windows and the idea was to do our best to flash them against the asphalt panels.
Assuming that water will at times get into the wall cavity from the outside, and assuming I proceed with the building an air gap behind the siding using the rigid foam method described in this article. Are the 3 layers of exterior siding (asbestos shingles, asphalt siding, wood clapboards) still vapor permeable enough to allow the cavity to dry to the outside?
Hugo,
If you haven't seen any water intrusion after heavy rainstorms, that's a good sign. It doesn't sound like the exterior side of your wall assembly is very vapor permeable, due to the asphalt siding.
One approach would be to use the flash-and-batt method, since a layer of closed-cell spray foam would prevent the innermost layer of siding (the old clapboard) from winter moisture accumulation. The spray foam would also reduce air leakage.
Another approach would be to strip off the three layers of old siding, so that you could install real sheathing, a real WRB, rainscreen strapping, and new siding. That approach would be expensive, of course.
Hi Martin,
Was wondering if you had any thoughts on my comment above (#147)
Travis,
Sorry I missed your questions. I just replied to Comment #147 directly below that comment.
Hi Martin,
I'm trying to determine if this approach is applicable to my 1920s house in climate zone 5, but I am not entirely sure of some of the building materials. I'm certain the exterior has cedar shake shingles, and I've attached a photo of the stripped studs of an exterior wall. Is the horizontal lumber against the studs considered sheathing?
I'm unsure if there is tar paper or any kind of WRB in between the horizontal lumber and cedar siding (there is definitely no rigid foam on the exterior).
I removed lathe and plaster as well as cellulose that had been blown in from the exterior by a previous owner. There appears to be no signs of water damage in the cavity of the wall. I am planning to use rockwool r-15 batts and will not use a vapor barrier, but I'm wondering if the air-gap approach is one I should take.
Thank you and happy holidays/Holladays,
Tyler
Tyler,
Yes, your house has sheathing. The fact that there are no signs of water damage is good news.
To determine whether your walls have a water-resistive barrier (perhaps asphalt felt) or some type of paper like rosin paper, you can either investigate from the interior by looking at a wide gap between sheathing boards (using a flashlight, and widening the gap carefully with a knife if necessary) or from the exterior, by removing a few shingles from the bottom of your wall in an inconspicuous place.
An air gap between the sheathing and the rock wool batts is not necessary. If you ever install new siding, however, you might want to install a water-resistant barrier (WRB), depending on what your investigations find.
Thank you, Martin. A follow-up question (one for which I could not find a more relevant article to comment under):
Because the studs on this wall are true 2x4", batts of r-15 rockwool will leave a 1/2-inch gap in the bay. Would putting cut-and-cobble rectangles of XPS rigid foam (sealed around the edges with canned spray foam) between the sheathing and the rockwool batts be a good way to fill out the bay? Would it be better to put the XPS rigid foam (without sealing the perimeter with spray foam) between the interior sheetrock and rockwool batts? In either scenario, I would use two coats of latex paint over the sheetrock as a vapor retarder.
Tyler,
You might want to buy a bundle of R-15 rock wool batts and experiment. Some batts are compressible and therefore expandable -- the batts may work well in 4-inch-deep cavities. Or you may prefer to buy 5.5-inch fiberglass batts and compress the batts to 4 inches -- a method that also works.
If you want to use 1/2-inch rigid foam, you can (with the rigid foam on the interior or the exterior) -- but that sounds like a lot of fussy work.
Tyler,
This suggestion definitely falls under Martin's description of being "a lot of fussy work", but in a recent similar Q&A, one suggestion was to place a layer of cedar breather (or similar mesh), and cover it with a WRB. While this wouldn't add R value the way foam would, it leaves you with a wall that is very resilient to any bulk water intrusion, and allows your existing siding to dry easily.
Thanks for weighing in. To be clear, does the cedar breather go in the interior, in the stud bay between the sheathing and rockwool batt? I am not sure when or if I’ll redo the siding on the house as it’s in relatively good condition for its age.
Could you please provide a link to the recent Q&A in which this was discussed?
Tyler,
I'm sorry - I've searched back and can't find the Q&A. The comment may have been part of the discussion of a blog like this one and so much harder to find again. Maybe someone else remembers and will chime in.
The mesh and WRB would be installed on the inside of each cavity. Sort of an inverted rain-screen, which would allow the siding and sheathing to dry better, and intercept any bulk water intrusion. The question is whether in the absence of any problems with your existing walls it's worth doing.
OK, if I decide to go this route, my plan from the exterior inward would be: cedar shake siding --> sheathing --> Cedar Breather with the flat side of the mesh to the interior (with 1/2 inch overlap on the side tacked to the studs) --> Tyvek house wrap as a WRB (with 1/2 inch overlap on the side tacked to the studs) --> r-15 rockwool batts, sheetrock.
Does that sound reasonable?
Tyler,
Labor-intensive, but not unreasonable if you want to do it that way.
Hey Martin,
I'm trying to decide what the best plan of attack should be on insulating an early 1900's farmhouse in North Texas. The home doesn't have exterior sheathing or weather barrier, it is simply the cedar cladding. My initial thoughts were to use the felt and spray foam mentioned above, or possibly a hybrid like the one used by Jeff Medanich in the linked article. The crawlspace is currently unvented, and is so tight that access to certain parts of the house is impossible. So my question to you is, what do you think is the best approach to insulate the house? Does being in a somewhat warmer climate change what I should do? Thanks for the help!
User 6766625.
You might want to tell us your name.
Only you can decide how you want to insulate your walls. There are lots of article links on this page, and I don't know which article you are referring to when you mention Jeff Medanich. Perhaps a link would help.
The first step is to assess water entry issues. I can't do that over the internet. I would say that if you are certain that your house lacks sheathing or a WRB, one of the approaches mentioned in this article makes sense.
As for your crawl space, it sounds as if the height of the crawl space is too low for human access. If that's the case, you need to lower the grade in the crawl space. This usually requires a shovel and buckets -- it's unpleasant work, but you should do it.
My name is Jason. I'm going to be using the cut-and-cobble method in my 6a (Minnesota) home. From exterior to interior: Stucco, 2 layers of felt, 2x4 stud, lath and plaster. I plan to add foam as air/WRB like described in the article, fur out the walls, add batts of r15 mineral wool and then drywall.
I'm a little confused regarding the specific foam/r-values. Polyiso does terrible in the cold. I only see testing done at 75 degrees where this gives the highest R value (6 per in), go figure. So while the product claims r9.7 at 1.5" I know it will not. Do I need to go to 2in? Same thinking I have with XPS. The manufacturer states it "Maintains 90% of R-value for the lifetime of the building" - so while they advertise r7.5 at 1.5", do I assume it will be r6.75? In both cases I would need to go to the next size up at 2in.
With Frost protected foundations, the Minnesota Residential Building Code provides max r-values for EPS and XPS. I don't see anything like that regarding foam and walls.
Jason,
For information on the long-term performance of rigid foam, and the cold-weather performance of polyiso, see these articles:
"Cold-Weather Performance of Polyisocyanurate"
"Thermal Drift of Polyiso and XPS"
If you don't want to buy thicker foam, you can lower your risk of moisture problems by including a smart vapor retarder on the warm side of your assembly (directly under the drywall). As with most building assemblies, attention to airtightness will also lower your risk of moisture problems.
Thank you. It makes the most sense to move to 2in XPS. Bulk discount pricing on it makes the cost insignificant, too. My only concerns now are on how to furrthe studs out 2 inches.
Originally I was going to use 2x2 furring strips, which would make drywalling and electrical a breeze. If I used 2" XPS as furring strips I think it would be a nightmare to drywall. My thinking is to use the 2x2 as planned and add another later of .5" XPS. Wouldn't really do much for a thermal break, but would get me the depth I need without compressing or having to trim the batts.
Hi Martin,
I recently closed on a 1905 ballon framed house in central NY. According to NY.gov I’m in climate zone 6.
Wall assembly from exterior in
Vinyl siding,1/2 foam, cedar clap board, thick tar paper, 3 1/2 stud, 3/4 board sheathing, 3/8 drywall.
The tar paper is fully intact but is compromised by the fasteners from the vinyl siding.
I’ll be removing the the drywall wall & 3/4 sheathing. I plan to install 1/2 osb in place of the 3/4 sheathing to add strength to the house followed by 1/2 drywall.
I’d prefer the option with adding an air gap/air barrier/insulation but with existing hot water baseboard/ reducing the size of the stairwell so I can’t fur out the wall unless I remove the baseboard. Would adding spray foam be the best solution?
If yes could I spray it directly to the tar paper as long as there is no water intrusion?
Alternatively I may add zip sheathing, and new siding down the road(if the price ever drops) so maybe adding 3” rockwool safe n sound flush to the interior of the stud allowing a 1/2” gap will be better than nothing until the time comes to re-side.
I’m aware the decision is ultimately mine but open to any input you may give.
Thanks,
Marcus
Anyone ?
Marcus,
Posts in the Recent Article Comments disappear very quickly. I'd suggest you ask your question in the Q&A, where it will elicit more responses.
Log in or become a member to post a comment.
Sign up Log in