
Image Credit: Images #1-6, #8, and #9: Peter Yost
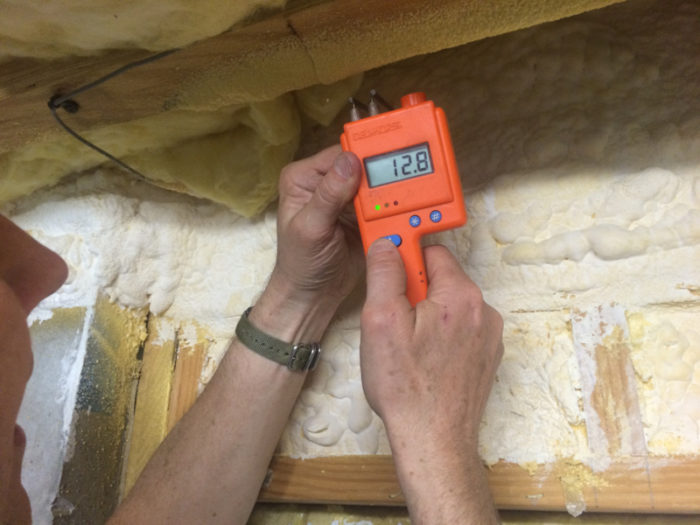
Image Credit: Images #1-6, #8, and #9: Peter Yost For the pins to reach the interior surface of the exterior sheathing in my brother’s double-stud walls, the pins need to be at least 12 inches long. Tapping the pin extenders through spray foam is really easy. The 3/16-inch diameter of the extenders means that the rods are stiff enough to handle some solid hammer blows to penetrate the surface of the rim joist. It’s critical that the distance between the pin extenders matches up to the distance between the meter’s pins, because it means that the pin extenders are the same distance apart out at the rim joist (as long as the pin extenders remain parallel). We removed the baseboard on a north wall of my brother’s house and measured up to be just above the wall bottom plates. With good solid hammer taps, the pointed tips make it easy to go right through the GWB and then penetrate the exterior sheathing. This finished cathedralized attic has the following roof assembly layers (starting from the interior): latex paint; vapor retarder primer; GWB; 2x4 furring perpendicular to framing; 11.25-inch rafters filled with cellulose; 5/8-inch Advantech OSB roof sheathing; roofing underlayment; architectural shingles. This image illustrates the subsurface test; it appears on page 11 of the Delmhorst BD-2100 manual.
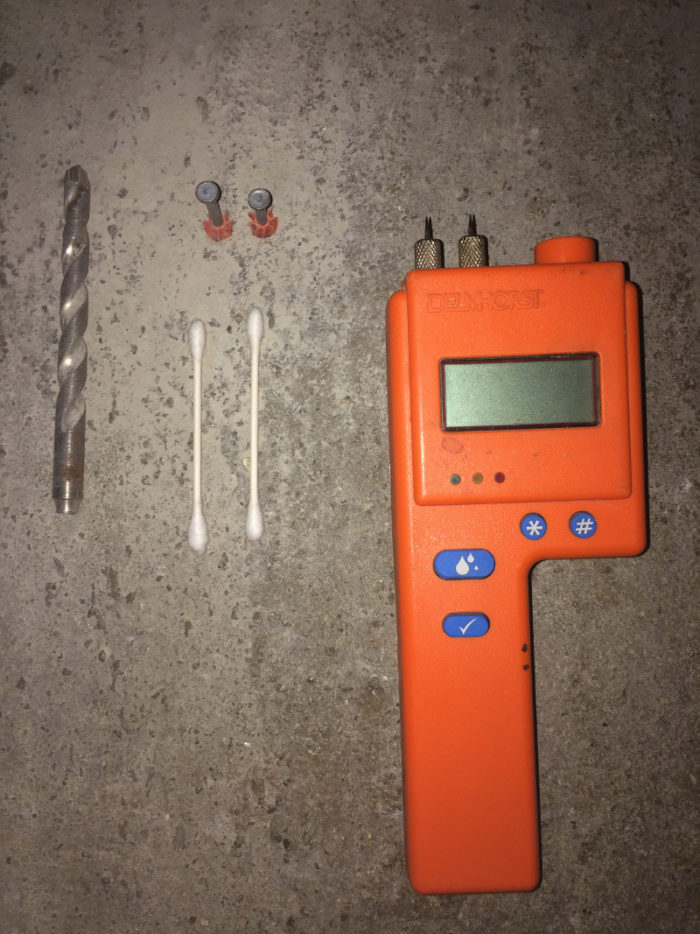
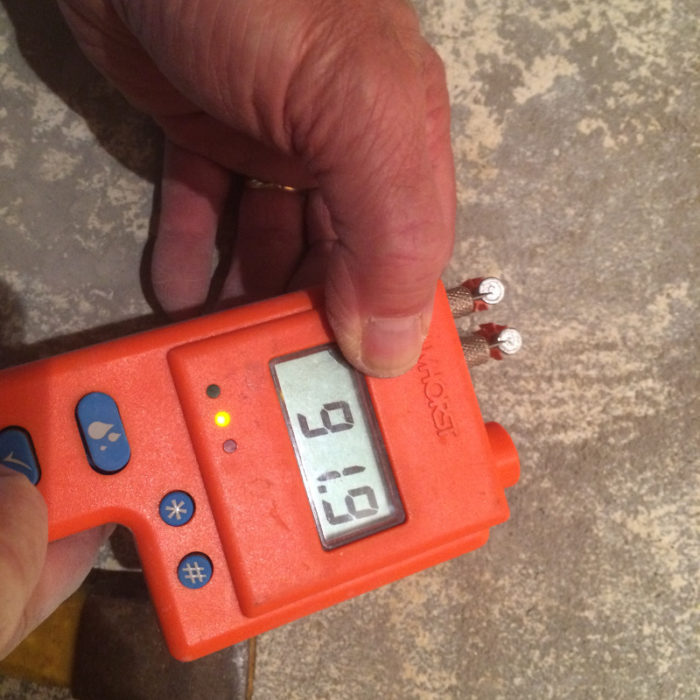
Image Credit: Image #7: Delmhorst My setup for measuring 2.5 inches down in concrete slabs: powder-actuated hammer nails with the telltale plastic sleeves; a masonry drill bit that is the same diameter as the plastic sleeves of the hammer nails; Q-tips to clean the concrete dust from the holes; and a BD-2100 Delmhorst moisture meter set for Scale 2. The plastic sleeves keep the masonry nails from contacting the sides of the drilled hole. When I read the slab in this location at the surface, the reading was 15 (out of 100), while 2.5 inches down it reads 91.9 (out of 100), suggesting that the slab is wet and continually moving water up through the slab. The moisture evaporates into the basement space.
More Building Science


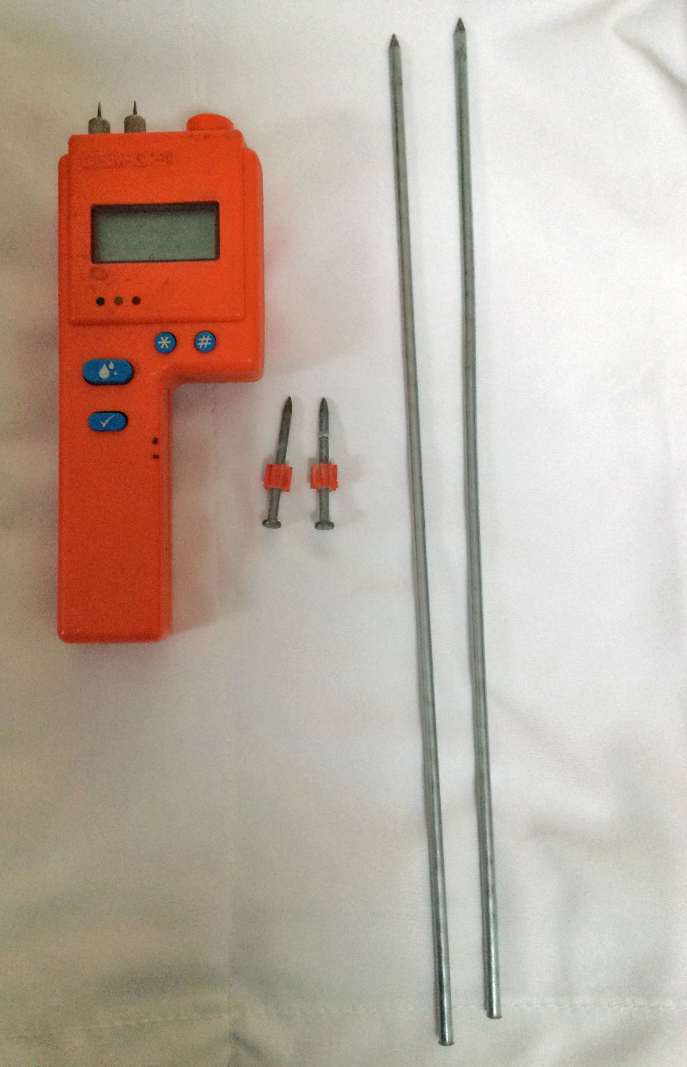
Typical pins on moisture meters are ½ inch long, meaning you can only determine moisture content by weight near the surface of building assemblies and materials (including wood, gypsum wallboard, and concrete). But I often find myself needing to assess moisture content of first condensing surfaces in walls and ceilings or well below the surface of basement slabs.
This article looks at ways to extend the reach of a moisture meter. (For introductory information on moisture meters, see Tools of the Trade: Moisture Meters.)
Extending reach in finished framing cavities
You can buy meter accessories that extend your reach; the Delmhorst 21-E/001 accessory has 6-inch Teflon-coated pins. (The Teflon coatings ensure that the only conductivity is at the exposed tips of the pins.) But sometimes I need to reach even deeper than 6 inches (see Image #2, below). And the 21-E/001 is not inexpensive; it retails for $105.
I checked in with Delmhorst on my own approach: two 3/16-inch rods (about $1.50 each) sharpened on a grinder wheel that I drive exactly parallel to each other. Tom Laurenzi, president of Delmhorst, agreed that this approach could work (see caveats and conditions below).
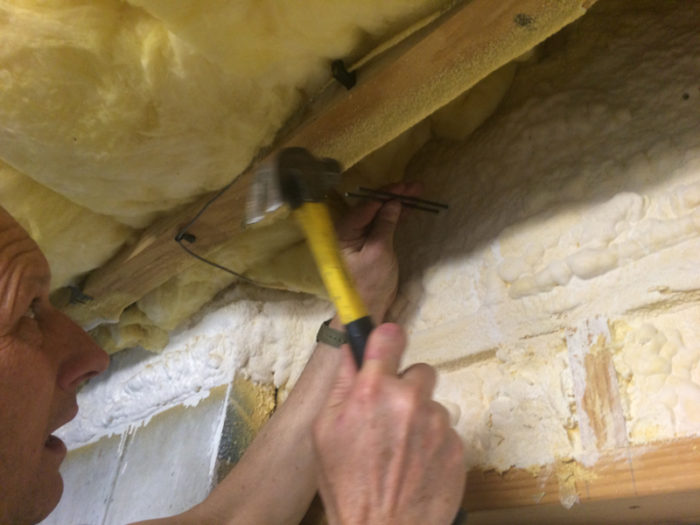
In Images #3 and #4 you can see that we are driving through the closed-cell spray foam till the pin-extenders hit the rim joist. In this case it does not really matter that the length of the pins is not insulated; the spray foam is non-conductive.
But when driving through gypsum wallboard (GWB) and cavity insulation to measure exterior sheathing moisture content, it is possible for the GWB and cavity insulation — particularly if either is at all wet — to affect the measurements because they can have their own conductivity. (See Images #5 and #6.) For the roof in Image #6, I needed 20-inch pin extenders: 15.25 inches of penetration and the remaining 4+ inches to make sure that the pins were actually parallel and the pin tips contacting the sheathing the same distance apart as the pins on the Delmhorst meter.
One way around this is to drive the pins just into the GWB and switch the meter to Scale 3, the setting for GWB, and assess the impact of the GWB based on that reading. Similarly, while driving the pins into the cavity insulation, you can switch the Delmhorst meter to Scale 2 (more on this scale below), and use this relative scale to assess just what, if any, impact the conductivity of the cavity insulation has on the ultimate moisture content reading — the reading on on Scale 1 — of the pins in the exterior sheathing .
The coat hanger trick
Another way to qualitatively assess the moisture content of the cavity insulation is to bend a hook into an opened coat hanger and insert the hooked coat hanger through one of the 3/16-inch holes in the GWB and twist the coat hanger until it snags some cavity insulation, then pull the coat hanger hook out to assess — by eye and by touch — the moisture content of the cavity insulation.
Another way to deal with the possible conductivity of the GWB and cavity insulation is to very carefully and tightly wrap the length of the rods with electrical tape. This is pretty tedious and you are going to have to re-wrap maddeningly often unless you penetrate the GWB with unwrapped rods first and round the holes out a bit to accommodate the slightly thickened tape-wrapped rods.
I spent some time looking for some sort of Teflon coating or spray paint so that I could coat the rods myself with this insulating material, but now conclude that Teflon coating or painting is strictly an industrial, not a do-it-yourself, process.
Extending reach in concrete
The Delmhorst BD-2100 has Scale 2 (also called the 0 – 100 Reference Scale); information on Scale 2 can be found on page 9 of the Delmhorst BD-2100 manual.
While Scale 1 (wood) and Scale 3 (gypsum) yield quantitative measurements as a percentage of moisture by weight, Scale 2 is a unit-less relative scale. You would think that % moisture content by weight for concrete could be had, but in fact concrete mixes are so variable that only qualitative assessment of moisture content is possible with pin-type moisture meters. But this also means that Scale 2 can be used on a pretty wide variety of materials.
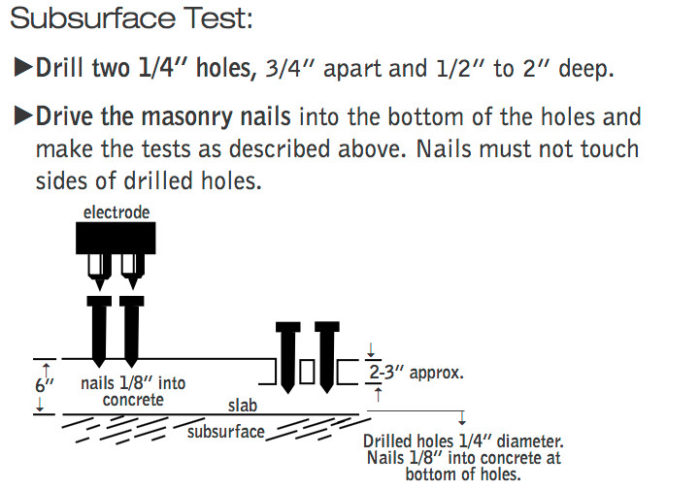
Sticking with concrete: you can’t drive the meter pins directly into concrete without damaging them, so to get a surface reading you drive 2 masonry nails 1/8-inch into the concrete, ideally first in an area you know to be relatively dry to get a “baseline” comparative reading, and then range from there to see how the moisture content compares with all readings being between 0 and 100 (see Image #7).
The problem is that if the rate of moisture movement up through the concrete is slow, the top layer of concrete can be quite dry, masking the moisture deeper in the concrete. In fact, ASTM F2170 (Standard Test Method for Determining Relative Humidity in Concrete Floor Slabs Using in situ Probes), requires that moisture measurements in concrete be taken 40% of the depth of the concrete. For a typical basement slab, that means taking measurements at least 2.5 inches deep (see Image #7).
But how do you keep the masonry nails from contacting the sides of the drilled hole, short-circuiting your slab moisture measurements? My solution is to use powder-actuated gun masonry nails, with their plastic sleeves ensuring that the nail only contacts the concrete at its tip (see Images #8 and #9). Note that dust in the hole will inherently be dry from the drilling, so it is important to make sure that the nail tips are contacting the solid concrete at the bottom of the drilled hole. I often wait an hour after drilling to allow the concrete at the bottom of the hole to “recover” to a more representative moisture content.
It’s possible to quantitatively measure the moisture content of concrete using concrete RH sensors and ASTM F2170. For more information on this approach, see this blog by Paul Laurenzi of Delmhorst.
In addition to acting as GBA’s technical director, Peter Yost is the Vice President for Technical Services at BuildingGreen in Brattleboro, Vermont. He has been building, researching, teaching, writing, and consulting on high-performance homes for more than twenty years. An experienced trainer and consultant, he’s been recognized as NAHB Educator of the Year. Do you have a building science puzzle? Contact Pete here. You can also sign up for BuildingGreen’s email newsletter to get a free report on insulation, as well as regular posts from Peter.
Weekly Newsletter
Get building science and energy efficiency advice, plus special offers, in your inbox.


6 Comments
Cerakoat?
While not necessarily cheap there are a variety of ceramic coating services available for firearms. I wonder how expensive it would be to have a few probe sets of varying lengths coated? Assuming, naturally, such coatings are non-conductive. They are very durable. Plus they are available in a variety of colors. You could probably match your meter for that "professional" look!
Welding rods
I've used coated welding rods as probes for a multimeter reading where the surrounding surfaces were metal. The coating isolated the sides of the rod-probes the metal at the sides. I wonder if they'd work with moisture meters.
moisture meter reach
Thank you for the useful article. I've used cut-to-length plastic (mixed drink) drink straws for pin-shields; great for sampling thru stucco and easy to replace.
heat shrink tubing
Why not use heat shrink tubing on the extended probes? Or did i miss something?
coating approaches
Thanks Nathan, Kevin, Mike, and Jim for your ideas on coating metal extension rods. I am going to follow up on this, including with Delmhorst, and will let you know what I discover, one way or the other.
Check with some water/flood restoration pros
The restoration industry use these meters extensively. I've seen technicians using coated pins, nails, and screws to reach deep into substrate (typically subfloor, and sill plates) to determine the moisture distribution thru the wood substrate and how their drying equipment is affecting the structure. They may give you some good sources for accessories.
Log in or create an account to post a comment.
Sign up Log in