
Image Credit: Energy Vanguard
More Building Science


Back in the summer of 2003, I was finishing up the green home I’d started building in 2001. One of the last pieces we had to complete was the graywater system, and we’d already put a lot of work into it before we ever moved a spadeful of dirt.
Even before my (now ex-) wife and I bought the land and started planning our house, we knew that we wanted to build as green a home as possible. Energy efficiency was essential, of course, but so were using low-impact materials and treating wastewater in a way that would create the least disturbance to the environment.
Hooking up to a municipal sewer system wasn’t an option, and we didn’t want a septic tank. I’d been fascinated by composting toilets for a long time and definitely wanted one in our home, so that made it possible to install a graywater system to handle the rest of our wastewater. I don’t remember how long it took or how we found him, but somehow in the summer of 2001, we discovered Art Ludwig and his company, Oasis Design.
We pored over Art’s books and settled on the branched-drain graywater system. Our next step was to get it permitted, so we wrote up a detailed proposal describing the rationale, our site characteristics, the numbers, and the design. (You can download the graywater proposal here.)
Using double ells to split the graywater flow
Briefly, a branched-drain graywater system divides the flow into smaller and smaller branches. In our design, the graywater was divided four times between the main pipe from the house and any of the 16 outlets, all of which discharged the graywater below the surface. The graywater was split into two equal amounts at each junction by the use of special plumbing tees called double ells (photo below).
We got our permit in the fall of 2001 but left installation of the graywater system till the end. In an article for the Southface Journal in 2004, I wrote a little about the permit snafu this delay caused but I can’t seem to locate my pdf copy of the article right now. As soon as I do, I’ll make it available for download as well. It was an interesting journey, from permit, to rejection, to permit again.
Grade the yard and lay things out
OK, fast forward to 2003 again now. We started the graywater system installation by laying the pipe out on the properly graded back yard, as you see below.
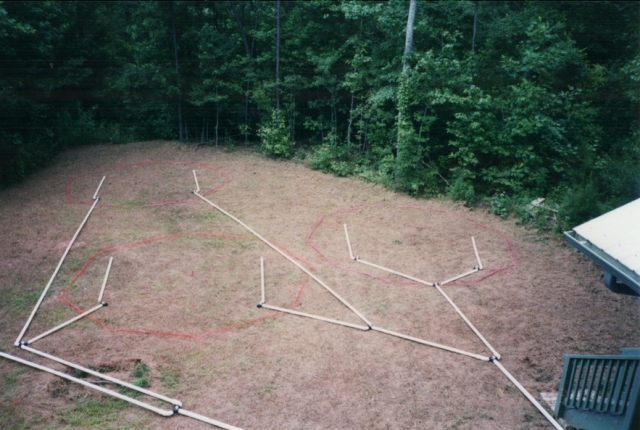
Step 1: Laying out the pipe for the branched-drain graywater system. Before you get to this step, you have to ensure proper slope and design the whole system.
Digging trenches
Next, I rented a Ditch Witch to cut the trenches for the pipes.

Step 2: Digging the trenches
Digging holes in clay
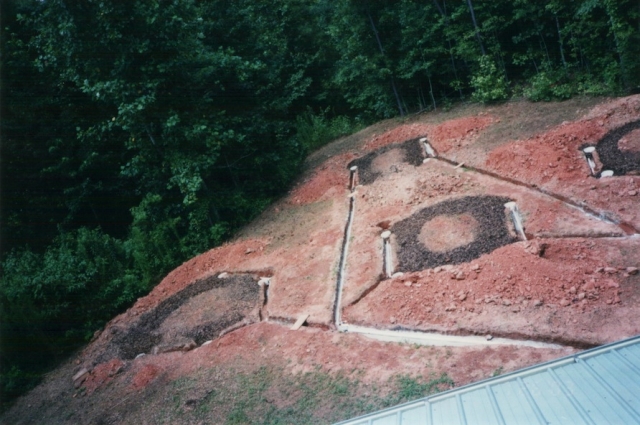
Once the trenches were finished, we took on the more difficult job of digging out the mulch basins and laying the pipe. (Don’t you just love that red Georgia clay!)

Step 3: Laying the pipe. The white patches you see are buider’s sand that we used to make sure we didn’t have any low spots in the pipe.
Filling the holes back up
With all the pieces installed, we then filled the moat-like mulch basins with shredded pieces of old rubber tires, bits of asphalt, and dead alkaline batteries. Ha! Just kidding. We were boring (and sane) and put mulch in the mulch basins.
Step 4: Filling the mulch basins
Valves and cleanout fittings
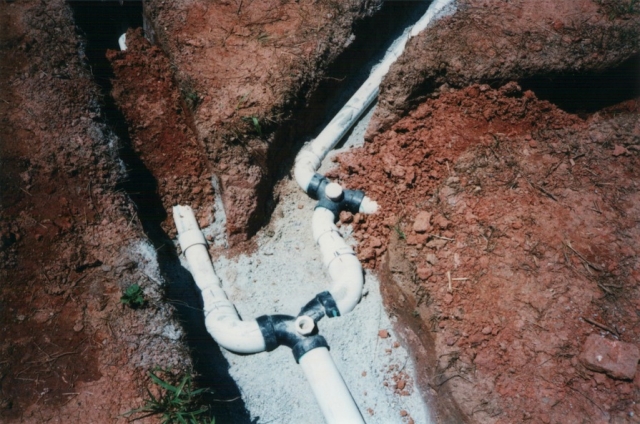
Below you see the main pipe coming out of the house and hitting the first branching junction. In this case, the junction was a valve because we divided the whole system into two zones, which we used alternately, allowing each zone to dry out for a couple of weeks while the other zone was in use. I also installed cleanouts at the top of each zone and intentionally placed them near a downspout so we could flush each zone with rainwater occasionally, too.
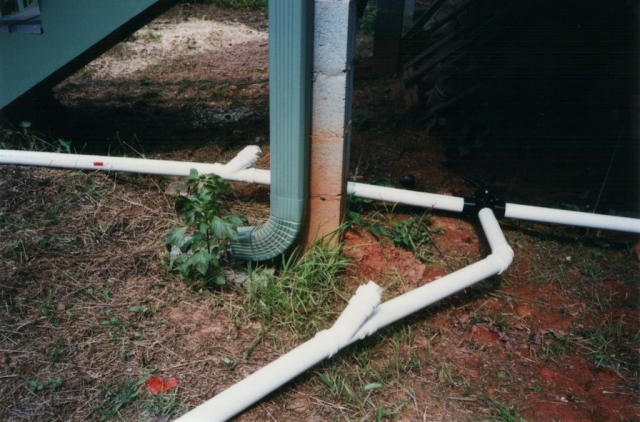
Step 5: The zone valve controls which zone is getting the graywater and which is drying out. We flipped the switch every 2 or 3 weeks.
Double ell fittings
The photo below shows a closeup of a double ell divider (with another nearby). I also used a few bags of builder’s sand to keep the proper slope on the pipes so water wouldn’t hang out in low spots.
Step 6: Setting the double ells for equal splitting of the flow of graywater.
Recycled mud buckets
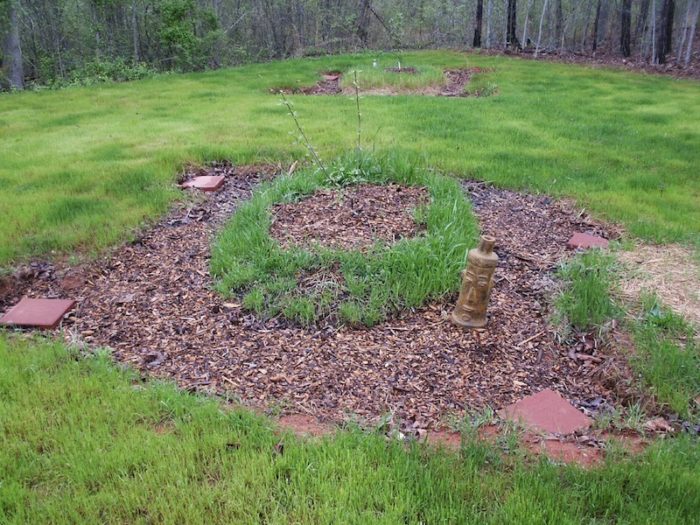
The outlets were drywall mud buckets with the bottom cut out, a lot of holes drilled in the sides, and buried in the mulch basins. I put pea gravel in the bottom of each bucket and a paver stone on the open top. The pavers, which you can see in the first photo at the beginning of this article, allowed for easy inspection.
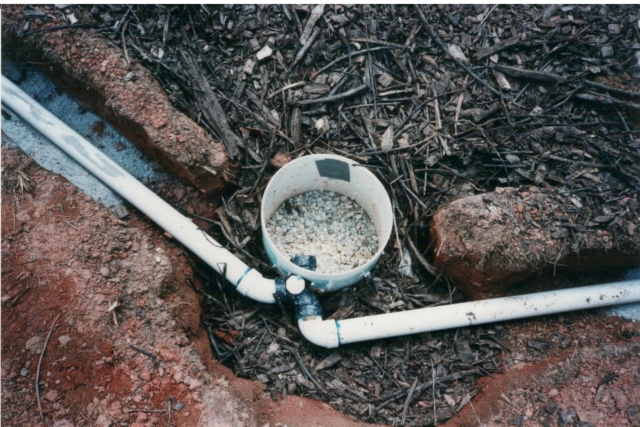
Step 7: Installing the outlets, 4 in each mulch basin. The bucket is surrounded by mulch, has holes drilled on all sides, and is open on both ends, with pea gravel at the bottom and a paver stone covering the top.
Cornelian cherry trees and mayhaw trees
In the winter after we installed the graywater system, we planted trees in the center of each mulch basin. We did some research on good fruit trees for this application and ended up deciding on two Cornelian cherry trees and two mayhaw trees, which we bought from Hidden Springs Nursery in Cookeville, Tennessee. The one you see below is one of the Cornelian cherries, a type of dogwood.
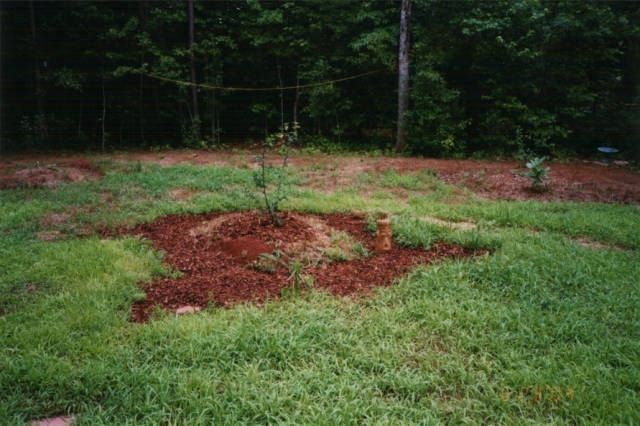
Step 8: Planting trees on the mulch basin islands. We did this in the first winter following the installation.
Four years later…
All the photos above were taken in 2003-2004. In 2008, I got on the roof one last time to take some photos showing how things had grown, and you can see that the trees look quite happy, even though they’d just lived through three summers of drought.

Step 9: Watching the trees grow. This photo is from 2008, when the trees were 4 years old.
No smells or problems
In the three years I lived in the house, the graywater system performed perfectly. There was nary a clog or a smell or any problem at all. And with no pumps, filters, or tanks, there was no maintenance to speak of. All we really had to do was switch the zone valve every two or three weeks and add mulch periodically.
What was more work than the minimal maintenance was the carrying out the research project on how the graywater system affected the groundwater quality and filing the quarterly reports with the state since we got it approved as an experimental system.
Alas, I think the couple who bought the house in 2010 were planning to install a septic tank. I don’t know if I’ll ever be able to bear going back and seeing what’s happened there. I still have my memories, though, as well as the knowledge and experience I gained and the transformation that happened within as a result of being so deeply involved with the whole process of birthing a green home.
Download the Branched-Drain Graywater System Proposal that I submitted to get the system described above permitted and installed.
Allison Bailes of Decatur, Georgia, is a speaker, writer, energy consultant, RESNET-certified trainer, and the author of the Energy Vanguard Blog. You can follow him on Twitter at @EnergyVanguard.
Weekly Newsletter
Get building science and energy efficiency advice, plus special offers, in your inbox.


2 Comments
Interesting post.
Allison,
This blog post seems like a refreshing change of pace.
I've been contemplating a greywater recycling system for my own home and agree with you that it seems like most of the work is in the research and permitting.
The Oasis Design website has come in very handy on the research end, but the few times I've brought up the subject with my local inspector there seemed to be little enthusiasm.
We shall see I guess...
Response to Lucas Durand
Glad you liked it, Lucas. And yes, dealing with the code officials was the most frustrating part of the whole process. I'll write another article about all that because it can be very instructive, too. As I wrote above, we got our permit approved, then it got denied when we had to reapply. In the end, we got it back after a lot of wrangling. It takes a lot of patience, too.
Log in or create an account to post a comment.
Sign up Log in