

Image Credit: Alex Wilson
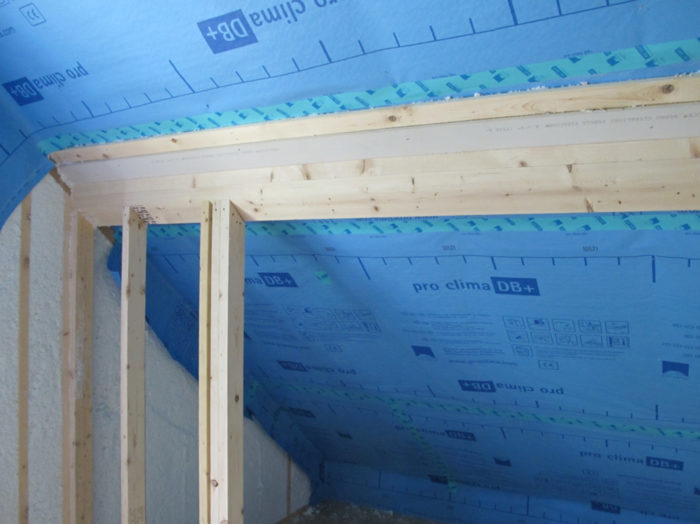
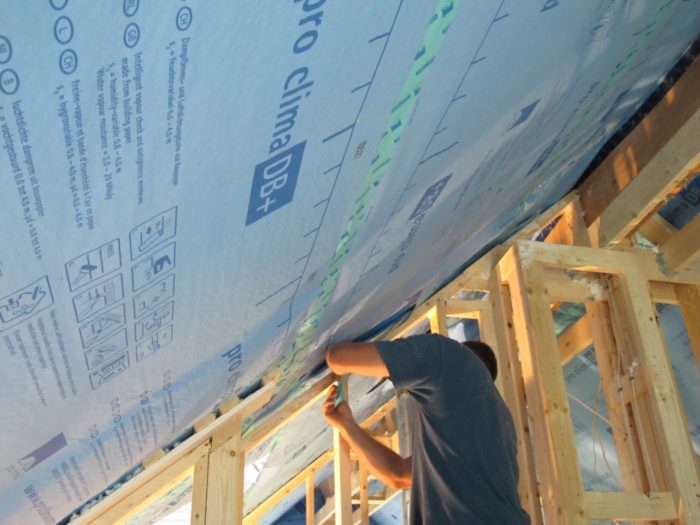
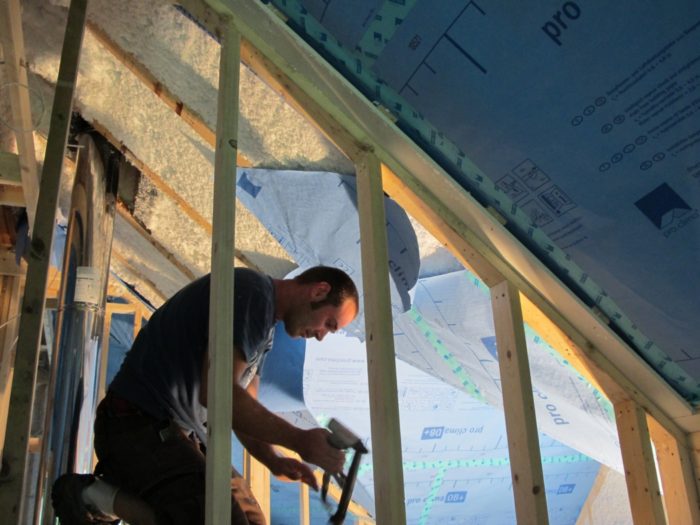
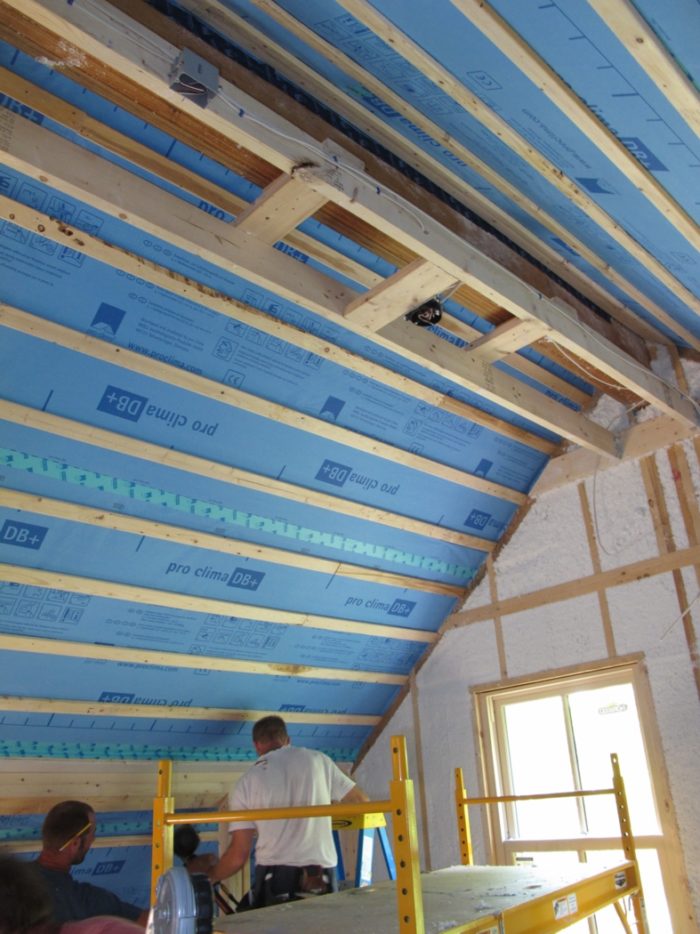
Image Credit: Alex Wilson The DB+ was stapled to the rafters (really, the flanges of the trusses) and the joints were taped. We almost ran out of DB+, so had to tape small pieces together for the last dormer. Strapping being installed for hanging drywall. Given the thickness of insulation, we opted to install strapping 12 inches on-center. The house will have a small section of flat ceiling for installing recessed lighting and a fan.
More Energy Solutions


Nowhere in building design has there been more confusion or more dramatic change in recommended practice than with vapor retarders. Thirty years ago, we were told to always install a polyethylene (poly) vapor barrier on the warm side of the wall. Then we were told to forget the poly and go with an airtight layer of drywall (airtight drywall approach). Insulation contractors, meanwhile, often said to skip the vapor barrier; we need to let the wall or ceiling cavity dry out.
It made for a lot of confusion. And I’m not sure we’re totally out of the woods yet.
Some experts are now looking to vapor retarders whose vapor permeance changes based on the humidity conditions. We installed one of these new materials on our house.
Changing recommendations
Back when poly was the default choice as a vapor retarder (called vapor barriers back then), the recommended placement of that layer varied depending on where you lived. The rule was to install it on the “warm side.” In northern climates, that meant that the vapor retarder should be on the inside (installed on the inner face of wall studs and rafters) before installing drywall.
The idea was that we wanted to prevent water vapor from migrating from inside the house (where it was warmer) outward through the building envelope. As vapor-laden air cools off, it is able to hold less moisture, and if it gets cold enough the moisture in the air will condense (i.e., it reaches the dew point) — causing problems by wetting the insulation or rotting wood framing. By installing the vapor retarder on the inside of the wall, we would keep that moisture out of the wall cavity where that water vapor might condense.
In warmer climates, we were told to install the poly vapor retarder on the outside of the wall cavity, because the inside of the air-conditioned house was colder than the outside. In this case the risk was that condensation could occur with moisture laden air moving inward through the building enclosure and cooling off.
But what about places where some of the time it’s warmer inside than outside and at other times it’s just the opposite: colder inside than outside? It turns out that this is the case in most of the U.S. Even in chilly Vermont, where I’m based, most new houses are now being built with air conditioning — and after this past July, the prevalence of air conditioning will go up further.
Confused? So is most of the building industry.
Smart vapor retarders
One solution to the changing conditions of a house during the annual cycle is to install a vapor retarder whose permeance (a measure of how readily water vapor can pass through) varies based on the humidity. These are often referred to as smart vapor retarders. The goal is low permeance in the winter when humidity is low but it’s critically important to block moisture flow and prevent condensation, and high permeance in the summer when humidity is higher and you want drying potential to both the interior and exterior
It turns out that the plain old kraft paper facing on fiberglass batts has this property of variable permeance — as my friend (and leading building science expert) Terry Brennan explained. As humidity increases (in the summer), it becomes more permeable to moisture, while in winter, when the humidity drops, it becomes less permeable and a better vapor retarder. Terry describes it as “poor man’s smart vapor retarder.”
Maybe 15 years ago, researchers in Europe began working in a more focused way on variable-permeance vapor retarders. The first such product I heard about was MemBrain, made by CertainTeed’s parent company Saint-Gobain (headquartered in France) and available from CertainTeed in the U.S.
MemBrain is a polyamide or nylon sheet with permeance that ranges from less than or equal to 1.0 perms in low humidity conditions to more than 10 perms under high-humidity conditions.
Two variable products are also made by Pro Clima in Germany and distributed by 475 High Performance Building Supply in Brooklyn, NY. Intello Plus is made from a polyethylene copolymer, and it varies in permeance from 0.17 in the winter to 13 in the summer. It comes in rolls 1.5 meters (59 1/16 inches) wide and 50 meters (164 feet) long.
DB+ is a less expensive, paper vapor retarder made by Pro Clima that varies in permeance from 0.8 perms with low humidity to 5.5 perms at high humidity. It is made mostly from recycled paper, and includes a fiberglass reinforcement grid. It comes in rolls 1.35 meters (53 inches) wide by 50 meters (164 feet) long. It is about 24% less expensive than Intello Plus.
Calculating moisture risk
There’s a software tool called WUFI that can be used to determine what the moisture dynamics are likely to be in a particular building assembly and climate. In our project, we were concerned about our roof assembly, because the sheathing was outside of the vented roof cavity. We worried that there might not be an adequate air barrier in the roof assembly.
Terry Brennan used WUFI to determine that as long as there is at least minimal roof ventilation we would be fine without a vapor retarder on the interior. But our roof dormers weren’t going to be vented and the main roof wouldn’t be vented above the roof valleys. So we decided to install a vapor retarder as a sort-of insurance policy.
To allow drying to either the interior or exterior, we decided to go with a variable-permeance product, and we opted for Pro Clima DB+. The performance isn’t quite as good as Pro Clima’s Intello Plus, but the cost was lower and DB+ had some environmental attributes — such as being made from 50% recycled paper and being recyclable.
Installation details
Installation of the DB+ was pretty straightforward. It went up after the Spider insulation had been installed. It was held taught over the rafters and stapled in place. Following installation, we noticed there was a reasonably strong ammonia smell for several days. Ken Levenson of 475 looked into this and got back to me that it is from the ammonium phosphate that is added as a flame retardant. By the time strapping and drywall went up, the smell was gone.
We didn’t bother with the vapor retarder on the walls, because there we have a well-sealed air barrier in the middle of the wall — made from Zip sheathing with edges taped and extra air sealing using the EcoSeal product from Knauf.
We’re happy. The drywall is now mostly installed, and we look forward to never having to worry about moisture accumulating in our insulation. At least until the next theory of moisture control comes along …
Alex is founder of BuildingGreen, Inc. and executive editor of Environmental Building News. In 2012 he founded the Resilient Design Institute. To keep up with Alex’s latest articles and musings, you can sign up for his Twitter feed.
Weekly Newsletter
Get building science and energy efficiency advice, plus special offers, in your inbox.


17 Comments
vapor, air and perms
Alex,
I agree the trends of vapor barriers have been confusing over the years. I think that your point of wanting a good air barrier is very valid and seems to be more of a focus lately.
Do you have typical sheathing of the roof deck? Sheathing can have a very low perm rating. How about using a less vapor permeable vapor & air barrier on the interior of roof assemblies like Majpell (www.sigatapes.com) and then skipping the roof sheathing altogether and using a "sarking membrane" (Majcoat, SIGA) that allows drying to the outside very effectively (34 perms). Also, there is a super sticky double sided tape called Twinet (SIGA) for the vapor / air barrier instead of using a bunch of staples. The Twinet also helps seal the penetrations from nailing the strapping, minimizing air leakage.
The permeance of roof deck sheathing doesn't usually matter
Jason- The permeance of #30 felt with composite shingles on the top is at the very low end of class-II permenance, something like 0.1-0.15 perms, which renders the permeance of a low-perm OSB roof deck somewhat moot- there's no drying to the exterior to be had in the first place.
Even with well-vented metal roofing mounted on purlins there are still structural wind-loading issues to deal with that usually call for a rigid sheathing rather than a flexible membrane air-barrier. Even VT is in a hurricane zone. In less windy areas with less stringent mechanical loading requirements it can work though.
staples don't leak and majpell is not smart
Jason,
Staples don't leak, if they are set flat, so there in no need to use tape to install a membrane (unless you have metal studs, the Proclima DUPLEX tapes works wonders). Staples actually work better as creates a mechanical connection. This is why ProClima's and 475's recommendations are to staple the membrane - such a mechanical connection is especially important when dense packing behind membranes (like the reinforce DB+ that is designed for that purpose). The smart vapor retarder is made absolutely airtight by taping the overlaps (in Alex's project the DB+ was taped with UNITAPE. A paper based tape, that in combination with the 50% recycled content DB+ makes for the most sustainable airtight/smart vapor retarder available (no plastics).
The majpell membrane you praise is not smart retarder, so is more similar to your grandmother''s Poly - albeit not perm 0.1, but at perm 0.68 and fixed will not allow any inward drying in the summer, which could be in issue if you have a vapor retarding sheathing, as you rightfully pointed out. Just so you know, Alex used SOLITEX MENTO Plus as reinforced vapor open membrane against which the insulation was blown (see photo in which the reinforcing grid of MENTO Plus is visible above the trusses). The membrane more importantly created a vented space between his trusses and his roofdeck/sheathing - so indeed a vapor open vented roof as 475 recommends (see our recent foamfree DER blogpost.
dual air barriers
I suggest that no matter what you do for a vapor barrier, you will benefit from well sealed air barriers on both sides. Airflow through your insulation isn't as bad as through the wall, but it is something to be avoided.
Elegant in it's simplicity
Floris,
Nice detail for creating an "airtight yet permeable & vented" thick roof under an existing roof line. I really like the simplicity of the 2x2 to create the vent space under the roof deck. It's important to prove that situations using structural sheathing doesn't mean that fibre insulation cavities have to allow "wind washing" The Pro Clima products are especially useful in this application.
Drying Inward?
It doesn't matter how smart your retarder is, when you cover it with sheetrock and layers of latex paint you will not effectively dry inward. Also, if you have 70% humidity levels inside your wall cavity then you can't dry fast enough to avoid problems without actually opening up the wall.
If you use a vapor retarder it is to stop vapor drive into the wall cavity from the living space.
Response to Steven Konstantino
Steven,
Inward drying of wall assemblies happens by diffusion, not air movement. Gypsum wallboard is quite permeable (about 50 perms). Once the drywall is covered with two coats of latex paint, the permeance drops to about 5 perms. But that's still high enough to allow a useful amount of inward drying.
Finally, you wrote, "If you use a vapor retarder it is to stop vapor drive into the wall cavity from the living space." This sentence is confusing. First of all, the main reason that we choose a vapor retarder instead of a vapor barrier is because we are interested in slowing vapor drive, not stopping it.
Second, while the hope of "stopping vapor drive into the wall cavity from the living space" may be the motivation for some, any product that stops vapor drive inwards also stops vapor drive outwards (also known as inward drying). That's why a vapor retarder is a better choice than a vapor barrier.
Inward Drying
Hi Martin,
Thank you for the clarification. I know it is necessary to use the exact phrasing on these blogs or be called out for inaccuracies. I understand that stopping vapor drive is not the correct phrasing. I probably shouldn't be writing late at night (which is my only time to write).
Most walls have at least three coats of latex paint to begin with. Then the home owner is unhappy with the color and adds two more coats. Then 6 years later the color looks dingy and they add two more coats. Do the additional layers lower the permeance?
Latex paint on sheetrock
Open for debate, but values you regularly see reported by experts are between 3-20 perms. Number layers of paint is never specified, as far as I have found. However, paint is very thin and the thinner a material, the less retarding (inverse of permeable) it will be. Air is vapor retarding as well, as long as you make the layer fat enough....(it has to be still air to do so)
BSC puts latex painted drywall at 8-10 perms although in the report they wrote for the DOE some latex paint is semi-permeable (class III) while others are listed as vapor open (see page 2, 4th and 5th paragraph). So what is it? And anyone ever asked their paint manufacturer what the permeability of their paint is? I haven't seen any reported latex paint data from paint manufacturers.
And even at perm 5, which could in my opinion be many thick layers of latex paint the effect of this vapor retardancy (semi-permeability) would be largely negated by the gaps, outlets, floors, wall and cracks around the drywall 'enclosure' (remember air moves more much more vapor than diffusion). As Martin points out, perm 5 is permeable enough that inward drying is not very restricted by it. A more vapor variability of the interior airbarrier would be better of course, and then covered with a vapor permeable interior finish - see article above.
In relation to what Steven and Martin were discussing: what about tinted lime wash on plaster walls or plaster veneer over blueboard? I imagine that would maintain higher permeability.
Ben,
Plaster veneer over blueboard is vapor-permeable -- but so is ordinary drywall. If you finish your walls with tinted lime wash instead of latex paint, the tinted lime wash is probably somewhat more vapor-permeable than the latex paint.
But as I wrote in the earlier comments, a few coats of latex paint still allow useful inward drying, so I wouldn't worry about the latex paint.
I'm a bit split on a final decision on my basement reno after reading all these blogs and trying to satisfy the inspector. A little confusion on the subject matter. My reno is mostly underway and I didn't do any foam board against the concrete block foundation. (Wish I did now, but too late to change) I did however add a layer of house wrap Tyvek over the concrete wall with a half inch air gap before installing the 2x3 wood framing to save on space on an already small basement. That was 5 years ago lol and not having information at the time to know exactly what i was doing and thinking I would prefer the walls to breath as apposed to using vapour retarder at all because it seemed to me its better to not use it at all so the walls could breath. My concrete block is 60 years old and surprisingly very dry not musky at all down there. So originally I didn't want to use the vapour barrier and opted for the Tyvek to block moisture but allow vapour permeability. Anyways that's where my project is at and I've insulated with Rock Wool between my stud cavities and was about to add drywall straight to it but the inspector insisted I add "vapour barrier" (Poly) over my studs and after having hardly any discussion about it with him he finally said he might be satisfied with a good vapour barrier primer and paint but didn't seem too happy about it as he left. I just want this to go up without problems and have opted to buy some Membrain by Certainteed.
However here is my question now. What are your thoughts on using a primer rated as a vapour barrier vs. Membrain between the studs and drywall? Would it be better to go with the Membrain and just use regular paint or perhaps use the Membrain with also the Vapour Barrier Primer and Latex Paint? Or originally in my thought process I thought that having no vapour retarder behind the drywall at all would allow the walls to dry inward during the warmer months and having 3 coats of a good quality vapour barrier primer and few coats of Latex Paint would help the moisture vapour propagation from Inside my finished space into the wall cavities. Keeping in mind I am being fairly thorough in my drywalling because I am sound (proofing) attenuating the STC classification throughout the wall and ceiling structure and am leaving a precise 3/8" gap around the perimeter of the drywall and stuffing the gap with closed cell backer rod and using acoustical sealant caulking on all corners and seams before mudding and taping as to make a better air seal around the perimeter. I am also used putty pads around all electrical boxes and heating ducts and rotozipping tight seams around them where the drywall will be cut around all electrical boxes and penetrations and also adding acoustical caulk to seal further and foam pads before final plate covers.
I live in Mississauga, Ontario, right next to Toronto in Canada. So mostly colder months and super hot humid summers. My house does get rather humid in the summer and is Air Conditioned.
With my current configuration, What might you suggest. Does my original idea of just the good Primer, Paint, Vapour Barrier the better way to go or would you suggest the Membrain? If you think I should use the Membrain, Should I also take the extra step of Vapour sealing with the high end primer paint vapour Barrier or would that increasingly hinder the inward drying of the concrete block sweating inwards with the moisture no where to go or not drying inwards fast enough through the drywall? Seeing as the Membrain does the job allowing moisture control in both directions especially drying inwards through the drywall through diffusion.
I guess my my point is if you suggest the Membrain. Would it be better to use a paint as permeable as possible vs a more impermeable paint. Keeping in mind I require a good air seal as well for sound proofing which I believe is also a function of Latex Paint.
Sorry for the long rambling and story... Love reading these Blogs... So interesting and informing... I really appreciate your time and efforts in all of this.
I suggest using the membrain and also putting in some moisture sensors, or leads to connect external moisture sensors. That way you have an early heads up on the studs getting soggy.
But if you've got a half inch gap, I think a half inch of foam behind the studs would be worth trying to get in there before you do the drywalling. It would be a shame to need to redo the drywall.
I am putting an air barrier (caulked and taped drywall) above a ceiling service cavity, but since I am in a mixed humid climate (SE Wisconsin) I feel I will need a vapor retarder to slow moisture from the home into the loose cellulose in the attic above. I hear not to use a vapor barrier so it can have some drying potential (i.e. in summer when the AC is running). Looking at membrane costs seems like it is going to double (or maybe triple) the cost of my air barrier - and then I see a reference to kraft paper in the beginning of this article. Is this a feasible/realistic approach to take? I can get a large roll of kraft paper pretty cheap, and if it is just going to sit snug between drywall, truss chord, and some fluffy cellulose, is there any issue with its feasible performance that I should know of?
John,
You can also paint your drywall to make it a vapour retarder.
Certainteed Membrain is a terrible product. First, it is stapled to the studs. No problem. Then one screws in the drywall. Big problem. The screws catch the membrain and it continues to wrap and pull around the screw. The membrain is then stretched and ruined. We had to remove all of the membrain and throw it out.
What did you end up doing instead?
Log in or create an account to post a comment.
Sign up Log in