
• 2 oz. Chesuncook (from Maine Craft Distilling)
• 1oz. fresh lemon juice
• 1/2 oz. real maple syrup (the 1400 calls for honey simple syrup)
• 1/2 oz. Campari (the 1400 calls for Aperol)
Shake with ice. Serve in a chilled glass. Garnish with a lemon wedge.
• 2 oz. Chesuncook (from Maine Craft Distilling)
• 1oz. fresh lemon juice
• 1/2 oz. real maple syrup (the 1400 calls for honey simple syrup)
• 1/2 oz. Campari (the 1400 calls for Aperol)
Shake with ice. Serve in a chilled glass. Garnish with a lemon wedge.
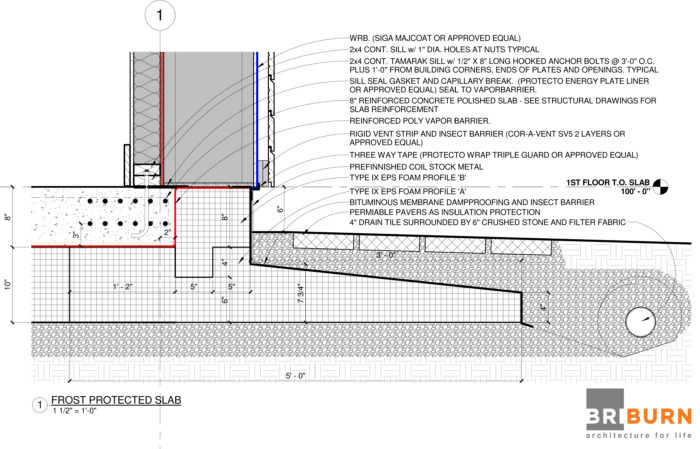
Image Credit: Briburn This slab is elevated above the frost wall and poured against the framed wall.
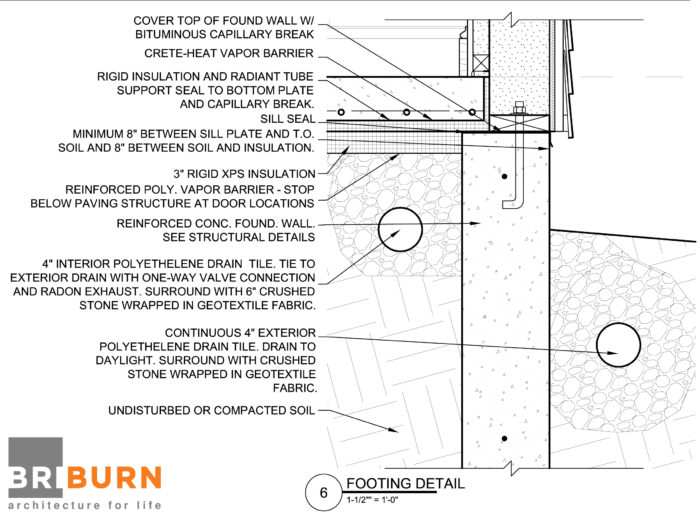
Image Credit: Briburn This home had double-stud walls that rest directly on the ICF frost wall. The slab is poured against the framed wall.
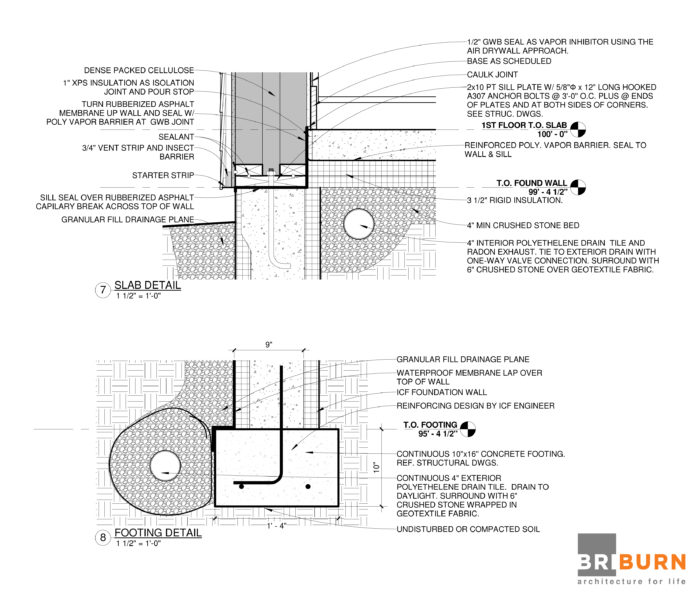
Image Credit: Briburn In our podcast we mentioned GO Logic's frost-protected slab detail. Alan Gibson was happy to share their approach. I should note, however, they have a patent on aspects of this detail (such as the custom 'L' foam and the flowable fill).
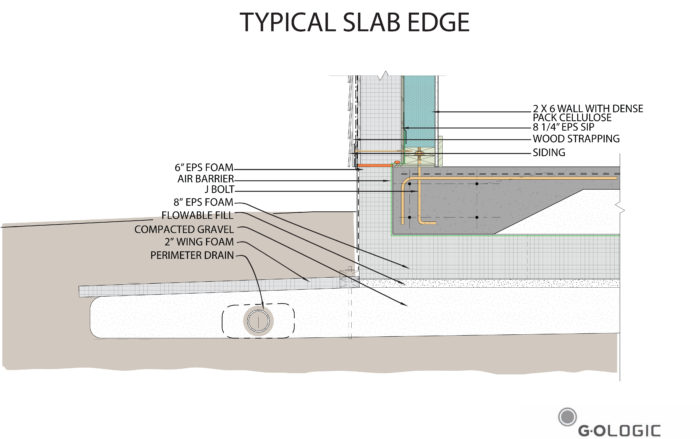
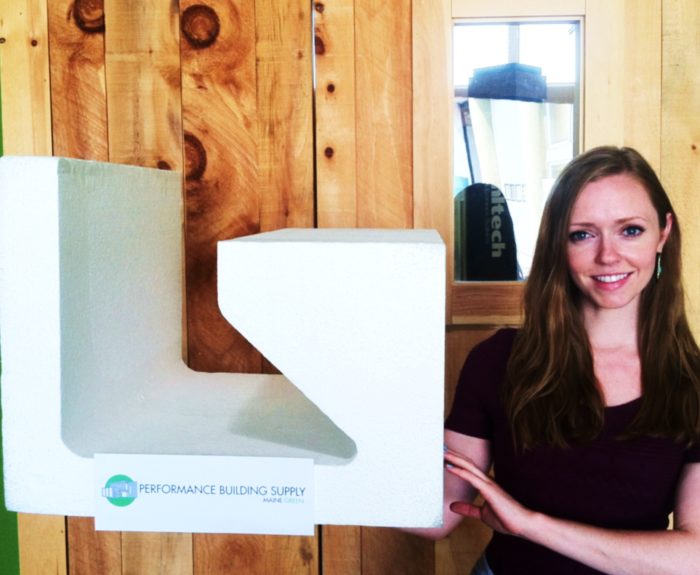
Image Credit: GO Logic Our friends at Maine Green Performance Building Supply are producing and starting to sell their 'Pro Slab' product, made of EPS. We're looking forward to using it on some upcoming projects.
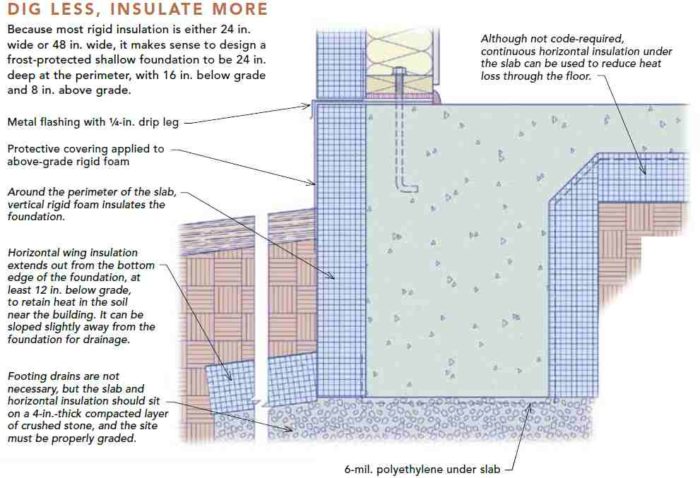
Image Credit: Maine Green Performance Building Supply A frost-protected shallow foundation detail from Fine Homebuilding.
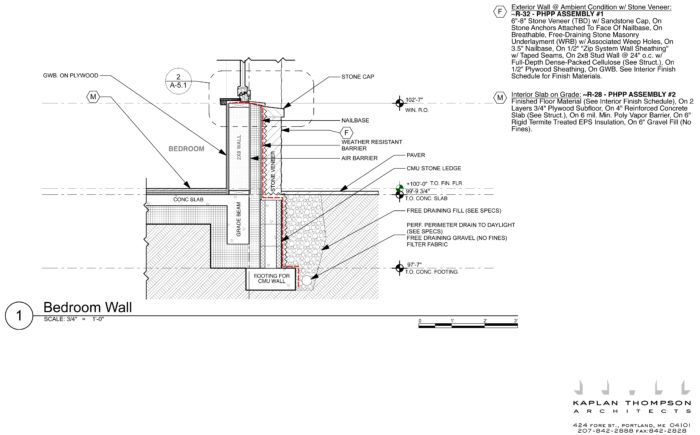
Image Credit: Fine Homebuilding Supporting a stone veneer on a slab-on-grade project is always tricky. He're's one way, Phil's office handles it.
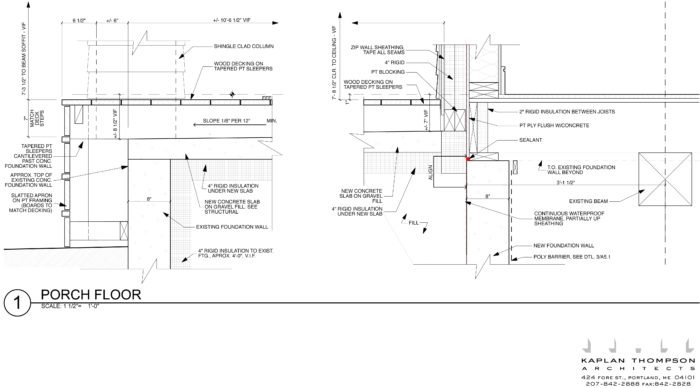
Image Credit: Kaplan Thompson Architects Using the new porch to help insulate (and keep dry) the existing foundation.
Image Credit: Kaplan Thompson Architects
More Green Architects' Lounge


Not too long ago I found myself in a deep conversation (pun intended) about frost-protected slabs with some other architects and building professionals. I was surprised at the energy surrounding the topic. We all seemed to have developed substantial differences in the details on our own and we were all learning from each other.
I was equally surprised at how fresh this concept seemed — I mean, haven’t we been founding our wood structures on the ground for centuries now? Millennia, even?
The diversity of approaches has to do with our culture’s new desire to create ultra-energy-efficient houses. I walked away thinking that we should do a podcast on the subject, but then I thought about how much drawing we all did, and wondered if an audio podcast was a good forum for this topic.
Luckily, with the courage supplied by a good cocktail and the “challenge accepted” attitude and encouragement from Phil, we decided we’d make a go of it. We decided we’d cover the concepts in audio form and provide some details from our own work here on GBA.
So here’s a quick disclaimer about the details provided: We’re providing them for the purposes of education and discussion. Be sure to consult with your own structural engineers and code enforcement officials before proceeding. This is especially true for the frost-protected slabs. In fact, some of the details we are showing involved conversations of “equivalency” with code enforcement officers. Some of these details deviate from the less-than-adequate section from the IRC 403.3, but would, in our professional opinion, perform better.
Subscribe to Green Architects’ Lounge on iTunes
— you’ll never miss a show, and it’s free!
RELATED CONTENT
![]()
PODCAST: An Update on the Pretty Good House, Part 1
Polyethylene Under Concrete Slabs
How to Insulate a Basement Wall
Part 3 – GBA Passivhaus Series
Frost-Protected Shallow Foundations
The highlights:
The 1401. Our cocktail of the episode is made possible by Maine Craft Distilling and is a variation of their cocktail, the 1400.
The basics. Foundations hold up the building, keep out the water, and, done well, can really help to insulate your house.
Radon. It’s a radioactive gas and you may have built your home over the elements producing it. It can cause brain and lung cancer, so you need a plan to detect and mitigate it.
Frost. Deal with it. You either need to build down to get below the frost (with frost walls), or insulate out to bring the frost line up (with a frost-protected slab).
Slabs. Where the vapor barrier goes, and how to treat the slab edge to prevent a thermal bridge.
Frost-protected slabs. Why do them? They can be cheaper and more energy-efficient, for the right project and with the right detailing.
Be sure to check out Part Two where we will discuss basements and the evil crawl spaces.
Thanks for tuning in. Cheers!
TRANSCRIPT
Chris: Hey everybody, welcome to the Green Architects’ Lounge podcast. I’m your host, Chris Briley.
Phil: And I’m your host, Phil Kaplan. Chris!
Chris: Phil!
Phil: You know, we’ve been here the whole time.
Chris: Oh yeah, I just forgot to press ‘record.’
Phil: Chris and I had actually recorded a whole bunch of these, and they just didn’t take.
Chris: They just didn’t show up. I don’t know what happened.
Phil: Yeah, we’re sorry that it’s taken this long for us to come back.
Chris: Again, yeah, this is not our day job. We are architects (green architects, one would even say…).
Phil: But, man, have we learned so much, Chris, since our last podcast! This one’s going to be ‘killer’!
Chris: I’m sure it is! Buckle up, people!
Phil: Strap in, because we’re talking about foundation details!
Chris: That’s right. Yeah. This is all about the foundation of your building project. We’re going to be talking about frost-protected slabs, basements, crawl spaces, and some of the details we’re doing. We realized when talking to some colleagues (there’s a lot to talk about), we don’t get into that a lot: these details, “How did you do that frost-protected slab?”
Then you have that conversation and, “Well, I don’t do it that way.”
“Well, how do you do it?” And then you realize: Wow, there are a few ways to do this out there!
Phil: There are. And you know what? I think we’ve both seen some real innovation lately. It feels like we’ve been doing the same thing for years and years and years. And we were barely insulating our foundation walls and slabs at all, for years.
Chris: Oh yeah. The number of basement walls that have nothing is amazing! And there are still production builders out there right now – I’ll bet you right now, someone is pouring an uninsulated foundation and they’re in Climate Zone 6 – and they’re just pouring a basement wall.
Phil: That’s right, because that’s that way they’ve always done it.
Chris: “It’s just a basement, Phil.”
Phil: It’s a crime!
Chris: “Don’t worry… they’ll put some pink stuff in the floor, maybe.”
Phil: “It’ll be fine. Just put some pink stuff under the slab.”
Chris: “The house has to breathe.” All right. Before we do that…
[The guys jaw about this episode’s cocktail.]
Chris: All right. Are you ready to do this?
Phil: Let’s do this! So, what are the basic goals of a foundation? What does a foundation do? It holds up a building.
Chris: Exactly; that’s the biggest thing. And if there are any engineers listening they’re going to say, “It’s more than vertical load. There’s horizontal load.” And of course, if you’re in California, there are seismic loads, and that sort of thing, that you’ll have to worry about.
Phil: And then there’s frost heave.
Chris: Frost heave is for us.
Phil: Yeah, it’s huge. You’ve got to go deep enough.
Chris: Oh yes. It’ll split a building in half. No kidding. Those forces are not to be reckoned with. You don’t have enough steel in your house to handle that.
Phil: It could rip your face off. In Climate Zone 22, people have been killed by frost heave.
Chris: Yeah. And if you ever have a 30-foot-long foundation wall, and you have Joe Shmoe Builder put an 8-inch wall in here… No! You’re going to have cracks like crazy! You’ll need some engineering, but we’ll get into that.
The other thing, Phil…
Phil: It keeps the water out.
Chris: Yeah. How often is the biggest complaint about basements that it’s wet? Or, it smells wet. Or something that has to do with wetness.
Phil: I should say, it should keep the water out. Right? And it often doesn’t. And often, I say, the only way to avoid a wet basement in Maine is not to have a basement.
[The guys go a little off-topic and joke about whether their clients listen to the podcast.]
Chris: Yeah. Keep out the water, and this is also an opportunity to insulate. Basements are not that well insulated because people think, “It’s just a basement. I’m not going to be down there.” But still, your house leaks tons of energy into the ground if you’re not insulating it. So, here’s your opportunity, folks, to insulate your house where you meet the ground.
Phil: Again, as Chris said, there are people out there not insulating still. 2012 IRC requires basement insulation now in Climate Zones 3 or higher. You’ve got no choice. And I’m afraid there are a number of builders out there who don’t know that. Right now, in Climate Zone 3 you’ve got R-5. If you’re in Climate Zone 4, it’s an R-10. And if you’re in 5, 6, 7, or 8, you’ve got an R-15. (An R-15, Chris!). The builders now who think they’re doing a good job will put 2 inches of XPS on it.
Chris: Well, guess what? You didn’t make it.
Phil: You didn’t make it. Don’t be so proud, buddy. You’ve failed.
Chris: Yeah. They think, “I insulated the basement enough.”
Phil: Did you? “With 2 inches; I doubled it up!”
Chris: It’s still not enough. You still failed. F! F-minus.
Phil: Can you do that?
Chris: Yeah. You think you’re doing great… F-minus! Yeah.
Phil: You’ve failed on your next house, too.
Chris: Exactly. And we should also say: it’s not just builders; it’s code-enforcement officers, too. And, of course we’re saying that it’s 2012. There’s a big difference between the 2009 and 2012 IRC.
Phil: But you know what doesn’t change in the new decade? In the new millennium? The good old boys network. Those guys have been working with the same builders for years and years and say, “Hey, don’t worry about it. I know the codes have changed.”
Chris: “Yup. I’ve been building like this for years and they’re fine.”
Phil: And the CO’s say the same thing and they turn the other way. So, empower yourself, people. Do a little research and know that this has to happen: at least an R-15 in Climate Zones 5 and up.
Chris: Yeah; which we are. Again, everyone knows this: Phil and I are used to the cold-climate stuff. We’re idiots when it comes to air conditioning. There are probably more clever people out there (a couple!).
One other thing that I always like to throw in about what your foundation really is doing is radon mitigation. Here in Maine, radon is a real issue. It’s a real deal here. You can’t do a house without either a passive or active radon mitigation system. Maybe this is our public service announcement for radon gas. It can cause brain cancer and do bad things.
Phil: They say that radon are the termites of the north.
[The guys go a little off-topic and joke about designing T-shirts and judging a wet T-shirt contest.]
Chris: What do you want to start with first?
Phil: Let’s talk about slabs.
Chris: Now, back to the basement slab conversation – and I think we’ve mentioned this before in our podcast – it’s becoming more and more common to have no basement. For me. I don’t know… are you finding that, Phil? Are you finding that you’re doing a lot more slab-on-grade?
Phil: Yeah. Absolutely. We definitely are. And I think we’ve talked about this before: the building site has almost everything to do with that. If you’ve got a sloping site, you’re not going to do it. You’re bringing in too much fill and it doesn’t make sense and there are other ways to figure it out. But otherwise, it’s a really great solution.
Chris: The client, the homeowner, also has a lot of input. They might say, “Well, I have a workshop.” With the last Passivhaus I did, that happened. Normally, you don’t see basements in passive houses. In fact, I wonder if this is the only Passivhaus that has a basement. That would be very interesting. I haven’t looked into that.
Phil: Yeah. Somebody, chime in. I’m sure there’s one out there.
Chris: But that doesn’t happen often. That’s because that’s a space you have to heat – you’ve just increased your volume. Remember what Pat Coon said: “A basement is the cheapest space you never use.” And if that’s a basement to you, then I think you’re better off without it.
I’ve sat down with clients and said, “Alright: basements. Why do you need one?” And if they say, “Well, I need to put my utilities in it.” Then I say, “All right. Well, what if your utilities were just small enough to fit inside that closet (and I point to my closet over here that houses my materials storage – it’s just a little closet)?”
And they say, “Well, okay. But I need to store stuff.” Then I say, “Well, what if, for cheaper than your basement, I can give you some dry storage over your garage?” And they say, “Oh, yeah. I guess that would work. Then I guess we don’t need a basement.”
No. Probably not, if it’s cheaper. That’s the thing that brings it in: “Well, if I can save you $10,000 by just not having a basement and not having to deal with it. Don’t you want that?” And they say, “Yeah, actually. Yeah!”
But, programmatically, if you need a workshop or something…
Phil: Right. Then you’ll deal with it. But, really, it’s probably the highest risk space in any house.
Chris: I would agree. And the only thing that saves you is that no one puts their heirloom furniture down in the basement. If you do a basement right, I could blindfold you and take you down to a basement and you’d go “Sniffffff…”
Phil: Right – one whiff!
Chris: In a normal basement – I could do that in most houses in Maine – you’d smell it and you’d say, “Oh, you just brought me down to a basement.” You could feel the area cooler.
Phil: And there are, really, two less joints if you move that slab up.
Chris: That’s right. Two fewer joints.
The basic thing you have to deal with – when you’re doing a slab-on-grade – is you are doing it two ways. Right, Phil? You have to beat the frost (we’re going to pretend we’re in a cold climate for this), which means (a) you dig down below the level at which the ground is going to freeze – because we know if that freezing happens underneath you, that water’s going to expand and it’s going to push your house up. And you can’t stop it.
Phil: So you’ve got to get your footing below the frost line, whatever that is in your world. We’ve got 4 feet, or 48 inches, here in Maine.
Chris: Exactly. And just as there are people pouring uninsulated basements, they are pouring uninsulated frost walls and they are pouring a slab on top. And they might be doing a couple of inches under the slab, but then they’ve got this real weak spot, which is where that frost wall is poking up out of the ground and their slab is hitting it. It’s just concrete going to the outside…
Phil: Which is like an R-nothing.
Chris: It is an R-nothing! One of the things I’ve started doing in that scenario is: I would pour the wall – not against the concrete, but – I’d pour it up against the framed wall.
And people, we’re going to include some details. Click through some details here. We’re going to do this as if you’re driving in a car and you can’t look at things on your computer. We knew when we started this podcast that it’s going to be really difficult to do without details. In fact, we’ve not done a bunch of podcasts. (Yeah, that’s why we’re late! We were just saying, “Let’s do wall sections. Oh… details… They can’t see them.”). Check out these details that we’re going to post. I’m sure in one of them, you’re going to see that one trick you can do is to actually lift the slab up above the frost wall itself, so that your insulation can actually go underneath the slab and then turn up against the framing, and use that as your pour stop. And what you’ve done is you’ve isolated your slab. So, go ahead: let that frost wall get saturated with water! Let it get cold and damp because you’re completely above it, as long as you get in that capillary break to keep that wall dry – that sill plate dry – and then you’re fine. Right as rain.
Phil: I think the isolation of that slab is so important. It’s something that we’re doing across the board. You can’t not do that now. One of the things that – even when people started insulating below slabs, they made a mistake of not insulating the edge of the slab. It doesn’t seem like it’s that much when you have this surface area, but I’ve read that – I know I should have researched this stat, but it was something like 20 percent of your heat loss of your slab comes out the edge if that’s not insulated.
Chris: 20 percent of the heat loss of your slab! And it makes sense. I mean, it’s all the way around the edge.
Phil: Yeah. It’s a big area.
Chris: So, either you’re going down – then you have to protect the slab itself. You’re trying not to insulate the wall itself, because, who cares?
Phil: That’s right. It’s going all the way down. And it’s really not about the insulation piece; it’s just about the structure piece.
Chris: Right. And I’ve seen some weird details where they’ll insulate on the outside of the foundation wall, they’ll insulate under the slab, but then the slab pours right up against the foundation wall (or maybe there’s just three quarters of an inch, or something like that). And it just seems silly because you know that foundation wall is bitter cold.
Phil: It’s a serious thermal bridge and it comes all the way into your inside space.
Chris: And it’ll be there all year long.
Phil: What’s the other way, Chris?
Chris: The other way is called a frost-protected slab, as you know. And, what you’re doing instead of digging down, is you are warming the earth outwardly. Basically, the earth is hot down there – it’s really hot, in fact, but by the time it gets to us, it’s only 50 degrees. (Dig down about fifteen feet, and it’s about 50 degrees below us, no matter how cold it is outside or how warm it is outside). And so, what you’re trying to do is, you’re basically putting a skirt of insulation around the outside of your foundation wall. A good rule of thumb is: every foot out that you insulate is equivalent to a foot down.
Phil: Right. So we end up doing about a 4-foot skirt, typically, if we’re going 4 feet down. So, you’re keeping that 50 degree air warming the space below your slab, so that frost doesn’t get underneath.
Chris: Right. So, what’s happening is that frost is 4 feet deep and it starts to hit your insulation, and then the heat of the earth is pushing back up. And by the time it reaches your building, it’s no longer cold enough to freeze.
Phil: That’s right. So, we’re essentially taking that 50 degree mark that was 4 feet below, and inching that upwards.
Chris: Yeah. At your foundation. And of course that works way better if you’re actually heating your house too. If you have a house that you’re leaving unattended – like a summer cottage or something like that – then you have to be careful about this, because you’ll need even more insulation since your house even above the slab is bitter cold.
Phil: That’s right. And, by the way, an aside: if you have a house like that, expect it to be cold for the first couple of days you get back, because it’ll take a long time to warm up that slab.
Chris: That’s right. Absolutely. One of the tricks that you’ve seen lately (and I’ve done this) is you can actually – and we’ll post some details – order some custom foam insulation, which sounds ridiculously expensive. But, in fact, it’s surprisingly inexpensive.
Phil: If you find the right people who do it. You have to find somebody who does it without thinking. If people have to think, it costs you money.
Chris: That’s right. We use Branch River, out of Massachusetts. Basically, I can send them a CAD file, because they’re used to doing SIPs. They do foam-whatever; they do foam-packaging. A lot of times there’s custom packaging – I’m going to ship a weird, funny satellite dish and I need to make sure it’s protected while mailing, so I send them a CAD file for what I want that foam shape to be – so they basically make it to a custom shape.
So, you can build a shape that forms a slab. Check out our frost-protected slab detail that we have out there, and you’ll see what we mean. You can get these interlocking foam shapes and you can form a base for which you can pour a slab.
Phil: And it takes away some of the thinking. Somebody’s done that for you. One of the questions that comes up in my mind, Chris, while you’re talking, is: Why not do this every time? Every building. Why don’t people do frost-protected slabs across the board?
One thing is that it’s new, and they have to think about it. And then the builder has to think about it and the designer has to think about it. And you feel a little uneasy about doing it because it’s the foundation – and don’t screw up the foundation, dummy! Let’s just relax and do it the way we’ve always done it and move on. So, it feels like a risk. Although, I have heard that it saves money for people who’ve done it again and again. You don’t have to excavate as deep, so you use less concrete.
Chris: You do; because concrete and steel – in the spectrum of materials that you can use for your building – are pretty expensive. They are among the most expensive materials. So, basically, you’re using more foam (which we like as green architects – not because of the material, but because of the energy you save), less concrete, less steel.
Let’s talk about curing slabs.
Phil: Just one more reason, to throw in here, why not to do a frost-protected slab. I ran into this once where we were unsure about the soils, so we got a geotechnical engineer up there. And the soils weren’t appropriate for it. It was clay, and there was something about the composition, the clay, that he said this is just going to be really bad news. So, there’s a risk if the soil’s bad.
Chris: So, you were worried about the hydrology underneath.
Phil: That’s correct.
Chris: As in: if you can create this perimeter where you’ve got… Basically, you make this little concrete bathtub with your frost wall where you can control the moisture and you’re not going to have moisture expansion.
Phil: Dude. When I say floating slab, I mean floating slab. So, that was the concern. He said, “Not here, friend.”
Chris: Interesting. One technique, though, is to have a really thick slab when you do that.
Phil: Like a monolithic pour.
Chris: A monolithic pour. And that is so you don’t have to do control joints everywhere. But friends, let me tell you from experience – just from anecdotal stories from others: Get a guy who’s done those before – who’s done more than your 4-inch slab.
Phil: I usually think of them as 18 inches. Does that sound crazy, Chris?
Chris: That’s crazy! The slab?
Phil: Yeah. Monolithic pours. I’ve never done one.
Chris: Oh really? I’ve done a10-inch slab. We’re about to do an 8-inch slab. The 10-inch slab was for other reasons, which are too complicated to get into now.
When you do that, you can span much greater distances without control joints. But now your concrete’s going to cure differently. Maybe we should talk about that for a second. We’ve had this debate, in times past, about where the vapor barrier goes. You should have a vapor barrier (right?) under your slab. Right up against the concrete, that’s where I was always taught to put it. Because, in the old days (think about the ’80s, the ’90s even – maybe even today), there are some commercial projects where they put down a gravel base, or something like that, then a vapor barrier, and then they do this sand layer. Why do the sand layer? So they can level that out. They’ve got a great base. They can walk on it. They can set up chairs. They can do all this stuff for wire reinforcement. Chairs are the little plastic things that hold up the reinforcement.
Phil: Oh, I pictured the workers hanging out, having a beer, sunning themselves midday.
Chris: I’ve got to clarify for the students, you know. Chairs are the little plastic things that hold up the reinforcement so the concrete flows around it.
You’ve got this little sand layer in which water can get in there and can pond. If you can have ponding water underneath your slab, then that’s a point at which the slab will cure unevenly, which will cause curling. That curling slab can be not-so-big a deal, or it can be kind of a big deal. It can hump or, if it’s an edge (and that’s where the curling comes from), it can lift and create weird things. [Editor’s note: For a clarification of the circumstances leading to slab curling, see the comment section below.]
Concrete does not dry; it cures. It uses that water to turn itself back into a stone. It’s a man-made rock. We’ve stripped it, and pulverized it, and all that jazz and now we’re putting it back together just by adding water. Poof! Amazing.
You want to make it so that it cures evenly. That’s my reasoning for always trying to put the vapor barrier right up against the concrete pour.
Our buddies at GeoLogic do it differently – in fact, I’ll try to get their detail on here, because they’ve really done some great stuff.
Phil: Yeah. They’re doing some really interesting foundations.
Chris: They do it without going to Branch River or going to some custom foam supplier.
Phil: Yeah, they’re all DIY. They’re making their own SIPs, too. Don’t they?
Chris: I don’t know. That’s fun! They extend sheet goods of foam and then they form an edge and then they create a haunched slab – to take the weight of the wall – and then they say, “Well, we don’t need an 8-inch slab or a 12-inch slab. It can go back to 4-inch.” So they fill that middle area with crushed stone and then pour on top of that. So the vapor barrier is in that cavity. That makes me uncomfortable, but they’re fine with it, and off they go. Maybe I’ll e-mail them and we’ll give an update or something.
Phil: So, what are the other conversations and things that we still see changing, moving? Even though I think we’re pretty consistent in how we do it, one thing is: Where is that vapor barrier? Which goes first: the insulation or the vapor barrier below the slab? Right now, what we’re doing is, we’re putting the insulation down and then we’re putting the vapor barrier – as Chris said – right underneath the slab.
Chris: That’s my preferred way.
Phil: Right. We’ve seen it the other way, more often than not. In fact, we were on a job site two weeks ago. Even though we had it drawn properly, we were out there at the time when the guys were prepping for that slab. Of course, they didn’t look at our drawings.
Chris: No! They looked at them a week ago!
Phil: The builder – who’s a really good builder (he’s built with us before; he’s done it the right way before) – still had to stop and think. He wasn’t quite sure. The guy said, “Listen. Back off, man. We’ve got to get in here and go. Trust us. This is how you do it. Just relax.”
And we actually said, “Stop. You can’t do it that way.”
Chris: Good for you!
Phil: They were a little pissed off at first, and then we talked it through with them. And they said, “Oh, all right. That’s fine. We’ll pick up what we did.” And they redid it. They put their insulation down the proper way.
Chris: Good for you, Phil. I’ve been in situations like that. That’s a difficult position – where things have been installed, there’s precedent where it’s okay this way. You have to go in there and stick to your guns and say, “Hey, dude. The client didn’t hire me to draw this thing (and tell you how it should be done) for you to go out there and just wing it or do it your own way.”
Phil: And these poor guys are paid to get out there and do this job as fast as they possibly can and move onto the next one. They lose money and they don’t really care and it’s not fair for them to do it.
But they were really great sports and they moved it around. And one of the things that we’re starting to do with our drawings is we’re actually showing pictures of this. In the drawings, right next to the slab details. So you can see how the vapor barrier sits on top of the insulation and all the seams are taped with a particular kind of tape. And once you get that visual, these guys get it a little quicker.
Chris: And you know, the truth is, they are probably right. It probably would be fine. Probably. But, you’re rolling the dice there a little bit.
Phil: It’s hard to discover problems with a slab. It takes a long, long time.
Chris: Right. And why roll the dice, if you can keep those dice in your pocket and detail it right?
Phil: Anything else we need to say about slabs, Chris?
Chris: Well, probably there’s tons to say – but do people want to sit here and listen to them? They’ll just click on the details and go, “Oh yeah. Cool!” and then we’ll get tons of e-mails.
Let’s call it good with slabs. In fact, let’s call this Part One. Let’s freshen up these delicious drinks, and then we’ll come back with a Part Two and we’ll talk about basements and crawl spaces – evil, evil crawl spaces. Sound good?
Phil: Boo! Cheers, Chris.
Chris: Boo! Cheers, buddy!
[END]
Weekly Newsletter
Get building science and energy efficiency advice, plus special offers, in your inbox.


19 Comments
Curling slabs
Chris,
You wrote, "If you can have ponding water underneath your slab, then that’s a point at which the slab will cure unevenly, which will cause curling. That curling slab can be not-so-big a deal, or it can be kind of a big deal."
I'm pretty sure that you have this story backwards. The reason that builders included a blotter sand layer between the polyethylene and the concrete was to prevent curling. When architects and engineers began insisting that the polyethylene belongs directly under the concrete, builders complained that curling problems increased.
The cause of the curling is unequal drying of the slab during curing, which is more problematic when the concrete has a high water/cement ratio (in other words, when it is a bad mix). If polyethylene is placed directly under the concrete, the slab can only dry in one direction (upward). If the concrete dries quickly in one direction, the corners of the slab can curl.
When the concrete has the right amount of water -- not much -- and is stiff when placed, and when the concrete cures slowly (which can be accomplished by keeping the top of the slab damp during curing), slab curling can be prevented. This takes more work and attention than the use of blotter sand, so some concrete contractors grumbled when they were told that blotter sand is a no-no.
The main reason that building scientists recommend that polyethylene be placed directly under the concrete is to prevent problems with finish flooring. For more information on the history of blotter sand, see Polyethylene Under Concrete Slabs.
Slab curing
Martin, if only your article had come out before I submitted our article I would have seemed much smarter! I appreciate the correction. I always thought the blotter sand was just a playground for moisture variations (causing the slab to cure unevenly). I knew that it was supposed to absorb some of the concrete's excess water (so that it more closely resembled the drying of the top side of the slab) but when it failed to do so because of a failure in the poly or ponding in the low spot after a rainstorm, this spoiled its positive affects.
I guess what really needs to be stated about large monolithic concrete pours (such as an 8" slab) is that the effect of curling is magnified and it's even more important to make sure a slab cures evenly. With the poly right up against the underside of the slab (as it should be) that slab is "locked in" from underneath and won't lose any moisture to the ground, so in order to cure evenly, this 8" slab needs to likewise loose very little moisture to the air above. So it's very important that the slab is moist cured with poly or wet burlap in accordance with ACI.
Concrete curing ..
Is too high water:cement ratio a problem in usa too ?
Here concrete contractors are cheap enough to try and get out without using "super" and hight cement mixes , so you get superb washed rocks pokets and shrinking cracks eveywhere.
I've poured roughly 5K sqft of high qualitty concrete for floors in my projects , and we watered all of them for 2-4 days after pouring.
Using a good poly cover for the first days also help grealy in reducing too fast curing and problems that comes with it such as corner curling and shrinkage cracks.
But nothing replaces quality mixes.
Plasticizer and some basic fibers is minimum in 2014.
polyethylene above the insulation
if the poly is on top of the foam, exposed during the placement of the steel radiant tubing, etc. how do you keep it from getting punched full of holes before and during the pour?
poly protection
First, it helps to have a reinforced poly vapor retarder. (there's a whole bunch out there now. Johns Manville makes one, Reef Makes one called Griffolyn, I'd be interested to here from others on here what they use). The difference is night and day. You actually have a good shot at tape sealing it not puncturing it.
Second, it helps to not have radiant tubing, but if you do the product called Crete-heat is pretty nice.
Third, it really takes some special care from the guys in the field. Tell them it's their life raft. If they puncture it they drown. (says the architect from his comfy chair).
Response to Trevor Chadwick
Trevor,
Q. "If the poly is on top of the foam, exposed during the placement of the steel radiant tubing, etc. how do you keep it from getting punched full of holes before and during the pour?"
A. I recently wrote five paragraphs on this topic -- the last five paragraphs of this article: Polyethylene Under Concrete Slabs.
Here's the short version: "The polyethylene is a vapor barrier, not an air barrier. It's perfectly OK for the polyethylene to have a few holes." To read the full explanation, and to read Joe Lstiburek's colorful suggestions for footwear, click the link.
Tougher than it looks
We've used serious plastic (Vyper most recently) but I don't know that I can say it was particularly more impressive than plain old 6 mil.
Response to Dan Kolbert
Dan,
I've always been a 6-mil poly guy myself. If the slab cracks, caulk the crack. You've still got an excellent air barrier.
"Patented Detail"?
Great article guys, my favorite part though is in the details section where it states Gologic has patented the L shaped underslab detail. Jeez...I never thought you could patent putting rigid insulation into an L shape. I hope the insulation police never stop by one of my sites. How about the guy who invented the California corner do I own him some money?
I think it is important to point out the challenges that come alone with a building site that has gradient changes when considering a shallow frost proof slab, as there are limitations as to how much above grade wall can be exposed.
Another good resource for frost proof shallow foundation was put out by NAHB
http://www.nahb.org/assets/docs/publication/Energy-efficient-frost-protected-shallow-foundations_1211200244041PM.pdf
Kyle
Here in the PNW, although frost protection isn't an issue, the challenge for slab on grade foundations is often the depth of the excavation necessary to remove organic overburden and get down to a good bearing substrate. If you have just removed four feet of debris, it is tempting to avoid buying the same volume of fill and go with crawlspace instead.
Good article. I've never seen foundation details where the slab was higher than the exterior wall framing before. Still trying to get my head around all the implications of that one.
Sequencing
Kyle, the biggest implication, of course, is the sequencing of the trades. You basically frame up the shell, and even upper floors if you have them, and THEN pour the slab (prior to interior framing of course.) It has both advantages and disadvantages. Access can be tough (for troweling too) but hey, you can pour in a rainstorm if you'd like. When I came up with this I couldn't get anyone to tell me it was a bad idea. Maybe I should get a patent. We could call it a Briley Slab. Of course, any time I think I've invented something clever, I learn someone else thought of the same thing years earlier.
Speaking of patents,Kye, I'll let Alan from G.O. Logic speak to the pattent, but I think you're probably safe from the patent police.
Chris
polished concrete slab
Since we're on the subject of concrete, does anyone out there know of a good sub to do a polished concrete slab in southern or mid coast Maine?
Thanks
Jon Meade
Jon Meade (207) 773-3323. I highly recommend him.
reply to chris
Thanks for the recommendation.
Podcast RSS
Hi guys,
I'm very interested in listening to the podcast.
However, a have a serious allergy to anything Apple.
Is there any possibility to letting us non Apple/Itunes people have access to the direct RRS feed.
Thanks for all the great work!
Response to Aaron Laudi
Aaron,
If you click the little black triangle near the top of this page, you can listen to the podcast on GBA. No Apple device is required.
.
Podcast RSS
:)
Thanks for the tip.
Actually I was looking for a way I could subscribe to the feed, so that I could listen to the podcast on the go, like I do with all my others podcast. The best thing about subscribing, is the automatic download, and you can listen where ever you want.
I have an Android device, which I hear is quite popular these days :)
A simple non patented insulated slab
This putting insulation under buildings seems to be a real PITA.
I am going to be building a Passive House outside Lancaster, OH, (5A) in 2 or 3 years and I am looking for the easiest and least expensive way to build a slab. The idea of putting down the insulation first seems to be rather problematic for the plumbing and forms (Unless this is a standard procedure today.)
I was thinking of staying with traditional methods, by building a frost wall, filling, and then placing the insulation on that slightly elevated surface. A slab is then poured on the insulation and the 1-storey PERSIST house is built on top of that.
Sound expensive? Complicated? Concerns about the non-thickened slab edge?
We seem to be reinventing the wheel with every build. What is a standard that I can bring to a slab installer that won't frighten them off or see me a source for their children's college fund?
I really don't like the slab above the outside walls. Framing interior walls would be a real problem as all the studs would have to be custom cut unless you can get exactly the right height to buy shorter studs.
Ready for your project today
I just read this on GBA, late for the party.
I wanted to let readers know that our company ByggHouse http://www.bygghouse.com is making an offering in this product type - insulated slab forms for frost protected shallow footings. We have in fact been working on this for years now and put a prototype in the ground, or I should say ON the ground in April of 2012 over 2 years ago with our partners in this, Bensonwood. And we have begun quoting to potential customers this summer.
The 2012 prototype was built in Maine by Bensonwood. The form pieces used there were prototypes, but essentially the same configuration as the final product. Our offering is based on the wide range of products like this offered in Sweden. We wrote about these products in my blog in 2008. http://blog.lamidesign.com/2008/10/letters-from-sweden-foundation.html Our work to bring this to market here began at that point with our hope to see it become a widespread solution here as it is in Sweden, where nearly all new houses are placed on this kind of foundation system.
The Swedes have refined this to an extremely efficient, and economical way to build. They build this way not only because it is energy efficient, but because it is faster and less expensive than digging footings below grade. This is why their entire industry has flipped to using this long ago. That said I have to offer the criticism that many of the details shown on your post are complicating the system, perhaps to the point it must loose some of its advantage over conventional footings. But that is quite common in our "green" building movement. This is a very simple thing, and very fast to install. A small house, two guys, one day, no digging, no muddy hole for a construction site. It is a commodity there, many manufacturers, very inexpensive, with free tools for sizing structural details supported by the foam industry. The mystery and proprietary that surrounds this in the US is quite ridiculous. Its time to get on with it, and change the way we build.
You can read about the product which we call WarmFörm on our site at this address:
http://www.bygghouse.com/products/warmform-slab-forms/
Typical details are linked there for you to examine. And a photo of the Maine house in progress is there as well.
To Martin who I count on pointing out that so much foam under slabs does not make sense, the Swedes have long ago found that more foam is less than more earthwork, and so even though it is more than needed, it is the easiest and fastest way to build this.
Log in or create an account to post a comment.
Sign up Log in