

Image Credit: Images #1 through #5: Andrew Michler
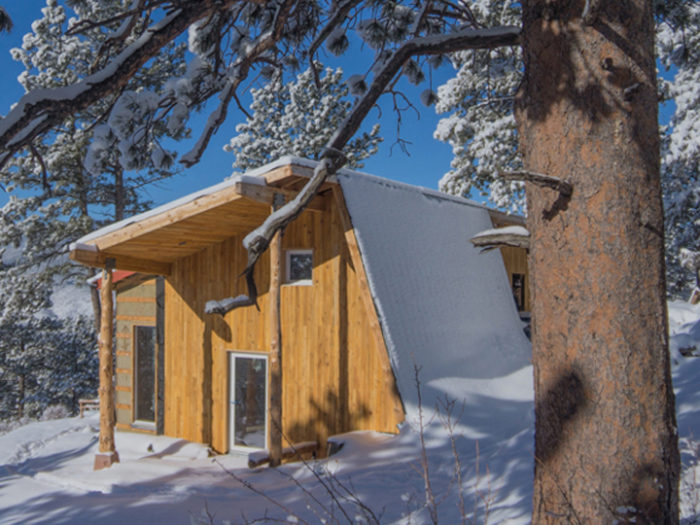
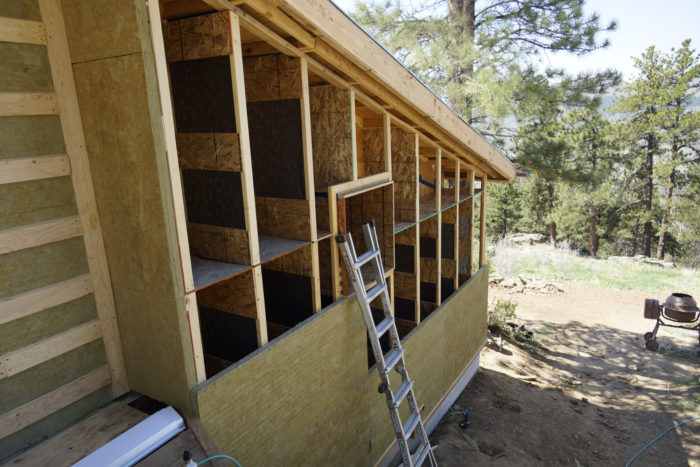
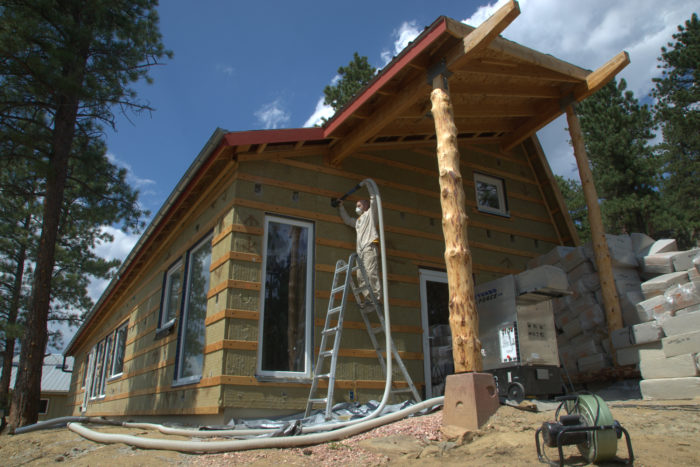
Image Credit: Images #1 through #5: Andrew Michler Exterior walls are 24 inches thick. Michler bought his own cellulose installation equipment because he couldn't find a contractor willing to dense-pack a Larsen truss wall this thick. The inner 2x4 structural wall is insulated with mineral wool batts. Over the Larsen trusses, Michler installed a layer of rigid mineral wool. With a combination of mineral wool batts, dense-packed cellulose and Roxul Drainboard mineral wool, walls have an R-rating as high as 85. The house is built over a crawl space rather than a slab or a basement. Stem walls are insulated with 2 3/8-inch-thick rigid mineral wool, and the I-joist floor system is insulated with blown-in cellulose. First, rigid mineral wool, then cellulose. After the 2 3/8-in. thick panels of Roxul Drainboard were installed over the Larsen trusses, the wall cavities could be filled with blown-in cellulose. Wall, roof and floor assemblies in Andrew Michler's Colorado guest house are insulated with a combination of cellulose and mineral wool -- but no rigid foam. This house was certified by the Passive House Academy. The 1,700-square-foot house in Santa Fe, New Mexico, called "VolksHouse 1.0," uses rigid foam insulation in roof and wall assemblies as well as under the slab.
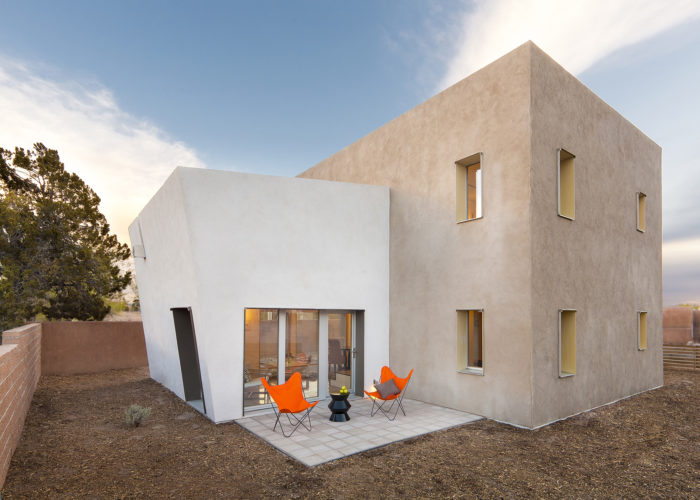
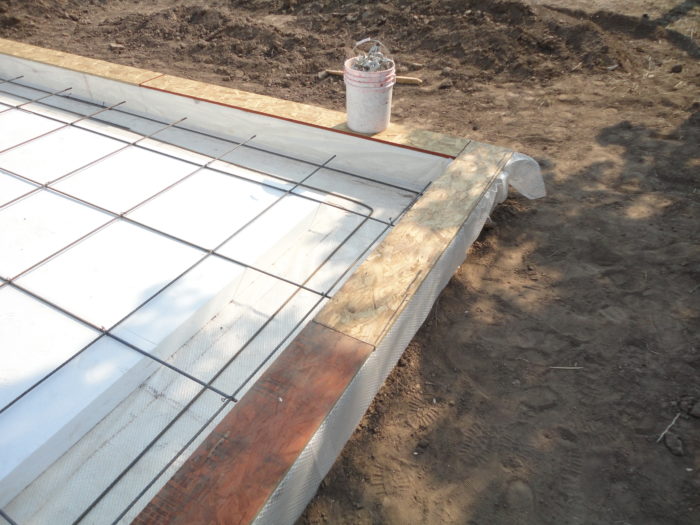
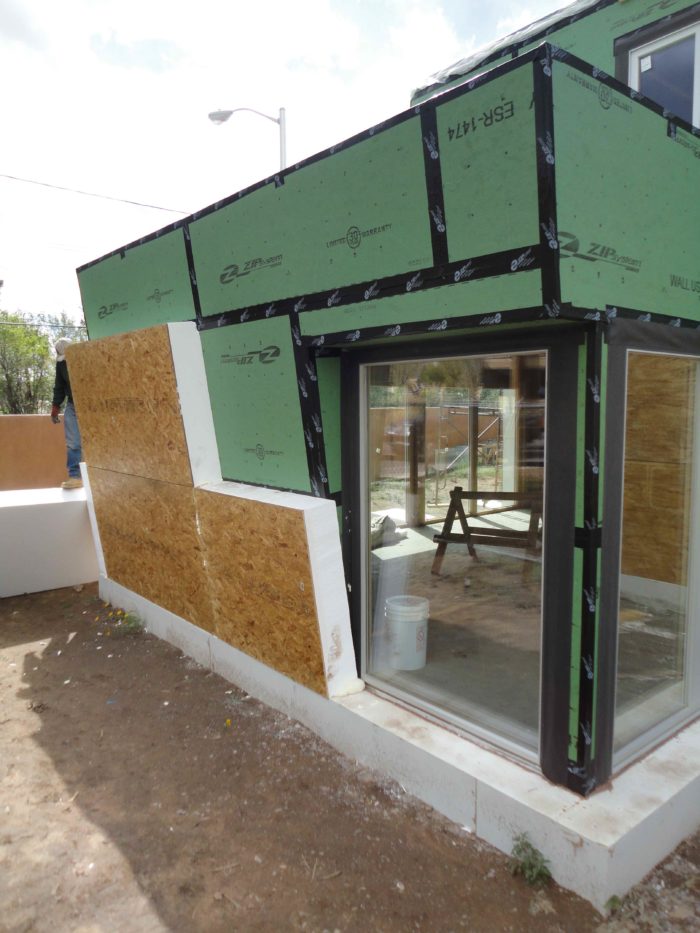
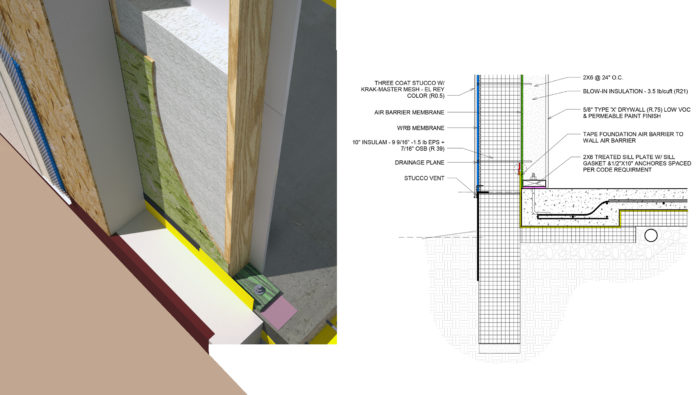
Image Credit: Image #7 through #11: Vahid Mojarrab, WAMO Studio The slab is insulated with EPS. Beneath the reinforced concrete slab are 4 inches of EPS insulation. The perimeter is insulated with 10 inches of EPS. The air barrier is in the middle of the wall. A taped Zip System wall between the 2x6 structural wall and an outer half-SIP is well protected from construction damage. The outer layer of EPS insulation is 10 inches thick. A combination of cellulose and EPS foam insulates the roof in VolksHouse 1.0. The walls in VolksHouse 1.0 use a combination of dense-packed cellulose and an EPS half-SIP for insulation. VolksHouse 1.0 in Santa Fe, New Mexico, met the criteria for a New Mexico "Emerald" rating, on a par with LEED-Platinum, as well as the Passivhaus standard.
More Green Building Blog


As difficult as it is to meet the requirements for Passivhaus certification, builders and designers have a great deal of leeway in how they approach it. There are just a few big hurdles to clear, including limits on how much energy the building can use and how airtight the building envelope must be.
Exactly how a builder accomplishes this is not spelled out. As long as the building meets the standard, it can win certification, either from the Passive House Institute U.S. (PHIUS) or its European counterpart, the Passivhaus Institut (PHI).
At the North American Passive House Network conference last month in Portland, Maine, two designers with very different outlooks detailed their Passivhaus projects, demonstrating that many roads can lead to the same destination.
One of them, Andrew Michler, took the unusual step of avoiding foam insulation in the house he designed in the mountains of Colorado: none under the slab, none in the walls, none in the roof.
The other, New Mexico architect Vahid Mojarrab, chose components made with rigid foam as a way of achieving Passivhaus performance economically and reliably.
Is one better than the other? It all depends on how you look at it.
For Michler, a first-ever Passivhaus design
Michler has been living off the grid in the mountains outside of Fort Collins, Colorado, for 20 years. He’s done lots of retrofit work, and built a few houses, but about five years ago, during a construction dry spell, he veered into consulting and writing. He hopes to publish a coffee table book on high-performance building sometime next year.
A few years ago, Michler interviewed William McDonough, an influential architect and writer who published a book called Cradle to Cradle in 2002 in which he advocates benign, waste-free design. The interview was pivotal for Michler. When he began designing a guest house for his Colorado property, one of the most important considerations became the selection of the materials that would go into it.
Foam insulation manufactured with petrochemicals wasn’t on his list. Although it’s commonly used in many parts of a high-performance house, Michler decided he didn’t want it. “McDonough makes a fantastic case that we really need to look at what a resource is, in general, and not just think about attributes but think about the long stretch,” Michler said by phone a week after the conference.
Time running out to make the right choices
What troubled Michler was “the legacy of toxicity” that foam insulation represented. He objects to its high embodied energy, the global warming potential of its blowing agents, and the extremely slow payback of using large amounts of it in a building. Spray polyurethane foam has more than 100 times the greenhouse gas potential as cellulose, he told a conference panel; expanded polystyrene has as much as 18 times the embodied energy as cellulose.
“What are the chemical impacts of what we’re doing right now?” he asked.
“The industry has kind of baffled us with bullsh**, the foam industry,” he said by telephone, “where they can kind of say, ‘We’ve done this better,’ while totally ignoring all the other science and other issues with their product and then call it green because it’s less damaging. The whole idea with Cradle to Cradle is that you don’t create products that are less damaging; you create products that are more beneficial.
“If we’re looking at turning around the ship, so to speak, we don’t have 60 years; we don’t have 15 years. We really have to start talking about the impact of our building sector at this moment,” he continued. “In that sense, I don’t see the race as a marathon, as we often talk about it for payback periods, but as a sprint from start line to finish line.”
The answer: Cellulose, mineral wool, and a crawl space
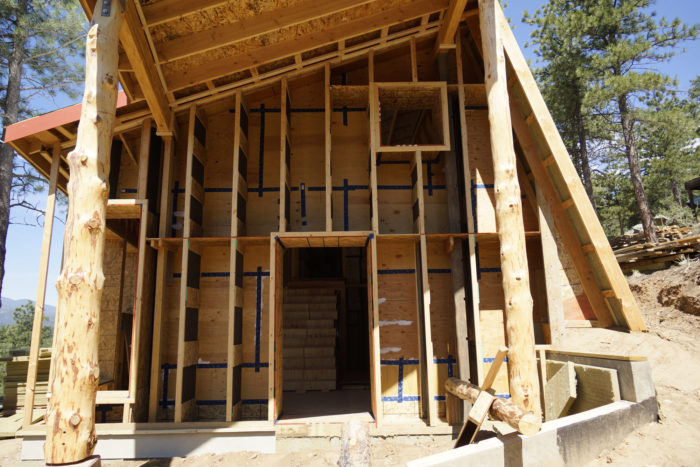
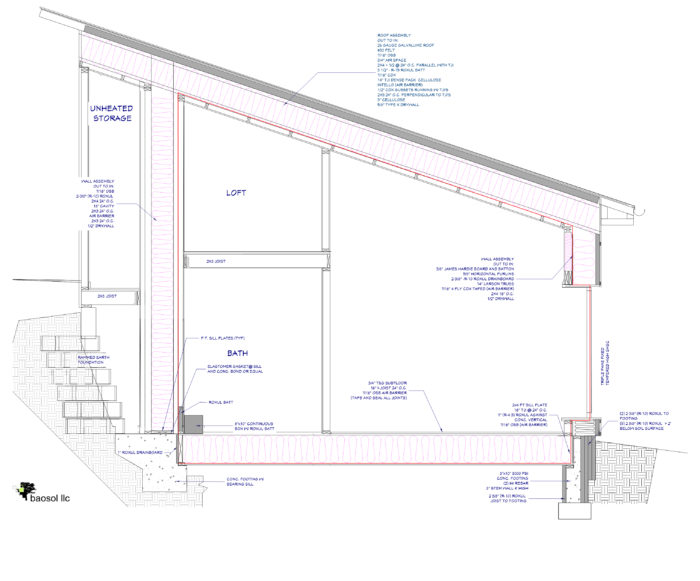
Michler’s two-story, 1,200-square-foot house in Masonville, Colorado, is built with 2×4 structural walls insulated with mineral wool batts, taped plywood sheathing, and 14-inch-deep Larsen trusses insulated with cellulose and Roxul Drainboard, a rigid mineral wool insulation.
Exterior above-grade walls are rated at R-65 to R-85, depending on how thick they are. Their unusual depth made it impossible for Michler to find an insulation contractor willing to dense-pack them with cellulose. He ended up doing it himself, using weed mat to contain the cellulose between truss cavities, and OSB shelves to divide wall cavities into spaces no more than 7 feet tall to reduce settling.
The roof, framed with I-joists, is insulated with a combination of mineral wool batts and cellulose to R-75 (see the section drawing for more details).
Michler built the house over a crawl space. The concrete stem walls are insulated on both the inside and outside with Roxul Drainboard to R-40, and the floor consists of 16-inch-deep I-joists insulated with blown-in cellulose to R-58. OSB provides the air barrier.
“A lot of people gave me hell for having a crawl space,” Michler said, because it raised concerns about moisture and mold. Although the crawl space will have to be monitored, the design looks viable in the relatively dry climate where he lives.
Other details:
- The windows are triple-glazed Intus units with a solar heat gain coefficient of 0.51 and a U-factor of 0.14.
- Whole-house ventilation is provided by an Air Pohoda heat-recovery ventilator connected to an earth tube.
- A 2-kW photovoltaic array (off-grid).
- Domestic hot water from a solar-electric preheater tank and a 92% AFUE Noritz on-demand propane heater.
- Heat comes from domestic hot water system, which feeds both a radiant loop in a wall separating the living room from the bathroom in the middle of the house, and a heat coil in the supply side of the heat-recovery ventilator. The HRV runs continuously, drawing 30 watts of electricity to move 62 cfm.
- A phase-change material called BioPCmat M51 is installed on two walls to help even out spikes caused by solar heat gain.
The blower door test measured air-tightness at 0.45 air changes per hour at a pressure difference of 50 pascals (ach50). Michler built the house for $220 per square foot.
In New Mexico, the aim is to compete in a spec market
If Michler had the luxury of working on a guest house on his own property, and the time to feel his way through some of the building details, Vahid Mojarrab faced a completely different set of challenges: How to build to the Passivhaus standard with a labor pool familiar only with conventional techniques, and do so quickly and efficiently enough to stay competitive on price.
Mojarrab knows the production housing market well. He’s built more than 1,200 houses in Colorado, New Mexico, and California but was first introduced to the Passivhaus standard five years ago in a training program in Champaign, Illinois. “It just made sense to me to be able to take advantage of the airtightness and some of the basic science to achieve a high-performance building,” he said by telephone a week after the Portland conference. “When I came back to Santa Fe, we started investigating how we could incorporate that.
“Obviously, the real estate market was in a downturn, so it was really hard to be able to go into the market with something so different and ask more money for it when people where looking around with really depreciated real estate all around the country, especially in our area.”
Mojarrab’s plan was to stick as closely as possible to familiar building practices so crews wouldn’t have to learn an entirely new way of construction. He had two other advantages: an investor named Bob Schneck who was wanted to collaborate with Mojarrab to advance Passivhaus building in the region, and energy modeler and “Passivhaus optimizer” Graham Irwin of Essential Habitat in California.
Start with typical local practice and work with that
Because of building requirements in Santa Fe, builders were already used to adding a layer of rigid foam insulation on exterior walls. “What we did,” Mojarrab said, “was to take that detail and just bumped it up.”
Instead of adding 2 inches of EPS, they added 10 inches of EPS in the form of a panel faced on one side with OSB — half of a structural insulated panel. The 2×6 exterior walls were air-sealed by taping the Zip panels before the SIPs went up, creating an air barrier where it would stay protected from plumbers, electricians, and other subs. With blown-in cellulose in cavities, and the 10 inches of EPS over the sheathing, total wall R-values are 61.
“It has to be taped; it has to be taken care of a little bit,” he said of the Zip wall system. “The construction approach has to adjust a little bit, but it wasn’t really a drastic measure. Nobody looked at our details and said, ‘We cannot build this. Oh, it’s so expensive.'”
Mojarrab placed 4 inches of EPS insulation beneath the slab. In the roof, he used another 10-inch thick, one-sided SIP in addition to blown-in cellulose in the I-joist framing for a total R-value of 97.
Mojarrab’s VolksHouse 1.0 (meaning “People’s House”) came in 6.5% below normal construction costs and was appraised for 35% more than similarly sized houses in the same area.
Some of the construction details:
- Domestic hot water: Solar thermal with an electric backup and an 80-gallon tank.
- Heating and cooling: A Mitsubishi Mr. Slim ducted minisplit heat pump rated at 8,100 Btu/hour for cooling and 10,900 Btu/hour for heating.
- Whole-house ventilation: UltimateAir energy-recovery ventilator.
- Windows: Optiwin. Southern exposure, solar heat gain coefficient of 0.63 and a U-factor of 0.11; east, north and west elevations, solar heat gain coefficient of 0.53 and a U-factor of 0.11.
The blower door test measured air tightness at 0.3 ach50.
Mojarrab built the 1,700-square-foot, three-bedroom, two-story house for $165 per square foot. It is certified by PHI and also won a New Mexico “Emerald” rating, which Mojarrab says is similar to a LEED-Platinum rating.
Foam was an important building component
Mojarrab’s decision to make rigid foam insulation integral to his design was an easy one. “The reason that we used the EPS for the performance of the building was that it was an easy way to get the performance very quickly,” he said. “We are dealing with production housing, so the people who are building the houses are not very sophisticated. They just put this stuff together.”
Using the half-SIPs on exterior walls was very familiar to the crews he worked with. “It’s the detail they are used to,” he said. “They’re not unfamiliar with it, so it can be executed again and again with great success.”
Mojarrab continues to tinker with his designs and reduced the amount of rigid foam insulation in subsequent designs. But he thinks it will be difficult to eliminate foam entirely, especially beneath the slab and in the roof assembly.
“As we are proceeding, we are really refining our walls,” he said. “I can’t argue with Michler or anyone else when they say that foam doesn’t have any place in their buildings, but at the same time I feel like I’d rather use it for insulation than burn it in my car. It’s available to us. Our builders get it. It makes a better building. Why not use it until we come up with a better solution?”
Then, too, there are the pressures of the production housing market in which Mojarrab is working. “What we try to do in all of our projects is to optimize it, to make every dollar count,” he said. “That’s production building. Every dollar counts in overall construction costs.”
Weekly Newsletter
Get building science and energy efficiency advice, plus special offers, in your inbox.


24 Comments
You dont need to overspend to get a beautiful Passive House
Just two days after the conference I ran into Vahid on the street in Santa Fe. The world is small and his work has been a great inspiration to me because of his ability to bring a fresh contemporary feel to Passive House.
I don't want to give the wrong impression that this is a price war. My project was my first and the learning curve and location bumped the price up. We designed and built a very conventional 2200 square foot house in Ft Collins afterwards using a very similar approach as the foam free one in this article which came in at $145 sq. foot. It certainly is nothing close to the VolksHouse in design but is right around the local cost point in the area. Probably the biggest influence in price is experience in Passive House design for now. When we get better at optimizing the design and having building crews familiar with the systems I believe the costs will level out quickly.
Passive House can be beautiful and affordable. Great article Scott.
Lessons learned, phase change
Andrew,
What would you do differently on your next build?
Also, I haven't read about any new phase change materials in a while. How is the bioPCMat working out? Would you use it again?
Great house, do you have any more pictures to share?
Thanks
Eric
Response to Eric West
Thanks Eric, design is a true labor of love. I originally was certifying through PHUIS but will be using Passive House Academy for this one, that would be the first thing I do differently. Over all I am happy with the results but we did way too much design in the field. The coordination between modeling, drafting, design and building is critical for a smooth project so each person has to give it their all and be able to trust one another. It was really hard to get that right on the first one (not to mention I was a newbie to Passive House designing). Since this was my own project I could pick up the slack but would look for an experienced and dedicated group, which takes time to build. There are a lot of pitfalls in Passive House design, I am not happy with how thick the end walls became but that is more for aesthetics reasons. We must have over 16 exterior surfaces modeled so that is too complex for a low cost build. There are tools like negative thermal bridging calculations we did not use so I may be over insulated.
The jury is still out for the bioPCMat. I think it helps with a small project from overheating (mine is set for 74f) and commercial where you have a spike in heat loads in various places. Designing for tuned thermal mass is notoriously difficult so without good apple to apples field tests tough to say what is happening. Although its fun to see the stuff change in the swing season as heat can build up quickly if there is no active shading. I spent about $600 for 200 sq feet so from a cost POV I would say its a luxury. I cool with the earthtubes and a bypass on the HRV so that was a better investment as it bumps up the efficiency too. I really wanted to try a lot of passive strategies with this project as it is off grid so a lot to learn when living in it.
Here are some more pics: http://baosol.com/martak-passive-house/ and the first in a series about the house I am writing on Inhabitat http://inhabitat.com/how-to-design-a-passive-house-off-grid-and-without-foam/.
Frost compression of Roxul Drainboard (Q4 Andrew)
I've read occasional internet scuttlebutt about Drainboard becoming incrementally thinner and less effective in exterior below-grade foundation applications due to inelastic compression the material during successive frost cycles. (One commenter stated it used be popular in Alberta, not so much after the frost compression issue became apparent.)
Do you have a work-around for preventing / mitigating that slow loss of performance over time?
Drainboard
That is new information for me and I would have definitely found a work around if I was very dependent on it below ground (in my project we are simply "bleeding out the cold" for a concrete lip that is going into the wall via therm modeling. Since we are talking about maybe 20" max below soil and a few inches in where frost cycle would occur on regular basis it would affect only the first layer or two of a build up. Now if thats all you got then its a problem. If that the case adding an extra couple inches at that level as just in case would be useful.
I used it to simplify my wall assembly above ground and because of it fire resistant and vapor qualities. I could only get my hands on a half truck load at a time so it was a one size fits all product. Good to stuff work with and didn't make a mess when cutting.
Love to see what Roxul has to say
More good NAPHN14 content
Scott - thanks for this great article. It highlights two more highly innovative presentations shared at NAPHN14, each representing two of the strong themes carefully cultivated at this event: materials and optimization.
We're about to share the link to many of the other great presentations given at NAPHN14. Attendees will receive this link first. It will then be posted on our event and NAPHN websites for general public viewing. I'll be happy to share that link with the GBA community at that time.
Many thanks again for your focus on the positive innovations happening around Passive House.
Bronwyn Barry
Larsen truss and solar DWH questions
Hi Andrew, Thanks for publishing all of this information, I really appreciate it!
Could you comment on a few details please?
1) It looks like it would be very hard to dense pack the cellulose through the holes left to fill the Larsen trusses. Can you talk about how the cellulose was packed into the cavities?
2) Based on the pictures it looks like you used some horizontal furring strips that were installed before the cellulose was installed. Was the intention there to help reinforce the drainboard? Along those lines, are there any concerns in regard to the drainboard bulging out when dense packing? Finally, would it be reasonable to use thinner drainboard (e.g., 1") in a similar use (exterior side of LT cavity); particularly in regard to the strength of the board.
3) Can you comment on the placement of the WRB (sorry if I missed this detail). Are you using the mineral wool (drain board) effectively as a WRB or is there something between the siding and the furring strips?
4) an you talk about the DWH system some more? It sounds like there is an electric HW tank with a propane instantaneous HW heater as a backup? How do you regulate when you use power from the electrical system versus propane?
Thanks again!
Chris
Response to Chris Barns
Chris,
It was difficult to get good information on dense packing of large cavities. Martin Holliday's interview with Bill Hulstrunk https://www.greenbuildingadvisor.com/blogs/dept/musings/how-install-cellulose-insulation was very helpful. The key is to get good access to every corner. Since a cavity is 7 feet tall max we bulk insulated with a 2.5" tube. Then we went back with a thin walled rigid 1.25 inch tube and dialed the material way back using a Intec Machine with twin blower motors at max. If we were within 12-16" of any area then it would properly pack to 3.5 to 4 lbs cu foot. No measuring of material as that would be too complex. I liked blowing through the Intello air barrierer better as we could feel the material and not overpack or miss a bay. Just take your time. We used Applegate Cellulose which was close by and we could order straight from the plant.
The furring strips do three things: Anchor the 2.3/8" drain board, provide a nailing surface for the siding (board and batt) and allow air flow to maximize drying potential. I did use some 1" drain board as well and it is dramatically flimsier. The 1.5" may work well on 16" oc with a WRB.
I could have used a WRB but, hey its Colorado. It will be sunny an hour after a downpour so we forgo it. Most places though I would install it on either over or behind the Drainboard and will and act as a windbreaker.
The electric hot water tank is a solar preheater using excess PV power which is typically 3-4kwh for a sunny day once the batteries are full. My PV charge controllers can be programmed to divert the load. I would like to experiment with a dedicated array just for a heating element as it is so simple. Back of envelope calc give me 15k btu for about 2kw array per day, not great but may work for most space heating and some DHW? I worry about legionnaires disease so if anyone has some suggestions let me know.
Passive House should not cost more, it will always cost less
Mojarrab's VolksHouse 1.0 (meaning "People's House") came in 6.5% below normal construction costs and was appraised for 35% more than similarly sized houses in the same area. Great first attempt. Since most North American Houses only have an average life of 32-34 years all homes built are a burden on our environment.
The is still a much better and faster way to build Passive House Envelopes and that is "EPS Composite Construction." You get Air Tight, Super Insulation in one step. The only difference is cost, it's less than half of wood frame. Because the entire surfaces of the EPS Foam are covered in Thin-Shell Concrete, the entire structure is water and fire proof. Finally, this combination of construction has the potential of lasting trouble free for 100's if not 1000's of years, now that's a good deal.
off grid domestic hot water
Andrew,
So I've actually spent the last couple days thinking about off grid DHW, as I fantasy-plan my own cabin. Here were my goals in designing a system: (1) minimize propane use, as it's expensive and I don't want propane giving off tons of humidity in my fantasy cabin; (2) minimize time the water spends in the legionella growth zone; (3) minimize expenditures on special use equipment (eg, no buying a 5000w inverter just to run an electric heater).
I have two ideas, both of which make use of a heat pump water heater, set to heat pump-only mode so that it draws ~500w rather than ~5000w. The water heater should be larger than you'd need for a conventional water heater, since the recovery is fairly slow. If you don't have the option of running a conventional element to speed things up, you'll definitely want to oversize the tank.
First idea is to build a drainback solar thermal space heater, like you see at builditsolar.com, and use it to heat the space the HPWH resides . That way you're making use of solar BTUs, essentially using the air as a really slow heat exchanger. Just size the solar thermal system to meet the cold air output of the water heater, so you break even. And you get to leverage your kwh in your batteries at a COP of about three. The key here is that the solar thermal heats the space, not the water. That way you don't really care when the heat gets into the room (and thence to the water), as long as it does at about the same time (within hours) as the water is being heated. And you don't have the classic solar thermal water heater problem of water that heats too slow, or indeed never actually gets hot enough to kill legionella.
The other feature I like about this system is that if you put your water heater in the same room as your solar batteries, you can use your solar thermal space heating and the chilling effect of the heat pump to keep your batteries at the proper temperature.
The second option, which may appeal to you, is to use a very small electric heater and heat the water in there with your spare kwh. Size it so that the spare power will get the water in the heater above 120 F relatively quickly, in case it sits there awhile. Put that heater in line before your HPWH, then let the heat pump do the easy work of keeping the preheated water at the right temp.
Thoughts?
Question for Andrew Michler
Very interesting project. Thanks for sharing it. I couldn't see from the section - what did you use for the floor of the crawlspace?
Response to David Hicks
David,
I think you are complicating things unnecessarily. On the question of solar water heaters and Legionnella bacteria, it's worth noting that the solar thermal industry is robust world wide, and has been around in the U.S. for about 100 years. The industry hasn't been sued out of existence because of Legionnaires' disease.
There are two possible explanations for this lack of litigation:
1. Having a secondary water heater set to 140 degrees F is all it takes to greatly reduce or eliminate the Legionnaires' threat.
2. The dangers of warm water have been exaggerated.
Almost all off-grid homes use one of three strategies to make domestic hot water:
1. A propane-fired water heater (either tank-style or tankless).
2. A solar hot water system.
3. A solar hot water system with propane backup.
Your idea of installing a heat-pump water heater in a room that has been preheated by an active solar space heating system is a Rube Goldberg device that you don't want to have to maintain. Moreover, your casual reference to a 500-watt load tells me that you may not be ready for off-grid living. In December, when the sky is cloudy for a week or two at a time, and the voltage on your batteries drops daily, a 500-watt load will start to sound scary. You certainly don't want to heat your domestic hot water with a 500-watt load -- not if you want your battery bank to last more than one year.
A third concession
I missed the first time reading that Andrew's house uses domestic hot water for space heating. I do not think my proposed system could keep up with those demands, even given the high levels of insulation.
Rube Goldberg water heating
Martin,
Two concessions to start with: first, yes the legionella threat may be overblown. The internet has a tendency to work itself into a tizzy over small threats. Second, I'm still very much in research mode, so I agree that I'm not ready yet to live off grid.
One of the premises of my solution was to minimize propane use as much as possible, ideally eliminate its combustion within the building envelope. My solar thermal space heating idea is more complex than propane heat, but a drainback system is not terribly complex, expensive, or maintenance-prone as a closed-loop system. It's not even as complex or expensive as a drainback water heating system! I believe the added complexity is worth it to remove propane combustion from the building envelope.
Solar thermal water heating is widespread, but I think even its biggest proponents would say it works best in warm climates, and acceptably in temperate climates. In truly cold climates, it doesn't work well in the winter (when, let's face it, is when you need it). Cold climate solar thermal users would be best served with an evacuated tube system, the costs of which start around $4,000. For that, you could buy about a kilowatt of PV, enough to run my HPWH at least a couple hours each day.
Of course, my ideas are, indeed, site dependent. What might work well in sunny-in-the-winter, lower latitude Colorado may not work in cloudy Vermont or Montana.
EDIT: Okay, I'm wrong. This scheme *could* work if you had some reason to go to zero propane use, but I somehow missed how cheap and efficient direct vent propane water heaters are. For a couple showers a day, plus some dishwashing, it does not seem worthwhile to spend the time and dollars to put together my proposed setup.
David- Off grid DHW
David,
DHW has been my boogy man for as long as I have lived off grid. I still use an atmosphere venting HW. Along with cooking it seem the toughest thing to eliminate fossil fuels. Because the space heating demand for PH are so low it brings up some interesting design options, mine was to combine a relatively inexpensive condensing on demand water heater with my hydronic heating system. This allowed me to add a cheap pre heating tank which I can easily upgrade in the future. I would never recommend this set up for a house that would need more space heating, the heat exchanger would scale up too quickly. The key with Passive House is alway try to simplify the systems or the costs needlessly up and you end up with this https://www.youtube.com/watch?v=ernhQr1Skb0. We saw a ridiculously complex PH DHW system in Maine with not one but three redundant systems which would rarely if ever be utilized.
Thinking about alternative systems one idea that I was intrigued by was hooking up a heat pump water heater to an in-slab water loop which was solar heated. It could grab all that excess solar heat on the south facing rooms in winter and if done right cool the slab in summer. Alternatively off-grid set your charge controller to divert and hook the condensing water heater to that. You would still need a back up propane system. I suspect a hard on off would ruin the compressor.
Malcolm - crawl space detail
We threw down pea gravel on to the ground and covered with plastic taped to the stem walls. I have a dedicated 4" ABS pipe and solar fan to create negative draft. I will monitor the crawl space humidity and if need be because I have acces from the storage area can add dedicated venting. The PHPP has the floor as modified earth contact so changes in temperature could affect the model (don't tell PHI). Crawl spaces are very common in the mountains and in the city in Colorado.
I learned to be more diligent when building a crawl space and when first installed run a big fan for months after dry in.
Larsen Truss question for Andrew Michler if I may please
Andrew,
Greetings from Ireland.
Can you describe the makeup of the 14" Larsen trusses please, including the depth of the rebate or dado to take the web.
I have not come across it before and it may just solve a problem I have for increasing the depth of loose fill cellulose.
I am familiar with "I" beams, joists but they are way too expensive for what I need.
Thanks.
Colm
Thanks Andrew
The house seems to do so many things well. Great project.
Colm - Larsen truss detail
The Larsen trusses are simple. We used 2x3" studs which are about $2 each here. They are spaced by OSB plates every 24" like a ladder. We used wood glue and 16g wide crown staples for sheer but truss nails or equivalent will suffice. The OSB is laid on the face of the 2x3, no need for a rebate. The weed fabric is placed between the 2x3 and OSB gusset. We built a jig where we could easily adjust the width. Much cheaper than I Joists and the fabric is important to let the air pressure escape evenly while dense packing.
More information on Larsen trusses on GBA https://www.greenbuildingadvisor.com/blogs/dept/musings/all-about-larsen-trusses
Cellulose equipment
Hi Andrew,
Great project.
The caption in photo #2 states you bought your own cellulose equipment, in addition to doing the work yourself. Any tips, comments or lessons learned on buying your own equipment, or doing the install with walls that thick? What density do you think you got with the 24" thick walls? Thanks.
cheers
Jason - Cellulose insulation
Jason. Thanks, we used a Intec Turbo Force HP http://www.inteccorp.com/turboforce/ which is actally manufatured about an hour drive from the project. It take 3(!)15 amp circuits to run the two blowers and hopper. First order of business is to get the right cellulose for denspacking. We used the Applegate loosefill http://www.applegateinsulation.com/Product-Info/Insulation-Products/Loose-Fill-Insulation/default.aspx which is dustier but packs very well due to the fines in it.
I did not measure density by weight but by stiffness of the install. Its less precise but easier to manage with all our bespoke walls. For a (really) deep cavity the idea is to compress the fluffed up material enough that when it naturally tries to spring back it becomes self supporting. We first bulk fill to save time. Afterwards we used a 1.25" ID thin wall stiff tube and set the material feed to about 1/4. As you pressurize with both blowers you need to get within a foot or so of the entire space to properly pack. So I will start in a lower corner until the blower whines (ie it can blow any more material. Then I pull back until it whines again, repeat- bottom then top then middle. Do this all through the cavity with the last section next to the hole so you don't have an issue getting the tube to where you need it. I know they got packed well because we had some deep wall cavities behind Intello which were very firm bottom to top. The advice I got from the sales reps were that I over packed them, but I think they were giving me bad information. Its not worth the risk to underpack, so budget the time.
Some of my cellulose got damp from storage and it really made the hoses clog. It is critical to have a nice hose reduction kit and learn how much material the smaller diameter hoses can take with the machine settings. Some days it can be a pain to keep them from clogging, others go very smoothly. I think its fun but you have to be a little crazy that way. https://www.youtube.com/watch?v=Q75eTXs9jIg&list=UUpFTNY2tZj_0ijbzkSjzTKw
Thank you
Thanks for the information, and advice.
cheers
Actually less expensive to construct?
From the original article above:
"Mojarrab's VolksHouse 1.0 (meaning "People's House") came in 6.5% below normal construction costs and was appraised for 35% more than similarly sized houses in the same area."
I would truly love for this statement to be true but I can not rationalize how adding 10" one sided SIPS, ZIP wall, solar hot water, an HRV, and amazing triple pane windows comes in for less money than a 2x6 wall with 2" of XPS, .30 windows, and a central furnace and AC testing out to 3 ACH.
I understand that as a successful home builder keeping the actual cost data confidential can be important but I have to opine that if the 6.5% savings number is untrue, it hurts all of us in the industry in setting false expectations with clients and buyers that a home that is significantly more durable, efficient, and in general much better built can magically somehow cost less than a 2012 IECC minimum code house put up by a tract house merchant builder competitor.
Response to Scott Sanders
Scott,
I had exactly the same thought you did. Something doesn't smell right about the claim.
Log in or create an account to post a comment.
Sign up Log in