
Image Credit: Fine Homebuilding
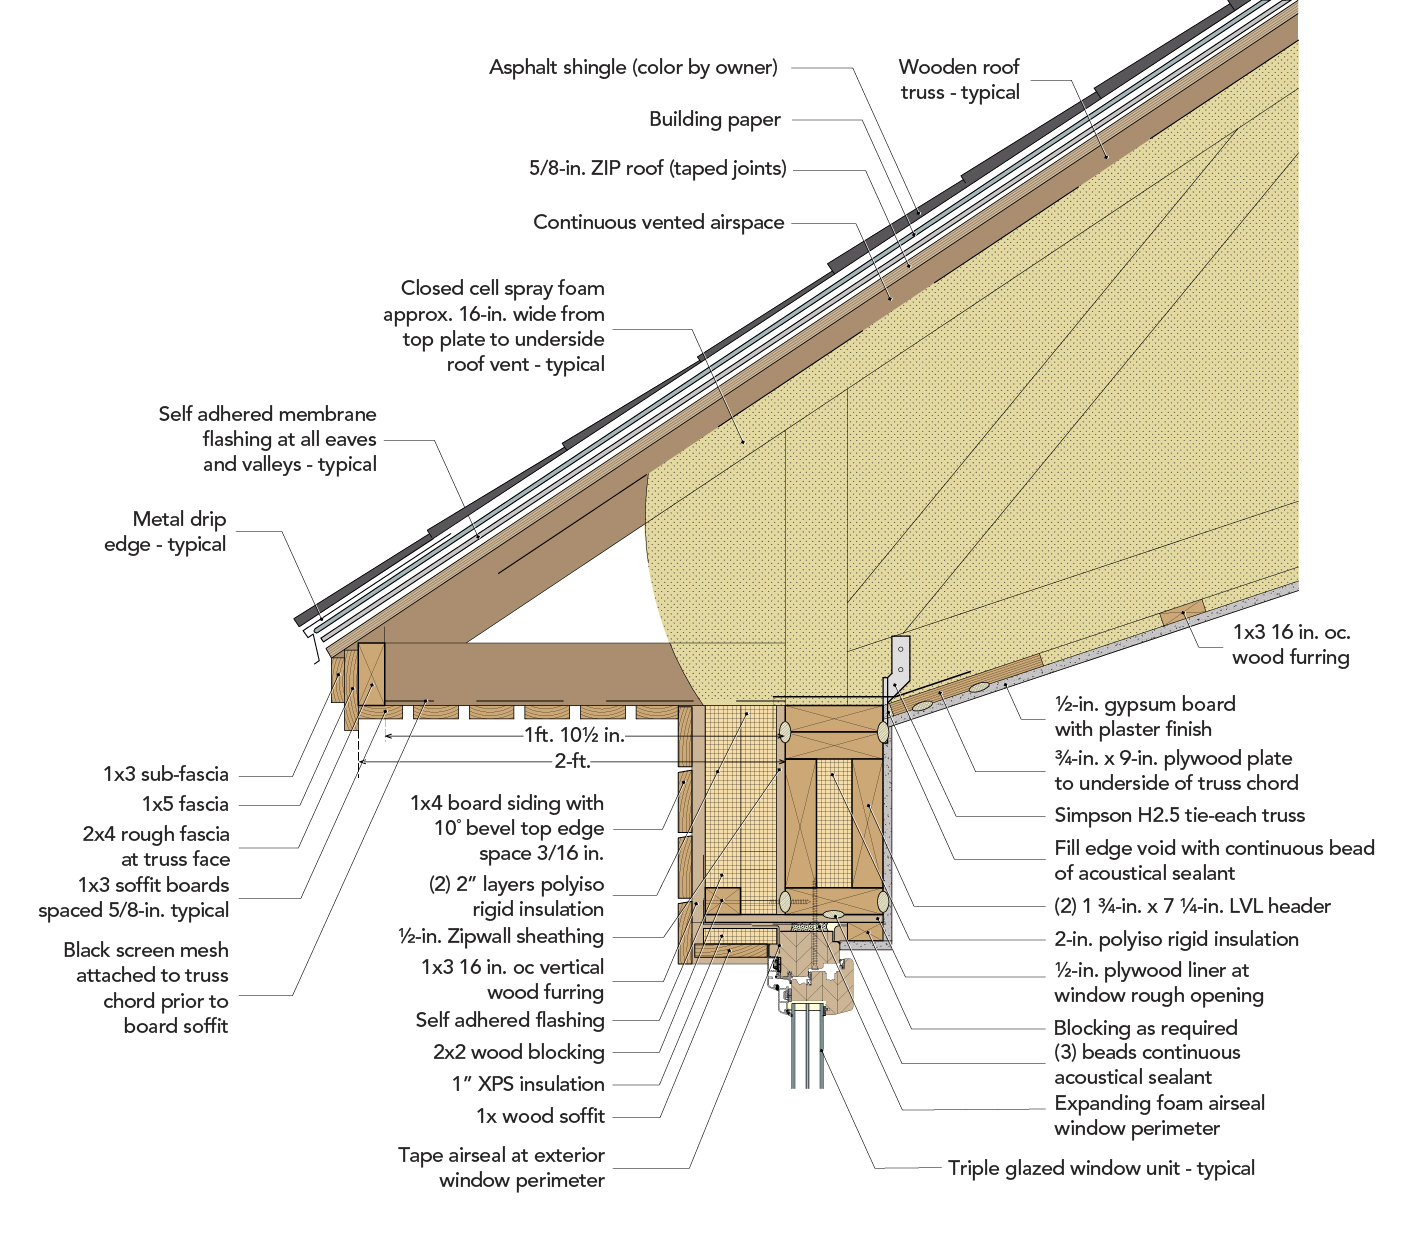
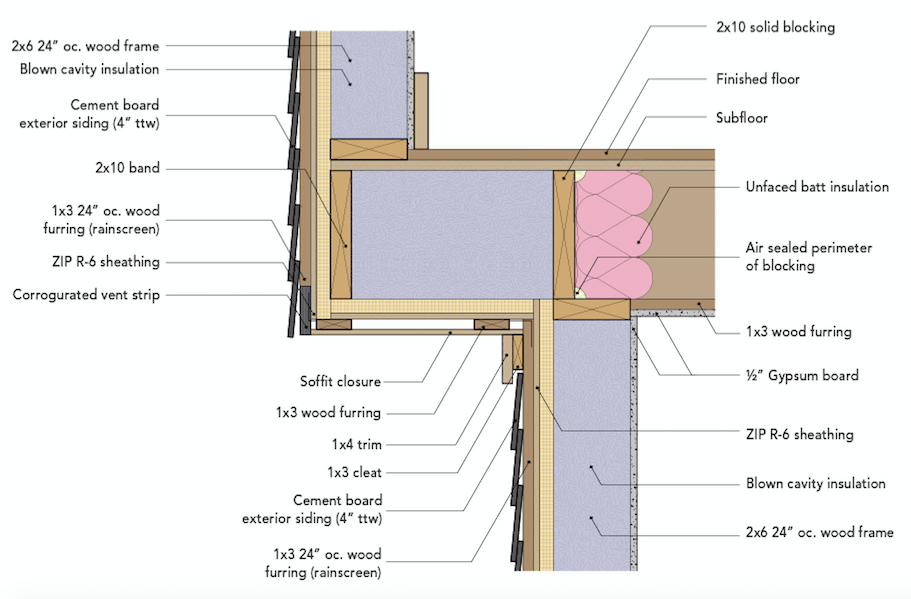
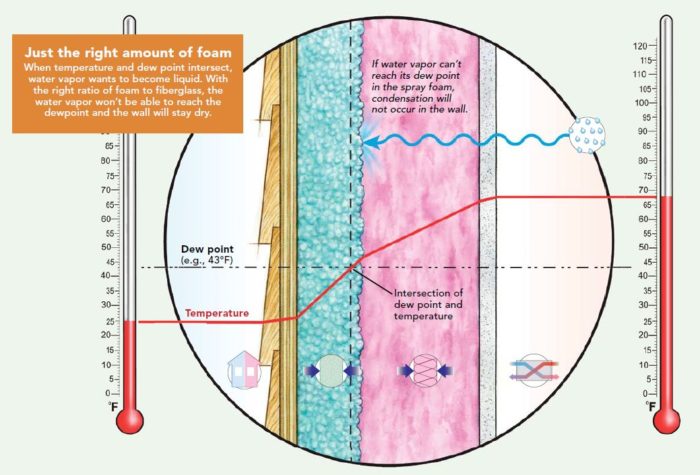
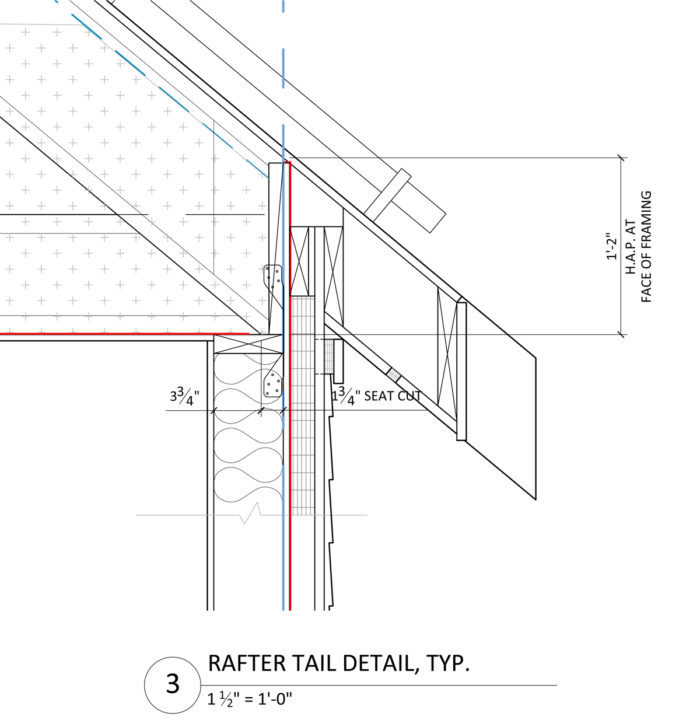
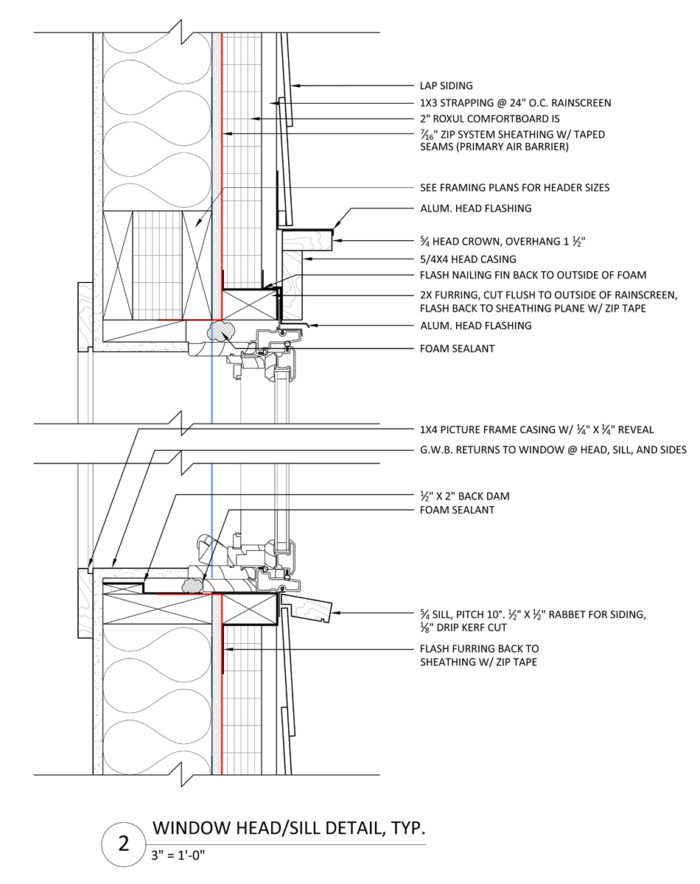
Image Credit: Fine Homebuilding A dew-point diagram for a flash-and-batt wall. This is not the ProHOME assembly, but it illustrates the same concept. (FHB image.) Rafter tail detail. Window head and sill detail.
More Green Building Blog


Editor’s note: This post originally was published as part of the ProHOME series at Fine Homebuilding magazine. Michael Maines is a Certified Passive House Consultant and residential designer based in Palermo, Maine.
When installed over an otherwise conventionally framed wall (or a wall built using advanced framing), continuous exterior insulation, also known as insulating sheathing, is a great way to improve whole-wall R-values and to keep the framing and sheathing dry. There are some tricks to choosing size and type of materials, though.
Depending on the situation, I use different wall systems. For low-energy new construction, the builders I work with often prefer either double-stud walls with cellulose insulation, or Larson-truss type outriggers with infill insulation over a standard stud wall. Both can work well, but they have their downsides, including cost, wall thickness, and water-vapor management. Many builders, including Mike Guertin, prefer continuous exterior insulation. Since builders seem to have strong opinions on which wall type they prefer, and I think they can all work fine if designed and detailed well, I worked with Mike to design a durable, efficient wall detail at the ProHOME.
The wall is framed with 2x6s 24 inches on center and insulated with fiberglass batts. The R-value of fiberglass batts is typically a bit more than that of cellulose and a bit less than mineral wool, but they’re all pretty similar. I have to say that fiberglass batts are rarely my first choice for insulation, but they are readily available and inexpensive, and in the right conditions — installed tightly in an airtight cavity with limited temperature differential across the batts — they can perform as intended. (The common assumption that they should not be compressed is wrong; if you compress them, their R-value per inch increases, up to a point.)
It’s important to have at least one really good air barrier somewhere in the wall assembly. It’s OK to have more than one air barrier, but it’s never OK to have more than one vapor barrier. I prefer to use vapor retarders rather than vapor barriers, as I’ll describe below. Air barriers and vapor barriers (or vapor retarders) can be one product that does double duty, or they can be dedicated layers. For the ProHOME, we are using one air barrier and two vapor retarders (the sheathing is acting as both a vapor retarder and the principal air barrier).
Detailing for Climate Zone 5
To meet code requirements for limiting vapor transmission by diffusion into the wall in Climate Zone 5, we needed a Class 1 or Class 2 vapor retarder on the interior, but with at least R-7.5 exterior insulation, the code allows a Class 3 vapor retarder. (Class 1 is 0.1 perm or less; Class 2 is from 0.1 to 1.0 perms; Class 3 is from 1.0 to 10.0 perms. Over 10 perms is considered vapor-open.)
CertainTeed is now selling kraft-faced batts with its vapor-variable MemBrain vapor retarder adhered to the kraft paper. The MemBrain normally blocks most water vapor diffusion as a Class 2 vapor retarder, but when the relative humidity reaches about 60% (when bad things can happen), it opens up to be vapor-open, allowing the wall to dry to the interior. With airtight sheathing, vapor movement by diffusion is not considered to be a major issue by prominent building scientists, but the MemBrain gives us insurance.
If we needed a functional air barrier at the interior, as some builders try to do with poly sheeting, then MemBrain in sheet form would be a better choice. Because we are using Huber’s Zip System oriented strand board (OSB) sheathing as the airtight layer for the walls, we don’t need to worry about the interior of the walls being perfectly airtight, although there would be no harm if it were a second airtight layer.
Zip System sheathing is denser and more airtight than regular OSB (I learned that the hard way on a Passive House project), and Zip’s tape system is now familiar to most contractors. Like other OSB products, though, it is more sensitive to moisture than materials such as plywood or solid lumber. That doesn’t mean it’s a bad product; just that moisture control needs to be considered when using any OSB.
The phenolic coating on Zip sheds liquid water effectively and is open to water vapor. Huber does not publish data for the actual vapor permeance of its sheathing, but standard OSB is usually between 1.0 and 2.0 perms, with some third-party testing finding that Zip is below 1.0 perm. The permeability of OSB and plywood sheathing varies with relative humidity, so it’s hard to pin down. In any case, the Zip panel can be assumed to be borderline between a Class 2 and Class 3 vapor retarder, meaning that it will allow water vapor to pass through, albeit at a slow rate. If the sheathing temperature is below the dew point of the air, the water vapor will condense out of the air and onto the surface of the OSB. Capillary action will then draw the moisture into the OSB.
Exterior insulation protects the sheathing
To reduce the chances of the OSB becoming saturated, our main defense is to keep air from flowing through the assembly, which we’ve already covered. The next defense is to keep the sheathing above the dew point by installing continuous exterior insulation. One of the key details of a wall with exterior insulation in Climate Zones 3 and higher is to make sure the proportion of exterior to interior R-value is high enough to prevent condensation most of the year. The exterior insulation keeps the sheathing warmer than the outdoor air, but insulation slows heat flow in both directions, so the cavity insulation keeps indoor heat from reaching the sheathing.
The 2012 IRC has a handy way to make sure the sheathing stays above the dew point most of the year: table R402.1.1, which shows the minimum R-value of cavity and exterior insulation. [Editor’s note: Strictly speaking, the previous sentence is inaccurate. For more information on this topic, see Comments #10 and #11, below, as well as a GBA article titled The 2012 Code Encourages Risky Wall Strategies.] For Rhode Island (Zone 5), it’s 13 + 5. In other words, a minimum of R-13 cavity insulation with a minimum of R-5 exterior insulation. What’s not clear from that table is that if you increase the levels of insulation, it’s very important to keep the proportional relationship the same, or to err on the side of additional exterior insulation. You can’t just keep code-minimum R-5 exterior insulation and bump the cavity insulation up to R-21; if you do, the sheathing will be too cold during a typical winter and condensation will occur.
For Zone 5, the relationship is 38% exterior to 62% cavity. We have R-21 cavity, which means that we need at least R-8 exterior insulation to control condensation. Table R702.7.1 supports this math, requiring at least R-7.5 for a 2×6 wall if you want to use a Class 3 interior vapor retarder.
We could have installed more exterior insulation; from an energy use point of view, more insulation is always better, but there are diminishing returns. Energy modeling showed that going from 2 inches to 4 inches of exterior insulation would save about 250kwh/year — less than $40 worth of electricity and less than the annual output of a single PV panel. I have designed Passive Houses with R-40 exterior insulation, so I’m not afraid of using too much, but considering the added expense and hassle of installing thicker rigid insulation, we opted to stick with 2 inches. At R-8 for the 2-inch thickness, we meet condensation-control requirements.
Choosing the best exterior insulation
With those decisions made, what should we use for exterior insulation? The most common exterior insulation is rigid foam, either XPS (extruded polystyrene) or polyisocyanurate (PIC). A third option is EPS (expanded polystyrene).
Although my feeling is that foam insulation is probably the best use for oil, in debating what materials to use, I argued strongly against XPS. XPS’s blowing agents are nasty — they stay in the atmosphere, and even though XPS insulation saves energy, in terms of global warming potential, XPS is usually a net loss to the planet, according to research by David White. Additionally, as XPS ages, its R-value decreases, and at useful thicknesses, it’s fairly effective at blocking the ability of the wall to dry to the exterior. In the plus category, it’s readily available, has decent compressive strength, and is easy to work with. Until the industry changes to the more benign blowing agents used for XPS in Europe, though, it’s always my last choice for insulation.

Polyiso has fairly benign, pentane-based blowing agents, and it is advertised as having a high R-value per inch, but with its usual foil facing, it is a total vapor barrier. Not only does its R-value decline over time, but it also loses performance as the temperature drops, just when you need it the most.
EPS is vapor semipermeable at thicknesses less than 3 inches, has relatively safe blowing agents, and stable R-value, plus it’s generally less expensive than the other options. It can be crumbly to work with, and it shares with XPS a brominated flame retardant that is not safe to ingest, but if I had to choose a foam, my first choice would be EPS. My second choice would be polyiso.
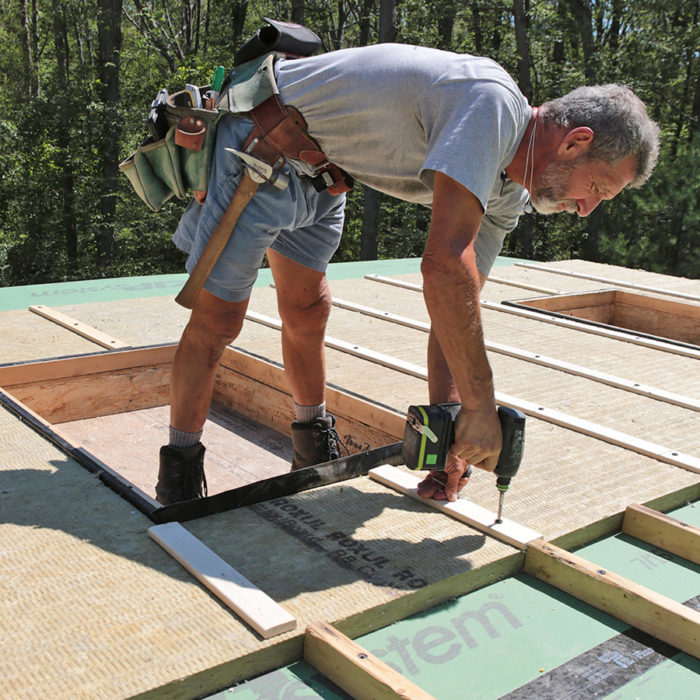
Fortunately, there is an alternative that is good for the house and good for the planet: rigid mineral wool, in the form of Roxul ComfortBoard IS (the IS is for “insulating sheathing”). It will keep the sheathing warm and dry, and it has low global warming potential and stable R-values. It’s a lot like a wearing a wool coat compared to a rain slicker. It’s a bit of a pain to install compared to the other options, but it’s completely vapor-open. Not only will it allow the occasional raindrop that finds its way past the siding to drain freely, but it will let the wall sheathing dry to the exterior if and when it needs to. Installed with 1x strapping, it makes an excellent ventilated rainscreen that is open to air movement at both the top and bottom of the wall.
Considering my obsession with managing water and water vapor and my strong desire to build resilient yet energy-efficient homes, I am happy with the ProHOME wall assembly.
________________________________________________________________________
Michael Maines is a residential designer in Palermo, Maine, and co-author of The Pretty Good House book.
Weekly Newsletter
Get building science and energy efficiency advice, plus special offers, in your inbox.


36 Comments
membrain and kraft
Isn't kraft paper already a smart vapor retarder? What's the reasoning behind attaching a second smart vapor retarder (the Membrain) to it?
On a related note, why not just use unfaced batts, as both code and building science seem so support their use in this situation? The paint on the drywall would be the required class III vapor retarder.
Thanks for sharing! It's always useful to hear how things shakeout in the field as to quantity of insulation vs payback.
Product choices
Brendan, some product choices were dictated by sponsors, as long as what they wanted to use did not conflict with good building practices. The idea with the MemBrain is that when properly taped it is also a decent air barrier. Mike Guertin and I both prefer to create the air barrier at the sheathing, in this case taped Zip, particularly as we were going for excellent air tightness (and achieved under 0.6 ACH50).
If you were not going for such high levels of airtightness, Taping the MemBrain-faced batts would be one way to create an interior air barrier. Kraft paper on its own is not a good air barrier. When using fiberglass insulation (which I am not as opposed to as some "greenie weenies") I do like to include a secondary air barrier at the interior, to fully seal the framing cavity, though some say it's not necessary. Drywall usually does the trick, especially when paired with Conservation Technology gaskets, but if you wanted boards or other air-permeable finishes on the interior, taping the MemBrain facing would be one way to seal the cavity.
The continuous exterior insulation is minimal, so there is some danger of the sheathing reaching the dewpoint for short periods. With thicker exterior insulation I would be less inclined to want an interior vapor retarder, but since we are on the cusp, I feel safer with a product that slows vapor transmission, and opens to allow free flow of moisture when relative humidity is high.
Desperate for approval
Guys, Im desperate for some way to confirm that the way im going to install walls and insullation is goint to be ok. Im a young home owner, first time buyer in the US. I had problems with my contractor and now I have to find out how to do things by myself. I live in Washington DC, lots of humidity.
My wall would be (from the interior to the exterior)
1) fiberglass (15″ Kraft – EcoBatts) faced to the interior of the house
2) spray foam closed cell 1″ BASF Spraytite
3) plywood
4) tyveck housewrap
5) roxul comfort board mineral wool 3″
6) 1 inch of air for ventilation
7) hardie planks
is this ok? could I suffer those water and condensation issues inbetween the walls that you talk about sometimes?
best and you cant imagine how much I appreciate your opinion on this
Pablo
Re: Product choices
Thanks for the explanation Mike! Being able to tape the MemBrain faced batts as an air barrier to improve the fiberglass performance is interesting, especially for folks who want to use finishes other than drywall. Do you feel like this is easier or cheaper than just using unfaced batts and sheet MemBrain?
Did you end up taping the MemBrain facing on the batts to form a secondary vapor retarder, or did you use it untaped?
--
Pablo:
A few questions that might help people help you:
- What's your interior finish? Painted gypsum board?
- How thick are your walls? 2x4? 2x6? Something else?
- Why the closed cell spray foam? You probably don't need it, but maybe it's for a specific reason that's not clear from your post.
- What is creating your 1" air gap? 1x4 strapping is commonly used, which creates a 3/4" air gap, which is a perfectly fine size of gap. 1" just stood out as an unusual number.
In general it sounds like you have the right idea. Just gotta sort out the little details.
Reply to Pablo
Assuming that you have 2x4 or 2x6 studs 16" on center (15" wide kraft-faced EcoBatts 3.5" or 5.5" thick, not 15" thick), then spray foam against the plywood sheathing...
Any wintertime condensation in the wall would occur at the spray foam on the inside next to the fiberglass, so the plywood sheathing would remain dry. Even with 2x6 walls, the interior insulation would be about R-19 + R-6 = R-25. The exterior ComfortBoard would be R-12. So the ratio is about 2:1 or about 33%/67%. That's more than good enough for DC area winters. The ratio even safer if you have less interior insulation with 2x4 studs. Total wall R-value would be somewhere around R-35 for 2x6 or R-27 for 2x4, after factoring in siding, drywall, air films, and thermal bridging losses through the studs. "Pretty good house" advocates might recommend that level of insulation for DC area. Also good that you have a vapor open continuous insulation layer of mineral wool since your foam layer is likely to be vapor closed except through studs, preventing drying out through the foam layer. Hope you find your owner builder work very satisfying when you have it all completed!
How difficult was it to stand up those walls?
It makes total sense to attach the exterior mineral wool before the wall is stood up but I'm thinking it makes for one damn heavy wall.
Response to Pablo (Comment #3)
Pablo,
Like Brendan Albano, I don't think you need the spray foam layer. If you want to cut down on air leakage, just tape the seams of the plywood sheathing with a high-quality tape.
-- Martin Holladay
approval
Thanks so much Brendan and Martin! I really appreciate it!
Response to Brendan
My opinion is that if a functional air barrier at the interior is needed, it would be easier with MemBrain or another membrane in sheet form, or with the airtight drywall approach, but that's based on my experience and others may find taping the MemBrain-faced batts an effective approach. They taped the batts on the ProHOME. This is a good overview of the insulation used on the project: http://www.finehomebuilding.com/2017/01/25/prohome-video-insulation-air-tight-house. (There is a short ad before the video plays.)
Table R702.7.1,not R402.1.1 for dew point control! (CAREFUL!)
"The 2012 IRC has a handy way to make sure the sheathing stays above the dew point most of the year: table R402.1.1, which shows the minimum R-value of cavity and exterior insulation. For Rhode Island (Zone 5), it’s 13 + 5. "
Not so!
Table R402.1.1 Chapter 4 is only about thermal performance, not dew point!
http://codes.iccsafe.org/app/book/content/2015-I-Codes/2015%20IECC%20HTML/Chapter%204%20%5BRE%5D.html
Dew point control R-values for the wall sheathing with only Class III interior side vapor retarders are found in Table R702.7.1 :
http://codes.iccsafe.org/app/book/content/2015-I-Codes/2015%20IRC%20HTML/Chapter%207.html
As it happens R13 + R5 c.i. happens to work for both thermal minimums and dew point control for 2x4 framing in Zone 5.
In zones 6-8 relying on Table R402.1.1 would fall short (sometimes woefully so) with the R20+ R5 c.i. option, even though R13+ R10c.i would still work (if only marginally in zones 7 & 8)
See Martin's prior blog pointing this out:
https://www.greenbuildingadvisor.com/blogs/dept/musings/2012-code-encourages-risky-wall-strategies
Good catch, Dana
And what I usually do because I usually design for zone 6, where the proportional numbers do not correspond. I'm not sure what I was thinking but will blame it on late night blog writing.
response to John (post #6)
I was also concerned about lifting a 50' long 2x6 wall with 2" of mineral wool on the exterior, but this set of wall lifts my friend made did the trick. Video here: https://goo.gl/photos/LuQat5f71seaX5vR7
Here's the company whose idea my friend adapted: https://www.wall-lift.com/
Just another general comment regarding using mineral wool over sheathing: To anyone considering this technique, I would advise that you do a bit of testing to see how far out you should build your window boxes before you frame up your entire wall. I didn't factor in how spongy some of the mineral wool is, especially at the edges, so my window boxes are generally sticking out 1/8" to 1/4" beyond my vertical furring.
Wall jacks
Mike Guertin, the builder (and owner) of the project, uses QualCraft wall jacks to raise the walls. They operate similarly to a pump jack. Mike blogged about it here: http://www.finehomebuilding.com/2016/08/22/wall-framing-tools-love-qualcraft-wall-jacks.
might pick a material designed for air and vapor control
If one is looking for a durable airtight layer inboard with robust vapor control, INTELLO Plus delivers tested and consistently strong results for both vapor control AND airtightness, as part of a complete system of smart high-performance assemblies. Disclaimer is that we sell the stuff - more info here: http://www.foursevenfive.com Cheers.
Smart vapor retarders
MemBrain and Intello Plus are two different brands of smart vapor retarder. They are similar but not identical. Both brands can act as an air barrier if properly detailed; both brands have variable vapor permeance.
Ken Levensen is one of the founders of 475 High-Performance Building Products, and as he noted, he is promoting one of the products he sells. GBA occasionally allows manufacturers and distributors to promote their products in our Comments section, but in general, we discourage the practice.
-- Martin Holladay
Re-insulating house questions
Hi,
I live in middle of Minnesota and am planning on residing my house this summer and am thinking this would be a good opportunity to add some additional insulation to the stud bays and the exterior. I have a few questions about types of insulation and condensation and dew point issues.
The house was built in 1958 with 2x4 walls and is located on the border of zone 6 and 7 (depending on the map). Current wall assembly is (from interior to exterior):
• Painted gypsum board
• About 1” of cellulose material with felt paper on each side (estimated R-3)
• 1x sheathing board
• Felt or tar paper
• Cedar siding
The plan is:
• Blow in cellulose or fiberglass insulation into the stud cavities. That hopefully will bring the walls up to about R-13 or so.
• Replace the felt with Tyvek house wrap on the exterior of the sheathing.
• 1.25” of Roxul Comfortboard mineral wool insulation R-5
• LP Smartside siding
If I do this am I opening myself up for future condensation and dew point problems? I realize that this is well under the suggested R levels for my zone, but this should be better than what I currently have.
It was also suggested I foam the stud cavities with an R-foam (from Applegate) instead of cellulose or fiberglass. While this would likely give a better R value and more air sealing, my concern is that it won’t allow enough vapor transmission. I think my plan should allow the wall to dry both directions.
Will this work? I appreciate any feedback you can give me.
Thanks.
Ward
intello vs membrain
a friend was finishing off a wall where he installed membrain on the studs with staples, then screwed the drywall to the studs. The wall was open on the other side. We could see that the drywall screws were grabbing the membrain and twisting and tearing it. Is this a common problem with membrain?
Is intello any better?
thanks
Intello vs. Membrain
I have not seen or heard of that problem. On the Prohome, Mike Guertin used Membrain as the primary air barrier at the ceiling, and was able to achieve under 0.4 ACH50, so I don't think he had many tears. If the membrane is serving only as a vapor diffusion barrier, a few holes don't make much difference anyway.
That said, Intello is a much more robust product. It's nearly tear-proof. Of course it costs more and is only available from one location in North America (https://foursevenfive.com/product/intello-plus/).
Response to Ward
Ward, Table R702.7.1 here: https://codes.iccsafe.org/public/document/code/362/6112168 lists the options for building walls with only a class 3 interior vapor retarder. With a 2x4 wall in climate zone 6 you need at least R-7.5 exterior insulation for condensation control; in climate zone 7 you need at least R-10 exterior insulation. R-5 Comfortboard is going to leave your sheathing vulnerable to moisture accumulation. Because Comfortboard is vapor-open, the wall should be able to dry easily to the exterior, but it would be safer to install at least R-7.5 to R-10 exterior insulation. I also strongly recommend including an air barrier on the exterior. Tyvek is not a good air barrier. I would step up to Henry Blueskin, Solitex Mento or Siga Majcoat as an airtight WRB.
My one experience using injection-applied foam was over 20 years ago, but it was enough of a disaster--blowing all of the drywall off the walls--that I have not attempted to do it again. At 10.6 perms, Applegate's product is vapor-open. Its R-value is only slightly higher than cellulose, without the hygroscopic and mold-resistant properties of cellulose. I would be inclined to use cellulose instead of foam in this situation.
Intello is more vapor tight than MemBrain
Both are decent products when properly used, but MemBrain becomes vapor open at a lower proximate RH level than Intello, and isn't quite as vapor tight at 30% RH. That means MemBrain allows more vapor diffusion into the wall cavity over the winter than Intello, but it lets it out quicker too.
A small tear at a drywall screw penetration isn't usually an air leak of any consequence, since it's under compression by the screw, clamped by the wallboard (which is very air retardent.) Moisture transport via diffusion is also a function of total area, which is also quite small in this senario.
intello vs membrain
it makes sense that this problem wouldnt be known because most wall cavities are not open on the back side when membrain is installed, and it was described more like the membrain was wrapping around the screws as they were set making big holes (like if you have ever tried to set a screw wearing latex gloves aggg!), but cant argue with .04ach50! could be installer problem or something
Reply to Michael - Re-insulating house questions
Michael -
Thanks for the reply. Would installing only R-5 exterior Roxul insulation be worse or more vulnerable to moisture accumulation than if I didn't install any exterior insulation over the R13-15 cellulose filled wall at all?
If I install 1.5 or 2" exterior Roxul I'll need to use furring strips. The LP SmartSide instructions says to use 2x4 furring to ensure 1.5" nail penetration. I see that in the above article the ProHome is using 1" furring. Is 2x overkill and 3/4" furring sufficient?
Thanks for your help!
Ward
Response to Ward Lenius
Ward,
Adding a continuous layer of mineral wool insulation on the exterior side of your wall sheathing -- of any thickness -- will not cause any moisture problems, and will improve the thermal performance of your wall. So adding the Roxul won't make things worse; it will make things better.
You need to follow the installation instructions of the siding manufacturer. If you prefer to use 1x4 furring strips instead of 2x4 furring strips, you should choose a different brand of siding. Lots of siding manufacturers will allow their products to be installed on 1x4 furring strips.
-- Martin Holladay
Response to Martin
Martin,
That's what I was thinking. Thanks for the confirmation.
Also curious as to venting/bug and rodent screens at the top and bottom of the Roxul insulation. Are there other options out there other than using Cor-a-vent?
Thanks.
Ward
Screening
Ward, I'll jump in again: Cor-a-vent works well at those locations, but you can also use insect screening. The IRC code calls for screening at soffit vents to be metal, not fiberglass, and that's what I recommend for rainscreen gaps as well. I also know people who have left the gaps totally open, without problems, but it's safer to use something to discourage critters.
Regarding siding, on a couple of occasions I have gotten written permission from siding manufacturers to use something other than their specified furring thickness or spacing, but clearly it's best to follow instructions.
Ward
As Michael wrote, metal flashing is the preferred choice. We use perforated stock like this in various profiles:
http://www.menzies-metal.com/building-flashing/perforated-l-channel-rain-screen-high-back
Insect screening is too vulnerable to damage and has almost completely disappeared from rain screen assembles here in coastal BC.
The advantage of the metal over Cor-a-vent is that you can get an appropriate profile fabricated to wrap the bottom of any cavity.
Screening
Thanks for the advice on the metal flashing. Are the 1/8" holes sufficient to the insects (hornets) from entering? Or do you add some type of insect screen as well? Or can I just but the Roxul right up to the metal flashing?
Thanks again for all your input!
Ward
project sponsors
It seems disingenuous for Martin to write
when this project was clearly the result of sponsor promotions/donations. I am personally trying to compare the wall assembly presented here with a cantilever TJI filled with dense pack cellulose assembly. So much comes down to cost, and I have found that rock wool boards are quite expensive. To present the wall assembly shown as the product of deep thinking when it may have been the product of sponsorships is disingenuous. Perhaps there is a list of project sponsors? This would be helpful both for finding the products presented and for determining if the design decisions may have been influenced by cheap access to otherwise pricy materials.
It does change the equation when cost is not a factor
But every project has criteria other than lowest cost. Pretty much everything on the ProHome is used as an example of good building practices.
For example, I think the very best assembly available is TJI outriggers filled with cellulose. It's a great way to build a Passive House. In fact at our first meeting I suggested using that system, panelized from Ecocor. I also use double stud walls. But we wanted to show something less "niche," and the owner/builder, Mike Guertin, prefers exterior insulation in sheet form. In any case, after energy modeling, our options came down to a single layer of rigid foam or mineral wool. Most foam has bad blowing agents and I don't think the vapor-closed nature is the most resilient assembly, so I argued for vapor-open, environmentally friendly Roxul Comfortboard. It is not the lowest cost solution but not outrageous either, if your goal is environmental stewardship and resilient buildings. Several manufacturers would have been more than happy to provide rigid foam on the exterior so it definitely wasn't a money decision. I'm drawing a project now with recycled foam on the exterior, but that's because it needs to be as inexpensive as possible and it's something the owners can pick up and help install. I would not waste new foam in a situation like this unless there was a good reason to--such as a current Passive House project I'm working on, where we have super tight lot lines, so the walls need foam for the highest R value per inch.
I don't normally spec fiberglass insulation, as I wrote in the blog above, but mainly because I have ready access to cellulose installers. Cellulose is best installed using specialized equipment, and the vast majority of projects get fiberglass insulation, so we wanted to show what is important when installing it.
The same process was true for all of the major parts and pieces. European-style Passive House windows perform the best, but they would have been overkill for what we needed, so we looked at American manufacturers. I have used a lot of Marvins over the years so they were at the top of my list. There are lower cost windows with similar performance but not the same look or track record.
The mini-splits are Mitsubishi because both Mike Guertin and I are very familiar with them, they fit our needs well, and they agreed to sponsor the build. But I spec them on every low-energy project, without sponsor money, because they are efficient and flexible. Fortuitously we got to show three different distribution methods, but it wasn't for sponsorship reasons--it was just what made the most sense for the project.
The ventilation equipment is top of the line Zehnder, which I'm familiar with from Passive House projects and advocated for. Their Comfotubes are much easier to install than conventional rigid ductwork, their core can swap between ERV and HRV which solved a dilemma over which to use, they are more efficient than any other unit available in the US, and they have excellent customer support, including duct layout services. They do cost more, so I often use less expensive, less efficient brands, but Zehnder is simply the best. If top notch ventilation is not a priority for you, choose a different brand or method.
I could go on. In fact, please feel free to ask me the reasoning behind any of the products we used. Here is the list of sponsors: http://www.finehomebuilding.com/2016/05/12/prohome-sponsors.
Ward
Sorry I didn't see your post. The only thing I've seen get through the holes are very small sugar ants. They are so small they could probably find a number of other ways in if they couldn't access through the perforations.
Response to Ethan T (Comment #28)
Ethan,
You wrote, "It seems disingenuous for Martin to write, 'GBA occasionally allows manufacturers and distributors to promote their products in our Comments section, but in general, we discourage the practice,' when this project was clearly the result of sponsor promotions/donations."
You make an extremely important point, for which I thank you. You are right to be suspicious of any endorsement of products that were donated by manufacturers. This is a slippery slope.
I'm tempted to leave it at that, but I'll say a little more.
1. As an editor, I've gotten into trouble for blunt statements about products and marketing materials developed by companies that advertise on GBA. In spite of the heat, I haven't backed away from my bluntness.
2. The ProHome series is reprinted from Fine Homebuilding, a magazine with a different editorial stance than the one established on GBA. That said, I take responsibility for deciding to reprint articles from the ProHome series. The articles are valuable.
3. I know Michael Guertin and Michael Maines. Both Michaels have integrity. They are straight shooters.
4. Please continue to keep us on our toes by challenging us on these issues. You keep us honest.
-- Martin Holladay
thank you, respectively
Michael and Martin, thank you, respectively, for your detailed replies. It is fortuitous for me that this conversation came about just as I am deeply embedded in a cost estimating exercise comparing a 2x6 wall + exterior rockwool (https://www.greenbuildingadvisor.com/community/forum/plans-review/101444/roofwall-connection-pretty-good-house-zone-5a-cold-6000hdd) wall assembly with the same basic build using larsen trusses and dense pack. I know that as Martin writes in response to my comment here (https://www.greenbuildingadvisor.com/community/forum/energy-efficiency-and-durability/26361/stone-wool-versus-blown-cellulose-insulation-) that costs are intensely local... so I have reached out for quotes for material and labor for both. I have also become more cognizant of the actual hygrothermal benefits of cellulose... so may go with the cellulose if all else is relatively equal. I'll be happy to share what I learn with this community as the estimates begin to come in.
single layer of rigid foam or mineral wool
Michael, you commented on your project using a single external layer of rigid foam or mineral wool. Did you end up doing this and we're you able to do so minimizing the gaps at the seams of a single layer?
Cheers
Tim
Tim, yes, on the ProHome,
Tim, yes, on the ProHome, Mike Guertin installed a single, 2" layer of what is now branded as Rockwool Comfortboard 80 on the exterior. I've also had projects with a single layer of exterior foam, including one under construction right now, and one about to start that will have Zip-R insulating sheathing. I have not seen any problems getting the exterior insulation to fit reasonably tightly together, but one advantage of the continuous exterior insulation approach is that an occasional gap in the insulation is not a disaster, as you still have the interior insulation as backup.
single layer of rigid foam or mineral wool
Hi Michael, thanks for the quick follow up. That's good to hear. My concern was that a gap in the exterior insulation would be a prime location for moisture issues (although with an airgap to the exterior siding and Zip system siding below the exterior insulation I suppose there would be little airflow to the gaps).
I've been mulling the zip-R as well, but feel a little uncomfortable about the sheathing being sandwiched between the air/moisture barrier on the outer surface and rigid foam (that's basically another air/moisture barrier) on the inner surface. Seems like if moisture were to find a path in it would not really have an avenue to dry out particularly well.
Tim, having an airtight layer behind air-permeable exterior insulation is important; if you don't have that, then I agree that gaps in the insulation could be a problem. I share your concern about Zip-R, and don't consider it the best or most resilient approach. There are many ways to make it work well, though: use ventilated cladding so the wall can dry to the exterior; use a vapor-retarding interior membrane or painted drywall, installed to be fairly airtight; control indoor relative humidity; use a hygroscopic insulation (dense-packed cellulose); make sure the seams are well-sealed with tape or liquid flash so they don't leak air.
Log in or create an account to post a comment.
Sign up Log in