
Image Credit: Fine Homebuilding
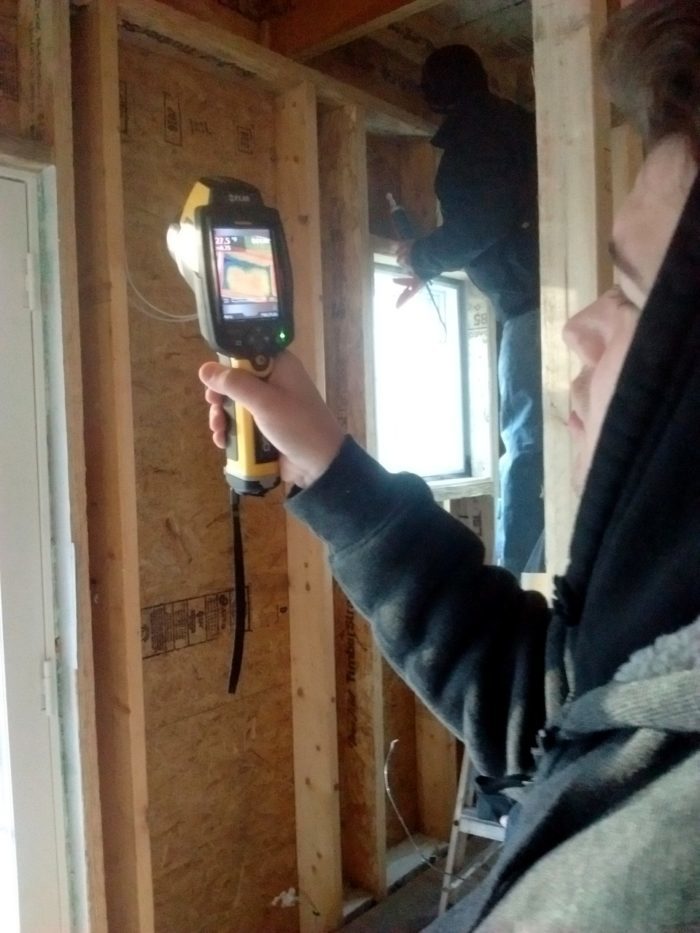
Image Credit: Fine Homebuilding On a particularly cold day, it was easy to find air leaks by using the infrared camera. Blue areas in the infrared image indicate incoming cold air.
More Guest Blogs


Editor’s note: This post originally was published as part of the ProHOME series at Fine Homebuilding magazine. Mike Guertin, an editorial adviser at the magazine, is building the house in East Greenwich, Rhode Island.
As we framed the house, we air-sealed as much as we could without the assistance of a closed envelope that could be pressure-tested with a blower door. We sealed the mudsill joints between the foundation and the Zip wall sheathing using ProtectoWrap Triple Guard sill seal, the sheathing joints with Zip System tapes, and the top of the wall sheathing to the top plates and blocking with Titebond acoustical sealant.
We installed CertainTeed MemBrain as the air barrier on the ceiling of the second floor and sealed it to the exterior top plates with Titebond WeatherMaster Ultimate MP sealant.
Now it’s time for the blower door
Now we’re at the stage where we need a blower door to exhaust air out of the house, creating a pressure differential between the inside and the outside.
This differential will cause air to leak into the house through all the holes we missed during our initial air-sealing process, so that we can locate them and seal them up. And since the house is just framed, with the utilities roughed in, now is the best time to check for leaks. Once the interior insulation and drywall are installed, it will be harder to access air leaks buried inside wall cavities or the top floor ceiling.
Cameron, Matt, Brandon, Derek, Ryan, Damian and Addison [students at the Warwick Area Career & Technical Center] worked with me on the air-sealing work during three mornings for about 90 minutes each day.
On the first day, the first pass on air-sealing focused on the top floor, sealing up leaks in the MemBrain and along the top plate of the exterior wall. We hit the big leaks. Matt used a Flir IR camera to hunt down air leaks that showed up as blue streaks along and between different building materials. It was a particularly cold day, so the IR contrast was good. As Matt located suspect air leak areas, the others sealed them up using tape and sealants.
On the second day, they looked for more leaks, with Cameron handling the IR camera and others feeling with their hands for smaller and smaller leaks. Derek and Matt took on the task of sealing the basement slab to the foundation wall. Sealing this gap is important not only to stop air from leaking in but also to block radon gas and soil moisture from entering the house.
Each day the students checked the blower door reading, which is shown as CFM@50pa (cubic feet per minute at a pressure difference of 50 pascals). They checked this number when they began and again when they wrapped up as a tally of their progress. And each day the numbers fell: 390 to 340 to 270 and finally 195.
In order to get an accurate CFM reading without the manometer blinking ‘LO,’ they had to crank up the fan speed and pressure differential up to 100 pascals, which induced the air leaks to whistle, making them easier to locate.
The students calculated the volume inside the air control layer of the house and from that volume calculated the air changes per hour (ACH) at 50 pascals as 0.47 ach50. And there are still more spots to air seal.
Air-sealing is one of the few parts of home building where we can use measuring equipment to assess and quantify our work.
MemBrain blocks air movement into the attic
One of the most important steps in the project was sealing the living space from the attic. The second-floor ceiling has to be installed in an airtight fashion. On this project we’re using CertainTeed’s MemBrain “smart” vapor retarder to block air from moving between the living space and the attic. To look at it, you’d think it was ordinary polyethylene plastic. But MemBrain has variable permeability; it permits moisture vapor to move through while blocking air movement.
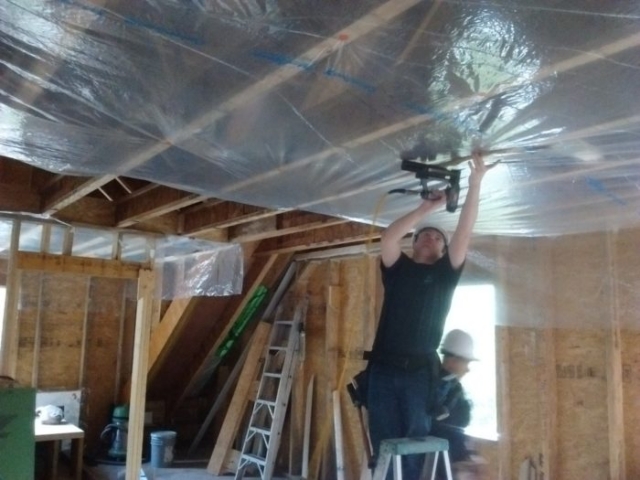
Cameron, Matt, and Derek used cap staplers to tack the MemBrain sheet to the ceiling joists. Cap staples are better than using hammer-tacker staples when you’re trying to minimize holes. The caps help protect the sheet from being damaged by the nose of the stapler. And the caps prevent the MemBrain from tearing out at the staple legs and crowns.
After the sheet was tacked up, the crew nailed 1×3 furring strips over the MemBrain. The furring strips serve a couple functions: they hold the MemBrain in place; they protect the material from damage when the interior partition walls are erected; and they create a space where some wires can be run without penetrating the MemBrain.
The MemBrain still needs to be tightly sealed to the exterior wall plates and to a strip of MemBrain that Bruce and I positioned over the center bearing wall before placing the ceiling joists. The crew used TiteBond’s WeatherMaster Ultimate MP sealant. It’s super-sticky and bonds well to wood and plastics.
After the windows and doors are installed, we’ll use a blower door and smoke to find any leaks in the MemBrain and seal them with tape or more WeatherMaster.
CertainTeed batts help control moisture
The exterior walls of the ProHOME are insulated with CertainTeed’s SmartBatt R-21 fiberglass batts. Some builders shy away from fiberglass batts, especially when trying to build an energy-efficient home. But installed correctly and coupled with a tight air-control layer, fiberglass batts perform well. The attic received 22 inches of CertainTeed’s InsulSafe blown-in fiberglass for an R-60 blanket.
I had planned on installing the insulation myself, with some help, but CertainTeed sent some of their building scientists and installation trainers to do most of the installation.
The first thing they did was conduct a blower-door test to check the airtightness. I think they were surprised at how tight the students got the house at the framing stage: 0.40 ach50. [That’s tighter than the Passivhaus standard requires.]
It took about two days to complete the insulation. Cameron and Damian and I worked one morning installing batts in the basement. Neither had installed insulation before. After just cutting and installing one stud bay they had the routine down and finished half a wall.
When the insulation was complete and CertainTeed re-tested the airtightness of the house, the blower door result came in a little lower: 0.39 ach50.
Two days after the insulation was complete, outdoor temperatures plummeted down to the low single digits at night and barely broke 20°F for daytime highs. I just turned on the Mitsubishi minisplit wall unit in the basement to 61°F and the whole house warmed right up to the mid- to upper-50s. If this is any indication, the insulation system is working great.
In the following video, representatives from CertainTeed explain how the batt facing keeps moisture out of the walls in winter and allows any moisture accumulating inside the walls during the summer to escape.
.
[Editor’s note: Although Drew Brandt says in the video, “There’s a lot of moisture in the [interior] air in the wintertime. That moisture has to go somewhere,” Brandt’s statement isn’t accurate. The moisture doesn’t really have to go somewhere. The moisture can stay right where it is.]
Weekly Newsletter
Get building science and energy efficiency advice, plus special offers, in your inbox.


8 Comments
titebond acoustical sealant
After being unhappy with the strong and lingering smell of Tremco acoustical sealant, I was interested to read about the Titebond alternative. The web page for it says,
After that suspenseful buildup, I was curious what the SDS would say. But it says only things like, "No hazardous ingredient," and "No known significant effects or critical hazards." Why should one avoid breathing the vapor, if there are no hazardous ingredients?
Perhaps the warning is overstated, but the SDS is certainly less forthcoming than I would like. Nonetheless, it's still probably a much better choice than the Tremco stuff which is partly based on "residual oil," which is the mix of nasty hydrocarbons left in the bottom of the reactor after crude oil is refined.
The "Weathermaster Ultimate MP" product has a slightly more specific warning,
Again, the SDS isn't very helpful, but at least it lists one specific hazardous ingredient, "Allyl Terminated Polyether." I would prefer more complete information, but I imagine it's fine as long as you have some significant ventilation during application and curing (which you might not when you are sealing the final crack in a mostly air-tight small house).
Probably the methanol is all gone after about a day, and smell and possible health effects will not linger as they do with Tremco sealant.
Just R-21 on the walls?
Are you planning on rigid insulation boards on wall exterior?
R-8 mineral wool exterior insulation
Ethan, we used continuous R-8 Roxul Comfortboard on the exterior. Energy modeling showed minimal savings with thicker insulation. You can read more about it here: https://www.greenbuildingadvisor.com/blogs/dept/green-building-blog/thermal-and-moisture-control-layers.
Titebond Acoustical Sealant
I've used this product extensively on my DIY remodel. This product is less than half the price of the similar product from Tremco. It also cleans up easily with water and it does not have an odor. It does not remain sticky after it dries. However it is mislabeled when they call it an acoustical sealant. It really isn't because it dries hard and does not remain pliable. Anything you use it on for sealing will likely have to be partially destroyed to separate the parts if you've let them set for more than 3 or 4 hours. It really stick pieces together hard as though they were glued.
Thank you Michael, I read that article. was cost a factor?
I have seriously looked at your wall assembly but have found rock wool to be pretty expensive, so I'm now looking at an all cellulose assembly. How much did cost factor into your decision making? Did you find the installed cost of rock wool comparable to the installed cost of cellulose (dense pack)?
Ethan, I think I answered your question on the other thread,
but briefly, cost was a factor, in that we didn't want to show anything we wouldn't use ourselves. But absolute lowest cost was not a priority, as there are always extenuating circumstances. At least there should be if you're building good houses! Mike Guertin said it took a little more time to install the Comfortboard, compared to foam, but it wasn't as bad as he was expecting. Every project has its own list of priorities and prices are different everywhere. Prices and availability vary a lot. A couple of years ago when I wrote about mineral wool for Fine Homebuilding, I could not even get a sample of Comfortboard without buying a truckload. Now it's starting to show up in the market a little more.
Cellulose costs roughly twice as much as fiberglass, so if you want lowest cost, use fiberglass. Just be aware of the performance differences and adjust your methods accordingly.
Silly question: Being that the Membrain is essentially
self supporting will the weight of the loose fill fiberglass eventually cause it to tear at the penetrations or will it stretch?
Response to John Clark
John, that's a good question. The strapping is 16" o.c. so I think the Membrain will be able to support the weight of the fiberglass just fine, and even if it stretched it would only go 3/4" so I don't think it would tear. I probably wouldn't use the Membrain on a Passive House project where we might have 30"+ of cellulose and 2x strapping (so wires can run below the air barrier); I would stick with a more robust product like Pro Clima Intello Plus or Zip OSB.
Log in or create an account to post a comment.
Sign up Log in