
Image Credit: Kent Earle
More Guest Blogs


Editor’s note: Kent Earle and his wife, Darcie, write a blog called Blue Heron EcoHaus, documenting their journey “from urbanites to ruralites” and the construction of a superinsulated house on the Canadian prairies. Their previous blog on GBA was called Insulation, Air-Sealing, and a Solar Array. The blog below was originally published in January. (A complete list of Kent Earle’s GBA blogs is provided in the “Related articles” sidebar below.)
Airtightness is as important as, if not more important than, the amount of insulation you put in your house. These two elements of building — insulation and airtightness — are the two pillars of a passive house (and pretty much any other “eco-house” building).
For our house, we’d gone with high levels of insulation — in the range of three times the typical amount for standard construction. We had R-32 under the slab and in the basement walls, R-56 for the above-grade walls, and R-80 in the attic. However, in deciding on our insulation levels and in targeting our goals for airtightness, we did try to strike a balance between cost and benefit and recognize the point of diminishing returns.
I have written about our insulation choices previously here, so I will not revisit that topic. But in terms of airtightness, there are some basics that are worth discussing. The fact is that air leaking into and out of a building is not efficient, no matter how much insulation you have in the walls. Although insulation decisions, thermal bridge reduction, and solar gain can be designed into the house, airtightness can really only be ensured while constructing the building.
Airtightness is tested with a blower door. The usual metric is “air changes per hour at 50 pascals of pressure,” or ach50. Typical construction in Canada reaches about 3 ach50. The Canadian R2000 program, our high-efficiency energy standard, calls for 1.5 ach50, while the Passivhaus standard is a whopping 0.6 ach50.
Although I was hoping we could target the extremely difficult goal of 0.6 ach50, the question was: How much money were we willing to spend in order to get there? As with insulation levels, there is a point of diminishing returns. Would 0.8 ach50 versus 0.6 ach50 be any more noticeable in terms of user comfort? And over the lifespan of the building, would you ever balance out these costs?
Choosing an “ambitious but realistic goal”
We decided to set an ambitious but realistic goal of 0.8 ach50.
The reason for this was four-fold.
First, our house is not big. It is a rectangular bungalow measuring 1,240 square feet. The blower door test is an test of absolute air leakage from the building — not a relative test. By that I mean that a large house can more easily meet a lower ACH level then a smaller house due to the greater volume of the house overall.
Second, we were not prepared to spend a great amount of money on air-sealing tapes, interior sheathing, and the labor to do this. In Canada, a standard house is sealed with a 6-mil vapor barrier (the cost is $50 per 8 foot by 500 foot roll) and tuck tape (also known as housewrap tape; $6 per roll). A Passivhaus is often sheathed with 5/8-inch OSB ($25 per 4-foot by 8-foot sheet) on the interior to serve as its vapor retarder or with a high-end Intello Plus vapor barrier ($320 per 64 inch by 164 foot roll) with the seams sealed with Tescon Profil tape or Vana tape ($45 per roll).
It does not take much in the way of math skills to see that the latter option can get extremely expensive. But if you really want to ensure you hit that Passivhaus 0.6 ach50 target, that’s probably what you need to do. (The Tescon Profil tape is often used on the outside walls as well to seal the air barrier, windows, and doors).
Third, we were not pursuing Passivhaus certification, so really there was no point in ensuring that we hit 0.6 ach50. If you’re spending the money to have a Passivhaus consultant work with you at the initial design stage and you’re spending the money on high-end Passivhaus-certified windows, as well as special tapes and extra insulation, you had better make sure that you hit 0.6 ach50 or all of that expense will be for nothing.
For us, if we made 0.6 ach50, great. If we didn’t, oh well.
Finally, we were installing a wood-burning stove and chimney. Although the stove itself is a very high-quality unit from Morsø in Denmark, I figured that this extra hole in the wall would negatively impact our airtightness. But we were not budging on the wood stove. We also had another extra hole in the wall for the water cistern in the basement — but again, this could not be avoided.
All that being said, we did make every effort to design the house so it would be as airtight as we could get it. The dense-packed cellulose in the walls itself provides a high degree of air sealing on its own. We limited the penetrations into and out of the house by selecting a condensing dryer from Bosch and having an electric boiler. (The only penetrations are the chimney stack, the water cistern pipe, and the heat-recovery ventilator).
We used standard 6-mil poly for the vapor barrier, with acoustic sealant at every seam. Each seam was also taped with standard tuck tape to ensure another layer of added protection. Around the windows and exterior doors, we used Teson Profil air-sealing tapes to attach the vapor barrier to the frames. Although this tape is very pricey, it made sense to me to use it here as the greatest area of air leakage is often at the window frames and doors.
Now it was time to test the house
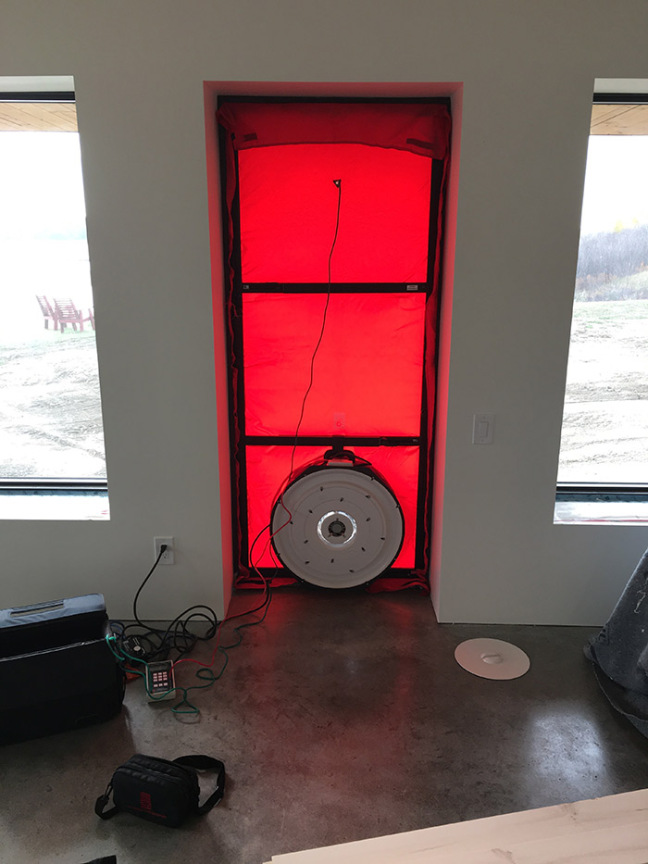
The testing is done with a blower-door test. The depressurization test is described at the U.S. Department of Energy website this way: “A blower door is a powerful fan that mounts into the frame of an exterior door. The fan pulls air out of the house, lowering the air pressure inside. The higher outside air pressure then flows in through all unsealed cracks and openings.”
The pressurization test is performed in a similar way, except by forcing air into the house.
“The auditors may use a smoke pencil to detect air leaks,” the website continues. “These tests determine the air infiltration rate of a building. Blower doors consist of a frame and flexible panel that fit in a doorway, a variable-speed fan, a pressure gauge to measure the pressure differences inside and outside the home, and an airflow manometer and hoses for measuring airflow.”
Essentially, the test simulates wind blowing against the house in all directions at the same time. The test takes about an hour to administer with the tester taking multiple readings at different fan speeds both while depressurizing and pressurizing the building.
While the test was running, we also used an infrared camera to look for any hot or cold spots.

A couple of days later, the technician sent us the results: 0.8 ach50.
Right bang on our goal. Not bad. The guy who tested it said it was the tightest building he’d ever tested.
I was happy enough with the results, but a couple of days later I happened to be standing beside the chimney on a windy day and I could (ever so slightly) hear a whistle through the stovepipe. I looked closely at the seams and saw they were not fully sealed. Damn!
We’d also had some crappy construction locks on the doors, and when I put my hand against them I could feel wind there, too! Double damn!
After sealing these leaks and a few other tiny ones we found, we did another test a couple of weeks ago. This time, the results were 0.72 ach50. Not too shabby.
After talking to the tester, though, he thought that given the higher-than-expected discrepancy between the depressurized and pressurized values, maybe the vents of the HRV had opened slightly and causing a skew to occur. He’d like to do one more retest in a couple of weeks, thinking this would take it down to 0.65 ach50 or lower. At this point, he’s doing it at no charge; he’s simply interested to see what the truest level of airtightness is.
For me, I’m happy to know that we reached almost Passivhaus airtightness values while still being as economical as possible.
Weekly Newsletter
Get building science and energy efficiency advice, plus special offers, in your inbox.


4 Comments
Congratulations, Kent. I
Congratulations, Kent. I enjoyed the post and learning more about how you balanced efficiency and cost. Please update us after your next blow door test.
Wat?
"...The blower door test is an test of absolute air leakage from the building — not a relative test. By that I mean that a large house can more easily meet a lower ACH level then a smaller house due to the greater volume of the house overall..."
Sounds like a relative test to me.
"The only penetrations are
"The only penetrations are the chimney stack, the water cistern pipe, and the heat-recovery ventilator"
Electrical wiring into and out of the house, plumbing vent, hose faucet, are all penetrations. Don't forget those when you're looking for air leaks.
Blower door
Hello Kent, And congratulations on the excellent Blower Door results. We built a passive-like home (160 sq mt, 1760 sq ft) in northern Italy, and the BDT was exactly the same, 0.72ACH! I too used 6mil poly as an air barrier. In retrospect, I would have done things differently (Rigid foam, and sealing joints). I concur with the effort to arrive at 0.6ACH. Not worth it. I also agree with the electrical box issues. While living in Europe I did many BDT, and almost 50% of "fails" were due to electrical and plumbing penetrations. The other 50% was amazingly, construction failures (bad tape jobs, bad window install, multiple crews damaging each others work, etc). Currently we are working on a complete retrofit of a very leaky 1901 red brick in Ontario. Plan is to reduce energy use by over 80%. Anyway, good luck with your project.
Log in or create an account to post a comment.
Sign up Log in