
Image Credit: Fine Homebuilding
More Guest Blogs


Editor’s note: This post originally was published as part of the ProHOME series at Fine Homebuilding magazine. Sean Groom, a former editor at FHB, leads it off with a discussion of how these windows were chosen, and FHB editorial advisor and builder Mike Guertin picks it up with instructions on how to install the windows correctly.
Windows and doors are unique in that they are an important aesthetic component of the house and also a critical part of the building envelope. And, as part of the envelope, they uniquely affect energy consumption through their insulating properties and their ability to add heat to a home through solar heat gain.
Let’s tackle the performance issues first. Designer Michael Maines started with a combination of fixed, casement, and awning windows to maximize energy performance. For operating windows, the hinged action of casement and awning windows closing onto the weatherstripping seals better than double-hungs, where the weatherstripping between the upper and lower sashes slides past each other at the check rail. Preventing small amounts of air leaking through the window assembly pays dividends when we get to the mechanical systems and for the comfort of anyone sitting near a window.
In a high-performance house, the choice between double-pane and triple-pane windows is fraught. Builders and designers typically have strong opinions on the subject. They fall either into the camp of using the highest-performing windows they can find, or the camp of using high-quality double-pane windows and directing the saved money elsewhere. Maines leans heavily toward the first camp. Mike Guertin, the builder, is firmly in the second camp.
The price differential between double-pane and triple-pane windows for the ProHOME project was roughly $7,500. Using BEopt (the National Renewable Energy Laboratory’s free Building Energy Optimization modeling software package), Maines found the triple-pane windows saved about $32 a year at current electric rates. (It’s an all-electric house.)
Whether you evaluate increased spending on performance from a break-even or return-on-investment standpoint, the numbers aren’t going to work out at any point during the life cycle of the windows.
Paying for a solar array
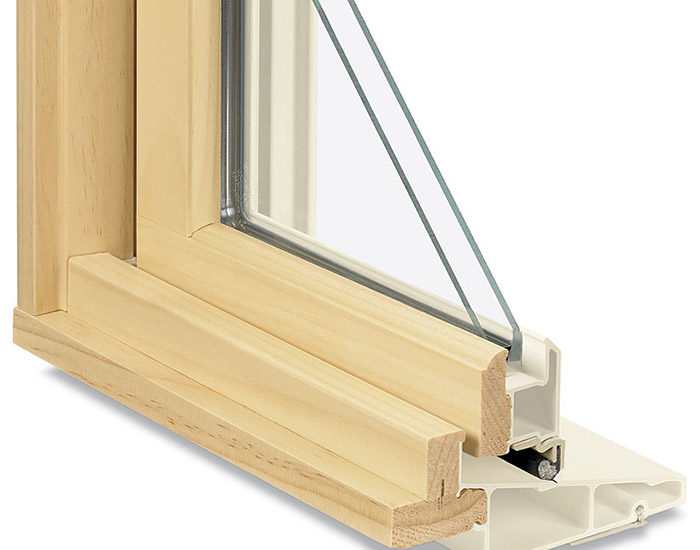
The ProHOME is not a Passive House, so it wasn’t necessary to keep the heating load below a particular threshold. Instead, the goal is to create a pretty good thermal envelope and limit air infiltration to between 1.0 and 1.5 ach50. The significant savings from foregoing triple-pane windows can be used on a photovoltaic array. Accordingly, the windows are double-pane Marvin Integrity units, which have a fiberglass frame and will stand up to the coastal weather in Rhode Island.
Maines still contends, however, there is a comfort argument for triple-pane windows that may sway the opinions of some clients, as the surface temperature of the interior glass can be significantly warmer than that in double-pane windows in the winter. A cold window surface chills occupants sitting near it even if the ambient air temperature at the thermostat is in the 70s.
Careful installation is key
The Warwick CTC students spent about a week installing windows for a couple hours a day. The process started with Bruce flashing the window bucks back to the Zip wall sheathing and then the students installing the sill pan flashing and rough-opening jamb flashing. The window installation is just as meticulous.
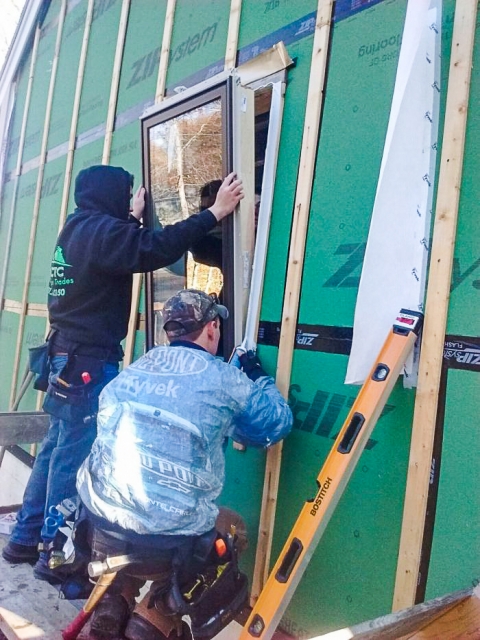
We worked in three-person teams, with one inside person who passed the unit out, centered the window and then shimmed it level under the direction of the two outside workers. The outside guys checked the windows for plumb, applied sealant along the sides and top, bedded the flanges into the sealant, and then screwed the unit to the bucks. It took 30 to 45 minutes to install and flash each Integrity window properly. This is in addition to the rough opening preparation we did earlier.
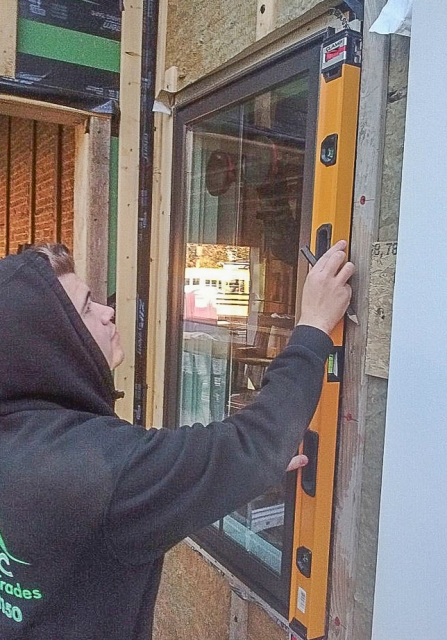
First the window is centered in the rough opening by the inside guy. Then the outside guys check for plumb and square. They instruct the inside guy to lift and shim if necessary. Very few windows needed any shimming, as it turned out.

With the window plumb, square, and centered, the outside guys draw lines along the two side flanges so the window can be quickly reoriented after the sealant is applied. The inside guy tilts the window out about 8 inches at the top — enough for one of the outside guys to run a 3/8-inch bead of TiteBond Ultimate MP sealant along the top and sides of the window buck.
The other outside guy keeps a hand on the window as a backup to the inside guy. The bottom flange is not sealed so any water collected in the sloped sill pan can drain outward.
When the window is tilted back into the rough opening, the flanges are realigned to the lines and then screwed off. We used 1 1/4-inch galvanized pan head screws instead of the 2-inch roofing nails that the instructions call for. Screws go in faster than the nails, and there’s less risk a poorly aimed hammer whack will damage a window frame. Since we are fastening directly to the 2×3 window bucks, I’m not concerned that the screws don’t penetrate as deeply as the nails would.
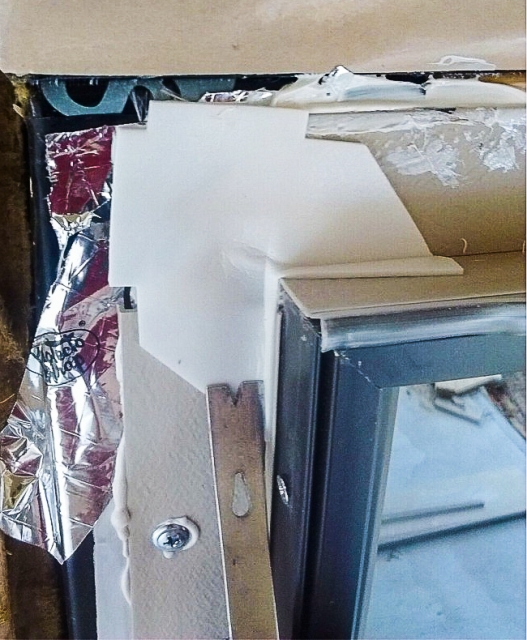
The four corners of the window flanges on the Integrity windows require a sealing patch. This is in addition to the backflashing step we took when preparing the windows for installation.
The adhesive foam pieces have to seal to the window frame and over the open corner of the flanges. We pressed the patch pieces in place with a mini flat bar to ensure good adhesion in the cold temperatures — low 40s / upper 30s.
In addition, a strip of housewrap is taped over the face of the flange. It helps deflect any wind-driven rain that enters in the joint between the trim.
ProtectoWrap’s SuperStick window flashing tape seals the window to the flashing tape applied between the Zip wall sheathing and onto the face of the window bucks. Integrity flanges are mechanically attached to the frame of the window, so the flashing tape must be bonded to the side of the window jamb by 1/4 inch to 3/8 inch.
The head flashing tape Bruce installed weeks earlier when he applied the Zip tape around the window bucks still had a strip of release paper along the bottom edge. We removed the release paper and folded the head flap down over the top flange and window frame.
For more, use this link to see a short video with Mike Guertin on how windows should be installed in a high-performance building.
Weekly Newsletter
Get building science and energy efficiency advice, plus special offers, in your inbox.


3 Comments
10 cents
I have found that if windows are individual and not huge, that there is not much difference in comfort between double and triple glazed. It is when you get into large areas of glass, whether a large single window or grouped windows that you can really feel the comfort difference.
This puts some numbers on the
This puts some numbers on the comfort issues.
http://www.payette.com/building-science/glazing-and-winter-comfort-tool
Lots of tall glass may require heat sources under the window to address the downdraft issue.
http://nesea.org/sites/default/files/session-docs/room_side_low_e_coating_as_good_as_it_sounds.pdf
Winter Comfort Tool
Thanks for sharing the glazing and winter comfort tool Jon - really impressive and useful. Choosing glazing is about far more than the ROI equation.
Log in or create an account to post a comment.
Sign up Log in