

Image Credit: Vera Novak
More Guest Blogs


While China is building new cities as fast as possible, Eastern Europe is faced with a challenge on the opposite end of the scale. With a negative population growth and an abundance of old houses, it makes much more sense to rebuild the existing infrastructure than to build new.
I’m now visiting Eastern Europe. Many of the villages have houses built prior to World War II. Fortunately, the thick stone walls and strong timbered roof structures make for solid buildings that withstood years of abandon and can serve for many more centuries once refurbished.
One of the greatest causes of deterioration is rising damp. Moisture in the soil wicks up the stone walls, through the porous mortar, and continues to move from wet to dry up the wall above grade. It can dry to either side of the wall — to whichever side is dryer. This means that if you have a nice dry interior, the moisture will move inward and evaporate into your dry air, pulling more moisture up behind it.
All fine, as long as you really don’t mind mold, wanted extra humidification, and are willing to leave your walls with a chalky, porous finish. Sort of a cave-man décor.
The other option is for the moisture to wick toward a dry exterior — usually via whatever covering you have. This was the primary reason for paint blistering and peeling off my wood siding in a previous house, and the cause of the plaster finishes of these walls staining and crumbling. Not good.
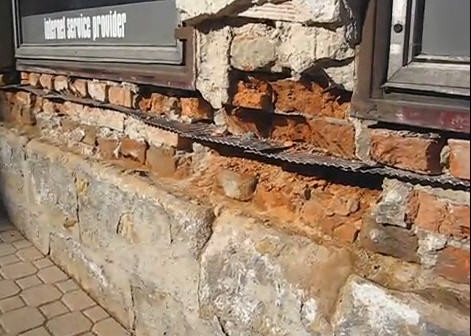
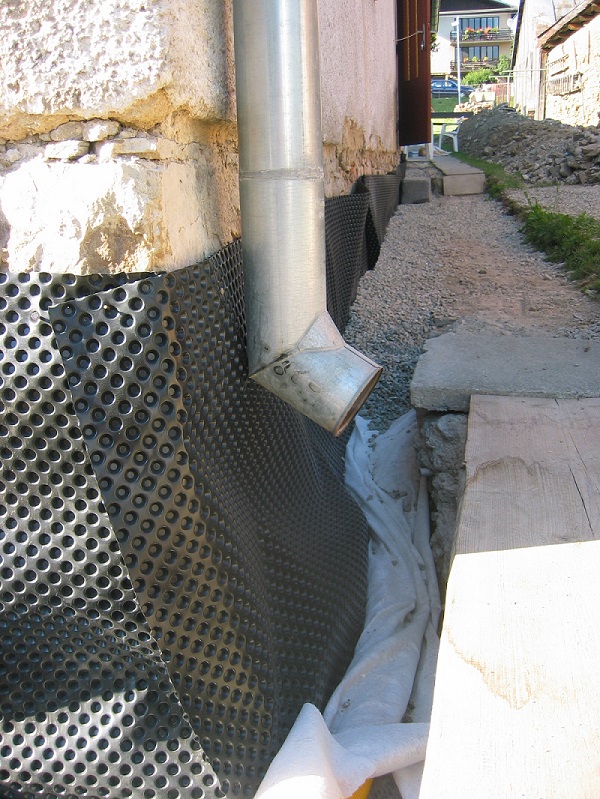
Plastic dimple mat, perforated pipe, and landscape fabric
Not surprisingly, these Eastern European countries have developed the tools and techniques to address the problem. There are two points of attack, depending on the source of your water. If the soil is relatively dry, waterproofing and good drainage might be sufficient to prevent surface water from reaching the basement walls.
Recently, in a little village in Slovakia, I approached an older gentleman who was in the process of retrofitting the waterproofing details around the foundations of his 110-year-old home. He had dug down 3 feet, and installed plastic dimple-board and a landscape-fabric-wrapped drainage pipe; then he backfilled with gravel.
He told me that all the installation details can be found on Google. (Gotta love it). He then proceeded to explain that the edge of the dimple-board needed to be covered, and that there was a poly / acrylic-type mortar that can be used in place of concrete to effectively continue the waterproofing up the foundation for 3 or 4 feet. It comes in a pebble coating, or can be the backing for a more traditional stone foundation. The stones are isolated both from the wall behind, and the foundation below.
I was relieved to hear of this home-improvement plan, since I had seen far too many of these dimple-boards just poking up above grade an inch or more, hanging out on the outside of the foundation finish. This is a problem, since the gap allows rain to flow down between the board and the side of the building.
I checked into some of the company websites and found that their installation instructions often stop short of discussing how to finish the top edges. (It’s not their problem …) A very definite gap in information that could sabotage the entire effort.
The alternative, if you don’t have the space to dig around your foundation or are in an area with underground moisture, is to insert a water-impermeable layer in the foundation wall just above grade. I looked into this after my trip to England last year (see my blog post, “Dealing with Damp”), but have found a bit more information through Google Slovakia. (I need to figure out how to “trick” the location of my computer so I can virtually be in different countries when I am using Google.)
Silicone cream or stainless-steel flashing
The easiest method is drilling holes at regular intervals in a mortar joint and filling the holes with a silicone cream, which will theoretically spread sideways through the mortar bed and create a waterproof layer.
However, in many stone foundations, there is no level bed of mortar. The solution for this scenario is far more complex, and calls for cutting (or also this link) through the foundation and inserting a rubber or stainless-steel flashing. (See also a video of an installed steel sleeve).
The great lesson for me is that buildings can be constructed in a way that can last for a few hundred years. This can provide a durable infrastructure that is available for adaptive re-use, and thus a longer service life to extend the value of the embodied energy of the building materials.
It also points out the importance of not taking any shortcuts when building new. Waterproofing and inserting a capillary break between the footings and the foundation wall are very important and should be included in the new construction, when it is the least expensive and easiest to do.
This is a lesson we tried to hammer home to the ICF builders, as this building material is so well suited to legacy buildings.
Dr. Vera Novak was recently awarded a PhD in Construction by Virginia Tech. Her work is dedicated to increased depth and breadth of sustainability in construction, by leveraging the points of greatest potential impact. She is currently working on optimizing corporate sustainability practices to support regenerative design, as well as adapting a lean thinking process for smaller scale projects. She also writes the Eco Build Trends blog.
Weekly Newsletter
Get building science and energy efficiency advice, plus special offers, in your inbox.


7 Comments
Rising what?
Great article, Vera.
I am trying to avoid rising damp and having a bit of a battle with my foundation contractor over installing a capillary break between the footer and foundation walls. I get the sense he thinks it's unnecessary--even though I have read that the theoretical limit for capillary lift through concrete is six vertical miles. Even if it is only six feet, that is a potential problem.
Short of a capillary break... (repsonse to Steve Knapp)
There are a number of admixture products for concrete out there for reducing the capillary draw in foundations and footings, but it's not necessarily as cheap or effective as EPDM liners in the forms for the foundation, or similar materials installed between the footing & foundation walls. eg:
http://www.basf-admixtures.com/SiteCollectionDocuments/Data%20Sheets/Specialty/OTH-DAT-0518%20RheoMAC%20300D%20072111_WEB.pdf
http://usa.sika.com/dms/getredirect.get/us01.webdms.sika.com/63
http://www.concuresystems.com/sites/default/files/Concure%20Admixture%20Data%20Sheet.pdf
I'm surprised that sacrificial parges weren't mentioned in the article- it's been a standard mitigation practice against masonry deterioration for centuries, but clearly stopping the moisture migration is superior to merely limiting the damage point to the sacrificial parge, to be re-applied every 50-100 years.
Sacrificial parging
Dana,
In the "Related Articles" box on this page, you'll see a link to an article by Joe Lstiburek, "Efflorescence = Water Damage."
Lstiburek discusses sacrifical parging in that article: "Parging protects the entire surface. Well, why not just coat the whole thing with a sacrificial layer? And instead of doing this on a 10-year basis, why not extend this to a 30- or 40-year basis? The way you think of this sacrificial layer is as a sort of lime-based poultice that sucks the salt poison out of the assembly. So how do you know when you have to replace it? Well, when it falls off. It's the building telling you it's time to put on another sacrificial layer."
10 years between parges...
...would indicate a pretty swampy location. Many historical buildings in southern Europe are getting by just fine on a 50-100 year schedule between parges, but I can believe it would vary a lot with local ground/drainage conditions + climate.
On a DER I was involved with last year we discussed parging the 120+year old brick foundation prior to hitting it with closed cell foam, but it was in pretty good shape, and used a very odd heavily sanded mortar. In the end the masonry experts couldn't come up with a parge that would stick well enough even while fresh. The plan now is to wait & watch, see if any efflorescence shows up on the exposed exterior, deal with it only if & when it becomes a problem. To be sure the drying paths for the foundation are now VERY different than the original 1890 design.
For Dana Dorsett
Hi Dana:
Thanks for the links. I would be fine with any method that prevent moisture movement up through the foundation wall. Unfortunately, the foundation contractor has zero communication skills. I did spec a BASF footer membrane ( or comparable), but it's been a challenge finding out what he has in mind.
a few thoughts...
You’ve probably noticed that rising damp, while common in Europe is rare in the US. Ippolito Massari, author of the excellent ICCROM book Damp Buildings Old and New, explained that the buildings and the areas around them are saltier in Europe, some because of burial salts near buildings, more because of food preservation by salting having been done in the buildings themselves. We here don’t realize the long-term impacts of de-icing salts.
Your first photo showed a pretty sloppy job of inserting flashing into very poor masonry. I’m surprised that the brickwork was not repaired. The photo shows windows. If the window heads are integrated into the wall as poorly as the rest of the frames, then the flashing is the dead wrong approach, as the water will be coming from above. This metal flashing may also be wrong in that there’s a seismic tradeoff—the deeper the flashing, the more likely the building could slide. Inserting a damp-proof course is not for novices.
The second photo shows some dimple mat wrapping—with a nice downspout discharging right there at the repair site. Sheesh. Move the water away from the wall, not into a gravel pit that will feed the wall.
Capillary rise is (modestly) a function of temperature. In your travels, check if unheated buildings show worse rising damp than heated buildings. Of course, unheated buildings receive overall less tlc, so it may not be a fair comparison. Still, if we insulate masonry, we can expect any capillary effect to be (somewhat, perhaps slightly) increased. There are a lot of lessons in rising damp.
Thanks for the contribution, Vera.
.. more info on the photos
Bill - Thanks for the comments. While the added salts are certainly an issue, I believe the problem of water wicking is present regardless. It would seem the purpose of the parge coat is to protect the masonry both from exterior rain and through the function of wicking the salts out of the masonry to prevent damage to the structure. But this doesn't address the groundwater issue - which is the problem of most of the buildings out in the country and in the villages - considerable numbers in this geographically disbursed population.
A further note to the photos - the metal sleeves are inserted a bit at a time, as the saw cuts are made, so it may look sloppy - but I think it serves the purpose. Following this step, them the masonry is repaired and coated with a cementitious or acrylic based parge coat. So the photo shows the beginning of the process. As for the location of the drain pipe - the surface water draining is a gravel "ditch" dug into the 1 meter space between the building and the street, covered with large clay tiles. . The gutter drainage, as well as the new footing drain installed by our Slovak friend were both discharging into that drainage ditch.
The challenges in Eastern Europe are the conditions and constraints of the retrofits. These are old buildings, solid but in need of tlc. The new building have insulation added to the masonry walls, but space and cost constraints limit this practice on reconstruction. New buildings can also use water proofing additives in the foundations, but even new buildings are often rebuilt on old foundations. It is a very different situation than what we see in America, and very interesting to see how they have approached this problem.
Log in or create an account to post a comment.
Sign up Log in