
Image Credit: All images: Elden Lindamood
Image Credit: All images: Elden Lindamood House plan. Elevations. Wall section.
More Guest Blogs


I am an architect. I have spent the last five years thinking about, sketching, drafting, changing, overanalyzing, second guessing, and fretting about the house that my partner Catherine and I would someday build on our rural land in northern Minnesota. This is probably not unlike the experience of many non-architect dreamers, but the difference is that I am armed with AutoCAD and REMDesign energy modeling software to analyze every conceivable scenario.
I also like building science. The firm that I work for, Wagner Zaun Architecture, encourages me to learn and think hard about many aspects of building performance, durability, cost effectiveness, and efficiency, and how they all relate to design and aesthetics. This, as many of you will attest, leads to more questions… and fear. If I push the thermal performance, will I compost my walls? The energy model says 12,000 BTU/h is my peak load: Is that really enough? Will the builder laugh at my “brilliant” flashing detail that took me three hours to draw?
Despite my background, I am burdened with the same issues that all other dreamers are. I have a not-quite-big-enough budget. I want a house that is not too big and not too small. I want an energy-efficient house with passive solar features that doesn’t look like the awkward love-child of the Saskatchewan Conservation House and an Earthship. I want a house that is beautiful and durable. I want a house that is environmentally sensitive and responsible. I want a house that enters into a conversation with our land, not one that holds dominion over it. I want a house that I will love.
A single-story house with a slab-on-grade foundation
On October 12, 2015, the rubber hit the road and we started construction. I can’t endlessly tweak (fuss over) plans and details any longer. The bank owns my soul, and the excavator is on site making a house-shaped scar on our previously pristine site.
This installment is an explanation of the concepts employed in the design of our dream house, with reflection on some of the choices and struggles. This will be followed with future ruminations on progress, lessons learned, and concessions made in the face of reality.
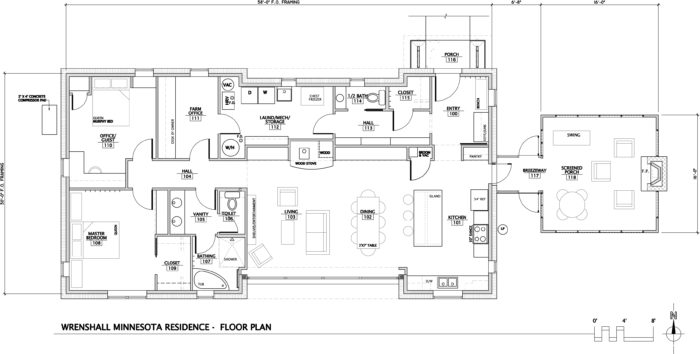
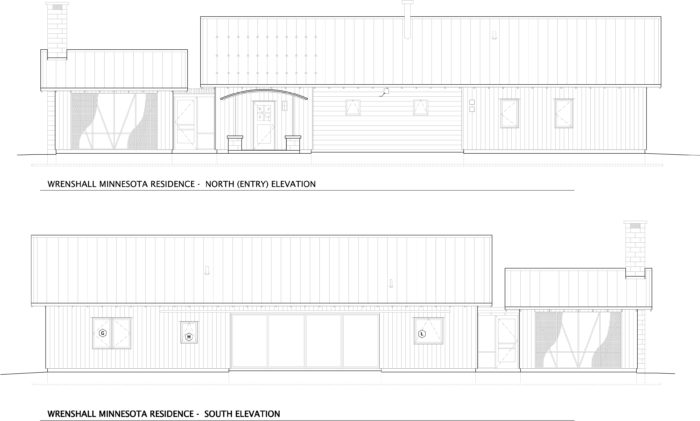
The “final” design is a one-story, slab-on-grade house (see Images #2 and #3, below). It is a two-bedroom, 1 1/2-bath home with an additional small office for farm operations. The main house is 1,668 gross square feet (1,575 conditioned square feet) with an additional 250 square foot screened porch.
As I said, I am a building science nerd, so I’ll cut to the quick. The stats for the house are as follows:
- Climate Zone 7, with 9,500 HDD and 250 CDD
- A dead-flat site with good solar exposure
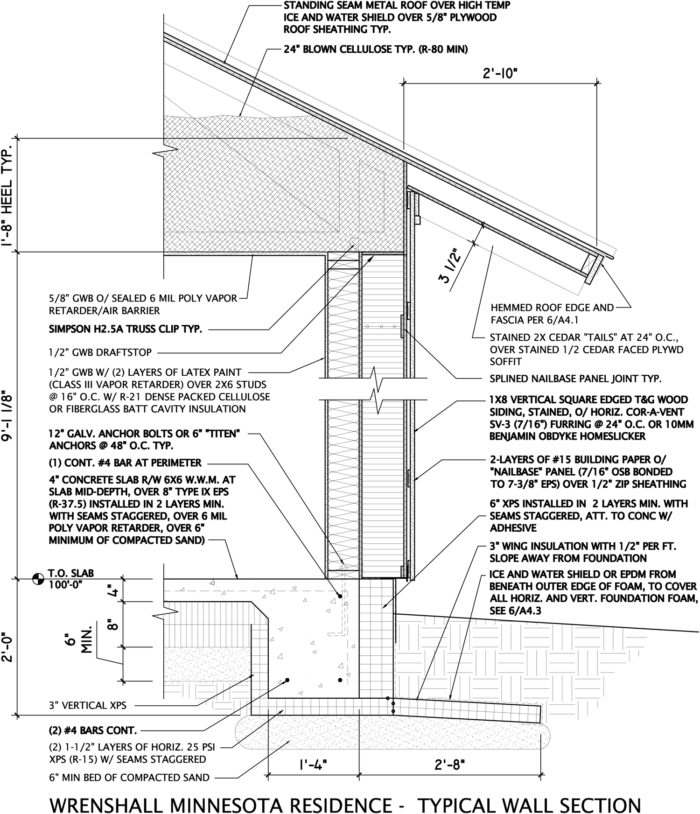
- Under slab insulation: a continuous horizontal layer (8 inches) of Type IX EPS (R-35)
- Walls: 2×6 framed structural cavity wall with R-21 dense-packed cellulose or fiberglass batts, with the structural Zip sheathing serving as an air barrier, and 7 3/8-inch EPS nailbase panels on the exterior (R-29) for a total of R-50
- Ceiling: Engineered roof trusses with 20-inch-deep energy heel and 24 inches of blown cellulose (R-80)
- Windows: Duxton Fiberglass windows with 1 3/8-inch triple-pane IGUs with argon gas fill and Cardinal 180 coatings on surfaces #2 and #5; center-of-glass specs: U-factor = 0.13; SHGC = 0.56, VT = 70%
- Airtightness target: 1 ach50 or less
The design goal for the house was to take full advantage of the good solar exposure and to reduce the mechanical load to a level where a minisplit heat pump would take care of the majority of my heating needs. Although we have very few cooling degree days, the notion of air conditioning and humidity control is appealing to me, which also prompted the desire to use a minisplit.
I wanted to have an all-electric house so that I could eventually offset the majority, if not all of my consumption with photovoltaic (PV) panels. Aside from a propane cooktop (one of the few requests from my very patient partner), which will be fed from a 100-gallon propane bottle, the house will be entirely electric. Although our region’s current electrical grid supply is very coal-dependent and propane is cheaper, I rationalized that I am reducing my load to a point that I can easily offset it with PV later, and I won’t be reliant on a propane delivery truck. Also, I am more afraid of gas than electricity, which may not be totally rational, but I am calling the shots.
Heating and cooling provided by a ducted minisplit
The mechanicals are as follows:
- Heating/cooling: Ducted Fujitsu 12RLFCD minisplit heat pump, single zone; backup consists of 6 electric radiant cove panels with individual thermostatic controls, totaling 3,450 watts; a small wood stove in the center of the house
- Domestic hot water: 50 gallon electric-resistance Marathon storage tank water heater
- Electric clothes dryer with through-the-wall exhaust
- Electric oven with a propane cooktop and a range hood rated at less than 300 cfm; makeup air unit with 1000-watt electric resistance heater tied to the range hood and clothes dryer
- Venmar E15 HRV, exhausting bathrooms and near kitchen, and supplying into the minisplit supply ducts.
I intend to monitor the electrical usage on the main house feed along with the individual radiant cove circuits to determine how often they kick on and under what conditions. We also have 30 acres of poplar woods to feed the woodstove. Poplar isn’t great firewood, but it is free and I’ll have more than enough deadfall to keep us warm after the energy apocalypse.
A frost-protected shallow foundation
The first item I grappled with was the foundation. I initially wanted a frost-depth stem wall (which is 5’-0” below grade here) just because it “felt right.” However, in the face of incremental cost increases and above-grade wall changes discussed below, I eventually arrived at a frost-protected shallow foundation.
Another factor influencing the choice was the very high water table on our site. I have dug many post holes on the site that fill up with water three feet down.
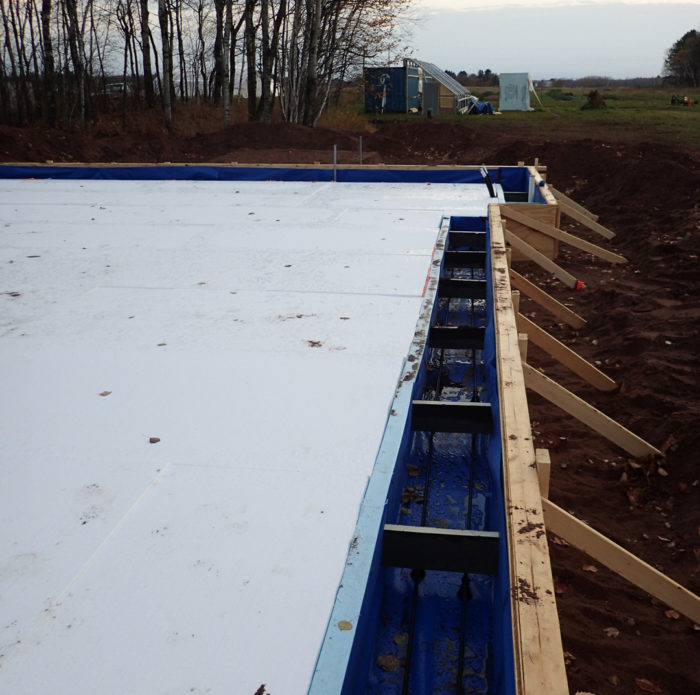
Once construction started, we discovered that creating the foundation forms with foam is fairly time-consuming (see Image #1 at the top of the page), and for future projects I want to look into a flat structural slab sitting in a simpler tub of foam. They might require a thicker slab with more steel, but the labor savings might be better than the additional cost to form a thickened-edge slab.
Nailbase panels on the exterior side of the 2×6 walls
The main item that was the subject of the most consideration on this house was the wall assembly (see Image #4, below). Since wall assemblies are often the hottest debate topic here, let’s start with that.
For the above-grade walls, I knew I wanted at least an R-45 assembly to meet my energy goals. I also initially wanted stone exterior cladding. As a result, the original plan utilized Quad-Loc ICF wall construction which I arrived at for a number of reasons. I wasn’t comfortable putting a masonry cladding over a high-R wood-framed wall, and I liked the security of a relatively storm-proof and rot proof ICF wall system.
The pricing for the stone work came in astronomically high, as did the “Plan B” brick option. This reality, combined with the facts that nobody in my area was familiar with Quad-Loc forms, and the nearest supplier was 200 miles away, started to chip away at the ICF wall strategy.
Ultimately, the cost of the concrete for the walls plus the nagging global-warming-potential guilt put the final nail in the ICF coffin. I begrudgingly decided to opt for a wood-framed wall with wood siding over a furred rainscreen.
Our design firm has done many double-stud walls with dense-packed cellulose. My builder of choice was also familiar with double-stud wall construction and had proved to be meticulous at detailing an interior vapor retarder/air barrier, achieving impressive blower door results well below my target.
However I have been increasingly concerned about the potential for moisture problems with double-stud walls, and more and more interested in continuous exterior foam strategies. I had numerous conversations with other nerdy types about the merits of using the structural sheathing as the air barrier in the assembly and concluded that it was the best strategy. Just like everybody else hoping to grace the world with the “perfect wall” solution, I was off to the drawing board (again).
Our office has done a few projects with single-stud walls wrapped in multiple layers of rigid polyisocyanurate foam, and we got quite a bit of feedback from our builders that the assemblies were time-consuming and a bit fussy. Lots of cutting and fitting, long cap-nails required to hold the water-resistive barrier (WRB) in place, and the need for fairly substantial furring to meet the nail holding requirements of most sidings. Regardless, I likely would have pursued this route with my own house, rationalizing that the form was simple and thus it wouldn’t cost much — but then I stumbled onto nailbase panels.
Nailbase panels are a product offered by many SIP manufacturers, and they are available in numerous specified thicknesses of EPS foam with a layer of 7/16” OSB bonded to one side only. Usually marketed as a retrofit product, we got to thinking about their potential for new construction.
Since we are essentially eliminating the structural component from the SIP, we amuse ourselves in the office by calling them IPs. I never personally cared much for SIP construction because the reliance on glue to hold the whole works together leaves me feeling uneasy. Also, the effort to run electrical and other services in the exterior walls seemed overly complicated. In contrast, the IPs come in 4’ x 8’ sheets, with notches on every panel edge for an OSB spline to connect adjoining panels. There is no internal or panel edge framing. You simply cut them to size, apply sealant to the edges and screw them to the framed structural wall.
The following are some things I like about the IP wall:
- The ability to cut the IPs to size on site allows for easy changes and adjustments that SIPs don’t.
- Attaching them to the outside of a framed structural wall makes framing the house walls easy, lets me utilize my exterior structural sheathing as the assembly’s air barrier.
- Keeps the structural sheathing on the warm side of the wall (unlike double-stud walls).
- Leaves the interior wall cavity open for whatever you want to stuff into it.
- With the structural sheathing as the air barrier on the exterior side of the wall cavity I also don’t need to mess with airtight boxes or excessive sealants at mechanical and electrical penetrations at the interior.
- The premium grade OSB that SIP manufacturers use makes furring and/or siding attachment simple.
A few of my reservations about the IPs are:
- Uses a lot of foam
- They make a mess when cutting with power tools.
With the 8-inch nailbase panel you get an R-29. That alone would meet code in our climate even if I chose to leave the framed wall cavity empty. I chose to fill the cavities with dense-packed cellulose because I wanted the additional R-value and the cellulose installer will be on site to do the attic insulation anyway. I may also decide to insulate the cavities with fiberglass batts myself, and the consequences of a “do-it-yourself” quality job will be minimized by the continuous exterior insulation.
With my sheathing nestled within the wall’s thermal boundary, the ratio of exterior to interior insulation is 1.38 (29/21), which is safely above the 0.7 minimum that the IECC calls for to allow a Class III vapor retarder to be used. Thus, my interior vapor retarder will be two layers of standard latex paint on the interior side of all exterior walls. I considered, for a time, that maybe I should still install a polyamide (“smart”) vapor retarder on the warm side, but at the end of the day I convinced myself that it isn’t necessary.
I am the kind of person who might cut into my walls in a few years to see how the sheathing looks. When I do, I’ll send in the report. For now, we are going full speed ahead to enclose the structure before the deep Minnesota snow falls. I have already made a few concessions to keep the builder happy, so look forward to those in the next installment.
Elden Lindamood is an architect with Wagner Zaun Architecture in Duluth, Minnesota.
Weekly Newsletter
Get building science and energy efficiency advice, plus special offers, in your inbox.


24 Comments
Thanks for sharing
Elden, thank you for the nice write-up about your home. I am building my own "pretty good" home in central ND (only a few miles from zone 7). I am doing almost all of the construction myself due to a few factors. On my walls I decided to go with two layers of 3" EPS over peel-stick membrane which covers my OSB sheathing. I can say that your nailbase decision seems to be a good one due to the fact that all of those furring strips are really time-consuming to install. The benefit to the furring method, however, is the 3/4" rainscreen gap to allow any water behind the wood siding to drain and dry. How do you plan to install the nailbase panels? I used 10" FastenMaster power lags to secure furring. I will say that it's easier said than done to hit a 1 1/2" stud through thick foam. I had about 50 screw holes that I had to seal up from the inside after missing the stud. Best of luck on your project!
Gas cooktop
Elden. I look forward to following your project.
My wife and I are avid cooks who always thought gas was the only way to go. In designing our new house, we wanted to avoid gas. We bought a cheap ($50) single burner induction unit to try out induction cooking. We liked it enough to include an induction cooktop in the new house. We are thrilled with it. It is energy efficient, much faster than gas. The heat is easily increased or decreased. No hole in the wall for a gas line. No ugly tank outside. Instead of burners accumulating crud that never seems possible to clean, the flat glass surface can be wiped clean with a damp cloth. If it isn't too late, you might try out induction.
While we're on the subject of appliances, we put in a Whirlpool heat pump dryer. No vent! Expensive, but very efficient. Works very well. Dampness gets condensed and goes into the same drain as the washer.
Gas cooktop.
Stephen, I will have to sell the idea of an induction cooktop to Catherine. There is still time. I have been secretly fretting about how to discuise the propane bottle.
I am also leaning toward a heatpump dryer. Seems like a no-brainer in our heating dominant climate. Thanks for the reassurance.
Gas vs. electric
Like many cooks, in my early adult years I assumed "gas burners = good, electric burners = bad." When I moved to Vermont, I cooked on a wood cookstove for a couple of years. This type of range takes a while to get up to temperature, and doesn't cool off quickly. You adjust the cooking heat by sliding a pot to the right of the stove, not by adjusting the flame. When baking, if the fire is getting too hot even when fully damped, you can cool a fire by putting a stick of green wood in the firebox. You learn a few tricks. You learn to rotate your loaves of bread halfway through the baking cycle.
After my years of cooking on wood, I developed a friendlier attitude toward old-fashioned electric ranges. They are a little slow to heat up, and they stay warm when you turn them off -- but a flexible cook can easily work with those conditions. An electric stove is more like a wood stove than a gas stove.
Induction ranges are a whole 'nuther kettle of fish, of course. But if you have PV on your roof (or a PV array in your yard), it may make sense to cook with electricity.
Furring and long screws
Adam, I agree that hitting studs with long furring screws can be a challange. With the nailbase panels, all you have to do is hit sheathing. The manufacturer stipulates 20 screws per 4' x 8' panel. That is a lot of holes in the sheathing though, so let me get back to that.
One thing we have learned on a similar build is that the nailbase panels warp since they only have sheathing on one side. As such, you need to suck them tight to the wall during installation. The supplier supplies 8" drill tipped screws for the panel installation, which won't pull a warped panel tight without stripping the hole in the sheathing, and they aren't long enough to grab a stud. The supplier sends drill tipped screws because that is what they use for SIP builds. The manufacturer took a look at the issue and suppllied the builder with 10" screws that will pull the panel flat if you hit a stud, but they were drill-tipped also because that is what the supplier had on hand. The builder thought a standard pointed tip screw would do the job even better, and I'll make sure to have those on hand when we do my house.
Then there is the matter of a bunch of holes in the sheathing-air/barrier from the screws. I considered wrapping the whole house in ice and water shield like you suggest so that the screw holes would self-seal. We opted for the ZIP sheathing instead for ease of installation. I'll be able to do the first blower door test before the wall cavities are insulated, and we'll look closely at the screw penetrations and decide if I need to hit them all with something like spray caulk. Obviously, again, the pointed screws would be better than the drill-tipped for this. I'll keep you all posted with the results of that experiment.
Reply to Martin and Elden
Induction cooking is substantially more energy efficient than electric resistance cooking. It heats up and cools down quickly. Every time we use it, my wife announces how glad she is we got it.
The only minor drawback is you need ferrous pots. If a magnet sticks to it, it'll work on induction cooktop. Cast iron, all-clad types, work fine. Aluminum doesn't.
Elden. Get a cheap induction burner and let your partner try it. She'll like it.
Induction cooktop links
In case any GBA readers missed them, it's worth pointing out that we've published several blogs on induction cooktops.
Marc Rosenbaum's blog on the topic is here: An Induction Cooktop for Our Kitchen.
Alex Wilson's blog on the topic is here: Going High-Tech With an Induction Cooktop.
When you said gas cook top I
When you said gas cook top I too thought of an induction range. To me it doesnt make sense to build an air tight efficient home and then introduce a gas cook top. Much has been written on the pollutant put out by burning gas. Does all of that really get sucked up by the hood? Also I picture the big cook top and some industrial fan to vent the system with large pressure imbalances.
From what I have read is that some cooks think the temp control is superior with an induction cook top.
Even more gas cooking
Helped cook dinner last weekend at a house I built this summer. They went with a commercial style six burner gas range. What a nightmare! Everything you spill falls into that looks like it belongs under the hood of a car. No idea how they cleaned it after we left.
Elden
The nail base panels are an interesting solution. My only reservation would be that you end up with the siding fastened to the 7/16" OSB skin. Do you think there are types of cladding that might prove to be too heavy over time for that situation?
I'm looking forward to pictures of the finished project!
Response to Malcolm Taylor
Malcolm,
Q. "My only reservation would be that you end up with the siding fastened to the 7/16" OSB skin. Do you think there are types of cladding that might prove to be too heavy over time for that situation?"
A. Perhaps... but siding is installed on the OSB facing of SIPs all the time.
Response to Malcom Taylor
Malcom, I wondered that myself. I was told by the nailbase panel manufacturer that they use "SIP Grade" OSB, which he led me to believe was somehow better than regular OSB from a nail holding and siding attachment standpoint. I don't know if that is hype, or if there actually are premium grades of OSB. I asked if he could up the skin to 1/2" or even 5/8" OSB, and he indicated that would be a large upcharge because of their stocking and manufacturing system. He again assured me that their OSB was adequate for the job. Since I am using cedar siding, , which is relatively light, I didn't press the issue any further. If I were using a thick fiber cement siding, I might have questioned it more.
suggestions from fellow N. Minn resident
In 1983 I designed and built a double wall, (R-40) and site built I-Beam gambrel rafters (R-80) home with a two story passive solar sunspace and an earthen bermed north facing wall, all very well insulated and sealed. Back then most folks thought I was overly concerned with heat loss, to put it nicely. It pleases me to see that the concern for heat loss is now catching up.
If I may make a few suggestions after looking at the photos. First off the large older Popular trees near the screen porch, and any others that could impact the house, need to be cut down before winter and spring storms. While this wood is a poor firewood (low output and way too much ash) it will do severe damage to your roofline. I have done more than my fair share of repair to buildings at Itasca State Park, where they love trees more than buildings and pay for it all with taxpayer funds.
After years of cooking with a wood, propane and now induction stovetop and electric oven, in an airtight home, this is a choice I wish I had made years ago. Believe me when I say that while gastop is fine to cook on, wrestling 100 lb cylinders (that always seem to run out during the worst holiday snow storm) from the back of your pick over to the far side of the house in 2 feet of blowing snow gets old real fast and I wager that the propane chef wants no part of that responsibility. Some aspects of living in the woods must respect ease of access and the realization that north of Brainerd, MN the winters begin in October and wrap up in May.
Completing over 200 energy audits and building about that many buildings over the last 40 years, I can conclude that your personal choices and lifestyle is going to effect your energy usage more than any other factor in your home. How often will you use the clothes dryer? How warm will you set the heating thermostat ? Will you install a timer on the water heater and when you need to plug in your auto at 40 below? How often will you fill the tub? You get the point. I could build the same house for two families and the resulting utility bills would vary greatly. If you want to limit your carbon/coal usage and realize savings it is something you need to control on a daily conscious level, just as much as you put thought and expertise in designing the home.
In my opinion you will need a garage more than and sooner than a screened in porch that will be used only in the short 3 month summer. Unless you can work from home (and have high speed internet) clearing ice and snow off your vehicle each morning to get into town is no fun and parking indoors and not needing to plug the car in over night is well worth the expense of a garage that you can actually park in and not just store your junk in.
I can't quite tell by the drawings the extent of your southern window exposure, but be sure to be able to have the ability to shade the windows to some degree during the summer as the 16 hours of sun can readily heat up a well insulated home to make it uncomfortable without A/C which is counter productive and not really needed in zone 7.
So far, local PV solar arrays are not working out as well as promised by some dealers and manufacturers. One taxpayer funded array in my neighbor, which cost 150 thousand to install, is not able to supplant the $3,000 annual projected savings and the panels are warranted for only 20 years, leaving the the last 30 years of payback under question. The efficiency rating so far is only 16 percent and the winter time production is far below projections due to limited sunlight on very short days and dense clouds. You can fair better using conservation and carefully tracking usage. I currently serve on the local power coop advisory board and can tell you that the EPA proposal for coal generated power (what we have in N. MN) is going to drastically increase rates under the proposed regulations. As the grid price rises, and more site based generation is installed (solar or wind) the power companies will need to increase the monthly base rate of connecting to the grid when you need the power to heat your home at night in sub-zero temps. Net metering will cause the the rates to increase even more as those without self generation will be billed more to make up for the loss of funds to cover the cost of maintaining the local grid. Overall the future of unlimited, reliable and affordable electrical power is not looking very promising.
Sorry, this entry got a lot longer than originally intended. I wish you and your wife a happy life in your new home and hope enjoy the lifestyle here in the land of 10,000 lakes and even more mosquitos.
Response to Mike Rak
Thanks for your thoughts Mike.
I am aware of the...impermanence... of poplars. I may take a few more down. I took down the largest ones hoping to make some room for the smaller birches to take hold. I'll do some more culling, and planting of sturdier species, once the dust has settled some.
We do have a quonset building we put up a few years ago to shelter our cars in during winter. It is about 100' from the house. I might build another garage someday, but I have no interest in an attached garage. We only plug in our cars when it is less than -20 degrees and know we'll be going out the next day. I entered into a conversation with my employer a few years ago, and the options for working remotely from home, especially on ugly weather days, are available.
I am also aware of the extent to which behavior effects energy use. The two of us have averaged about 300 kwh of use per month (with an electric dryer, range and water heater) for the last 10 years. I am expecting slightly lower use in the new house with better lighting and appliances, but we'll see.
I love sitting outside, so the porch was non-negotiable in the budget cutting phase. The mosquitoes, and ticks are brutal in the summer, as you undoubtedly know, so I will use it. The outdoor fireplace will extend the usable season even though it was a pricey item. Some things we just want, regardless of practicality or payback. We humans are funny that way sometimes.
The large south windows will be fully shaded by the roof overhang a week or so either side of the summer solstice, which is why they are recessed in the plan. The additional south windows will be shaded longer than that. My energy modeling actually showed a slight improvement in annual consumption if I raised the large south window sills up 18" off the floor, but I felt the visual effect of the full height windows was worth the extra few dollars of heat. Aesthetics trumped performance on that one.
Thanks also for the PV thoughts. I intend to monitor our usage for a few years and decide what size array we may ultimately want. The rebate and grid-tied fee structures will likely be quite different by then so I'll reassess when the time comes. I am watching those trends (and lawsuits) also.
Elden
One of the most beautiful rooms I can remember was a screened porch on the east side of a house on Prince Edward Island. It was used as an office with only a simple desk and chair. On the summer day we visited it was infused by dappled light filtered by the surrounding copse of birches. It was one of the reasons I went into architecture and your photos made me think of it.
Screen Porch Suggestions
I like your train of thought and have made several notes of my own for some future dream home. Years ago I attended a couple weeks' seminars at an IBM retreat in up-state NJ and they had a student break room for each class area similar to your screen room - extended from the main structure by a short "breeze way" - but made up as a 3-season room. Given your location and the amount of time a screen room would be practical, I'd recommend a 3-season room design instead of just screen, even if you only use triple-track storm windows to be able to open to a screen facing. Also - you might want to integrate the 3-season room idea into your front (North) porch too (or a second room if there was some other reason for the East-side screen room, like a view) - converting it into a mudroom/vestibule so your home interior is not directly exposed when the passage door is opened.
spacing of wood studs
Elden,
I see that you have your 2x6 studs spaced at 16" on center and are also using a double top place. Is the 16" spacing needed for the IP support? And is the double top plate because the trusses are at 24" o.c. and not aligned with the studs?
Responses to Malcolm and David
Thanks for sharing your experience Malcolm. If I have only a few transcendent moments in the screened porch, it will be worth it to me.
David, I can isolate the entry hall from the rest of the house a bit on the coldest days with a sliding door between the entry and the liv/kit/din space (the thick line behind the pantry). The front porch is very much just a weather protected space and not intended to be a transitional space from interior to exterior.
I had considered whether I'd ever need or want to have storms on the screened porch if only to block a prevailing wind if necessary. I'll live with it a few years and see if I want to add those later. We have done a few rooms for clients with triple track storms, and I don't think it is the feel I want in this space. I definitely want a "mostly outside" feel, as opposed to a "somewhat outside" or "partly inside" feel. That is hard to quantify, but the screens alone feel right to me.
Response to Hallie
Hallie, Yes I have done studs @ 16 o.c., and the trusses are 24" o.c., thus the double top plate. That is what builder's typically do here, but I didn't default to it without consideration.
I haven't adopted the 24" stud spacing, much less the single top plate with stud- aligned trusses, for purely emotional/irrational reasons. I know it is acceptable by code. I know it is "sufficient". but I get a much better feeling of solidity with the 16" o.c. stud wall. I have actually built a couple of sheds with "advanced framing", but I opted not to do it on the house simply out of gut instinct. I discussed it with my builder, and he felt it would save a little money on studs and plates, but not a significant amount (maybe a couple hundred dollars at the most). I didn't ask the insulator if it would save a few dollars on the dense packing, but I suspect I wouldn't see any savings there. These things combined with the substantial layer of exterior foam to thermally break the studs and plates led me to stick with the 16" centers.
Hallie,
Moving the stud spacing from 16" to 24' is a common and fairly inconsequential change. Using single top plates, or other features of advanced framing, are something else altogether. My take is they are another of the innovations that look appealing at the conceptual level, but pose more problems that they are worth.
I love the exterior nailbase
Elden,
Thanks for this detailed description. I love the use of nailbase on the exterior. It seems like a much less fussy way to get continuous insulation than staggering sheets of foam, taping, and installing strapping. How do you plan to detail the windows? Innies, plywood boxes, or some other method?
Did you put much thought into using something other than Zip panels for exterior sheathing? You're not using the WRB aspect of them, so I'm thinking you could have gotten away with plain ol' OSB, but then I suppose it would have made it a little tougher to use the sheathing as the air control layer.
Response to David Hicks
David. I'll include some window details in the next installment: for both what I initially planned, and what I subsequently changed with my builder.
I did think a lot about the structural sheathing/air barrier. I started with plywood or OSB in the specs, but due to concerns about tape adhesion and non-airtight OSB reports we opted for the ZIP sheathing. True that we won't be utilizing the weather resistant barrier (WRB) function of the ZIP sheathing, but I was more confident in the air barrier buildability and continuity than with other sheathing options. The exterior walls are mostly sheathed with the ZIP now, and the roof is sheathed, so I'll provide some additional experiences soon as the sealing is undertaken and the nailbase panels go up.
Cold roof ?
In the roof design details, there does not appear to be soffit ventilation and an air space above the insulation. Is this design a hot or cold roof ?
Response to Robert Leliaert
Hello Robert. You are correct, there is no soffit ventilation or air space above the insulation at the roof to wall intersection. Since the trusses have a 20" energy heel at the framing plane, and because I have a metal roof, to be honest I just wasn't concerned about ice damming. I also do not have snow retention on the majority of the roof, and so far the snow just slides off on the south side anyway.
Since the attic insulation is blown cellulose, if I do get any condensation on the underside of the sheathing where the insulation is in contact with it, it can certainly dry to the attic side in due time. If the cellulose in that location settles at all, then there'll be a small air gap, but not a ventilated channel.
The attic above the insulation is ventilated with gable end vents on each end of the house, so it is technically a cold roof...with a slightly less cold heel. Keep in mind it is also a rural residence, so there wasn't a building inspector to argue with about it.
Log in or create an account to post a comment.
Sign up Log in