Image Credit: All photos: Spartan Giordano
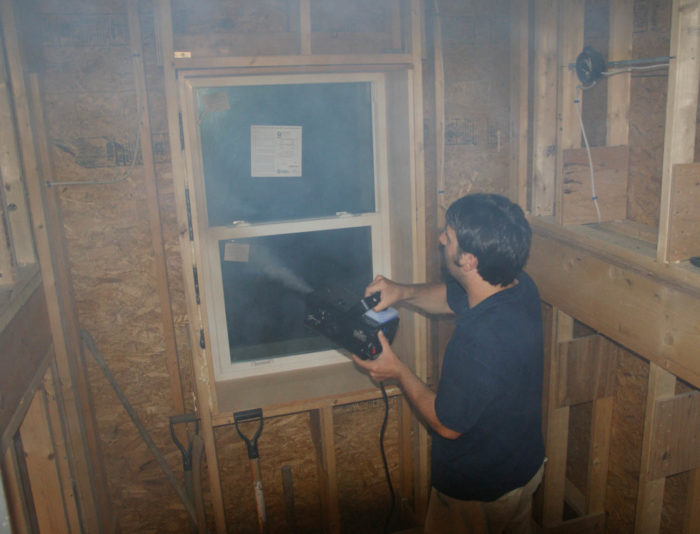
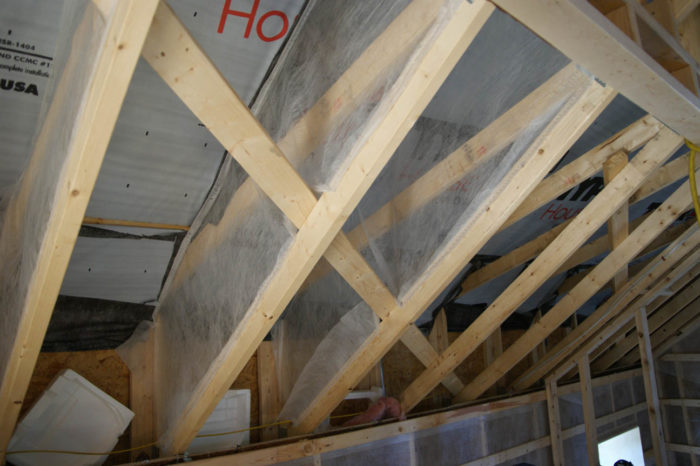
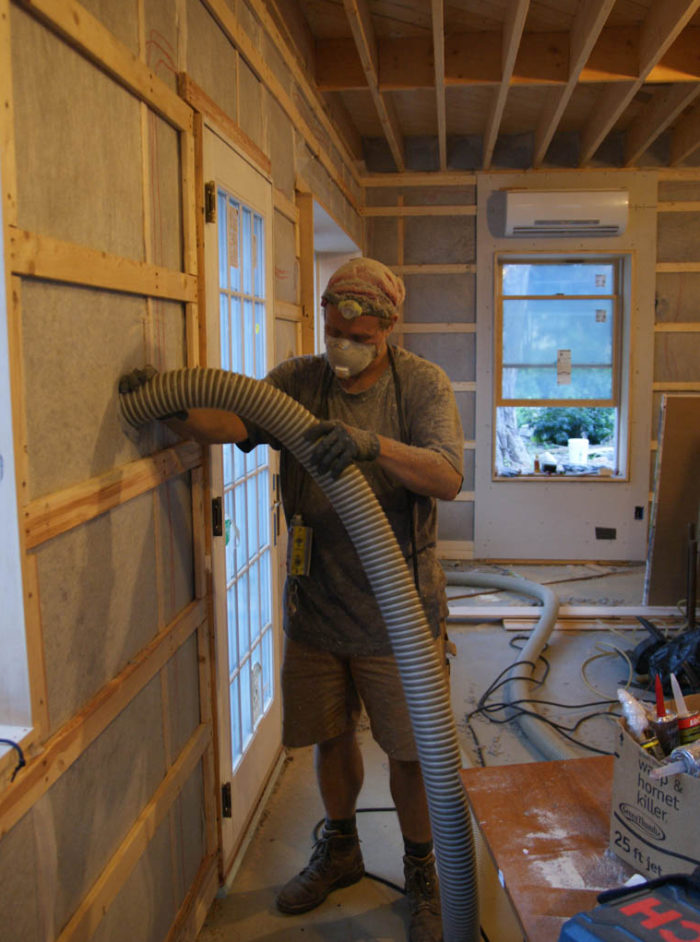
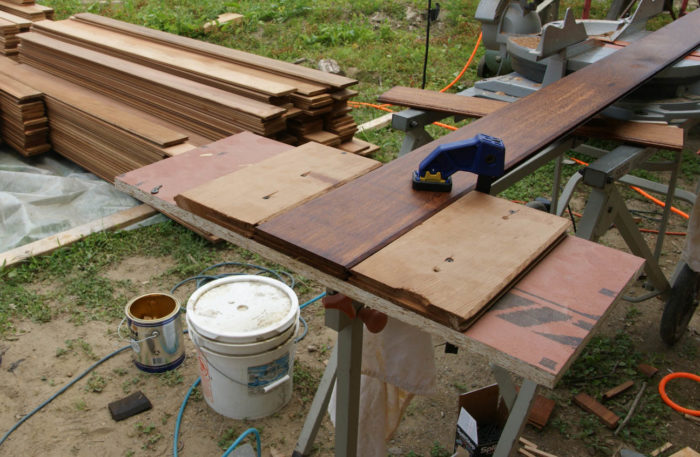
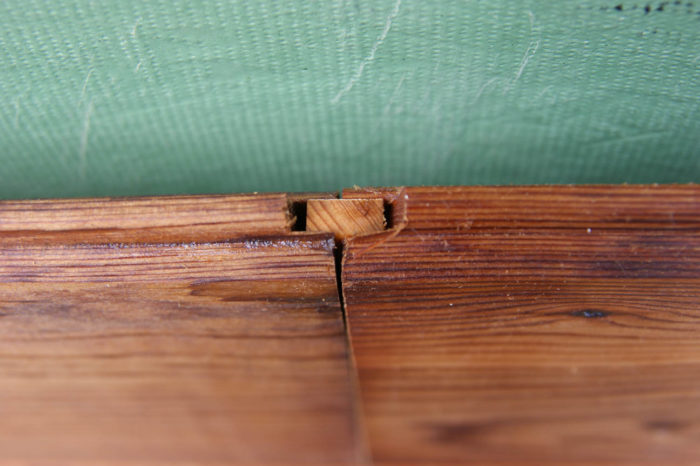
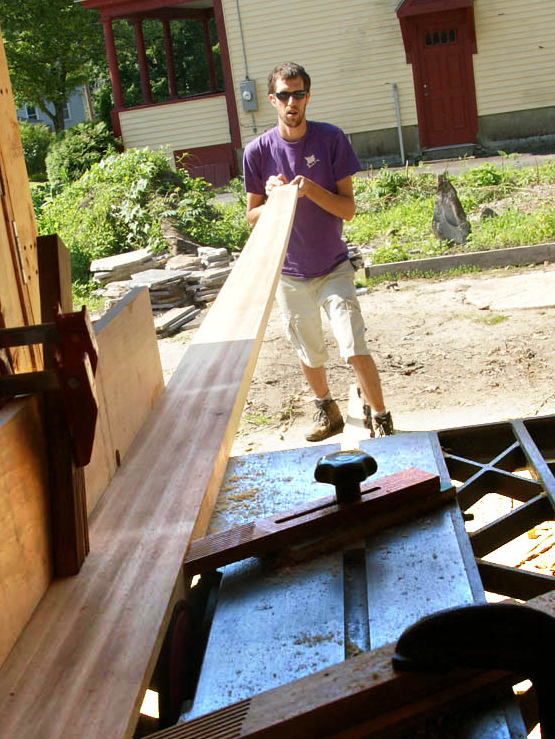
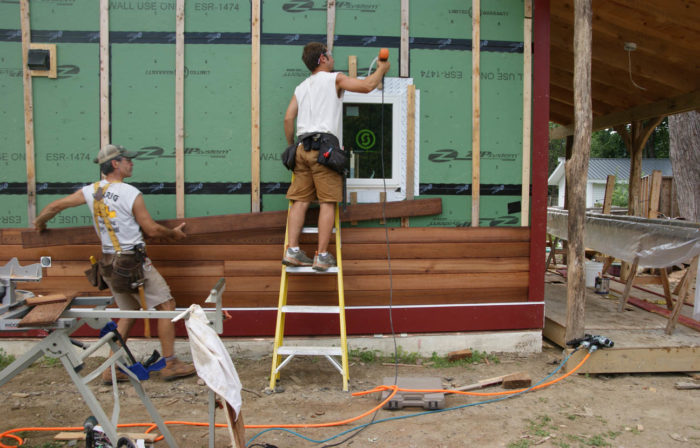
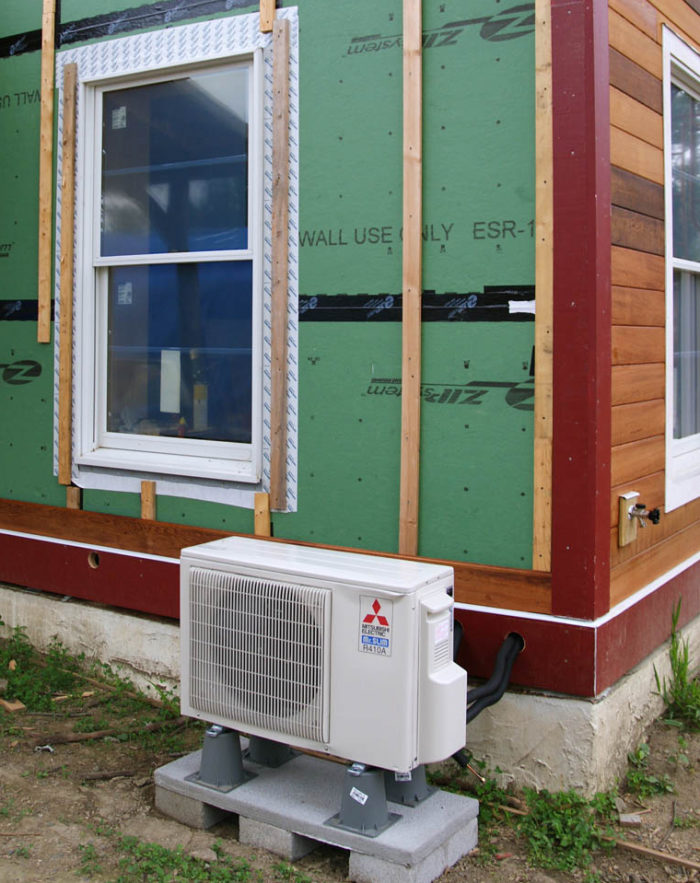
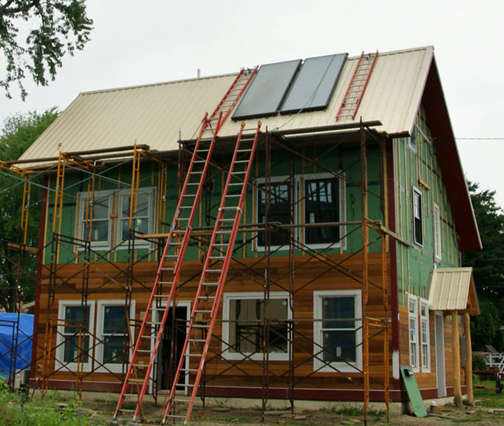
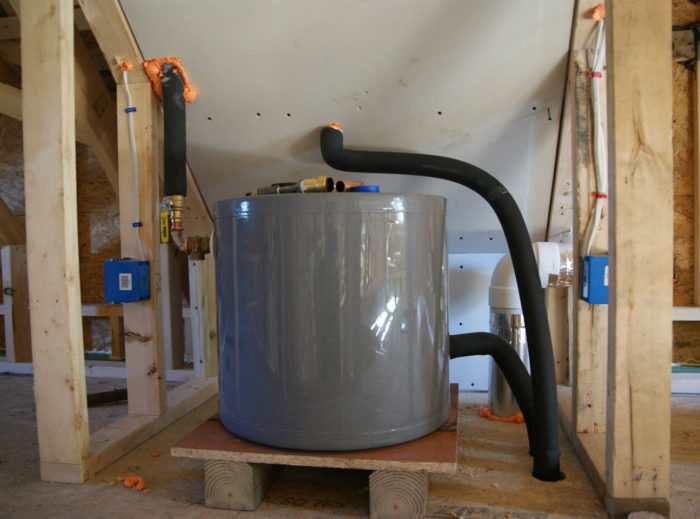
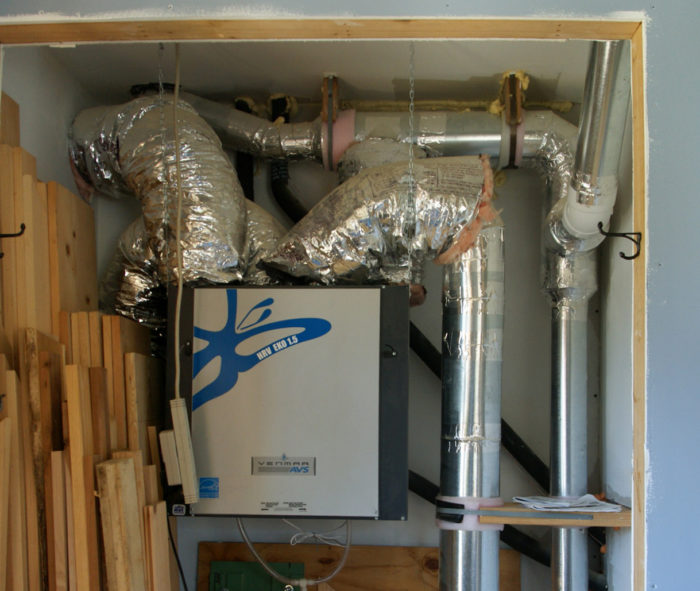
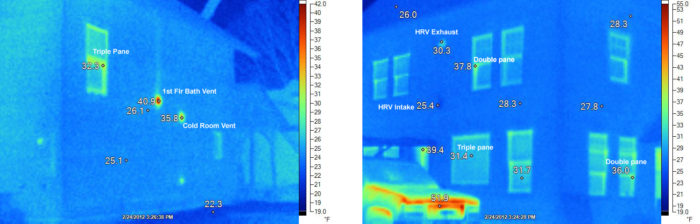
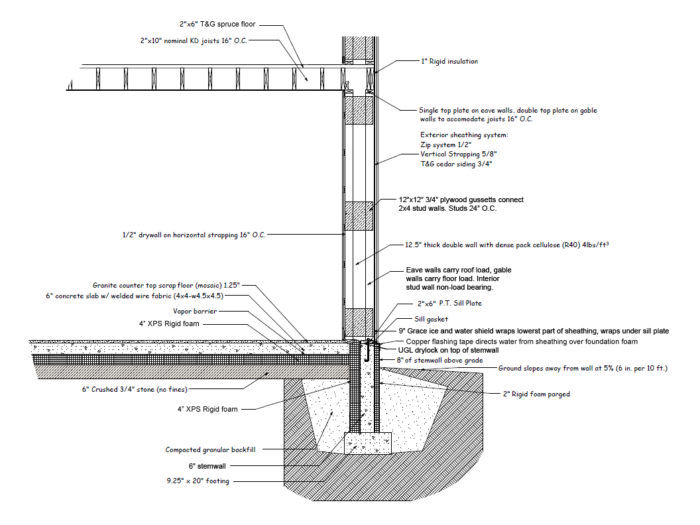
Image Credit: All photos: Spartan Giordano I installed 4 inches of vertical rigid insulation at the slab edge, all the way up to the bottom of the double-stud wall. Due to several factors, non-load-bearing interior stud wall hardly bore on the slab at all. This is a photo of our west wall, which was 13 inches thick rather than the 12 inches that I specified. The rigid foam board was broken off so that it would sit below the top of the slab. Later, I used one-part spray foam to seal the top of vertical insulation. The second floor gable walls are balloon framed. There will be a ledger installed south of the transom window to catch the east-west joists. There will be a load-bearing wall half way between the gables. Note the notches on the top of the gable wall top plate. This will be where the “lookouts” will be installed. The 4-foot lookouts for the rake overhang will be attached to the first truss with structural screws. We used Tyvek FlexWrap to flash the stone threshold sill pan. Behind the white FlexWrap is the blue rigid foam insulation (1.5-inch-thick XPS) that the door will sit on. The foam eliminates the thermal thermal break under the door. The copper flashing tape provides an impervious surface protecting the parged 2 inches of vertical rigid foam that is attached to the exterior of the foundation. The jamb extensions were attached to the aluminum-clad door with Kreg screws and waterproof glue. There is a second set of screws attaching a strip of wood near the outer edge because the piece of cypress that we used wasn’t very wide. A blower door test is nice, but actually finding the leaks is better. To do this, we flipped the blower door fan around so that it presurized the house. Matt blows fog at a window, a common location for leaks, while observers outdoors look for escaping fog. We used Typar to create a ventilation gap below the sheathing of the roof. The truss bays are separated by sections of InsulWeb fabric. An employee of Uptight Insulators is dense packing cellulose into the wall cavity. Note the ductless minisplit unit on the wall at the rear of the photo. To reduce water entry at siding butt joints, Adam devised the jig pictured above. The jig let us use a router to put a groove on the edge of each siding board. After two adjacent siding boards were installed, we pushed a spline into the groove. The process sounds time-consuming, but the jig made it a snap. A spline was inserted at siding board butt joints. We rabbetted a groove on the edge of the cypress corner boards. The groove allows the siding to tuck behind the trim. This prevents water from getting behind the siding and it creates a better looking connection. The first pieces of window trim are being installed with stainless-steel finish-head screws. The siding is stunning, especially when the sunset hits it. We have been getting compliments from everyone who walks. There are also a lot of cars that drive by very slowly with passengers craning their necks. The ductless minisplit condenser is lower to the ground than I would have liked, and we’ll need to make sure snow doesn’t build up around it. Eventually I will build a little roof over it. The condenser is located about about a foot and half away from the house so the airflow to the fan is not impeded. Although it is not obvious in this picture, the solar thermal collectors are not installed straight on the roof. This is no accident. Because this is a drain-back system, the water needs to be able to drain from the collectors back to the drain-back tank. In my opinion, this stagnation protection technique is better than the more common use of pressurized antifreeze combined with a heat dump if there is too much heat in the system. The solar hot water system's drain-back tank. The heat-recovery ventilator (a Venmar EKO 1.5) is located in the master bedroom closet. The ventilation system has 6-inch-diameter main ducts 4-inch-diameter branch ducts. We used off-cuts from granite countertops for flooring. James, Beth, Sarah, Mike, and Dan joined us for a granite floor work party. The mudroom floor was done towards the end of the process and so benefited from lessons learned. Nominally 1.25-inch countertops vary +/- 1/8 inch. For the mudroom, thicker pieces were discarded and thinner pieces were built up with additional thinset in a technique called “backbuttering.” The “doormat” piece with red veins required a lot of attention. It varied in thickness by 1/4 inch across its length; no doubt this was why it was in the discard pile at the countertop manufacturer. The view from the living area into the dining area. The view from the west reveals the shape of the saltbox roof. The clothes lines that I installed in the “overlook” area between the first and second floors take advantage of the natural air flow there. Hannah was skeptical at first that we could get along without a dryer, but she is a convert now. If the clothes aren’t drying fast enough, which happens when it is humid, we turn on the ceiling fan above the clothes line. This thermal image shows that the walls are uniformly at the exterior temperature. The 40.9°F reading on the left image is heat loss from the bathroom vent. As expected, there is a fair bit of heat loss around windows and doors. The windows on the left image are both triple-panes from Serious. On the right image on the second floor wall one can see the intake and exhaust duct hoods for the HRV. We are taking in 25.4 degree air (the lower hood) and exhausting 30.3 degree air (the upper hood). Wall section.
More Guest Blogs


The superinsulated home that I designed and built for my family of three in Greenfield, Massachusetts has been comfortable for the entire year and serves as an example of successful design for our climate. We moved in to our new home in February 2012.
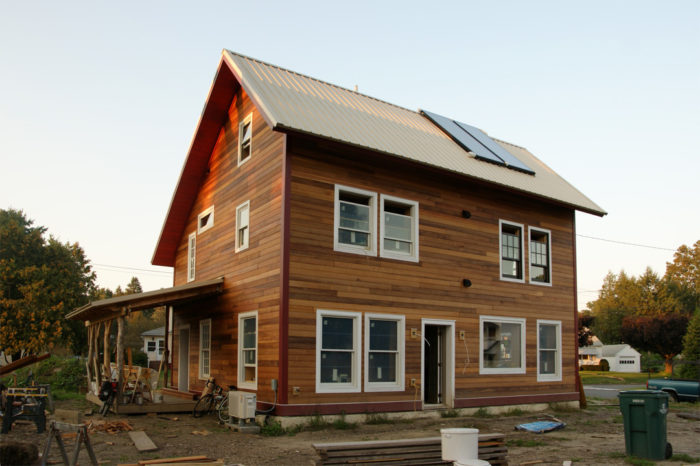
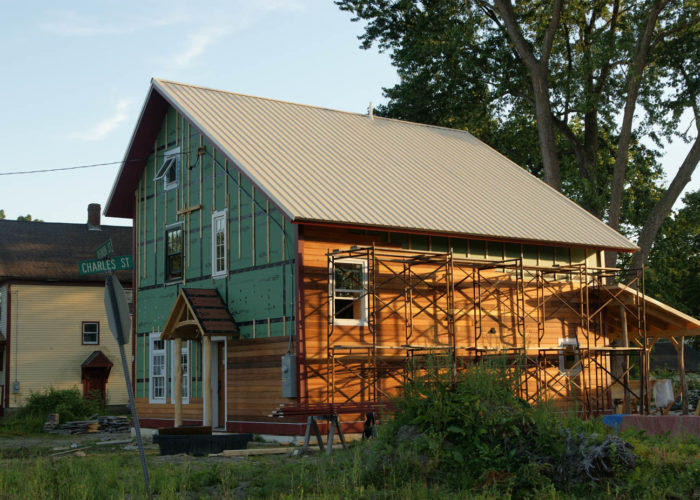
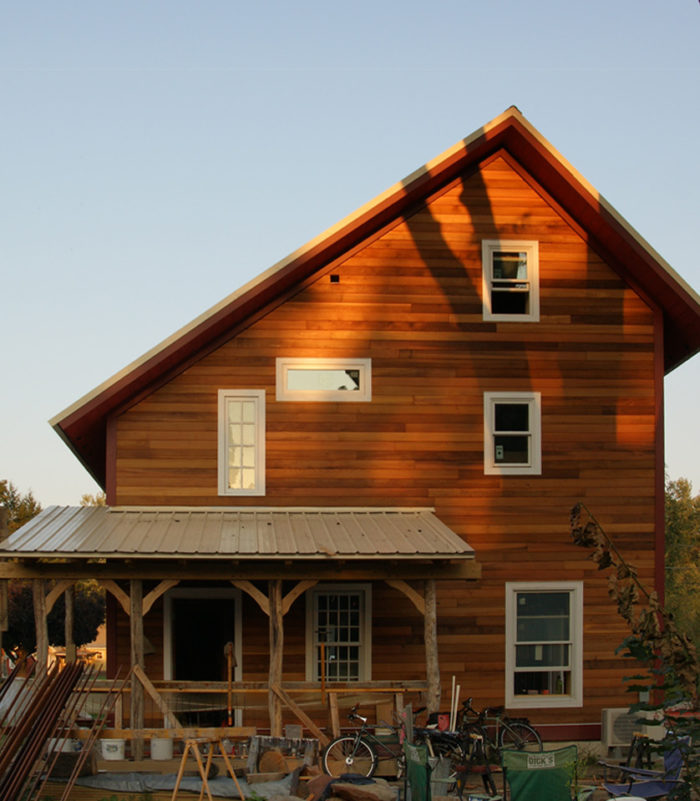
Modest in size, our home measures 26 feet by 32 feet and has 1,500 square feet of living space, with two full floors plus a partial third floor tucked into the slopes of the cathedral ceiling. In order to decrease the overall volume while maximizing south-facing exposure, we chose a saltbox shape.
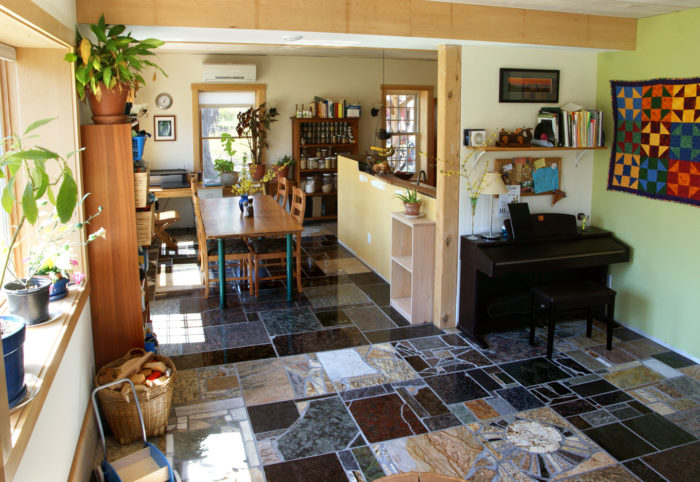
An opposing design goal was a sense of spaciousness, which was achieved with higher ceilings. The first floor has 9-foot ceilings, while the master bedroom’s cathedral ceiling is a rather tall 15’6″. Closets, utility spaces, and bathrooms were all positioned on the north side of the house, and generous windows allow natural light (and solar heat) to enter all but one of the living spaces. To facilitate the movement of heat throughout the home, we chose an open floor plan and included an additional air passage between floors adjacent to the stairwell.
A thick concrete slab and lots of south-facing glass
The house is built on a slab and makes use of passive solar design. One quarter of the south-facing wall is glass, which is significantly greater than design norms. The 7-inch-thick slab is thicker than usual. Since the majority of our windows are conventional double-pane windows with standard low-e coatings, we have a weighted average SHGC on the south of only 0.33 — not as high as some passive solar designers recommend.
When the house is not heated by the sun, we use a single 12,000 Btuh Mitsubishi air-source heat pump located on the first floor. When the outdoor air temperature is 5°F, this ductless minisplit unit is capable of putting out 11,200 Btuh. Other than internal loads (appliances, lights, occupants and cooking), there are no other heat sources.
The home has been very warm and comfortable throughout the winter. Since our modeled heat load is 15,000 Btuh (0°F outside, 68°F inside), I was concerned that we weren’t going to be warm enough. Most of the difference may have been made up by using nighttime single-cell cellular blinds on 83% of the glass. (More details on performance are in the next section.)
Double-stud walls filled with cellulose insulation
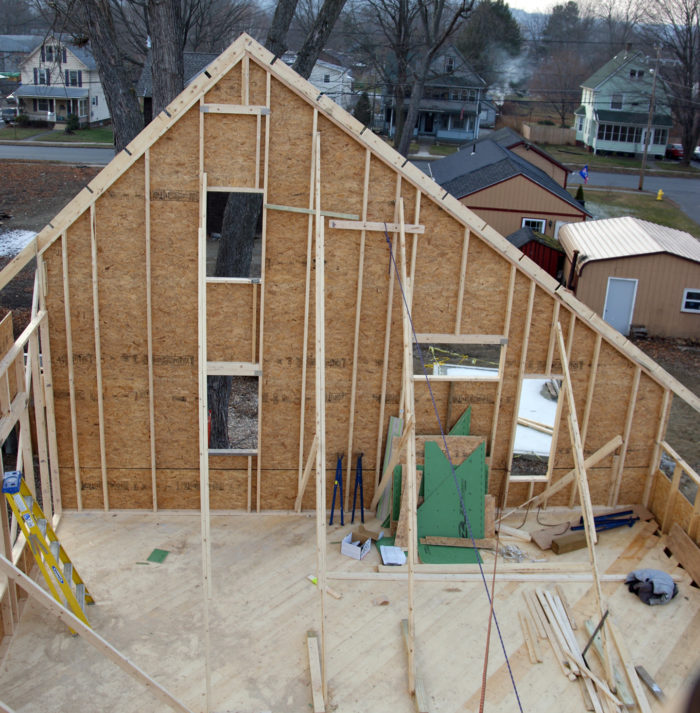
The house has lots of insulation and a very tight envelope. The blower-door test showed that the house has 0.54 air changes per hour at 50 Pascals. The home has double-stud walls with 12.5 inches of dense-packed cellulose (installed at a density of 4 pounds per cubic foot). The roof is framed with parallel-chord trusses insulated with 21-26 inches of cellulose (depending on the pitch of the roof).
SPECIFICATIONS
Location: Greenfield, Mass.Construction completed: 2012Footprint: 26 ft. x 32 ft.Area: 1,500 square feet Heating degree days: 6,700Heat loss at design temperature: 15,000 BtuhFoundation: Stem walls with 7-inch-thick slab on gradeSlab insulation: 4 in. XPS (R-20) horizontal insulation under entire slab; 6 in. XPS (R-30) vertical insulation at slab perimeterWall construction: Double-stud walls insulated with celluloseWall R-value: R-46Roof construction: Vented cathedral ceiling framed with parallel-chord trusses and insulated with celluloseRoof R-value: R-78Blower door test results: 0.54 ach50Windows: Double- and triple-glazed windows from several manufacturers; weighted average U-factor = 0.28Roofing: Through-fastened steel roofing panels over Zip sheathing Siding: 1×6 T&G clear Western red cedar over a rainscreen gap (vertical furring)Space heating: Mitsubishi MSZ-FE12NA ductless minisplitDomestic hot water: 2 solar thermal collectors connected to 80 gal. storage tank; electric resistance backup.Mechanical ventilation: Venmar EKO 1.5 HRV
I was originally planning on dense-packing the trusses, but later realized that this was not going to be possible due to their depth, and was probably not desirable since the roof assembly was going to be unvented. Switching the design was costly, since the change didn’t occur until we were almost ready to insulate. The change required the installation of an interior air barrier and the creation of a 4-inch-deep ventilation channel by stapling Typar to the underside of the top chords of the trusses. We also reinstalled the ridge cap with Coravent under it. Our insulation contractor then filled the cathedral ceilings with a “medium pack” of cellulose, installed at a density of 2.5 pounds per cubic foot — dense enough so that it won’t settle.
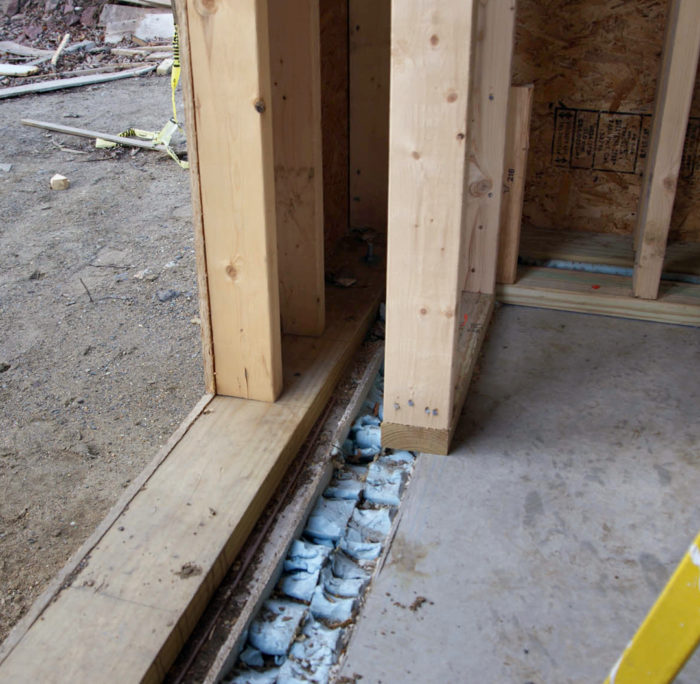
The foundation has 4 inches of XPS below the slab, and 6 inches of XPS installed vertically against the stem wall.
Solar hot water and an HRV
In addition to passive solar orientation and high levels of insulation, our house has many other design features that improve its energy efficiency. We have a water-charged drainback solar hot water system with two 4’ x 10’ SunEarth collectors and an 80-gallon HTP SuperStor tank with electric backup. For ventilation, we are using a Venmar EKO 1.5 heat-recovery ventilator that returns 80% of the exhaust heat back to the house. The ventilation system pulls stale are from the bathrooms and kitchen and supplies fresh air to the living space and bedrooms. We ran 6-inch main ducts with 4-inch branches, and there is one more supply than exhaust.
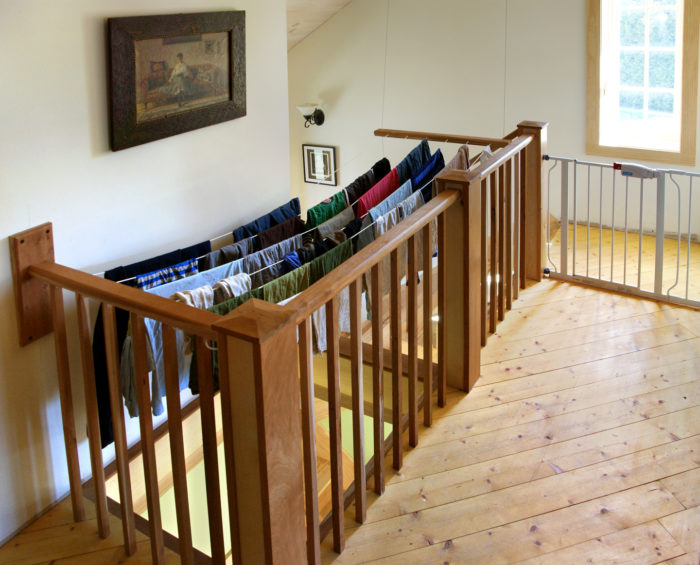
One of my favorite energy-saving ideas for the home is the laundry rack installed over the air passageway between the first and second floors. The natural air flow between the floors dries most clothes within a half day. If that isn’t quick enough, there is a ceiling fan right above the drying rack. It has been so effective that we have not needed to purchase a clothes dryer for the home. The best part is that we love doing laundry since it is so effortless; the washing machine is also on the second floor and the rack is at waist height.
Recycled materials
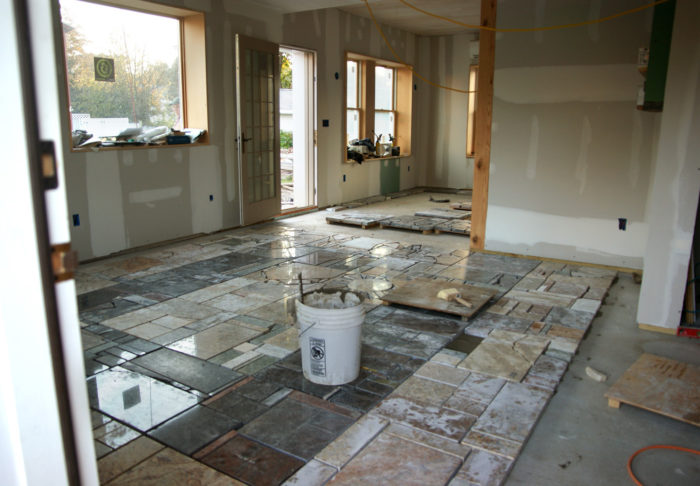
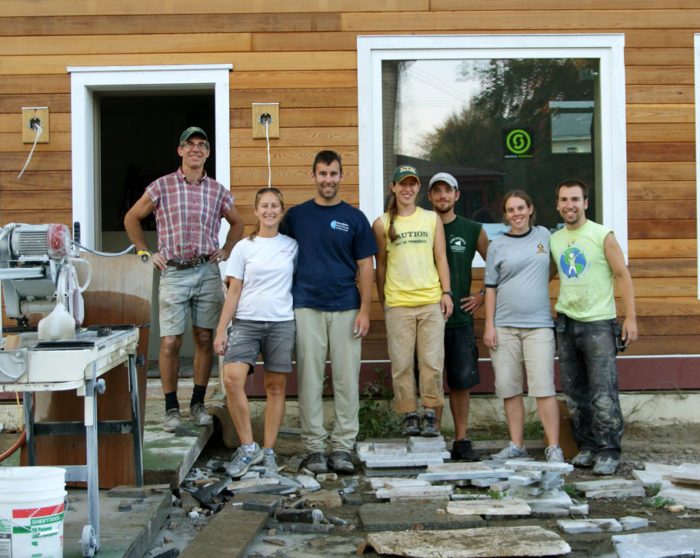
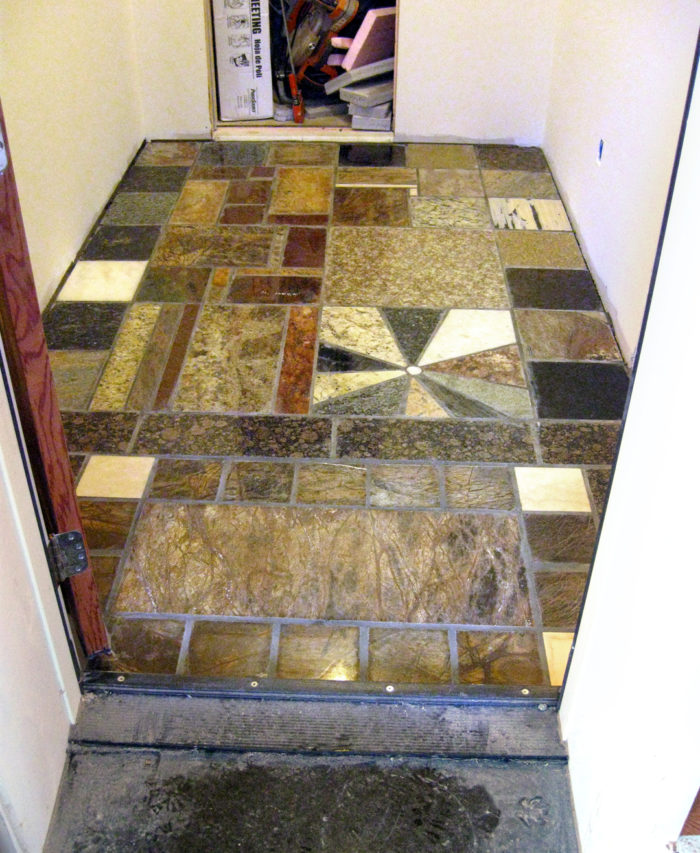
Our finish flooring on the first floor consists of a mosaic of granite countertop off-cuts. If one calls around to countertop installers, chances are that one or more of them will have a large pile of scrap and broken pieces that they are willing to give away. Our granite off-cuts were 1 1/4 inch thick. This is not an easy or quick material to work with, but the result is very rewarding. Not only is the material recycled, the added thermal mass benefits the passive solar design and serves as a remedy to the cold appearance that tinted concrete slabs sometimes create.
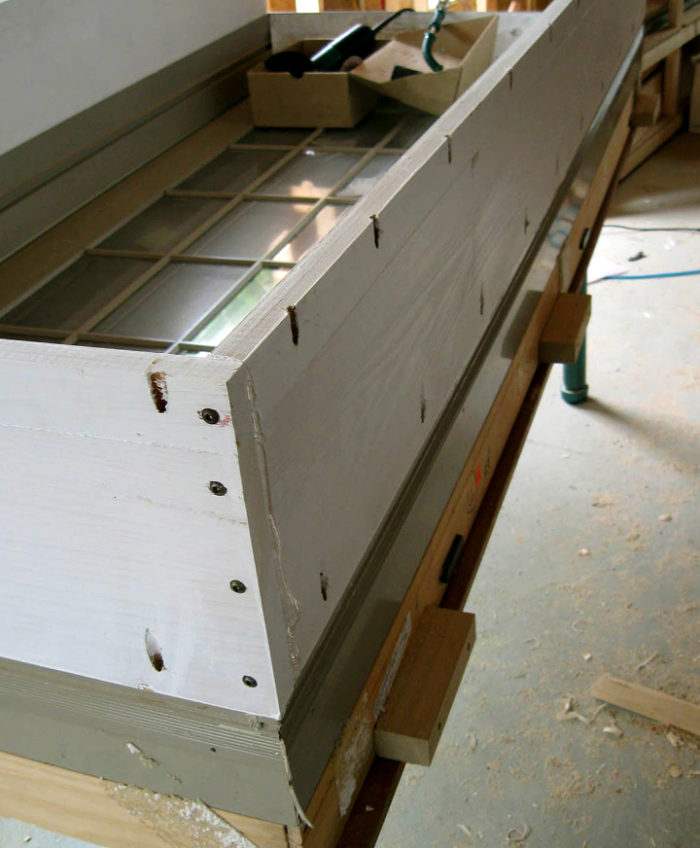
In addition to the granite, we used a number of other recycled materials in our home. Earlier I mentioned that the majority of our windows were conventional double-pane double-hung units. These were all jobsite cast-offs or former floor models from a lumber yard that closed. They were purchased before construction began and worked into the design. This is also the case for all of the exterior and interior doors. Although there are a couple of windows that, from the outside, do not match, the differences between them are minor and arguably make the home more interesting.
Other recycled materials include all of our foundation foam, sinks, cabinets, and doorknobs. Many of our recycled materials were obtained from Craig’s List and our local building salvage store, Renew. Our siding (tongue and V-groove clear Western red cedar) was also a lucky Craig’s List find. We installed it on vertical strapping over Zip sheathing. CoraVent prevents bugs from getting into the rainscreen gap behind the siding.
We implemented a number of other strategies to make our home more sustainable. There is a cold room where, once complete, we hope to store root vegetables and possibly all of our refrigerated goods during the winter. The room has a dedicated air intake and exhaust.
We reduced the use of concrete and drywall, which are both energy-intensive materials. There is no basement, and the rebar-reinforced stem wall is only 6 inches thick.
Rather than use 5/8-inch drywall to span the 24-inch-on-center studs, we strapped the walls so we could use ½-inch drywall. Also, 50% of the home’s ceilings are finished with tongue-and-groove pine instead of drywall. In areas where the pine boards formed the exterior ceiling, we first installed Tu-Tuf polyethylene as an air barrier and sealed it to the top plates of the surrounding stud walls.
Isolating the mudroom from the rest of the home with an exterior door keeps the mudroom an average of 11 degrees colder than the first floor during the winter. Finally, ivory (white) screw-down metal roofing reduces the heat island effect, and perhaps also our cooling load during the summer.
Electric bill for the first year: $700
In its inaugural year, our all-electric home used 4,200 kWh costing us $700. During this period there were 6,691 heating degree days (base 64°F). Unfortunately, we have no way of parsing out how many Btus our heat pump put into the home. Going forward, there will be a TED 5000 energy meter that will allow us to log and compute this data. As I mentioned earlier, the home has been satisfactorily heated. The bedroom doors are normally open, but when closed, some guests have preferred a little extra warmth (provided by a space heater).
The heat pump is normally set to 63°F during the day and 59° at night. Interestingly, a data logger on the first floor recorded an average temperature much higher than the heat pump set points. From October 23 through January 27 it logged an average of 68°F with a range of 62° to 73°F. Even on overcast days with minimal or no solar heat gain, the logger recorded temperatures 3°F higher than the heat pump set point. Perhaps the discrepancy has something to do with the window or slab temperatures, although there is a fair bit of furniture in the way of the slab.
During this period, the data logger recorded an average relative humidity (RH) of 48% with a range between 39% and 67%. The logger was subsequently moved to a second-floor bedroom, where it recorded an average temperature of 65°F with a range of 61° to 72°F. The average RH in the bedroom was also 48%, with a range of 43% to 58%. The humidity has undoubtedly been greatly affected by indoor laundry drying. On average, we did one large load of laundry per day.
I would like to report data from the internal HRV temperature sensors, since the HRV averages the interior air temperature of the house and provides an outdoor air temperature data-point as well. However, 2 out of 3 exhaust grilles are in bathrooms that have exhaust-only fans that leak a fair bit of cold air into the home. This is a bit of a thorn in my side, since it was entirely preventable. My advice to those who want to install an exhaust-only fan: for an additional $100, install an inline motorized damper that operates with the fan switch.
There is one data point from the HRV that is worth mentioning. On one January day my wife reported on Facebook: “I’m so grateful for our superinsulated passive solar house today! It’s 14° outside, but it’s 70° inside with the heat off, the solar hot water is cooking away, and we’re basking in the sunshine.” This is perhaps one of the most powerful stories about our home: routinely turning the heat off during the winter on sunny days.
The drainback solar hot water system has performed very well. Although we have an Apollo SunReports monitoring unit, the data collection has not functioned properly. To date, SunReports has not resolved the issues. However, I can report that I had the water heater’s electrical element shut off from June through September 2012 and we experienced no disruption in hot water.
Lots of volunteer labor
It’s difficult to calculate the cost of our home for many reasons. My own labor was free and unaccounted for, and I had free help from friends, family, classmates, and neighbors. Friends who I did pay agreed to work at reduced rates to accommodate our tight budget. Also, some of the savings we reaped on materials were unique opportunities.
Finally, as with many homeowner-built projects, trim remains to be installed, one of our countertops is plywood, and there are still no closet doors. With these caveats, before rebates and tax credits, we spent $161,000 on site-work and construction, including a foundation for our future garage. After $15,000 in rebates and incentives, $8,000 of which came from Tier III Energy Star certification, we had a net cost of $146,000. That comes out to about $97 per square foot — less if one omits the cost of the garage foundation.
No prior building experience
The fact that we have had such good success (so far) with our home is due to several factors: the knowledge and help of many smart people, thinking every detail through, and modeling all of those details in ArchiCAD.
Our success is even more impressive considering that I had virtually no prior building experience. I had never even used a nail gun. I certainly could not have accomplished what I did without the help of Adam Heintz (who I hired as lead carpenter) and Greenfield Community College professors Peter Talmage and Scott Baum, whose building science classes I enrolled in.
There were many others who helped out in small and large ways: neighbors, classmates, friends, and family members. The entire process of buying and clearing the land, to detailed architectural plans, to photographs of flashing details are all available at our blog.
Spartan Giordano began this building project with virtually no building experience. With help from friends, family, neighbors, and professors, he built a superinsulated passive solar home for his family in Greenfield Massachusetts. Spartan currently installs solar systems with Sandri Energy.
Weekly Newsletter
Get building science and energy efficiency advice, plus special offers, in your inbox.


18 Comments
I just gotta say...
Those granite-mosiac floors are DROP DEAD GORGEOUS! (A great way to add some thermal mass to the passive solar aspect too!)
The setpoints on mini-splits don't have high precision regarding average room temps since they only sense the incoming air temps at the head. It's not at all surprising to see 3-5F deltas when measuring the temp at some random location in the space well away from the air inlet of the mini-split head. While there are wall-thermostat retrofits available for some models, it's not usually worth the bother- most people can bump it up/down to find the best comfort/efficiency setting empirically.
Any plans to take it Net-Zero with some photovolatics in the works?
Net zero soon
Dana, thank you for the compliments and the insight into the mini split. Yes! We will soon be adding PV. I just put a downpayment with Sandri Energy (the company that I work for) for a 4.5 kW system. We are really looking forward to producing more electricity than we consume.
set points
"The heat pump is normally set to 63°F during the day and 59° at night."
You're really living up to your first name, aren't you??!!
Beautiful house
I really like posts like this one. It helps to see a project in detail. Thank you for sharing your experience.
re: set points (response to Gordon Taylor)
In a high-R house the radiation temperatures from all surfaces are about the same, which makes 63F air temps far more comfortable than it is in homes where the colder exterior surfaces might be in the low 50s or lower. Mid-60s set points aren't all that tough to deal with at ALL, especially if you have the option of sitting in a sunny spot.
Crunch the numbers
My trusty calculator comes up with electric costs of 16.6 cents/kWhr (go for the PV). Based on 1,664 sqft (exterior-2 floors), your EUI is 8.62 kBtu/sqft. Sweet!
re: set points
Keep in mind that we averaged 68 degrees on the first floor for most of the winter. That average includes night time temperatures as well.
re: Crunch the numbers
Jim, EUI is not in GBA's glossary, what does it stand for? Also, I am curious how you come up with 8.62kBtu/S.F.?
reply to Spartan and Dana
Many thanks for the clarification. Great post, great details.
PassiveHouseSkeptic checking in...
Nowhere did I see the word "house" immediately following "passive"...hmm.
Congrats on beating the PH infiltration standard by 10%!
How fared your comfort during summer 2012?
While Mass is certainly milder than sweltering Florida, I know there are intervals of a few days duration where highs approach 95 and dewpoints hover near 70. I imagine the ductless kept the first floor quite comfortable, but what about the upper levels?
SHGC
DO you mean as low as passive solar designers recommend, or as high as PASSIVITY as is recommended? .33 is too high, so it is good that you have so much glass, otherwise you would not get much passive solar benefit.
Siding choice?
Curious about the t&g siding choice. It doesn't generally perform too well in our NC climate except in very sheltered locations, due to a tendency to trap water and not enough movement potential with humidity changes, though certainly the rainscreen detailing would help. Is it commonly used as a siding material in the northeast?
Energy use intensity
Spartan,
EUI = energy-use intensity
More info:
http://www.energystar.gov/index.cfm?fuseaction=buildingcontest.eui
http://www.buildings.com/article-details/articleid/12617/title/what-is-energy-use-intensity.aspx
Building Certification Jargon
THought this was kinda funny: TMA= too many abbreviations, USGBC, EA, ES, SHGC, PH, PHIUS, PHIA, Pa, CFM, ETC;...............Fortunately most of us already know them and and/or are literate, even though some people question that fact.........
Superinsulated does't equal passive (response to Curt)
Most Passive House designs in this region would need higher R values than described, but most houses at these performance levels could hit Net Zero with PV that actually fits on the roof, given reasonable shading factors.
There's considerable thermal mass in this house, including that in the cellulose insulation. Even on days when it hits 95F in Greenfield MA (like 20 June or 17 July 2012 : http://weatherspark.com/#!dashboard;a=USA/MA/Greenfield ), the mean temp for the day even on those days rarely exceeds 80F- it really IS different from FL. With any kind of recirculation or directed ventilation air to break up stratification it's pretty easy to keep a place like that comfortable with a 1-ton mini-split, at least the vast majority of the time.
The amount of west facing glazing on this house is modest, some of which is shaded by a long-porch roof, as well as tree on the SW. It's on the SW corner of the intersection of Charles & Vernon, based on this pic: https://www.greenbuildingadvisor.com/sites/default/files/Spartan%20-%20installing%20the%20siding%202.jpg
The aerial view shows the SW shade tree:
https://maps.google.com/maps?q=charles+street+greenfield+ma&hl=en&ll=42.600737,-72.603385&spn=0.000734,0.001206&sll=42.036922,-71.683501&sspn=3.019015,4.938354&t=h&hnear=Charles+St,+Greenfield,+Franklin,+Massachusetts+01301&z=20
And this pic shows the wintertime shadow of that tree being cast on the west wall:
https://www.greenbuildingadvisor.com/sites/default/files/Spartan%20-%20Saltbox%20shape.jpg
The tiny head-banger third floor probably has some AM or PM comfort issues from direct solar gains, but the R78 moderate-mass cellulose roof would do a lot for evening that out during the mid-day swelter. The rest of the house probably stays pretty reasonable, but I too am curious how the second floor makes out in the summer, especially the east end which has bigger windows & less shade.
Summer-time comfort
Last summer we had about two weeks where temperatures were in the 90's. As Curt suspected the mini-split kept the first floor quite comfy, but did little for the upper floors. We tried to move the cooler temperature upstairs with our ceiling fan (located in the over-sized stairwell opening) and with the HRV on recirculation. Neither was very effective. I think Dana is also correct that the insulation and our large silver maple to the west of the house keeps the upper floors cool enough. I think the white roof helps as well--before we insulated, the 3rd floor remained cooler than other homes with insulation, but asphalt roofs (both myself and my lead carpenter were living in such homes during construction). This summer I will be monitoring temperatures with the logger. One other fun data-point: the first floor slab/granite floor almost always is cold to the touch (indicating it is below 80dgr/surface body temperature); last summer after a 3rd straight day of temperatures in the 90's I arrived home from work and immediately noticed that the floor did not feel cold. I think we turned on the AC at that point.
1/2 inch drywall
You wrote: "Rather than use 5/8-inch drywall to span the 24-inch-on-center studs, we strapped the walls so we could use ½-inch drywall."
If the walls are stuffed with dense pack cellulose, with the bulges pushed in and smoothed out to be on a plane with the interior edge of the studs, why isn't that plenty of backing for the drywall, no matter how big the stud cavities? Why did you assume you would need 5/8" drywall?
This sounds like an excellent
This sounds like an excellent example of a PrettyGoodHouse.
Our (North Florida) summer mean temps tend to run in the low 80s, which doesn't sound bad except that the dewpoint hits 72 around Memorial Day and hangs between 72-77, 24/7 for the next 100 days.
I'll bet that the subject Greenfield house could be kept comfortable on both floors during the few torrid days in Mass., particularly at night - maintaining reasonable sleeping comfort on the second floor, by using a small portable 3 speed blower (Lowes ~$70) as an "air lance" as follows:
Set the Mitsu at 68-72F cooling setpoint at night. Place the small blower (NOT a fan - idea here is low CFM, long throw). on the floor of the lower floor Direct the blower discharge vertically up through the opening pictured for hanging laundry. It'll entrain significant first floor air and send it up, also breaking the stratified air upstairs The second floor ceiling fan, described as useful for quickening clothes drying in humid weather, would distribute the air driven up from the lower floor well enough, I think, for comfy sleeping upstairs if bedroom doors are open.
Holding drybulb to 80 or a bit less along with relative humidity to 50 or less with some slow air movement is sleeping nirvana relative to tossing and turning with windows open to outside with dry bulb = wet bulb = dewpoint = 72*F, IMO
Log in or create an account to post a comment.
Sign up Log in