
Image Credit: Erik North
More Guest Blogs


I conducted my first paid energy auditing gig a few months after I’d completed the Maine State Housing’s Auditor certification program. It was a two-week program — one week of class work and one week of field training. That’s just enough learning to make you dangerous (and I’m only being a little facetious; uninformed auditor recommendations can have dire consequences).
I had done three practice audits on the homes of friends and family and observed three others. However, this was the first paying audit largely on my own.
I say “largely” because the audit was through MSHA’s low income weatherization program, and one of their representatives would be there with me. A little background: the low income weatherization program insulates and weatherizes homes of folks who qualify for heating assistance. MSHA evaluates the houses and tackles the “worst” ones using highest BTUs per square foot per heating degree day as criteria. Then they apply their limited budget to insulating and weatherizing the building.
Eventually this program moved under the umbrella of the Community Action Program (CAP) agencies in the local counties. At the time, auditors evaluated the house and independent contractors bid on the work.
The bit that probably got glossed over just now was the part about “the worst homes” in Maine. That’s a bit unfair, perhaps, but uniformly they were terribly inefficient homes, as we would see.
An old farmhouse
The house I was assigned to audit turned out to be a very large, classic 19th-century farmhouse. It was located toward the end of one of the innumerable peninsulas that spike out from Maine’s central coast. The nearly 4,000-square-foot Colonial had a large main section and two enormous wing additions.
The first whiff we got that there would be issues was when the owner warned us about a rotten spot in the floorboards. “Careful with this spot,” she said, “Your foot will go right through.” A harbinger of things to come.
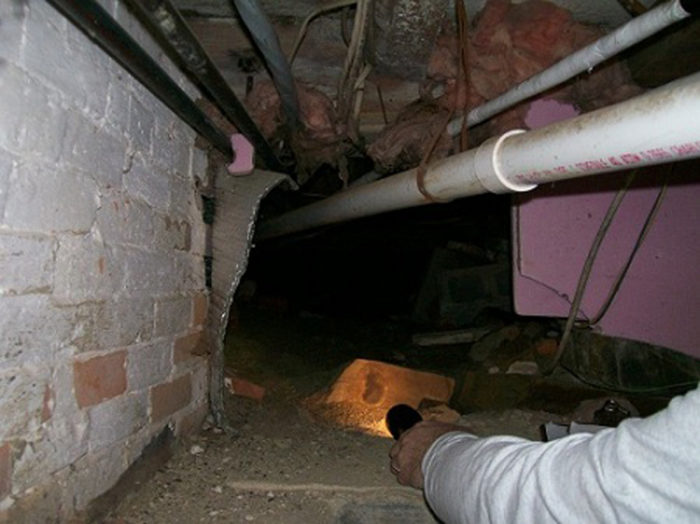
The foundation was of double brick and rubble construction, with the brick wall above grade. The double brick wall was a two-wall construction method, with the exterior wall being the load-bearing wall, and an insulating 2-inch dead air space sandwiched between the two. The interior brick wall was collapsed and crumpling in many places. So much for the insulating dead air space.
The floor was wet sand with many pools of standing water, stretching into crawl spaces beneath the additions.
The windows and doors were almost all original to the building, and loose would be an understatement. They were lovely, wood-framed, single-pane windows with sash weights, and the frames were so badly out of square that I could often see outside around the frames.
The walls were balloon-framed, finished on the interior with old horsehair plaster and lath, and finished on the exterior with ancient clapboards coated thick with white lead paint.
The main house and two additions had distinct but connected attics. Each one was filled with various keepsakes nearly to the rafters. All told, a picturesque, full, New England classic needing some TLC.
Can we insulate the basement walls?
Our initial thought was to install spray foam on the basement walls, but this would prove difficult. A civil engineer with MSHA examined the foundation and determined it wasn’t structurally sound enough to receive spray foam. (The load-bearing wall was OK, but the interior facade was crumbling in several places).
We briefly discussed installing netting and dense-packed cellulose in the basement ceiling. However, the moisture from the sandy floor and the standing water would have made a cellulose approach deeply problematic.
Can we insulate the above-grade walls?
The walls of the house were balloon-framed, clad with clapboard. The cedar clapboard was original to the building, having been installed in the mid 19th century. At some point since installation, the exterior was coated with lead paint. The interior had a very thick plaster finish. So how do you insulate these uninsulated walls?
Not easily. Finished wall cavities in older homes are usually insulated by drilling holes and pumping in some type of insulation. Without ruining the older siding or blasting lead paint dust everywhere — either stripping off a course of siding or drilling right through the siding — the work couldn’t be done from the outside.
An added wrinkle was that this house was in the county historical register. Any major alteration of the exterior was off the table. Even drilling through the siding, plugging, and re-painting would have required approval.
The other possibility would be insulating from the interior. That would mean drilling holes to blow cellulose through 1- or 2-inch thick horsehair plaster. This is not easy or pretty. Old plaster is like rock and just as hard to drill. Also, once the insulation work is completed, it’s notoriously hard to hide or finish the drill holes. Contractors sometimes opt for a horizontal wood trim over trying to match the original plaster.
The attic was open to the interior
The attic was in three sections: one each over the main house and two additions. Just about everything in the attic was open: the top of the exterior walls, the interior walls, the walk-up stairways … all were wide open. Oh, and the attic was uninsulated.
With older buildings, we often talk about insulating along the roof rafters. Air sealing along the flat attic floor can be difficult in older houses for a variety of reasons (settling of the foundation, access, extent of necessary air sealing). In this case, each of the three sections of the attic had widow’s peaks. It made air sealing the roof slope a much more difficult proposition, as you’d need to tackle the widow’s peaks with their windows on all four sides.
The blower-door test
The blower door test came after the physical review and infrared scan of the house. After setting up, we fired the blower door up and witnessed air flying in from everywhere. The blower door read nearly 13,000 cfm50 at -12 Pa. The blower door was moving several thousand cubic feet of air per minute and barely depressurizing the building.
When a blower door cannot depressurize to a full -50 Pa, the manometer will extrapolate what the air leakage would be at -50 Pa. This is notoriously inaccurate, but suffice to say this was an extraordinarily leaky building enclosure.
Basically, every solid surface with the potential to leak air was doing so. Air was rushing in around doors, around windows, through the wall framing… Like I said, basically everywhere. There was a huge amount of air sealing needed.
The energy retrofit work
Here’s where things get a bit disappointing. Maine State Housing’s low income weatherization program has a set amount to spend per house; the limit was around $7,000 in 2008. They can spend more, but would need to pull money away from another project down the road.
It was determined that the house needed between $20,000 and $25,000 worth of work. MSHA can’t afford to commit three houses’ worth of efficiency work on one project, so they were forced to move on.
It was an illuminating experience, and one I’ve seen repeated in subsequent years. It also showed the limits of what was being done through public programs and the private sector. The house had been passed from owner to owner until it had developed problems too severe to easily fix. It needed thousands of dollars of weatherization work, as well as tens of thousands (possibly hundreds of thousands) of dollars of structural work. It was a beautiful old house that had fallen through the cracks. Unless some enterprising homeowner with cash to spare invested significantly, neither the market nor the available programs offered a future for this grand old home.
Erik North, the owner of Free Energy Maine, is an energy auditor and home performance specialist in Westbrook, Maine. He is also the author of the Energy Auditing Blog.
Weekly Newsletter
Get building science and energy efficiency advice, plus special offers, in your inbox.


4 Comments
moisture remediation
Remediating the standing water and excess water on the basement floor would take priority over any insulating. If you insulate, you are asking for mold. I've seen it. Also, For the most part, on those older homes, the attic floor is dense packed, as long as the knob and tube is out of commission. Some of the hollow walls can be accessed from the top plate, but most likely, siding would have to be removed.
What happened to the house?
Erik,
Do you know if the house is still standing? Did anyone ever work on it?
Audit
Shane: You're absolutely right about the standing water. In a previous blog post that was re-published here, I wrote extensively on dealing with excess moisture. We did have conversations about encapsulating the basement space (closed cell foam and a vapor impermeable flooring) but the foundation wall couldn't support the foam.
Lucy: As of about two years ago, it was still lived in. Can't speak to whether the work has been done since then. Far too many houses in Maine (and areas with a similiarly aged housing stock) confront this issue: Too old with too many expensive problems. These houses float around the market, sometimes finding a loving owner but too often not.
Similar problems in Chicago
This week in NY Times magazine there is a story about how the foreclosure crisis has left many houses in similar circumstances because they have been abandoned, not maintained, and aren't worth enough for the cost of fixing them.
Article is entitled "The Death and Life of Chicago" http://www.nytimes.com/2013/06/02/magazine/how-chicagos-housing-crisis-ignited-a-new-form-of-activism.html?hpw&_r=0
The issues in making the houses habitable are somewhat similar though the cause was not exclusively that the houses are old
Is there a stepwise approach to fixing these houses? What I mean is, asking questions like what is the most important single thing we need to make this house better and safer for inhabitants this year.
For example, in your house above just fix the foundation and moisture issues related to the foundation. Homeowners could caulk or foam the area around the windows as a temporary measure. That's it for that year or 2 or 3.
Then work on the attic for the next layer of energy retrofit, etc. That also gives you time to come up with creative and possibly innovative solutions.
Another idea for improving these old homes, what about "Adopt A House" where a school or organization adopts a house as a project for energy retrofits? It could be a project over several years time if needed. If a school were to adopt a house, the students would receive training in various trades. Kind of like Sam Mockabee's "Rural Studio" but more in the line of retrofits rather than new builds. Not as sexy as new buildings and design, but equally as educational.
Log in or create an account to post a comment.
Sign up Log in