
Image Credit: All photos courtesy of the author
More Guest Blogs


In 1987, my wife and I purchased a one-story, 1,200-square-foot ranch with a basement in Appleton, Wisconsin. It had been built in 1960. Its 2×4 walls were filled with 3 inches of fiberglass batting; the house had single-pane windows. The basement slab had been poured directly onto clay without a gravel drainage base. There was sectional tile drain around the exterior perimeter and one sump. The house had a large patio door facing west and a bay window facing east, and only two windows on the south side.
Faced with opportunities galore, we started by ripping out the ugly free-standing fireplace. You know, the kind that looks like the Martian in Bugs Bunny cartoons. We threw R-30 insulation into the attic over the ceiling joists, which were barely covered by blown-in fiberglass.
We both love winters and sweaters, and we spent the next 20 years verifying that fact. It didn’t matter what temperature you set the furnace at, it was a drafty, cold house.
We replaced the windows
The first update came in 2000 when we decided to get double-pane windows and a new patio door, and to replace the hail-dented aluminum siding with vinyl. We replaced the storm-damaged roof shingles as well.
We didn’t add any new insulation, but we did cover the torn tar paper on the exterior walls with a water-resistant barrier (WRB) — a big update for someone who is gone a lot. We were smart enough to hire a contractor even though I had been in the building trades most of my life and built my first solar home in Colorado in ‘85. Needless to say, we wanted it done quickly.
By 2006 I had retired as a climbing guide after 29 years in cold climates above the clouds appreciating every bit of warmth the sun could give me. I spent most of the winter studying and taking courses through my lifetime membership with the Midwest Renewable Energy Association in Amherst, Wisconsin.
While I began installing solar equipment professionally close to home, I also befriended Rob Ryf of Solar Heating Services who helped me install our solar domestic hot water system (one solar thermal panel feeding one storage tank) with a Rinnai on-demand water heater as a backup. With his long history in the heating and cooling industry, he appreciated any opportunity for a retrofit. Better yet, he was game to try anything to make things work if I were to advance my system in the future.
Wait, what’s that breeze?
In the winter of 2006-2007, I spent some time in my basement workshop and for the first time on a windy, cold winter day I noticed some cobwebs moving above my head. I followed the breeze past the unfaced fiberglass insulation stuffed between the floor joists at the rim. I was shocked to see through a horizontal space between wood and basement concrete wall into the back yard. My first thought: “I’m heating the back yard!”
Running out to the garage to find some caulk, I noticed the wind forcing the power line to scrape the roof, taking grains of asphalt shingles with every swing. Obviously, some changes were needed to make this a comfortable home and keep my hard-earned pay away from the utilities.
While taking in all the facts and figures of photovoltaics (PV) and solar thermal installation, I knew I needed first-hand experience by living with it. My significant other was game after dealing with my organic ways for 20 years. At about the same time, I received a letter in the mail regarding a life insurance policy that had terminated and needed to be cashed. It was like rain during a drought.
We had already taken out the house’s original water heater and replaced it with an on-demand unit as a back-up to one solar thermal collector and 50-gallon storage tank. The liquid circulating through the collector heated water for domestic use via an external heat exchanger.
The next stage would be to seal and re-insulate the house and add a grid-tied PV system.
Insulation and a modest PV array
After consulting with another MREA member and PV installer, I began in the spring of 2007 with efficiency measures and house insulation. I received the electrical and building permit through the inspector’s office ($25). As solar installation was new to them, they trusted my MREA training as long as it was used on my own house.
All spring and summer I beefed up the existing framing in the garage roof (2×6 rafters 24 inches on center) to accept an adjustable tilt rack for the new 1.52-kW PV system.
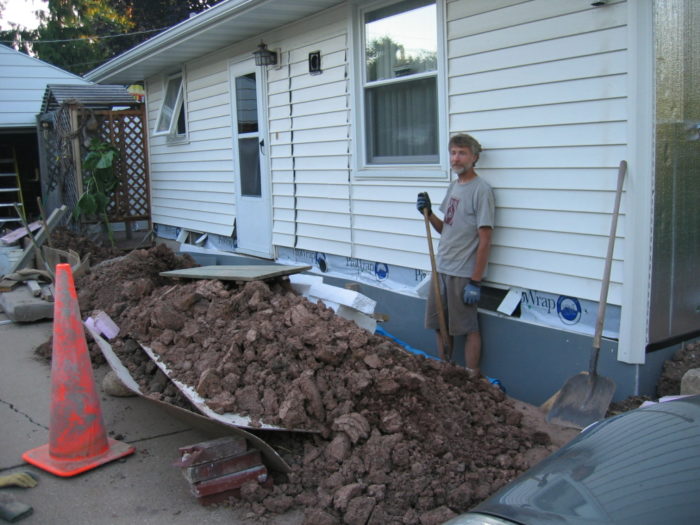
I’d also started retrofitting the house. I removed the siding and dug by hand a 5-foot-deep trench around the basement. I also began working odd solar jobs for local installers and whatever I could do to keep cash flowing to maintain my schedule. Some long days and warm early spring weather allowed me to move fast while listening to my favorite public radio shows. The radio and rechargeable hand tools were powered by my homemade portable solar display.
With an EPA-approved breathing mask and full protection suit, I attacked the attic. Keep in mind, you have to do all this work with few inches to spare at full arm’s reach. With a 4:12 roof pitch, the nails from the roofing are sticking into your head even while you are laying prone five feet from the outer walls. When this house was built the standard bird’s mouth cut was sawed into the rafters. This lowered the soffit below the wall height. It also left only 3 inches (2×6 rafters back then on this hip roof) of free space for ventilation from top plate to roof sheathing.
I pulled back the 50-year-old blown fiberglass from the top of the perimeter walls to expose holes in the top plate where wiring had been pulled. I knew the walls could never really be warm with the top plate exposed to the cold. Any wall joints and soffit areas that had direct wall top openings were closed with expanded polystyrene (EPS) insulation and sealed with my polyurethane foam gun.
It was a filthy and tiresome job that I couldn’t imagine anyone doing for a living. I’m 6-foot-2 and the hip roof was only 5 feet high at the center. There were vents in the soffit and three vents near the ridge. That left 4 feet of attic floor less than 16 inches from the rafters along the entire perimeter of the hip roof. I’d come down drenched in sweat even on cool nights.
Insulating the foundation walls
On hot days I insulated and sealed the basement rim joist. I had found enough EPS, 2 to 4 inches thick, for half of the exterior basement walls at the nearby Habitat for Humanity’s ReStore. The 8-foot lengths would be glued sideways to reduce heat loss at the top 4 feet of the 7-foot tall foundation.

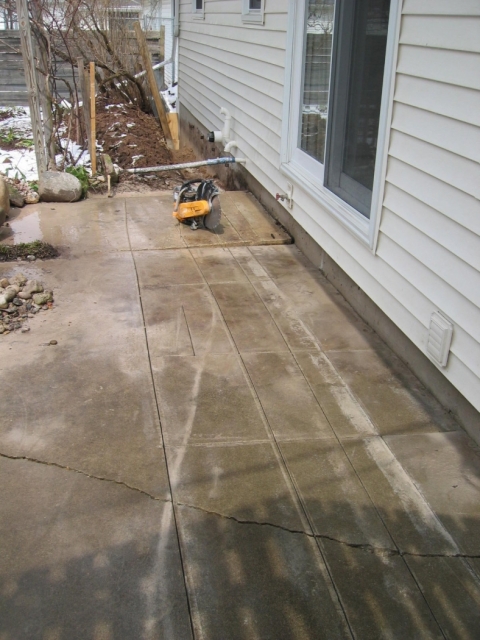
The patio slab had to be cut to allow trenching against the house. I rented a water-cooled diamond saw for an afternoon and cut blocks 3 feet in length and 14 inches wide. With a grunt, I shoved them onto a dolly and hauled them to the north side of the house where the grade was lower. Stacked neatly, they could form a terrace and help insulate the coldest basement wall.
Once flipped over, the concrete looked enough like stone to pass as a natural wall. I didn’t have time or the motivation to dig fully to the base of the wall so I planned on laying down a frost protective surface (2 inches of extruded polystyrene) 4 feet outwards from the wall just under the top layer of dirt surrounding the basement. This horizontal layer plus the new upper basement wall insulation would control heat loss and still allow natural cooling in summer (from the lower wall and slab).
To control air leakage at the rim joist and force out any water behind the wall’s WRB, I pulled out the staples at the bottom of the WRB’s, caulked along the joint between the concrete foundation and wall, and put flexible butyl window wrap under the WRB and down and over the top of the new vertical 2-inch insulation. It would have been nice to work from the bottom up but I had to work around the weather. One day I’d be down in the trench with the shovel, the next would be spent stretched out on my stomach in the corners of the attic.
Opportunities abound when you decide to make a house wider and longer by 4 inches (2 inches of new insulation on each adjoining wall). I didn’t want to move the windows outward as I had read they stay warmer when deeper in the wall. I built out the sills and framing to match the new 2+ inches of insulation thickness. We had enough old vinyl siding that had been left in the garage loft to make up the difference in the width and length of the house. It would take just a bit of moving pieces around. Seemed easy enough.
After sealing any holes in the plaster ceiling and closing off any holes in top plates with foam, we blew in 18 inches of cellulose, and with all of the siding removed, I installed 2 inches of EPS on all outside walls.
The first phase nears an end
In the late ‘90s we had invested in double-pane replacement windows. This had been done without making any structural changes to the house. Imagine my surprise when I saw straight through to the interior wallboard backing from the outside while removing the siding—the gap between the rough framing and the window jamb had never been sealed. Not only were the old windows cold and drafty, but without any insulation around them, most of our heat had been conducted straight out the wall. Even with the newer windows, heat retention was negligible. My best investment at that point was a foam gun and cans of low-expansion foam.

By the end of the summer of 2007 I was able to start putting things back in place while planning the new PV array. With our previously removed plantings back in place and window frames built out, you’d hardly know the house had changed. At that point, we were just tired of the mess. We immediately noticed the house remaining cool on hot humid days as long as we shut windows early in the morning. Without air conditioning, this was a great benefit and relief.
I needed to upgrade from the original 100-amp main panel to a 200-amp panel. I also did not want the power lines to cross over our yard and shade our solar modules. That meant hand digging (yes, again — I didn’t want to hurt the roots of my grapes or apple trees) a 100-foot long trench 2 feet deep for buried utility lines.
By late November, with cold hands and a headlamp, I completed the adjustable-tilt PV rack on the garage roof and wired up the array: eight 190-watt modules for a total rated capacity of about 1.5 kW.
We really lucked out. Our solar power was commissioned on December 6, 2007, and the next day more than 8 inches of snow fell.
Goal accomplished? Stay tuned…
The second installment of Paul Kuenn’s blog series is here: One Man’s Quest for Energy Independence — Part 2.
Paul Kuenn lives in Appleton, Wisconsin. He is a past owner of a climbing school and guide service who has studied environmentally sound building practices, along with plumbing and electrical. He’s a graduate of solar thermal and photovoltaic installation programs at the Midwest Renewable Energy Association. In the last eight years Paul also has worked as a third-party inspector for fire and rescue apparatus. In his spare time, he helps homeowners use the least amount of fossil fuel energy possible.
Weekly Newsletter
Get building science and energy efficiency advice, plus special offers, in your inbox.


0 Comments
Log in or create an account to post a comment.
Sign up Log in