

Image Credit: All photos: Paul Kuenn
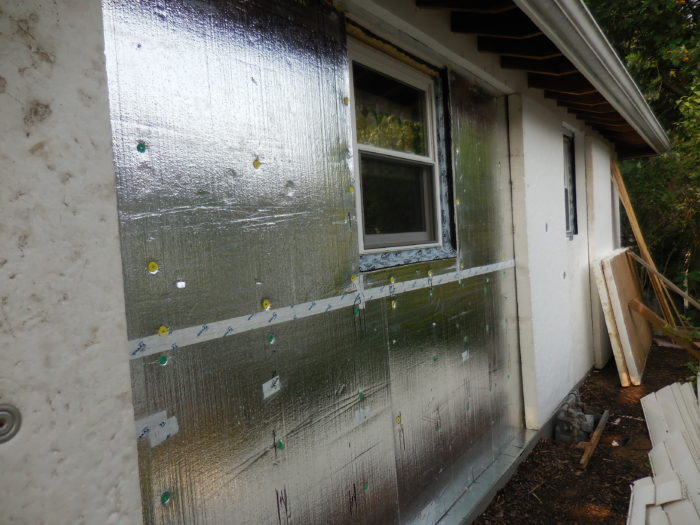
Image Credit: All photos: Paul Kuenn The finished wall assembly included the original 2-inch layer of EPS plus an additional 6 1/2 inches. In the attic, the top plate of the wall got a new layer of closed-cell polyurethane foam. Cutting around the rafter tails. The author cut a layer of rigid foam to fit around the rafter tails, filling gaps with canned foam. The cutouts below the sheathing are vents.
More Guest Blogs


This is the fourth and last in a series of blogs by Paul Kuenn describing energy-efficiency improvements to his home in Appleton, Wisconsin. To read the first blog in the series, click here.
It took a bit of courage asking my spouse for one more full summer of mess and less play time, but she knew what it meant to me to live in a world we chose to make.
The winter of 2013-2014 was one of the coldest in a long time. I logged over 15 days riding the bike to work at -17°F. Inside, on the ceiling where the wall meets the top plate in the two north rooms, I saw frost clinging to the paint.
After a full winter of planning and knowing the house could feel warmer if I just added more insulation, I started searching for used EPS. By March I had found two loads of recycled insulation for one-tenth the price of new: 35 sheets of 4-inch and 40 sheets of 2 1/2-inch and enough XPS to add an additional 4 inches around the perimeter of the foundation (this time only 2 feet below grade).
Seven years had now passed since I had added 2 inches of insulation to the upper 4 feet of basement wall and exterior house walls. The nightmares of sealing the tight attic and blowing 16 inches of cellulose up there had faded.
Snow and cold lingered into late April, so I started digging on the warmest sides of the house first. But I noticed that the ground was not frozen under the 2-inch XPS frost protection layer laid down in 2007. This allowed digging the whole perimeter even while it snowed and rained into mid-May.
It remained busy at work, so as a one-man team I was glad that I had laid out the entire plan with a rigid schedule. I did want this done by December — of the same year!
I found a supplier of Trex recycled content board stock for extending the window jambs and door jambs.
I also purchased a pair of Lunos E2 heat-recovery ventilators, as I was going to be sealing the house even better than I did in 2006. In 2012 I had a blower-door test done and got 1.2 air changes per hour at a pressure difference of 50 pascals. Not bad, but that was with the shrink plastic over the windows and a patio door. I had since made my own airtight window inserts out of recycled screen window frames and shrink plastic from past winters.
Since my new project required me to remove the siding again, I could do a better job of sealing around windows and doors. I would need better air exchange without sacrificing our precious heat.
Increasing the foam thickness on the exterior walls
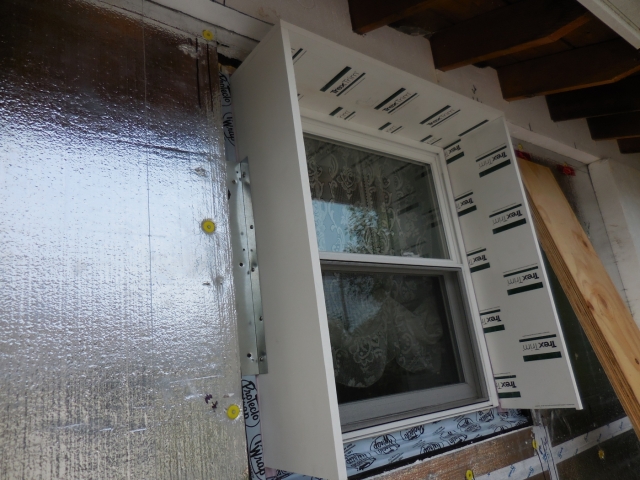
In seven years I had already forgotten my methods for working around windows and doors, back when I installed the first 2 inches of insulation. But all went well with stripping off the siding and previous extension jambs. I tried to mock up one window and door to show what it would look like with the windows 8 1/2 inches deep. The 2×4 walls, with cavities insulated with 3 inches of fiberglass batts, would have a total of 8 1/2 inches of exterior EPS insulation (R-34).

I was forced to find a close matching vinyl siding because the style we had on the house was no longer made. We only needed one side to be completely refinished as the rest would make up for the enlargement of the house on the other three sides. We decided that the new siding for the house would go on the west wall, which can’t be seen from any other direction.
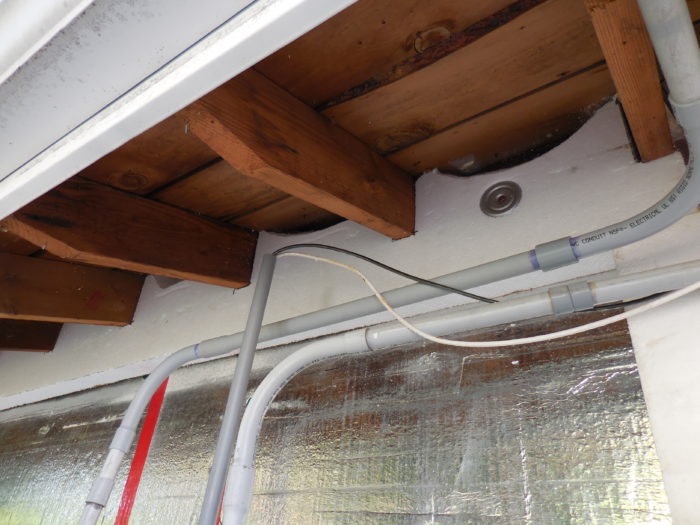
I took off all Mondays from May 15 to early December and gave up many weekends of play to get the job done. On a few days, family and friends joined me when the work required a third hand. Moving electrical connections for the house, performing all of the solar disconnects, and installing the meters took two full days. I needed to mount everything away from the wall so I could get insulation behind.
Luckily, I knew the local utility crew and they had no problem with my ability to get it done right. They gave me five hours to refit the extended conduit for the meter and came back in the evening to reattach our main breaker panel to the grid.
It wasn’t until three weeks later when we received a utility bill that I realized with some embarrassment I had inadvertently shut down the inverter and all the solar had been wasted. Ughh! Better a month than a whole lifetime though, so I got over it.
More insulation over the top plate in the attic
Meanwhile, as if I didn’t have enough going on with the exterior walls, I found a trustworthy contractor who understood my need to insulate the top plate of the wall where there was so little space to work with. His team would spray the entire perimeter of the attic with polyurethane foam.
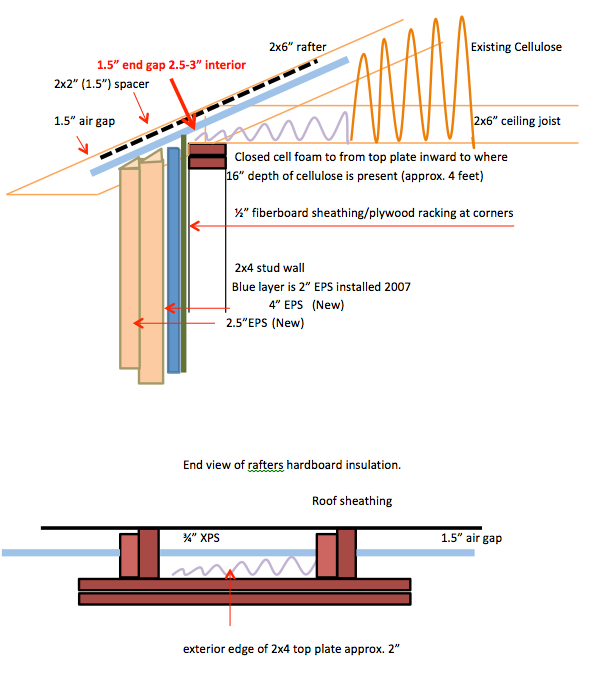
I was not looking forward to working again in the tight attic, especially in June when things begin to heat up in Wisconsin. Martin Holladay had recommended that I spray closed-cell foam over the top plate inward over the ceiling to where cellulose could reach at least 16 inches in depth. I still wanted ventilation under the roof, so I made my own very stiff EPS vent channels, which extended from the top wall plate 5 feet inward directly under the roof sheathing. They would not collapse under the foam expansion as it cured.
I wanted a minimum of R-12 (only 2 inches left free between top plate and vents), with the R-value growing as the available height increased, moving inward. At 1 foot inward, the spray foam would totally encapsulate the depth of the 6-inch ceiling joists. Cellulose on top of that would increase the R-value to over R-50, 4 feet inward from the wall. That was the best I do under the circumstances.
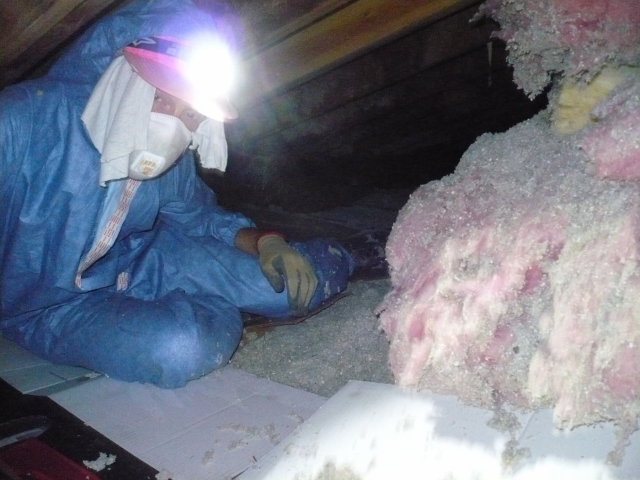
To accomplish this, I had to vacuum out all of the 1960s blown-in fiberglass insulation along with some of my 2007 cellulose in a 6-foot-wide strip around the perimeter of the attic. This was after I shoveled most of the cellulose I had previously placed into the center of the attic. Working in a protective suit and breathing mask at 90°F can be very exhausting. It took three days and two late nights to have the attic ready for the spray foam crew.
At the corners of this hip roof I first had to drill vent holes in the hip jacks on each side of the hip rafters. This was a contortionist’s worst nightmare, to say the least, and it would take me hours to walk upright again when I’d come down out of the attic. Installers spraying the foam would have to be very careful in these tight spaces not to block what little ventilation was available.
Once up in the hot and very tight attic, the “experts” just wanted out. They ended up spraying way more inches of foam than they had planned to charge me for. I bought them lots of beer for their efforts. I was already facing burn-out with this project, so I paid them to blow in the added cellulose to fill in any voids on top of their foam and my work areas.
I left all the cellulose I had shoveled to a depth of 32 inches over the 75% remaining middle attic space. At least the ceiling in the center of the house would be very warm with approximately R-115 overhead.
Once again, they did a great job and added more than requested for the bid price. Better yet, it took them only two hours. It would have taken a full day for me, and one other if I had to rent the equipment.
Cleaning the house was easy this time around compared to what I had been through in the past.
Adding more wall insulation
To keep all of the rigid foam courses lined up around the entire house, I snapped a line at 12 inches down from the top plate. I wanted the most difficult and time-consuming work done first, so I decided to add the two new layers of EPS at the top plate. This meant careful measuring and cutting out rafter slots into each layer. Any gaps would be filled in with the foam gun. Knowing that there was a very thin layer of foam sprayed directly above the top plate, I hoped that these additional exterior side layers would warm the upper part of the wall.
At the bottom of the wall, I was able to remove nails and lift out the 2-inch EPS layer from 2007 just enough to nail in an insect screen which would be folded up and outward to be attached to the outer furring strips to minimize insect invasion. I also added a customized “Z” shaped galvanized steel drip pan over the basement EPS layers. To protect the basement insulation, the 2007 gray-colored fiberglass over-layer would be replaced.
There were many unplanned improvements that I did just so things would look and work better than they did in the past. That ate up some precious time early in the process but I began to speed ahead once the first 4-inch layer of EPS was attached to the outside walls.
I had taken the time to measure all 127 stud locations very accurately and marked them with a story board on the ground and above on the soffit. With two or three 7-inch screws per panel and large roofing fender washers (to address the 2 inches of EPS in 2006 plus 4 new inches of EPS now) temporarily holding on the first layer, I was gearing up for the 12-inch screws to come that would hold the 3/4-inch plywood furring strips over all three layers of EPS.
By August I was installing my pre-cut plywood furring strips to hold down all the layers of insulation while building out the windows and patio doors. We needed a break, so we took off for a two-week bike ride knowing things were tight enough to endure any big summer storms.
This time around, I decided to insert the one solar hot air panel we had on the south wall in the last outer 2 1/2-inch layer of EPS. With trim, it would be more efficient and easy to remove if need be.
As I dislike the cheap look of “J” channel, we decided to use a molding around the deep new window jambs to hide the siding edges.
The siding goes back on
By September, I was working after work with lights and a headlamp. Cold rains became more of a nuisance and biking back and forth to work became slower and used up more time. I pressed on with the beginnings of the siding work. I had to temporarily add recycled wire mesh to keep the birds off the EPS and out of the soffit.
By October, the siding was going up and the new deep window jambs were looking good. As soon as the north and east walls were finished, I began cutting and replacing the soffit vents. As the cold season approached, the house was already noticeably warmer.
The cold came very early, with lows around zero by mid-November. I had to be careful nailing the siding so it wouldn’t explode into pieces. Working with bare hands was next to impossible.
With all trim completed, and only a few remaining items that could wait until spring, I was very happy to be finished.
How does it work?
After two years of minor changes and tweaks, both the domestic hot water and floor-heating systems are efficient and effective. Solar fluid from the collectors first passes through the external heat exchanger to produce domestic hot water. Then the fluid proceeds to the storage tanks devoted to space heating; first, to the internal heat exchanger in the 80-gallon tank (tank #1) and then to the external heat exchanger for the 50-gallon tank (tank #2).
Our solar isolation is about 4.7 hours per day. The target for our location (45° latitude) is 1.5 gallons of storage per square foot of collector. We have 180 gallons of storage and 128 square feet of collector surface — about 1.4 gallons per square foot, to ensure heating of the tanks in winter. The solar collectors are tilted at 60° for better winter heating.
I added R-25 of foil-faced fiberglass insulation around all tanks. With the 50-gallon domestic hot water tank, it takes about two days of washing clothes, washing dishes, and showers to activate the heat pump. (That happens when the water temperature drops below 120°F.)
New city water comes into tank #2 for floor heating, so the temperature of that tank drops the fastest when floor heating is called for and we are using domestic hot water. This is really a buffer tank that is useful when sunlight is abundant; the tank pre-warms the domestic hot water and the #1 floor-heating tank.
As floor heat circulates around the house at 90°F to 120°F (depending on the storage water temperature) it first passes through the electric boiler. The boiler has three elements and only uses what energy is needed to warm the water to 110°F — our setting for comfortable floors. The water returns to the manifold at around 85°F to 90°F, so tank #1’s temperature never drops radically.
If tank #1’s temperature drops below the temperature of tank #2 (for example, when little domestic water is used after a sunny day), the temperature-differential sensors will turn on a pump to circulate water in another external heat exchanger to warm up the water coming from tank #1 before it enters the boiler.
During the coldest days — it’s been down to -24°F — the incoming glycol/water solar fluid enters the system at 135°F and returns to the collectors at 90°F in the late morning. That’s when the heating demand is greatest after warming the house. As with all solar thermal systems, the higher the temperature of the water in the storage tanks, the less heat is extracted from the solar fluid. It is a fine line between capturing heat and wasting heat.
With a house like ours, which was not designed passively to capture the sun (our windows and longest side face east and west following the street plan), it is best to heat the house most when the sun is out to capture as many BTUs as possible from the collectors. If I know it’s going to be sunny, I change the programmable thermostats before leaving for work to a higher temperature. If there’s a doubt about sunshine, I will leave it at the cooler daytime setting, as I don’t want to pay the higher time-of-use kilowatt hours from 7:00 a.m. to 7:00 p.m. to heat the house with the on-demand boiler.
We left the heating completely off for a 24-hour test in January 2011. At -17°F, with partly cloudy skies, the house never fell below 61°F.
Paul Kuenn lives in Appleton, Wisconsin. He is a past owner of a climbing school and guide service who has studied environmentally sound building practices, along with plumbing and electrical. He’s a graduate of solar thermal and photovoltaic installation programs at the Midwest Renewable Energy Association. In the last eight years Paul also has worked as a third-party inspector for fire and rescue apparatus. In his spare time, he helps homeowners use the least amount of fossil fuel energy possible.
Weekly Newsletter
Get building science and energy efficiency advice, plus special offers, in your inbox.


5 Comments
How did the OP vacuum out all
How did the OP vacuum out all of the 1960s blown-in fiberglass insulation?
Do you have an idea of how
Do you have an idea of how many kwh you are using for heat in the year?
Vacuum
Hey Alan!
The guys who did the foam insulation rented us a gas operated industrial vacuum. I think it had 3" ports so it could suck your shoes off if you weren't careful. I first used a garden steel rake to pull back the cellulose from 2007 into the center of the attic. Then worked just the 5' of the perimeter of the attic. The vacuum outlet was tubed to a large 7 yard waste bin which we covered heavily with tarps. That was one powerful machine. You do have to be careful because nails sucked in (leftovers from 60s build) could tear right through the flex tubing so have lots of duct tape at hand. Even with the tarps, enough escaped to make a mess 10 feet around the bin.
A costly but somewhat amusing note: my friend helping that day walked away from the engine with someone who walked up the driveway to ask all about the retrofit. At that moment a hole developed by the exhaust and "poof" mixed fiberglass and cellulose (enough to hit the hot engine) ignited. Luckily my extinguisher worked but not after $250+ damage was done to the engine. Very embarrassing. In those two minutes it also blew toxic insulation (lots of formaldehyde in 60s insulation) all the way into the tree above and some into the garden. Once I had it fixed I had to vacuum that part of the yard as well. Hrrumph:(
KWH for heating
After a full year and knowing the rest of the house has a very consistent usage of power, I will look up the past bills and work out a number of heating KWHs. Good idea for future reference. What a difference a year makes. Yes, we have a foot of my wonderful snow on the ground but we have not seen cold air yet.
KWH for heating
Did the number crunching. Keeping all things equal, I used 2013 KWHs per Heating degree days before extra insulation and 2014 KWHs per heating degree days after super insulation. It was actually colder October 2013 to March 2014 but warmed up fast. It didn't warm in spring of 2013 until mid-May! Anyway, we averaged 28.4 KWHs/day to heat in 2013 and 21.9 KWH/day in 2014.
Not a huge difference considering all the work. However, there are no more drafts anywhere. No condensation and frost near the top of the walls, No water dripping down the windows (thanks to Lunos) and it just feels a lot warmer! So needless to say we're both happier I did the job. We really love the house now:)
Someday I'd love to replace the Thermolec mini boiler with an even more efficient air to water heat pump like the Airtap we use on the DHW tank. With the new insulation, I may just do a new heatload calculation and switch to a heat pump...
Log in or create an account to post a comment.
Sign up Log in