
Image Credit: All photos: Brian Post and Kyra Salancy
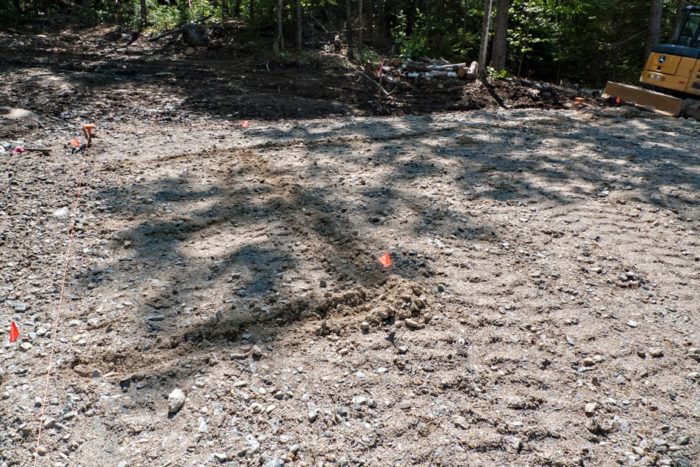
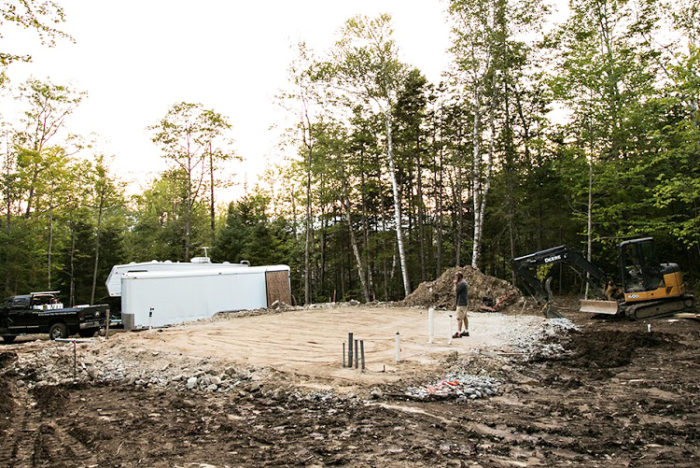
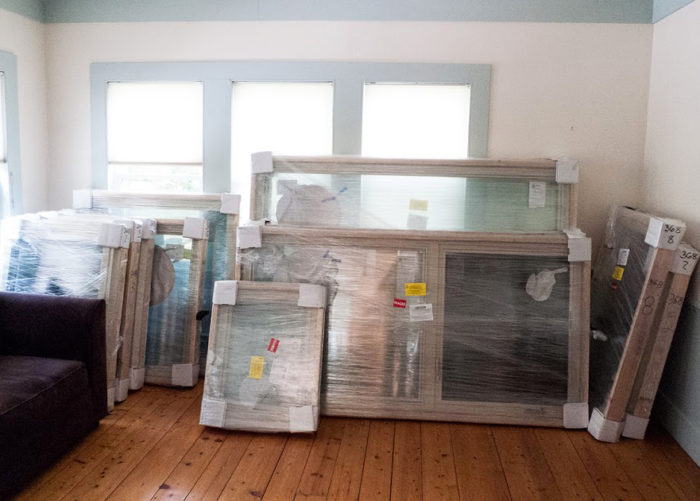
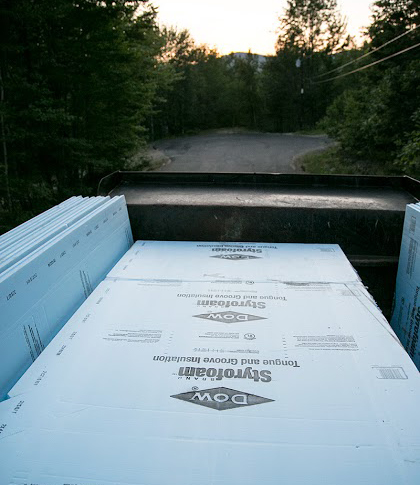
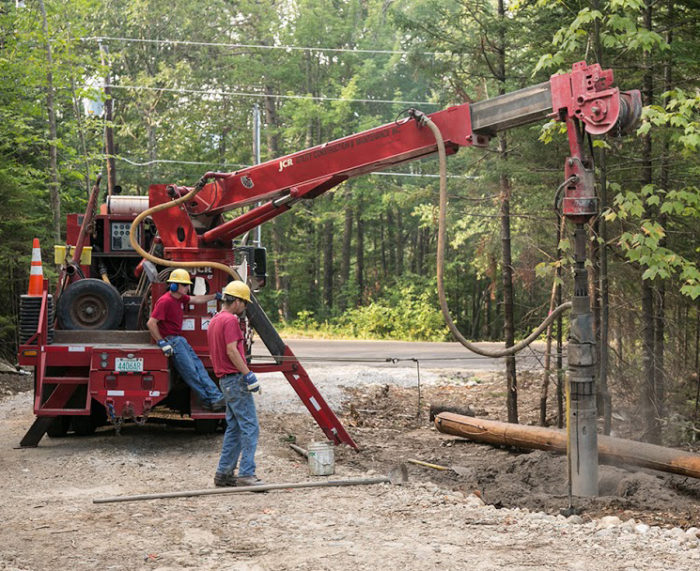
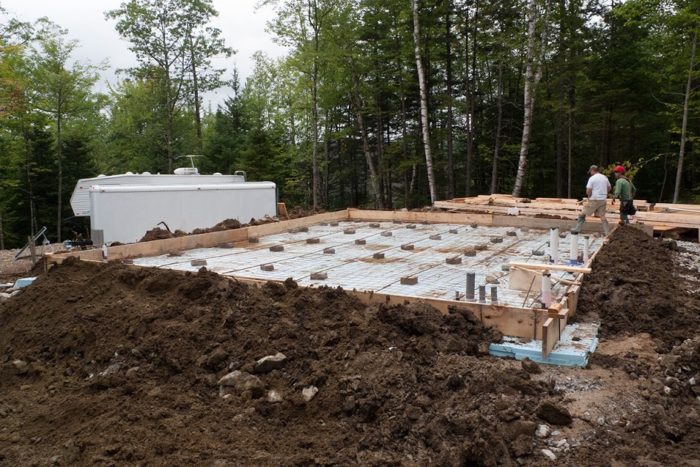
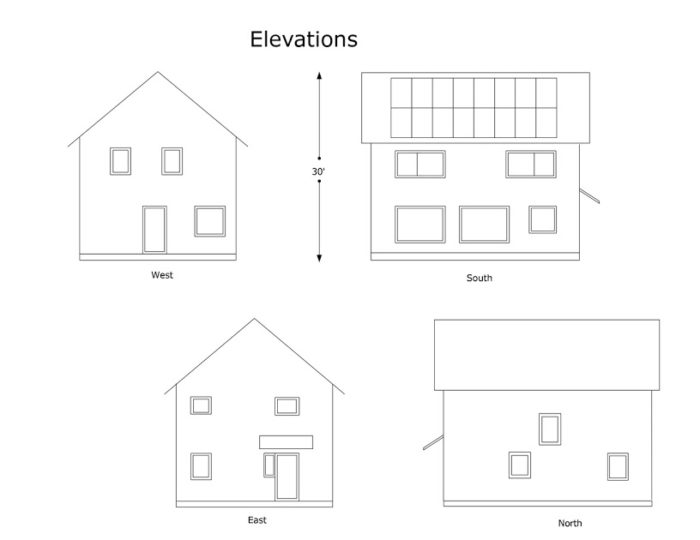
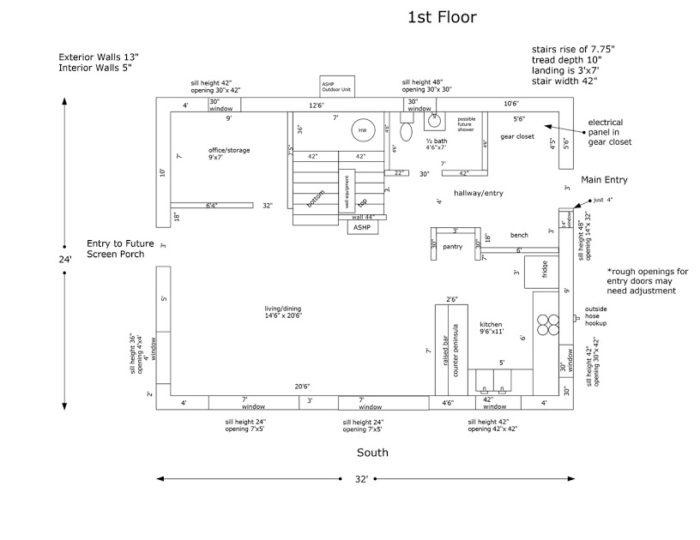
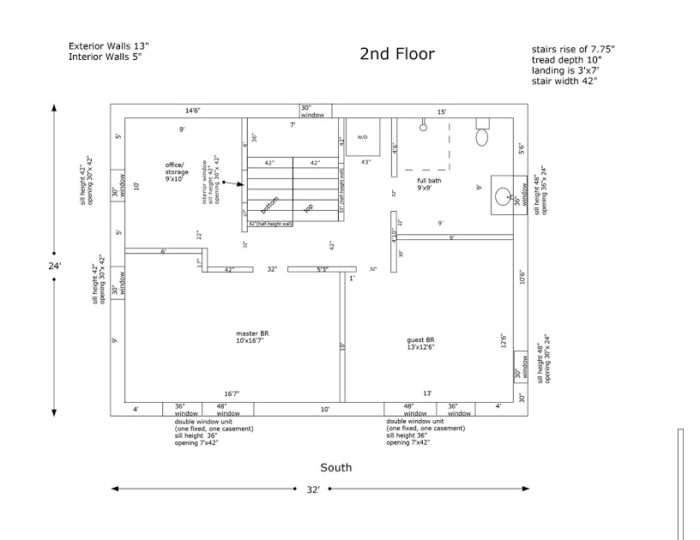
Image Credit: All photos: Brian Post and Kyra Salancy Our gravel didn’t work for the Jackson building inspector. The marked areas needed to be trenched for the sand and pipe. The Jackson building inspector wanted to see the plumbing pipes embedded in and protected by sand. The building site is ready for rigid foam, a vapor barrier, concrete forms, rebar, wire mesh, and concrete. The Alpen 525 series windows stored at our rental house. A mix of styles including casement, awning, and fixed. The truckload of XPS rigid foam insulation that was installed under the slab. Drilling into ledge for the new utility pole. The electric line will be overhead from the road to this pole and then underground to the house. Above the gravel, 4 inches of XPS insulation was installed, followed by a 6-mil polyethylene vapor barrier, rebar, and wire mesh. The foundation will be an 8-inch-thick monolithic slab. Elevations. First-floor plan. Second-floor plan. Framing started in mid-September 2013. Looking down the 5-inch-wide cavity at the center of the double stud wall. This cavity, and a total of 7 inches between the studs, will be dense packed with cellulose insulation. The floor system includes rough-sawn 2x12 hemlock joists which will remain open to the first floor. The crew finishing up the 2x6 tongue-and-groove spruce floor.
More Guest Blogs


Editor’s note: This is the second in a series of blogs chronicling the design and construction of a house owned by Brian Post and Kyra Salancy. The first blog in the series was titled Building a Small House in the White Mountains.
In mid August of 2013, we scheduled our local plumber and electrician to be on site. They would install the plumbing pipe and electrical conduit needed before the slab pour.
We met them early in the morning to help with the layout and watch, but there was a problem. The plumber said that the Jackson building inspector would insist on a bed of sand for better protection for the pipes instead of the current topping of gravel used by our not-so-local foundation/shell contractor (see Image #2, below). There were some phone calls between the parties, but the sand won and there was no progress that day.
We had to get our foundation contractor back on site to modify the sub-slab material and then re-schedule the plumber and electrician. Kyra and I realized something that would be a trend throughout the whole house build: scheduling contractors was going to be a challenge, especially as GCs with no experience or prior contractor relationships. The scheduling was further complicated by needing various contractors to complete projects in order for other contractors to start their projects.
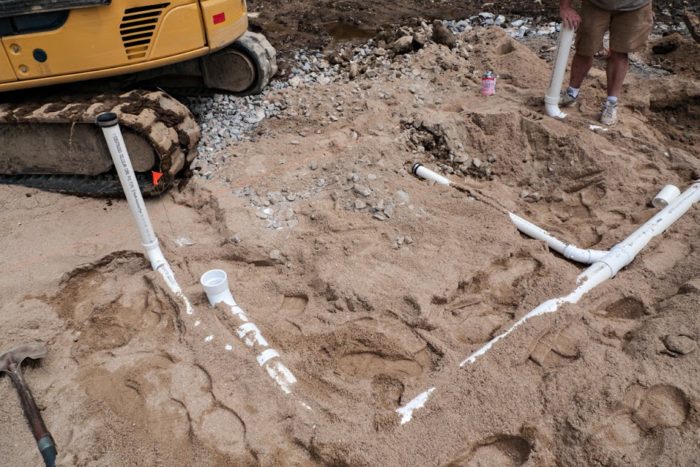
The plumber’s schedule wasn’t looking good, but after some pleading to fit us in, we set a new day for the sub-slab plumbing and electrical. Shallow trenches were excavated, sand was delivered, pipe and conduit were installed, a pressure test and inspection was passed, and we were back on track (see Image #3, below).
U-Factor? SHGC? VT? XPS? Polyiso? EPS? ABC? XYZ?
During the prep phase for the slab, our windows were delivered and we had to make a decision about the type of slab insulation.
The windows were ordered a couple months prior, after a long research and decision process. We wanted a window with above-average performance, while also trying to keep costs down. After considering many companies, we narrowed our choices down to Marvin Integrity (fiberglass-framed, double-pane), Alpen 525 or 725 series (fiberglass-framed, double-pane with suspended film), and Intus Eforte (U-PVC, triple-pane). We ended up choosing the Alpen 525 series (see Image #5, below). The energy performance ratings on the Alpen 525 were better than the Marvin Integrity and there wasn’t a huge cost difference. The Intus windows had impressive specs and great reviews, but we were worried their longer lead time might not work with the building schedule. (Turns out this wouldn’t have been an issue).
I learned a lot about different types of rigid foam when planning the house build. Extruded polystyrene (XPS) is still the general building industry standard, but expanded polystyrene (EPS) is often being used by the high-performance building crowd because the manufacturing process uses a more environmentally friendly blowing agent. Our foundation contractor was planning on using XPS, but I was looking into switching to EPS. The problem was supply. The reclaimed insulation warehouses in Massachusetts weren’t going to work out because of transportation. I eventually found an EPS dealer in Vermont, but in the end, I didn’t feel comfortable making the switch due to timing. XPS won (see Image #6, below).
This is a good lesson to beginner builders; you can do tons of research into alternate materials, but they are of no use if you can’t find them or get them on site in time.
Utility pole and water line
As I mentioned, we weren’t going to be able to bury the electric line from the road pole to a meter station near the house because of ledge. A representative from New Hampshire Electric Co-op (NHEC) made a site visit and we decided to run the electric line overhead from a pole on the road to a new pole about 100 feet up and across the driveway (see Image #7, below). The plan was to put the meter near or on this new pole and our electrician would be able to run underground to the house from here. This was not an ideal situation compared to all underground from the road, but the new pole location didn’t require additional tree cutting and kept overhead power lines away from the house.
Utility Pole Drilling – 08/22/2013 from Brian Post.
The curse of the inexperienced GCs struck again shortly before the slab was poured. We had to set up the well water line, something we had originally thought might be a rough plumbing responsibility. We didn’t know whether it would be best to embed the line in the concrete, bury it below the foam, or adopt some other option.
Fortunately, we did buy and have the water line on site. We decided to run 4-inch PVC pipe vertically down through the slab/insulation and then horizontally (after two 45 degree bends) under the slab and insulation. The 1.25-inch water line and 1-inch well electrical line could then be pushed through this into the small utility room when the well was hooked up. The benefit of this setup is that the well water line could be dug up, pulled, and replaced if there was ever an issue.
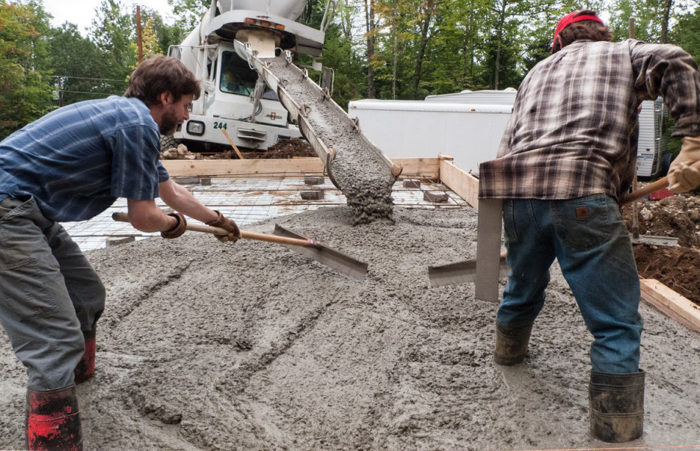
Concrete time
Due to incoming weather, we received a call from our foundation contractor that the slab was going to be poured earlier than expected. Fortunately, a local friend with lots of building experience was available at the last minute to help.
Kyra and I arrived on site that morning to a chaotic scene. Although a concrete truck was due to arrive any minute, there was still some prep work to do. The rebar and mesh weren’t ready, and surrounding the scene was a muddy mess because the forms were braced with soil (see Image #8, below). I found myself finishing tying the rebar to the mesh myself (something I had never done before) as the first concrete truck turned onto our driveway. I finished quickly and then was handed a pair of rubber boots and dove in. Kyra was on photo/video duty.
Slab Pour – 08/29/2013 from Brian Post.
Despite the small crew and an extra truck load of concrete ordered by mistake (not our mistake), the pour seemed to have gone well and it was exciting to finally stand on the slab, which is our finished floor. There were some imperfections in the surface and it would get beat up more, but those would be addressed during the staining and sealing phase.
After we stood on the slab and pictured the space, it seemed smaller than we’d imagined. We noted where the interior partition walls would later be, the placement of some furniture, and it just felt… small.
Kyra and I wondered if our plan for the house was too small. Would we go through the whole building process and regret the size?
After much discussion, we approached our foundation/shell contractor about increasing the overall square footage of the house by making both stories the full 24×32’ footprint. It was not too late to make this change and the price was reasonable. We decided to go for it as this would allow for larger bedrooms and an upstairs office room. The one downside is that we had to re-configure the window layout and it was too late to order new windows, but we were able to make our current window inventory work in the expanded wall space.
Kyra modified our basic plans to reflect the change (see Images #9, 10, and 11, below).
Framing starts
After some quick work by NHEC and our electrician, we finally had power on site via a temporary panel on the utility pole. This required the use of extension cords, but at least the generator went silent.
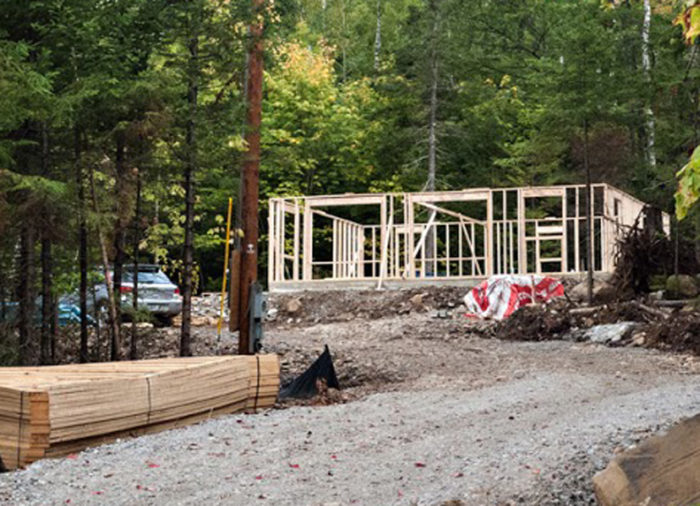
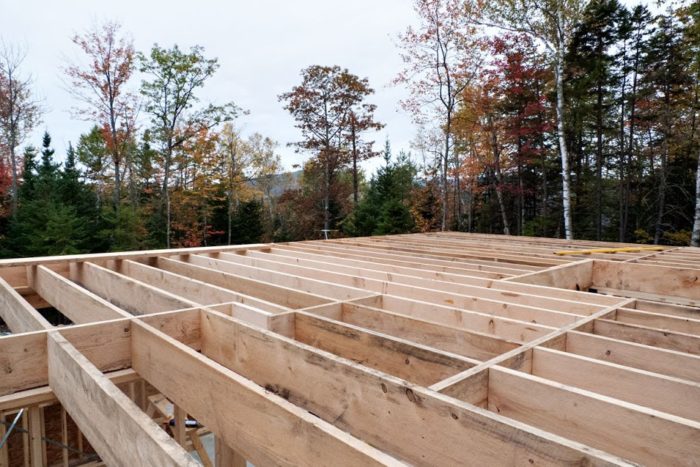
The trusses for the roof were also delivered. With the slab all set, power on site, and framing lumber delivered, framing started in mid-September 2013 (see Image #12, below).
The double-stud walls have parallel 2×4 walls with staggered studs, 16 inches on center (see Image #13). We sheathed the walls with Advantech.
The second-story floor system consists of rough-sawn 2×12 hemlock joists with 2×6 tongue-and-groove spruce flooring (see Images #14 and 15). The spruce is our finished floor and the hemlock joists are open to the first floor. There was a delay getting the hemlock, so it took just over three weeks to frame the first story, set the hemlock joists, and install the spruce. While this was going on, the second-story exterior walls were being built on the ground.
The rough-sawn 2×12 hemlock was beautiful, but some of the pieces needed some cleaning. We should have taken the advice to work on them on the ground, because cleaning and finishing them after they were installed was a massive undertaking.
A crane to lift the walls and roof trusses
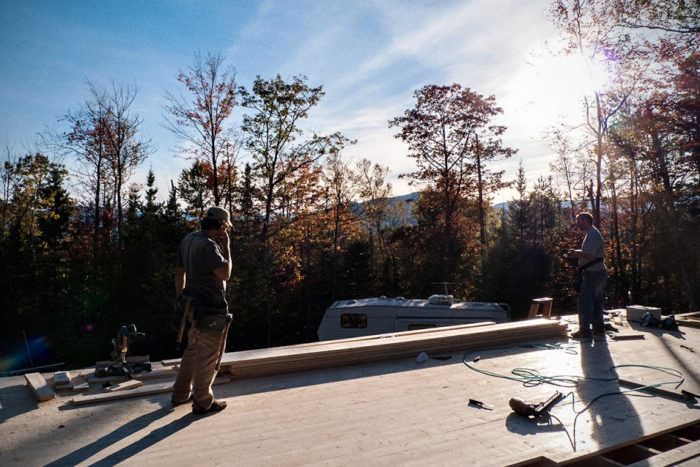
One of the most transformative days during this whole project was on October 11, 2013, when a crane was brought on site to lift and install the second-floor walls and roof trusses. The roof and any remaining open wall space would be sheathed as well.
Crane Day 10/11/2013 from Brian Post.
It was very exciting to see all this concrete and wood finally looking like a house. Next on the schedule was window installation and getting the roofer on site as soon as his schedule allowed.
Winter comes early to this area of New Hampshire; October snowflakes aren’t uncommon in town and nearby Mount Washington averages almost 1.5 feet feet of snow during the month. We had been very lucky with the dry weather so far, but it was getting down to the wire for getting the house weather-resistant.
Editor’s note: This is Part 2 of a multi-part blog series on the construction of Brian and Kyra’s home in New Hampshire. Here is a link to Part 3: Windows, Housewrap, and Roofing Underlayment.
Brian Post is a photographer and website builder. He lives in Jackson, New Hampshire with his wife, Kyra Salancy, and a fluffy black dog. When not working on their house, Brian and Kyra enjoy climbing and skiing in the White Mountains.
Weekly Newsletter
Get building science and energy efficiency advice, plus special offers, in your inbox.


0 Comments
Log in or create an account to post a comment.
Sign up Log in