

Image Credit: Stephen Sheehy
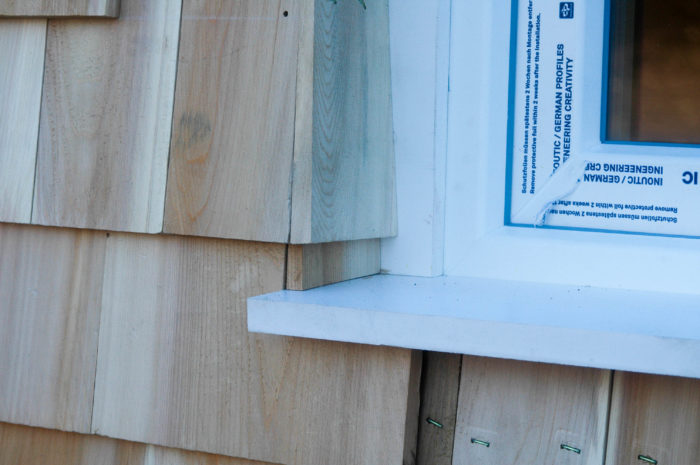
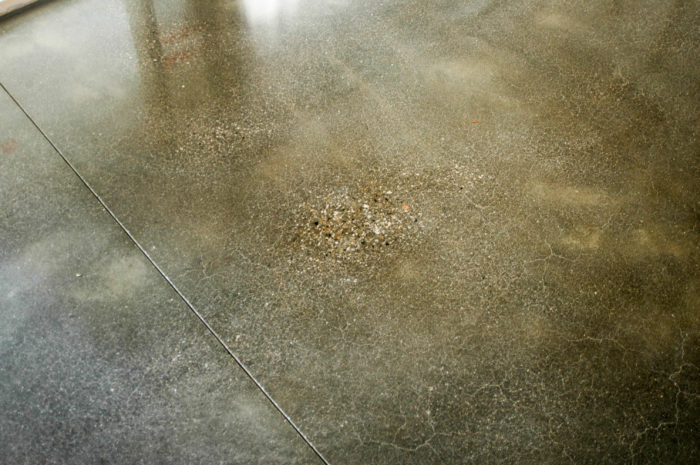
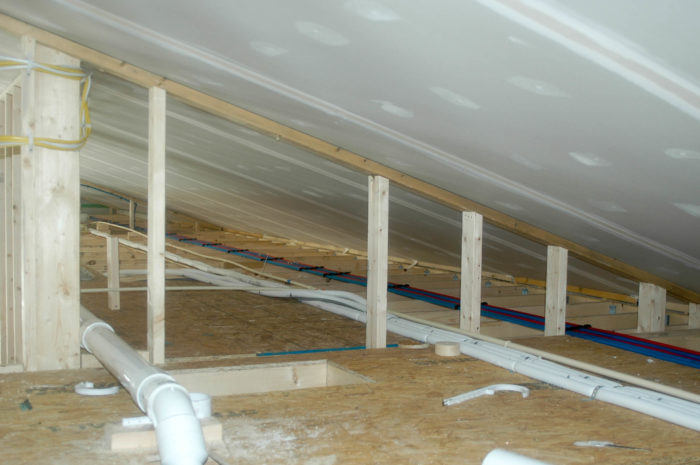
Image Credit: Stephen Sheehy With the “innie” windows set into place, the gap between the window frame and the rough opening is bridged with tape for a seal that's airtight and watertight. The floor gets a polish: The finish floor in the Pretty Good House is the top of the slab, polished with increasingly finer abrasives to produce a durable and attractive surface. The conditioned space above flat ceilings becomes a mechanical chase. The area is protected from cold temperatures, and pipes and wires don't penetrate the building's air barrier.
More Guest Blogs


This is Part 5 of a blog series describing the construction of Stephen Sheehy’s house in Maine. The first installment was titled Pretty Good, Not So Big Maine House.
There has been lots of progress at the job site recently. All of the windows are set into the openings. They are held into the rough opening by steel clips that attach to the window frames and then are attached to the wood that forms the opening. There are six windows on the south side of the living room, with a total opening of about 11 by 11 feet. The fixed windows in the middle were especially heavy, but the guys installed them without any problems.
Wide tape is used to seal the inside of the sill to the housewrap. Once the windows are set in the openings, the spaces between the window frames and the rough openings get taped, creating a watertight and airtight seal.
Then the window gets trimmed on the exterior to cover the tape and provide a sloped sill to shed water.
The windows are shipped with plastic tape that will get removed later. Instead of trim around the window openings, we decided that the shingles will wrap around the corners. We’re also doing woven house corners.
While the crew was working outside, Jon Meade’s guys were polishing the concrete floor. The process is a little like floor sanding, with big machines grinding the floor with ever finer grits, eventually getting to a highly polished look.
A cold and snowy winter slows progress
Throughout New England, we’ve had a cold, snowy winter. We finally gave up on doing any more work outside, after about half the siding was installed.
Plenty of work is going on inside, though. Most of the insulation is in. The walls received about 9 inches of cellulose blown in between the inner and outer stud walls. Some was blown in from above and some required that we cut holes in the membrane. Later, we taped the holes.
Tom and I weren’t happy with the first installation of the cellulose, because it settled in spots and wasn’t dense enough. Tom got the installer to come back and we ended up with what we needed, although it required lots more holes in the membrane. I had been concerned about all those holes, but once we taped them, it looked OK.
The next step was to insulate the ceiling. Tom’s guys stapled the same membrane to the underside of the trusses. Then they nailed strapping to hold it in, because we were getting about 2 feet of cellulose (R-70 or so) on top of the membrane and we didn’t want all that weight to blow out the membrane.
We temporarily blocked the opening for the main entry door with a piece of AdvanTech (a brand of oriented strand board used for sheathing). We don’t want to put the door in until most of the work is done. Breaking it would be an expensive mistake.
Then Tom’s crew screwed drywall to the ceiling strapping. Once that was done, the insulating sub came back and blew the ceiling insulation through an access hole cut into the outside of the house, above the ceiling, under the peak. The hole will become a permanent access door, should anyone ever need to get into the space above the scissors trusses that create the cathedral ceilings.
A blower door test for airtightness
All this air sealing is time-consuming and thus costly. But if done right, it will pay off in lower heating bills forever. It will also eliminate drafts and make the house more comfortable. While we hoped the air sealing was done well, the only way to know for sure is to test for airtightness using a blower door. Diane Milliken from Horizon Residential Energy Services in Portland came out to do the blower door test.
It consist of blocking one of the exterior door openings with an airtight covering. There’s a fan in the covering that sucks the air out of the house at 50 pascals, the standard pressure used for all such tests. Diane explained that 50 pascals is roughly equivalent to a 20 mph wind blowing on all sides of the house.
Once the house was depressurized, the moment of truth arrived. Did we measure up to our hopes for a nice tight house? YES!
The blower door meter showed that 178 cubic feet per minute was leaking out. The standard method of measuring air leakage is air changes per hour at 50 pascals, or “ach50.” The most rigorous standard I’m aware of is Passivhaus, which requires 0.6 ach50 for certification.
We multiplied 178 by 60 to get cubic feet per hour and then divided by the house’s total volume of 18,000 cubic feet to get air changes per hour. Our house came in at .59 ach50, slightly better than the Passivhaus standard and a fifth as much as permitted by the International code. Needless to say, we are pleased. It was a good job by Tom, Brian, Greg, Chris, Joe, Ryan, and Kenny.
Since the house is mostly insulated (except for inside the interior stud wall, which gets insulated after all the wiring and plumbing is roughed in) we can use a single electric heater to keep the workers comfortable. Since it has been below zero almost every morning, we have been able to verify that the house is easy to keep warm.
The benefits of double-stud wall construction
As I’ve said, one of our design goals was to minimize penetrations through the air barriers. Having a good tight house, with minimal air leakage, makes for a comfortable home. Good insulation is important, but if a house leaks a lot of air, the insulation won’t do its job as well as it should.
The double stud wall approach, with the primary air barrier attached to the outside of the inner stud wall, allows us to keep most of the pipes and wires on the warm, or conditioned side, of the air barrier and insulation. With the exception of the handful of wires for outdoor lights and receptacles and a few pipes for hose bibs, all of the plumbing and wiring are inside the conditioned space.
Another obvious benefit is that with the water pipes inside the conditioned space, we don’t need to worry about pipes freezing in our cold Maine winters.
We used scissor trusses to frame the roof. The trusses allow for sloped, or cathedral ceilings, which we like. The air barrier was attached to the bottom of the trusses, then strapping was applied, then drywall. Thus everything underneath the trusses is conditioned space.
But it didn’t really make much sense to have very high ceilings everywhere. We decided that on the north side of the house, where the bathrooms, kitchen, main entry and mechanical room are, we’d have flat ceilings. The resulting space between the flat ceilings is a utility chase. There, the electrical and plumbing can be installed.
There are real benefits to having a utility chase available inside the conditioned space.
First, it is much easier to install pipes and wires. Drilling through the framing is drastically reduced. Installers have a warm and dry place to work. Most of the pipes and wires are inside the utility chase, not in the walls. This makes putting insulation inside the inner stud wall spaces easier as well.
Second, as already noted, everything in the chase is safe from freezing.
Third, if we ever need to access the pipes of wires, for repairs or if we want to install a new fixture, the space will be easily accessed through a hatch just outside the mechanical room doorway.
Stephen Sheehy is the author of a construction blog documenting the process of building a Pretty Good House in rural Maine. GBA has been publishing a serialized and slightly condensed version of Sheehy’s reports. The first installment was published June 15.
Weekly Newsletter
Get building science and energy efficiency advice, plus special offers, in your inbox.


9 Comments
Stephen
What product did you use to seal the concrete floor?
Reply to Malcolm
The floor polishers used a densifier. Jon Meade could give you the details.
http://www.jonmeadedesign.com
Beautiful
I love the details in the house. The white cedar shingles around the windows are a beautiful way to detail the windows. Thank you for showing us this house.
Pretty Good Relationship With Contractor and Subs
Stephen, it sounds like you and your contractor and subs have collaborated well on your Pretty Good House in Maine. That makes all the difference in the desired outcome.
Do you have any estimates on what % of heat your passive solar feature may contribute?
A solar consultant estimated that my wife and I may gain as much as 30% from our 1,100 sq ft passive solar construction in North Central Minnesota. That seems high. But we will see. Meanwhile we are about ready to have our concrete floors polished. But unlike you, we already have at least 4 or 5 cracks outside the control joints.
I have attached a construction photo collage. Our home design is somewhat similar to yours but with a different solution for the clerestory windows
Good job on air sealing.
Team, great job on creating an effective air barrier. I like how you note the PH benchmark. It's the best one out there.
Air sealing is one of the most meaningful measure you can apply to a low energy project. And as you prove again, one of the most reasonable to accomplish.
Response to Randy Bunney
Randy,
Q. "Do you have any estimates on what % of heat your passive solar feature may contribute?"
A. I'm always a little suspicious of these estimates, for several reasons. One is that the amount of available sunshine varies a lot from winter to winter.
The other reason is that all homes, ever since window glass was invented, get solar gain through south-facing windows. This was true when your grandparents were growing up in the 1920s or 1930s, and it's true today. Most designers have always put a few extra windows on the south side of the house, especially in cold climates.
These days, we have better glazing options, and our homes' thermal envelopes are usually tighter and better insulated. But adding an extra window on the south side of your house and claiming that the windows are providing x% of your heat implies that this type of solar gain is specific to a certain type of house. ("I have a passive solar house.") It isn't. This type of solar gain happens in all houses.
estimated cost per square foot
I know you aren't done, and you might well have already published your target, but I don't remember it if you did. What is your current estimate of total cost on a per square foot of useable space basis?
Reply to Michael
In order to even try to calculate cost per square foot, we need an agreed-upon definition. Do we count design fees? Appliances? Light fixtures? Wall to wall carpet, but not rugs? Window treatments (whatever they are:-)?
I didn't try to break out the garage costs from house costs. I just got one bill from my GC for footings and foundations and slabs, with a separate bill for concrete floor polishing. Does the garage space count in square footage? I would think not, but without carving out the garage portion of various trades, I don't know what to include.
The house has about 1860 square feet of conditioned space, measuring from the outside of the foundation and about 1650 of usable space after allowing for the foot thick walls. We have two rooms outside the conditioned space that are insulated and have windows. Do their approx. 300 square feet count? I dunno.
I'd be interested in anyone's comments or suggestions about what to include. Most Fine Homebuilding Magazine articles have a square foot price, but I haven't seen a definition.
Stephen
I hope there is going to be a part six showing the finished house sometime with a few comments on what you have found living in it is like.
Log in or create an account to post a comment.
Sign up Log in