
Image Credit: Fine Homebuilding
More Musings of an Energy Nerd


UPDATED on April 3, 2016
Builders in northern states and Canada often specify exterior wall foam for new construction as well as for residing jobs on existing houses. Installing rigid foam on exterior walls reduces thermal bridging through studs and (as long as the foam is thick enough) greatly reduces the chances of condensation in wall cavities. Current trends favor thicker and thicker foam; many cold-climate builders now routinely install 4 or 6 inches of EPS, XPS, or polyiso on exterior walls.
Innies or outies?
Builders installing thick exterior wall foam can install windows two ways: with the window flanges in the same plane as the back of the siding — so called “outie” windows — or with the window flanges in the same plane as the OSB wall sheathing — so-called “innie” windows. Either way will work.
Let’s consider a wall with 2×4 studs, OSB sheathing, 4 inches of exterior foam, 3/4-in.-thick vertical strapping, and fiber-cement lap siding. How should the windows be installed?
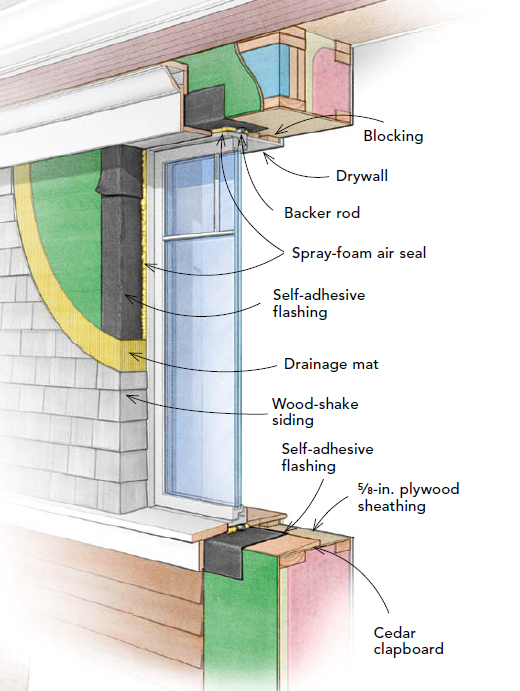
Outies, step by step
A builder who prefers “outie” windows would do it this way:
Weekly Newsletter
Get building science and energy efficiency advice, plus special offers, in your inbox.

This article is only available to GBA Prime Members
Sign up for a free trial and get instant access to this article as well as GBA’s complete library of premium articles and construction details.
Start Free TrialAlready a member? Log in


52 Comments
Outies look better
Martin, I vote for the Outie.
The Outie does look "cool and correct".
Each of the systems that you described included a box of plywood or a box of costly trim.
In the case of the Innie...The "box" provides a thermal shortcut from inside to outside.
The Innie Strategy adds more exterior surface area(heat transfer) to the system.
The Outie looks like a warmer/safer(in winter) assembly to me.
The Outie will have less exterior trim material to maintain.
The head detail for Innies seems very complex to me.
Outie requires less of the costly flashing materials.
If this were a roof window (think skylight)..which is better?...Innie or Outie?
Think of a window as a shingle in the wall....which is better?....Outie or Innie?
Some tomatos are better than others.
I would prefer to deal with cat hair over pigeon poop.
The Westford Habitat House window strategy(Outie) looks better to me than the Innie.
More on Innie disadvantages
The Outie works with 2 dimensional flashing.. the Innie is 3 dimensional.
The Innie creates 8 additional "triple points"(3-d corners)
It is hard enough to get the 2-D stuff right.
Passive House window details
I'm no window flashing/trim expert, but I thought I'd supply some images of a typical Passive House window detail for debate. http://www.passivhausfenster.at/products/passive-house-windows/passive-house-windows?view_image=venster1.jpg (click on the thumbnails below the image) The European Passive House folks seem to greatly prefer the "Innie". In addition to the reasons mentioned in Martin's post is that with the "Innie" detail (combined with inward opening windows typical for European Passive Houses) you can insulate OVER part of the frame, greatly reducing or eliminating the typical thermal bridge at this location.
I don't see any thumbnails
John,
I don't see any thumbnails on that page. Do you mean this page?
http://www.passivhausfenster.at/produkte/passivhausfenster/passivhausfenster?view_image=venster1.jpg
nice link
John S, Thanks for the PH link ... there are a lot of foreign and interesting things going on in some of the illustrations.
I am very interested in all things Passivhaus.
Here is a main link that I have been going to..
http://www.passivhaustagung.de/Passive_House_E/PassiveHouse_directory.html
Do you have any more good Passivhaus links?
innie has better energy performance in cold climates
Although it may seem like the innie adds exterior surface area and provides a thermal shortcut between inside and outside and therefor has worse performance than the outie, I believe this is actually a simplification. Because the window frame is a very week link in the thermal envelope, you have to look at how the placement affects the interior surface temperature of the window frame. Placing the window at the very exterior plane of wall will greatly lower the interior surface temperature of the frame, which can lead to condensation, especially if it is a typical wood (uninsulated) frame in a cold climate. Placing the window in the middle of the wall cavity, in general, will result in a warmer interior surface temp in winter. The Passive House method is the best from an energy perspective: place the window in the middle and cover the outside of the frame with insulation. This is possible because window manufacturers in Germany design windows to be insulated, and also because european windows open towards the inside.
JLC author votes for innie windows
The latest issue of the Journal of Light Construction has an article by Fairbanks, Alaska builder Thorsten Chlupp, who strongly prefers innie windows over outies.
He writes that he prefers innies "because the window is somewhat protected from wind-washing and the interior glass is more easily warmed by the heat in the room. ... I've observed that in extremely cold weather — when it's 25°F below zero, for example — frost tends to form inside windows installed at the face of the wall, whereas frost rarely occurs on inset windows. I've installed windows both ways, but because of the frost problem I now do only recessed installations."
For more information, visit
http://www.jlconline.com/cgi-bin/jlconline.storefront/4a09e6f207e7dff027170a32100a062a/Product/View/0905inst
Thorsten Chlupp
Martin, thanks for the link.
Great article .. I will consider carefully anything that Thorsten Chlupp has to say.
innies and solar gain
I realized I needed to qualify my earlier post about innies having better energy performance. If you look at total net performance where the window is being used as a passive solar collector, the innie will recieve less solar energy from shading. The farther "in" it is, the less solar it will get, potentially decreasing passive solar gains considerably. The german window isn't perfect either because from a passive solar standpoint the wider frames,although insulated, allow less solar gaine for a given rough opening.
It is not about looks...
Inset vs outset windows...I have learned my share of lessons the last two years about this the hard way and thanks to John luring me over here I just can't resist to voice my humble opinion about this. As pointed out in my recent JLC article I have done both but only use the inset by now. We had a fairly long stretch of very cold weather this winter and I saw a big difference on the homes I build in regards to inset or outset window placement. At very cold temperatures the outset windows had icing issues on the inside. I have been doing simple tests with thermometer/humidistat's placed in six different window openings on the inside by the window on the sill throughout the house. I have done this on various houses we build - inset or framed out windows. Overall I have seen warmer temperatures on the inset windows on my readings. We looked also at the exterior with an infrared camera and seen less cooling on the inset windows. All of this wasn't done in form of what I call a scientific study/research in the quest to find out if this truly is making a difference. Something we are planning to do through CCHRC.
Anyways - this was very convincing to me and I made it policy for us to only build inset windows anymore. With that in mind we started to build several mock-ups and tried different ideas to come up with a good inset window detail which can be build fairly easy in the field...which is what we do now on all projects. Meanwhile I started to connect with the building science community in Europe and studied a ton of research papers from across the pond and traveled to the Passiv Haus conferences in Europe and now actually have a much better understanding of the importance of the window placement and detailing in the wall assembly. Someone already pointed out the Passiv Haus windows are always inset and have wider frames. The Passiv Haus Institutes research publication #37 with 140 pages published 11/08 (available through http://www.passiv.de under publications) is a wealth of information of why exactly we need to pay so much more attention to how we install windows - and were we place them. At the moment this paper is only available in German but I recommend it highly to anybody serious about building high efficient buildings. Their research shows very interesting isothermal curves of the window/wall assembly from their studies in relation to window placement and over insulating on the outside over the window frame which is really eye opening. Think about the window as the thermal conductor between the cold and the wall assembly. How and where the window is attached plays a big role on the thermal bridging that penetrates into the wall assembly. The isothermal images they show from their study indicates very clearly how this effect can drastically change with placement and installation. They show a standard window installation with a window installed at the edge of the structure before the outer-insulation layer begins compared with a window which is placed onto the insulation layer and is also over-insulated on the frame - with a drastic difference in the heat loss by a factor 30 on the edge of the window in the standard installation. Something we cannot ignore and so I am back to the drawing board and building mockups in the shop trying to find feasible means of incorporating this knowledge into our building practices. As our window frames are fairly slim it is difficult to detail the over insulation into the window frame properly - at least as far as openers goes. On picture windows it's fairly simple. If stucco is used it isn't to difficult to detail either - but with any other siding material it is tricky. I am working on a either brilliant or complete stupid idea about this right now which might solve this problem very easy and economical and also solve the question on how to change out a window down the line without tearing down the siding/insulation.
So to sum this all up: I believe that we can't really afford to choose "looking cool" over being more efficient in our day and age. Based on (European) building science there is no question on were the window needs to be placed - inset to the correct ratio of the overall wall assembly ideally just in front of the actual wall structure. This means neither too far to the outside nor to the inside. If placed to close to the inside we do not only lose solar gain efficiency but also see a significant increase in energy loss due to thermal bridging-conduction of the window into the conditioned space. This would be the worst installation placement option. Further over-insulating the window frame on the outside has a huge effect on the overall window performance as it reduces the loss through thermal bridging. It is advisable to plan for a thermal break especially under the window frame on the sill area which practically cannot be over insulated on the frame. Spray foam should not be used as a sealant in the installation as it will shrink over time and break loose by the window which will result in air leakage. We use baker rod first, followed by sealant and then spray foam the reaming gap.
Writing this comment almost 12 years later. Was there ever any follow up or resolution regarding Thorsten's above ideas, especially easy detailing of over-insulation for windows that open?
T. Barker,
Adding strips of exterior rigid foam to cover the exterior of window frames has been a common practice with Passivhaus builders for more than a decade. I'm not sure whether this approach could be called "easy detailing," but the concept is fairly simple.
For more information on overinsulating exterior window frames on the GBA site, see this Q&A thread: "How much more efficient is it to put windows in the middle of the opening of a double-wall construction?"
For more details on this approach, see this document by Florian Speier: "Window Installation in Passive Houses."
For a discussion of buildability issues with this approach, see "Walls and Windows for the Orenco Passivhaus."
OK, thanks for the links Martin. I will take a look at them.
But my point was has there been any progress on EASY or pre-manufactured detailing for this problem? Did Thorsten ever follow up with his idea that he mentioned?
T. Barker,
I haven't heard of any developments along those lines.
Great post
Thorsten,
Great information! Thanks very much for taking the time to share it.
Good luck with your research and experimentation — keep it up!
TC...Just noticed you posted
Thorsten,
Thank you for coming "over here"
I stand to be corrected.
I really like your extreme climate perspective.
The fact that you are doing mockups and observing data..
I would love to see photos of your mock-ups.
Thank you Dave and John S. for your insights also.
Another good resource on "innie" versus "outie" windows
For a fairly in-depth discussion of "inner" versus "outie" windows, see the excellent guide to the REMOTE construction technique, “REMOTE: A Manual”.
Attaching nailing fins to outies
The vinyl windows I will be using in my superinsulated retrofit (2" of polyiso) only have a 1" nailing fin. Assuming 1/4" for shimming and a 3/4" plywood box, I would end up screwing the window into the plywood edge instead of into the 2"x4" framing behind the foam. What would you suggest?
I can get the window with a 1.5" fin but that comes with an integral J-channel and I will be using T1-11 siding. Can I put the T1-11 into the J-channel or will that cause problems? (I know that J-channel is typically used for vinyl siding and I just can't go there...)
Thanks in advance!
Securing "outie" windows
Lesley,
You don't say whether you are installing "innie" or "outie" windows. I'm guessing "outie."
As I wrote in my blog, most "outie" windows are secured with metal masonry clips (masonry brackets). That means they don't have nailing fins. Contact your window supplier to find out whether the windows you are interested are available with this option. Don't use the wrong kind of window just because it's cheap or available.
Housewrap question
Martin, thanks for your comment. I have finalized the window installation details -- outie style with masonry brackets. The front of the foil-faced polyiso will serve as the primary drainage plain. However, I am considering applying housewrap to the sheathing behind the foam, simply as a protective layer until I can get the foam installed. (The project is located in the Pacific Northwest and unfortunately the "storm door" has opened, so there will be daily/weekly rainstorms for the next five months!) With outie window flashing techniques, I can't see a way to connect the WRB on the sheathing to the front drainage plain of the foil layer. So I am wondering if I will have future issues if I have two disconnected drainage plains? Alternatively, is there a way to detail this differently? Thanks in advance for your recommendations.
Foam plus housewrap
Plenty of people have built successful homes that include both exterior foam sheathing and housewrap. Whether or not your system will work depends on the details.
It sounds as if you want to use the exterior of the the foil-faced polyiso as your WRB. That will work, as long as you detail the foam properly. Vertical foam seams must be taped. Horizontal foam seams are more problematic than vertical seams; while some builders rely on tape for horizontal seams, others prefer the dependability of Z-flashing (either conventional metal Z-flashing or 6-mil poly). Be sure to think through the flashing details at window heads and door heads.
If you have flashed the exterior face of the polyiso to be your WRB, you shouldn't have any liquid water on your housewrap. Since your housewrap is vapor-permeable, its presence shouldn't cause any problems.
Taping the foam
Thanks for your quick response, Martin. I am planning to tape all the polyiso seams using foil tape with an acrylic adhesive (as recommended by PIMA, the polyiso mfr assoc.). I also plan to use this tape to cover any exposed edges of the polyiso (e.g. at the base of the wall where the foam cantilevers out from the existing stem wall and at any penetrations). My goal with this is to protect the polyiso from moisture and bugs. As for the windows and doors, I will flash them with a 25 mil butyl hybrid tape.
Does this approach sound right? I am modeling my project based on what I have learned from the Building Science and CCHRC case studies. However, the devil is in the details and it is not always clear which specific type of tape is used in different places in the wall assembly. This is particularly critical since some flashing tapes are not compatible with solvent-based caulks. And then the challenge is determining what is in the caulk...!
I would love to hear about specific products that people have successfully used in their super insulation efforts. Many thanks!
Flashing window heads
Lesley,
If you are flashing your window and door heads with 25 mil butyl tape, it sounds like the top of the tape will be installed on the foil face of the foam. Is that true? If so, you will be depending on the butyl tape to stay adhered to the foil facing for the life of your home.
Whether or not that is a good bet depends on who you talk to. I think butyl adhesives are great, and I have no reason to believe they will fail -- especially if they are installed on surfaces without dust, moisture, or frost, and especially if the installer uses a roller. Will you be watching, or will you be doing it yourself?
After 40 years, who knows how well it will adhere? As many building scientists say, "Physics trumps chemistry." The good thing about lapped flashing is it doesn't depend on a chemical bond; it depends on gravity. You might want to consider the use of Z-flashing extending from the nearest horizontal seam in the polyiso (above the window head) and lapping over the top of your window head flashing.
Z-flashing
The window flashing will be installed by me and my trusty J-roller. The folks at Building Science share your concern that the butyl tape will not hold by itself, so they recommend taping the head flashing. (Of course, then one has to wonder about the longevity of that round of tape!) They also suggest installing metal head flashing that goes in front of the furring strips and then over the top of the window trim.
Unfortunately, I don't think I can implement your flashing proposal since the house is a low-slung ranch. Accordingly, the only "seam" above the windows is the intersection of the roof with the wall. However, the windows will benefit from the shelter provided by the generous eaves so hopefully very little rain will hit the top of the window (except during the horizontal rainstorms!).
I welcome any other tips or recommendations as I head into my very first deep-energy retrofit!
Thermal Performance of Innies and Outies
The position of windows within a deep wall affects the thermal performance of the wall itself. The inside of the window is at room temperature and the outside is at ambient. So the temperature gradient through the window is steep. The temperature gradient through the wall is more gradual since the wall is thicker than the window. If a plot is made that shows lines of equal temperature (isotherms) within the window and the wall than these lines are parallel to both the surface of the wall and the surface of the window. The lines are closely spaced within the thickness of the window and more widely spread within the wall.
The transition zone (from the edge of the window to some distance away from the edge) where the lines change spacing is interesting. Around the window cills (external, internal or both) there are parts of the thickness of the wall which are at ambient or room temperature. In the transition zone, from a purely thermal pont of view, the effective thickness of the wall increases from the thickness of the window to the overall thickness of the wall. Obviously, if the wall is not as thick then its thermal performance is not as good. So the thermal performance of the wall is degraded in the transition zone.
When the temperature distributions are modelled and plotted, the transition zone appears to be approximately as wide as the cill is deep – the isotherms nearest the surface have a slope of ~1:1. With an outie window all the transition is on the inside; with an innie window all the transition is on the outside. So the transition zone, the zone of degraded thermal performance, is about as broad as the thickness of the wall minus the thickness of the window. If the window is placed in the middle of the wall then the transition takes place in both the inside and the outside of the wall. The transition zone is then about as broad as half the wall thickness minus half the window thickness. So the thermal performance of the wall is degraded less than with either an innie or an outie.
The area of the transition zone is proportional to the perimeter of the window – another good reason to size windows carefully to balance solar gain and conductive heat loss. Two windows which are sufficiently close that the transition zones that they would have in isolation overlap will cause an even greater loss in performance in the wall that separates them. It would be better to have them side-by-side or, better still, combined.
Replacement of Innie Windows
Martin,
One issue that Thorsten Chlupp touched on was the inevitable replacement of the window. That's no small matter!
For the outie windows, it appears fairly straightforward, especially if the width of the exterior window trim exceeds the width of the window flange. Remove the trim, peel back and tease the flashings away from the flange, then it is accessible.
For innie windows I can't imagine the process. Remove trim boards, possibly siding, remove the exterior jamb extensions, cut the foam away from the flange, reach what flashing material you can . . .
It sounds like a nightmere.
Perhaps with the Passivhaus windows, the insulation that is used to cover the exterior of the window frame is large enough that just by removing this extra piece - you would have ready access to the window and flashing? I just haven't seen that level of detail in any of the European PH documents I've read.
A similar problem can be found in this detail:
https://www.greenbuildingadvisor.com/cad/detail/flanged-window-head-exterior-foam-sheathing-brick-veneer-siding
Do you know if anyone has found an elegant solution to this problem? If so, could you please link any relevant articles / drawings?
I know you could replace just the window (leave the frame). Or you could use flangeless windows with an integral brickmold (rely on caulk?). But both of these are potential compromises.
From a performance standpoint the innie window has a lot to recommend. But not being able to solve this replacement issue could tip the scales for many people back to the outie concept. Carpenters 20 - 30 years from now will probably be cussing our shortsightedness if we don't get these details right.
Thanks!
Response to Daniel
Daniel,
Thanks for contributing some excellent points.
Although I'm convinced that innie windows perform better, I continue to prefer outie windows. In addition to the point you made, here's why: to me, outie windows look better; I worry about the integrity of the flashing details with innie windows; and I like to have wide interior window stools.
CCHRC Tests / Research
Martin - I queried Thorsten Chlupp to see if he had resolved any of the issues mentioned.
He said that their latest research indicates a 20 - 22% improvement when windows are inset and overinsulated (frames). He hopes to publish these findings at the CCHRC website - possibly this winter.
Response to Daniel
Daniel,
I'll be interested to see his data. But remember, you can't "overinsulate the exterior frames" of Canadian casement windows, because they open outward. The technique only works for expensive European tilt/turn units that open inward.
More light and more views
Martin,
"Although I'm convinced that innie windows perform better, I continue to prefer outie windows. In addition to the point you made, here's why: to me, outie windows look better; I worry about the integrity of the flashing details with innie windows; and I like to have wide interior window stools.
"
Your second point is, I suspect, the clincher for anything other than extreme climates. Water control must surely out-bid thermal performance. The integration of air-sealing measures around the window with an external air barrier will also be simpler (more reliable, more robust, KISS).
The wide interior window stools can be wider still by splaying the window recess. Because of the transition zone you won't affect the thermal performance and you'll get more light into the room and broader views from the room. So your carefully-calculated, thermally-optimised, not-very-large windows work to their greatest advantage. The downside is that the cost of your drapes goes up...
Correction
You don't get more light in, of course since the area of the window has not increased. You get direct light in for more of the day so the solar gain will be a bit more than with a parallel window recess.
WRB under foam on outie windows?
Are there any drawings that detail installing outie windows with the WRB under the foam? If so, where can I find them? It seems like most of what I have read, puts the WRB outide the foam with outie windows. But the WRB between the OSB and foam "feels" better to me.
Thanks
Response to Fred
Fred,
I don't know of any such drawings. I suggest that you post your question on our Q&A page:
https://www.greenbuildingadvisor.com/qa
That way other GBA readers are more likely to see your question -- and someone may have an answer for you.
Great Passive House Paper on Window Placement Depth
From the Passive House Northwest conference:
http://phnw.org/PHnw-2010-04-26_presentations/PHnw-2010-04-26_Barry.pdf
Response to Len Moskowitz
Len,
Thanks very much for providing the link to a very interesting presentation.
For those who want the quick summary, the presentation by Bronwyn Barry recommends "halfies" -- windows installed in the center of the wall thickness -- instead of "innies" or "outies."
Barry also discusses different ways to follow the European practice of "overinsulating" window frames to lower thermal bridging through the window frame.
Foam sheathing with windows in existing house
Hi all,
Great thread. I'm wondering if the "innie" concept could be modified to work with existing windows in a house when adding foam insulation. We're closing on a house in which we'd like to update the windows right away. And while we want to add foam insulation to the exterior, we don't really have the time until next spring to do that kind of major overhaul. (I know it'd be far preferable to do it all at once, but we're swamped with other commitments and have to budget our time to achieve what's realistic before fall). Any advice on how we can proceed with the window insulation now and set ourselves up for adding the foam at a later date (perhaps using this "innie" concept?) I'd really like to not rip out the windows and re-install them if that can be avoided. Thanks!
Response to Lou Blouin
Lou,
If you know that you will be installing a layer of exterior rigid foam on your walls, I strongly advise you to hold off on your plans to replace your windows. It makes much more sense to do the two jobs simultaneously rather than successively.
The problem concerns the window flashing. Unfortunately, window replacement contractors usually do a terrible job of window flashing -- and in many cases the "flashing" details consist of little more than caulk. Even if you find a contractor who understands how to flash a window opening, the expensive work will be mostly wasted and will have to be repeated once the exterior plane of your wall is altered by the rigid foam.
Both jobs should happen at the same time and should be performed by the same contractor -- one who understands how to flash a window rough opening.
Thanks + Roof Overhang Question
Hi Martin, Thanks for the quick response. That makes total sense, and living with old windows for six months sounds like much less of an inconvenience than redoing a bunch of work next spring. One more question. To accommodate the thicker walls, we'll also need to add a roof overhang (currently the roof is flush with the exterior walls). I was thinking it might make sense to tackle that job this summer and work on the exterior walls next summer, as the former seems to be a pre-requisite for the later anyway. Does that sound like a better use of energy—tackling the roof overhang now and the windows and walls later? Thanks in advance!
Response to Lou Blouin
Lou,
Yes, your plan to extend the roof overhangs first makes sense. That work is independent of the wall and window improvements.
Good luck on your project.
Doors
Nobody ever seems to talk about door details. I'm building a house now and would like to do outie windows and doors, but realized doors would need some extra details since you can't extend the slab/foundation walls like you can a window with a plywood box. If I want to do outie doors (large sliders) how would you detail them so they have enough support on the bottom? I'm doing 2" of foam plus 3/4 furring strip airspace. Thanks
Response to Adeeb Hattar
Adeeb,
Good question. I have some ideas, but this question would benefit from responses from the entire GBA community. I urge you to post the question on the Q&A page, so that more people can see the question and respond. Here is the link:
https://www.greenbuildingadvisor.com/qa
Question About Framing a Home w/ "Outie" Windows
Hi. I've never insulated a home with rigid foam on the exterior before, but have been reading about and want to try it. An article that I read said that I need a minimum of 2" of foam for my climate. My questions and problem are: I have already framed the home and have the OSB on the exterior. I don't want to go back and redo all the rough openings of the windows for a plywood buck. Would a "picture frame" liquid nailed and screwed be enough support without the plywood buck Some of the windows are 72" wide by 54" high.... my second question is concerning the installation of the siding. I understand the need for the wood strapping/strips to hold the foam to the house, and provide an air gap... however the windows I am going to buy have an "J channel attached to them"... when I am installing my picture frames should I make them thicker than the 2" foam to account to help make a straight and flush surface right into the J channel... for example if I use 3/4" strips to hold the foam in place should I make my picture frames 2 3/4" to make a flush surface for the siding to rest upon when installing... having a hard time visualizing what I should do in this instance.
Response to Denon Carpenter
Denon,
First of all, it's best to determine your window installation details, and the type of window you want to order, well before you frame and sheathe your house. Each decision you make affects other decisions, so to some extent you may have painted yourself into a corner with your failure to figure out your window installation details until after your rough openings were already framed.
Second, your wrote, "I'm having a hard time visualizing what I should do." You don't have to visualize it; you have to draw it. If you aren't good at making architectural drawings, you probably need to hire an architect or a designer.
Third, you should read this article: Installing Windows In a Foam-Sheathed Wall. That article provides many more details on this type of window installation.
Fourth, to address your questions:
1. If your windows include J-channels to receive the siding, of course the thickness of the foam, the thickness of your picture frame pieces, and the thickness of your furring strips have to be selected to ensure that the siding will end up on the correct plane -- the plane that allows the siding to fit into the J-channels. Again, a drawing is very helpful when determining the thickness of your foam, the thickness of your furring strips, the thickness of the picture frame pieces, and the method used for attaching your windows.
2. Whether or not it makes sense to attach a 54" by 72" window to a "picture frame" of 1x4s depends on (a) how securely you have screwed your 1x4s to the framing, and (b) the structural elements in the window itself. If you have any doubts, consult the window manufacturer or an engineer.
Depth of plywood bucks?
You say the depth of the plywood bucks should be 8 3/4". I presume that's 3.5" for studs, 0.5" for sheathing, 4" for foam, with the extra 3/4" to make space for the 3/4" picture window we'll make around the rough opening later. Is that right?
Also, let's say we're installing plywood bucks and 2" of foam but we intend to screw the nail-fin windows into the framing without using a picture frame. In that case, would our depth for the plywood bucks be only 8"? Also, in that case, I'm wondering if it's okay that the window will then be recessed 3/4" after we add the 3/4" furring strips to make the rainscreen gap.
Response to Michael Bluejay
Michael,
There are lots of ways to do this. For more information on the topic, see Installing Windows In a Foam-Sheathed Wall.
If you want your furring strips to be proud of your window fins, you can do that. However, that approach complicates your exterior trim work, because now you need an additional exterior sill to convey the water from the window sill to the exterior, and additional exterior jamb extensions. But you can do it that way if you want to.
Whatever you do, make an illustration of your plan. Add up the thickness of each layer to be sure that your window bucks are as deep as you want them. And think through the water management issues and trim issues before you start.
For me, the advantage of the outie approach is that you avoid exterior jamb extensions and the need for a new sill to convey water to the exterior. That's why I think that it's best for the window flanges to be in the same plane as the exterior side of the furring strips.
Arctic Brickmold
I am currently putting a window package together for a house build in Manitoba Canada. There is at least one company I have found that has an exterior option called an Arctic Brickmold. The 'brickmold' has an integrated nail flange and sets the window box/glass 3" into the wall where it is attached to the actual pvc window box. From there the interior jamb takes over. The Brickmold is available in both pvc and metal. Due to the manufacturer putting it all together at the factory the corners are mitred and welded and the joint between th Brickmold and the window box is waterproof. I have never actually seen the product installed on a window but have wondered if it would resolve some of the concerns of the 'innie' windows. Below is a link to the companies brochure. The Arctic Brickmold is in the bottom left corner of the last page.
http://berdick.com/wp-content/uploads/2015/01/Brochure-2014.pdf
Response to James Barkman
James,
You may be right, but the brochure you linked to is far from clear. The options illustrated on the bottom left corner of the last page are simply called "Jamb extensions," a term that is usually used for interior trim. It's not impossible that these are exterior jamb extensions rather than interior jamb extensions. But if they are exterior jamb extensions, the author of the brochure forgot to explain that.
If you want to know more about these jamb extensions, I suggest you contact the manufacturer. Ask them to tell you more about this product, and describe what you intend to use it for. They'll be able to give you some advice.
"Middlly" windows for thermo clay block wall
Thanks to Thorsten Chlupp, and the most useful link he provided from passiv.de.
Conclusion for up Europeans is that if we build with thermo clay block, and most of us do, we should opt for "middly" window, that is, so that the outer plane of the window is flush with the outer plane of the clay block. Since λ for these blocks is ~0.15-0.20 W/mK, thermal bridging is not a significant factor.
Response to Davor Radman
Davor,
All researchers have reached the same conclusion -- and the conclusion applies to wood-framed walls (for example, double-stud walls) as well as walls built from clay blocks. So-called "in-betweenie" windows are better than innie windows or outie windows when it comes to thermal performance.
The differences in heat flow aren't huge -- but the differences favor in-betweenies.
Thank you Martin
Thanks for giving it a name :)
The article itself also said so, but the document linked is for my climate, with the building materials and assembly I will be using, and from as a reliable source as it gets, so that was the final confirmation.
I know this is an old thread, however I dont see a mention of using pressure treated lumber for the extended window bucks for outie windows. Is this not necessary? Price is actually fairly similar at the moment where I am and wondering if it would be wise to do so. Or if there was a reason not to? Thanks
Mike,
If you understand flashing procedures and follow best practices, there should be no need to use pressure-treated lumber for your window bucks. But there isn't any harm in using pressure-treated lumber, as long as you remember to use stainless-steel fasteners for any fastener that contacts the PT lumber.
Log in or become a member to post a comment.
Sign up Log in