Window sill pan question
Tommy87
| Posted in Energy Efficiency and Durability on
Hi all,
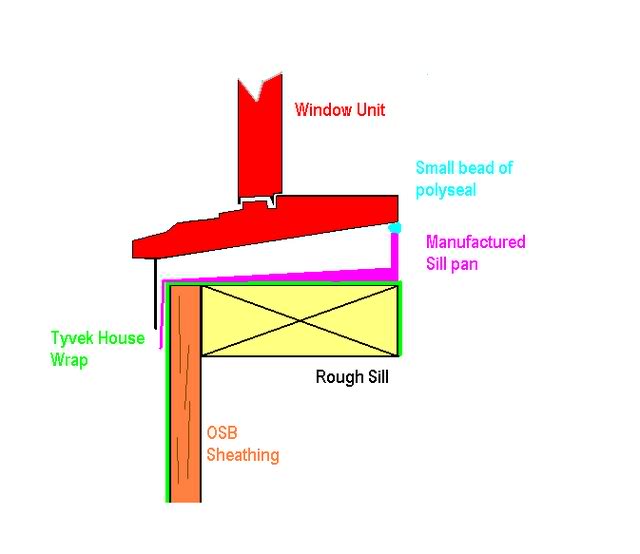
I am about to install my windows and will be making my own sloped sill pan. I will be using bevel cedar and screwing on a thin back dam as well. Over this, will go the flashing tap.
Regarding the back dam, should it go behind the window (interior side) or under the end of the window? I would think it would be best practice to have it go behind the window. Only downside I can see is making interior taping more difficult.
Please see pictures on which method I should use.
Thank you!

GBA Detail Library
A collection of one thousand construction details organized by climate and house part
Search and download construction details


Replies
Tommy,
The back dam goes behind the window. Here is a link to a GBA video that shows the process: Window Sills That Won’t Rot: Sloped Sill or Backdam?
I am also sharing a screen shot from that video.
.
Thanks for clarifying Martin. So ideally, the backdam should run flush to the very edge of the interior sill?
Tommy,
Q. "Ideally, the backdam should run flush to the very edge of the interior sill?"
A. Yes. That way, it's easier to install the stool. (In other words, it's easier to trim out the window on the interior.)
Great, thank you Martin.
Another question just came up.
I got my windows delivered yesterday and the window flanges do not go down near as far as I expected (the bottom of flange only goes down 1" and the nail hole 5/8").
I was planning on using 1/2" bevel cedar for a sloped sill pan but this would raise my window up another 1/2", which wouldn't allow for the bottom flange to be nailed into the sill (framing). Do you have any ideas to make this work so I can nail the bottom flange into the framing?
Tommy,
That's an annoying surprise. Most flanges used to be 1 1/2" but recently more are going with 1 1/4", mainly so they can secure 2"x2's to the bottom to avoid damage. A 1" flange is a real headache to nail too.
I guess the two best choices are to either use a flat sill with a back dam, or drill more holes closer to the bottom of the 1" flange.
I know! Pretty upsetting to see a 1" flange. The windows are milgard. I got a few other brand windows and they are 1 1/2".
My plan was to pre drill some lower holes but still seems like the hole would be too high up. Would it be an issue if I didn't nail the bottom?
I was thinking of stapling as an alternative as well (to get even lower).
Tommy,
The fasteners on the top and bottom are really only there to keep the window frame straight. It's only recently that manufacturers suggested nailing the top flange at all, and windows installed before that did fine.
I bet staples would work. Or if you are using a rain screen (so protruding heads wouldn't matter) you could install pan head screws angled down to catch the sill.
Sounds good Malcolm. Thanks for the advise.
One other thing- My windows have a 2" depth over the sill pan so my sloped sill pan will only be 2". The windows are cut out to use a 1/2" tall sill pan. Is there anything wrong with setting a window on a 2" (site-built) bevel with that big of an angle? Most I see are far less of an angle.
No. as long as the shims you use are the same angle it really doesn't matter.