Follow-up question on cut & cobble rigid foam in rafters
Several weeks ago many of you were kind enough to offer advice on a cut & cobble insulation project I undertook while converting our old garage into a new master bedroom. A quick update on my progress. After three long weekends and a few extra hours here and there, I have 8″ of polyiso foam board fully installed (one layer between the rafters, one layer beneath). Both layers are ~95%+ airsealed (I now need to find an effective way of locating any last remaining leaks). The room is still unheated but the difference is palpable. Just the residual heat from the attached house is keeping the room in the upper 50s/lower 60s. We’ve had a cold spell here in Chicago so I’m really pleased.
First, I want to thank Martin and the other people who posted for their advice. I used a number of suggestions and ultimately decided to air-seal like a madman with cans of spray foam.
Now that this project is completed, I’d like to use the remainder of the 4″ thick polyiso I found to insulate the attic of our detached garage. The goal is to eventually condition both the garage and the attic (attic becoming a rec room for the kids).
My challenge is that the headroom in our garage attic is low (about 6′ 4″ at its peak). I feel I have almost no choice but to insulate this as an unvented roof. I need every available inch for insulation.
First some quick math. A spray-foam contractor came to our house and bid 5″ of spray foam across the entire underside of the roof deck at $1/board foot (at 5 inches of spray foam that comes to $5/sgft). By contrast, I can buy 4″ thick salvaged polyiso foam boards for about $0.15/board foot. Also, the spray foam contractor used the entire surface area of the roof deck in his calculations even though ~15% of the roof deck is taken up by framing.
My question is this. Martin describes an installation method that he called “Peanut Brittle”. It makes perfect sense to me to use this approach to get the benefits of spray foam at the cost of this salvaged polyiso.
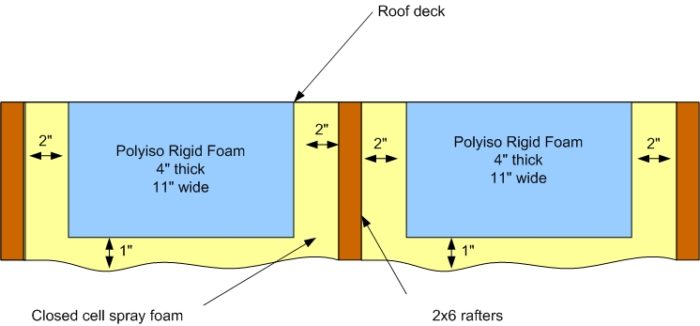
I’ve attached an image of the approach I’d like to take while insulating this room. In short, I plan to entomb my cheap polyiso with a thin layer of expensive closed cell spray foam. Other than the fact that it isn’t 100% spray foam, I feel like this has to be the best compromise for those of us who cannot afford 5″ of spray foam.
Any comments would be greatly appreciated. To me this makes sense as the best compromise in an unvented roof.
GBA Detail Library
A collection of one thousand construction details organized by climate and house part


Replies
The approach works, but there's no need to go as fat as 2" on the sides, even 1" seems a bit excessive, but easy to fill.
Aside from the per board foot expense, the environmental hit from the material has to be considered, but a 1" flash over the whole thing isn't of much concern.
The outer inch of polyiso is only good for about R3 at the cold outdoor temperature extremes in a Chicago climate, but the average wintertime performance of the polyiso layer will run R5-ish per inch, which is just fine for cavity fill. The 1" of closed cell polyurethane is nearly a class-II vapor retarder, and in combination with whatever facers the polyiso has, it'll be under 1-perm for the stackup.
Brian,
There have been a few reported failures in homes that used the cut-and-cobble approach for unvented cathedral ceilings, so you have been warned. That said, the failures are due to air leakage -- so the better job you can do sealing air leaks, the lower the risk.
The peanut brittle approach is definitely preferable to the standard cut-and-cobble approach, in my opinion, so your approach should work if you are conscientious. You can buy a two-component spray foam kit (or kits) at the lumberyard and do the work yourself if you want, especially if your local spray foam contractor won't give you a low price for a small job. (They usually don't, which is understandable.)
Just a note on installation conditions for spray foam:
The temperature of the foam components is really important but so is the temperature of the substrate. Follow the manufacturer recommendations/requirements for just what the minimum temperature of the substrate needs to be for proper bonding of the spray foam to the substrate. I have seen minimum surface temp of 59F required.
Peter