Air sealing, flashing questions
I have to say that reading GBA for 4 years certainly helps when you build your own house (my brother’s house, really), but it does not replace actually getting your hands dirty or sticky. I use the term sticky because my job is air sealing and I get covered in sticky stuff daily.
I have a few questions because I am not sure that I am doing things correctly. I don’t really “get” flashing. I know you are supposed to “think like water” and ask yourself where would the water go and how to divert it to the outside of the building, but some details still baffle me.
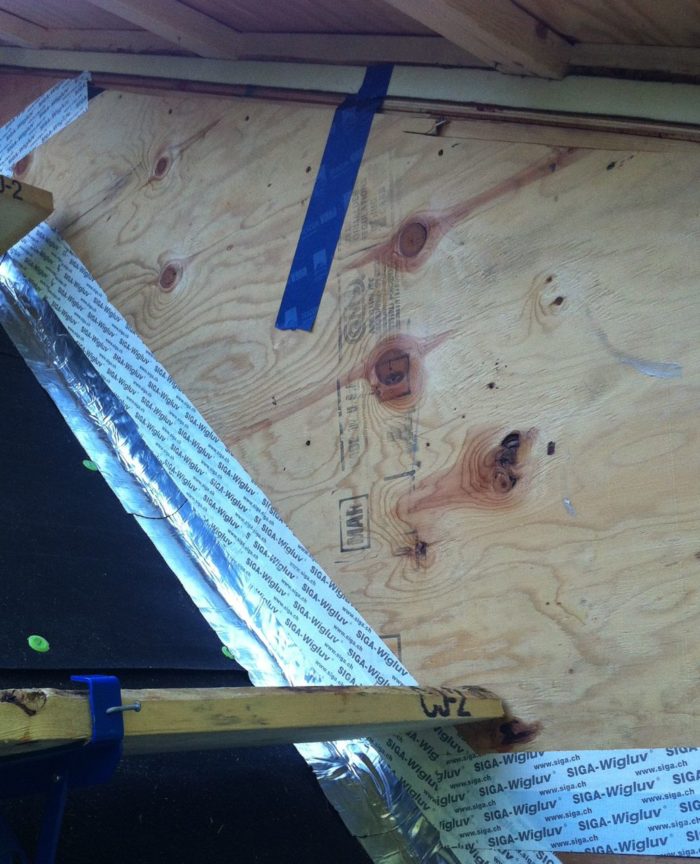
Here’s an example. This attachment shows the roof side on one of the shed dormers. The roof consists of plywood, 30# felt, roll flashing over the felt at the wall/roof intersection, one 1.5″ layer polyiso taped at seams, then 2 x 4 nailers with 1.5″ polyiso between the nailers, then another layer of plywood taped at seams, 30# felt. Seams were staggered so they did not overlap. This will all be covered with a metal roof.
Aside – I thought the second layer of plywood was not necessary, but was overruled by Carlton, the carpenter.
So the flashing that you see in the attachment is the second layer of flashing at the roof wall intersection. My question is when you install flashing do you flash over the felt or not? I think the roofers will add a layer of metal flashing as well. Serious, crazy overkill? I’ve been doing the flashing so there is no labor cost involved at least.
Next question, what to do at the top of the dormer where the foam is visible. I was thinking about sealing the seams between layers with Prosoco joint and seam sealer and then painting over it with Fast Flash. I cannot find any information as to whether this product works in such an application. I can tape though, it if that would seal it well enough. The carpenters are not used to these air sealing details so they did not tape this side adequately. They are taping the other side of the roof at each side seam of foam and plywood.
Thank you for all your help.
GBA Detail Library
A collection of one thousand construction details organized by climate and house part


Replies
Lucy,
Please explain what the photo shows. I'm guessing that we are looking at the exterior of a dormer cheek. I'm guessing that the lower left corner shows asphalt felt; the center area shows the cheek wall sheathing; and the upper part of the photo shows the exterior part of the roof overhang of a shed dormer. Is that correct?
If you are asking about flashing the intersection between the main roof and a dormer cheek, the type of flashing you install will depend on the type of roofing.
For metal roofing, you will need a length of metal flashing that is as long as the dormer cheek. The vertical leg of the flashing should be 10 or 12 inches high. The horizontal leg of the flashing should extend from the flashing crease to the just beyond the nearest rib in the roofing. Then the flashing should have a short (1/2 inch) vertical drip leg that goes down, just beyond the rib. The flashing is secured with metal roofing screws (hex head screws with neoprene washers) to the roof. The flashing should not be attached to the dormer cheek.
Your WRB (asphalt felt or housewrap) is installed so that the WRB laps over the top of the vertical leg of the metal flashing.
Other types of roofing require a different approach, but there should always be metal flashing at the intersection of the main roof and a dormer cheek.
If dormer cheek means the sidewall of the dormer, then you did read the photo correctly.
I was concerned that what I did with taping the felt to the dormer was incorrect and made the next layer of flashing impossible or difficult. We've been having such torrential rains lately that water was dripping all throughout the house.
Any advice on air sealing the foam layers at the top of the dormer below the overhang?
Lucy,
Q. "Any advice on air sealing the foam layers at the top of the dormer below the overhang?"
A. If you are worried about creating an air seal at the layer of your rigid foam, you can seal foam seams with tape. It looks like you've got some Siga Wigluv tape on site; that's good stuff.
If the rigid foam is your primary air barrier, you have to ensure air-barrier continuity at the edges of the foam, where the foam intersects with your wall air barrier. Follow the seams and imagine how the planes intersect; use caulk, gaskets, tape, and/or canned spray foam to ensure that your wall barrier and your roof air barrier are continuous.
Martin, I've never seen a sidewall flashing on a metal roof that wasn't attached to the wall sheathing. If it was installed the way you suggest and it extended 10" up the wall it would be secured by the fasteners for the dormer siding anyway. The gasketted fasteners penetrating the roof are simply there to prevent it from lifting and depending on the distance from the wall to the first rib, or if the edge of the roof panel has been turned up, can be eliminated altogether.
Malcolm,
The debate over whether step flashing (or sidewall flashing) should be fastened to the roof, to the wall, or to both, is an old one. I side with those who argue that the flashing should be fastened to the roof but not the wall. (For more discussion of this issue, see Martin’s Ten Rules of Roof Design.)
You're right that the siding fasteners will hold the flashing to the wall. You are also correct that the roof fastener will prevent the flashing from lifting due to wind or ice.
If the flashing fails before the siding needs to be replaced, it's much easier to remove the flashing if it hasn't been fastened to the wall. All you have to do is remove a few siding fasteners and carefully insert a flat bar to make a little room between the siding and the sheathing.
I am probably way overdoing things on this house, but the plan is resiliency and low maintenance. So the roof is a metal roof ( 50 year lifespan?). The siding will be Hardiboard siding over a rainscreen over 2 inches of Roxul Comfortboard over standard housewrap. So the metal flashing will be behind about 3 inches of material. In other words, it will be very well protected. The roof itself is essentially 2 roofs. The very bottom plywood and 30# felt layer was sealed to the sidewall just like the photo above.
Then the 2 layers of polyiso and nailers are installed, then another layer of plywood and felt. I finally have a photo of the process which shows it better.
Thank you again.
Lucy,
One of your sentences confuses me: "The metal flashing will be behind about 3 inches of material."
I'm not sure I know what you mean. While it sometimes makes sense to have multiple air barriers (or redundant methods of air sealing), the same is not true for flashing. Flashing is installed for water management, not for air sealing. Roof flashing should be integrated with the outermost layer of your house -- your roofing -- and shouldn't be buried under 3 inches of material.
So where should the flashing go if you have exterior insulation with a rain screen around the dormers?
Lucy,
Perhaps my last answer was incomplete. It's possible I misunderstood your meaning.
If you are installing metal roofing, the roof flashing installed at the base of a dormer cheek will be visible on the roof. You will also be able to see the crease of the flashing. However, the vertical leg of the flashing will not be visible. I'm now guessing that you were referring to the vertical leg of the flashing when you wrote that the flashing was behind 3 inches of material. So now I understand what you are saying.
Sorry for the confusion.
Martin,
Ok, thank you. I figured that the vertical leg of the flashing would be able to do it's job even better if it was closer to the wall making it much less likely for water to get behind it.
We could put it just behind the furring strips for the rainscreen but that means that the last few inches of the rainscreen would not be anchored to the wall if you don't anchor the flashing to the sidewall. I don't know if that is a big issue or not. Does that sound like a better place for flashing for the dormer in your opinion?
I appreciate your help in this matter. These are somewhat difficult details for me to describe well and to understand. Thank you.
Dos this help? I think it's what Martin is describing. Doesn't show the airsealing connection which would have to occur at the sheathing layer.
That is exactly what I was wondering about. Do you think that is a better design than having it under the insulation?
Very nice drawing, James. That helps a lot. Thank you.
I forgot to include the location of the all-important WRB. Here's an update of the diagram. Yes the flashing should go on the outside of the insulation, at the inside of the rainscreen gap, tucked under the WRB.
Lucy, if you are going to connect the flashing in the way suggested by Martin and James you will need to provide continuous backing under it so that the fasteners to not become the low point and the flashing maintains a slight cant away from the wall.
Malcolm,
The insulation behind it will be Roxul Rockboard 80 which, truthfully, I have never seen before. I think it is the same stuff or close to Roxul Comfortboard. The Comfortboard would have taken 6 weeks to get here to Upstate SC and cost more. The Rockboard 80 I can get from an acoustic supply house next week.
So I don't know how firm the insulation it is. I think the simplest installation of the roof flashing is behind the insulation, but as Martin points out, if you ever have to replace the flashing to have to take down that area of siding. I'm thinking the vertical leg of the flashing would be so well supported and protected that there is very little risk of that.
The other thing is that we were planning on putting the "all important WRB" as James said, behind the insulation. The dormer cheeks are relatively small. We could fairly easily install another layer on top of the insulation, if needed. But each modification adds to the complexity of the design.
I'll get the insulation material next week and can determine if it is sufficient to go behind the vertical leg of the flashing.
Lucy, One reason for installing the flashing on top of the insulation is the normal construction sequencing. Typically you want to do as much of the work as you can before the roofing goes on because all tasks become that much harder after.
However, I am not as worried as the others seem to be about the accessibility of the flashing. Unlike the typical short lifespan of asphalt shingles which occasion the concern, a pre-finished Kynar metal roof should last 50 years and then would simply need re-painting. I doubt your siding will out outlast the roof.
Another thing you need to be aware of with metal roofing and sidewalls with rain screens is the potential for water to splash up into the cavity. One solution is to run another short L flashing 3/4" from the bottom of the siding to shield the cavity, the other is to make sure your WRB is sealed to the roof flashing.
Malcolm,,
Normal construction sequencing is one of the things I know nothing about. I am learning more about sequencing now with the installation of windows.
Also the roof is a 12/12 pitch so water should run off quickly with a little less risk of splash on a flatter roof.
Thank you and Martin and James for help in this matter.
Lucy
I think that we have much in common being laypeople attepting (and in your case completing) a highly energy efficient house build. I would love to get into contact with you and share thoughts and experience. If you are interested contact me at [email protected]. Thanks!