Inexpensive exterior insulation stand-off — Critiques?
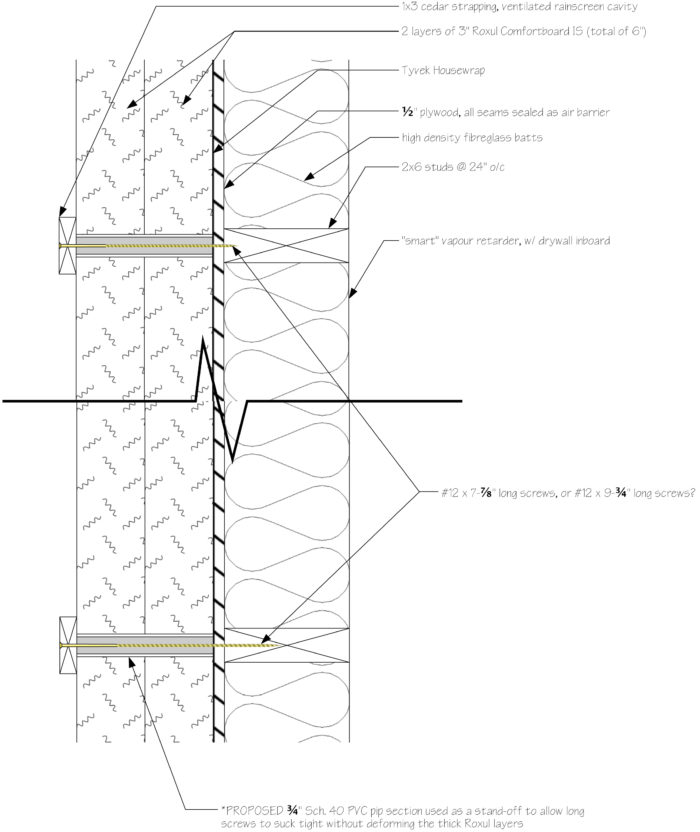
I am trying to come up with some inexpensive, and sensible details to accommodate a 6″ layer of exterior Roxul Comfortboard IS comprised of two layers of 3″, 2′ x 4′ batts. See attached PDF for details. My concern is that with such a substantial thickness of Comfortboard, the potential for faster “sag” through this, or durability issues during seismic events is problematic. On many of our projects, we have screwed our vertical cedar 1×3 rain screen material directly through a single, thinner layer of the Comfortboard directly into the framing. With these thinner layers (2″ or less), the assembly seems reasonably solid and durable once all the rain screen strips are attached. It does require some fussing around with sucking screws in and out to keep all of the strips co-planar and flat, but it’s not too bad. With a 6″ layer, however, I am concerned that these challenges will multiply, and that the dead load of the siding will cause sag and deflection in the thick layer of Roxul, which will cause durability issues of attachment over time.
My solution, which I am hoping people will both assess/critique or offer alternate suggestions to, is shown in the PDF as well. Essentially, I am thinking of getting a bunch of lengths of ¾” schedule 40 PVC and cutting them into a whole bunch of 5-â…ž” long pieces, and as I install my batts of Comfortboard, I will have a 1″ spade bit that I will use to quickly bore a hole into the Comfortboard every 2′ vertically, and then slide the piece of PVC through so that it bears against my house wrap and sheathing, and then when I lay my vertical cedar 1×3 over it, I will be able to install a long screw directly through into the cedar rain screen, running through the PVC pipe, and into the framing studs.
I could buy something like the Cascadia fibreglass stand-off system (http://www.cascadiawindows.com/products/series/53.php), but I suspect it would be prohibitively expensive, and I am not installing extremely heavy cladding systems. Most likely just Hardi-plank, Hardi-panel, or cedar siding. Perhaps some areas of thin veneer stone or tile.
What do people think? Would this work, or does it just seem like a lot of work that won’t actually provide any resistance to sag, or deflection? Also, I am wondering if be best served by using 7-â…ž” long GRK screws, or 9-¾” long GRK screws? The former provides 1-â…œ” of embedment, while the latter would provide 3″ of embedment. Any engineers want to tear me to pieces?! I’d be happy for any assessment, good or bad. Thanks in advance for your input.
GBA Detail Library
A collection of one thousand construction details organized by climate and house part


Replies
Burke,
If you go forward with your plan, you may want to consult an engineer.
GBA published an article about a successful project with 6 inches of exterior mineral wool -- the Mark Yanowitz project. Here is the link: Wrapping an Older House with Rock Wool Insulation.
Yanowitz did not use stand-offs or squash blocks; instead, he used Heco Topix-T fasteners.
I don't have the knowledge necessary to critique your plan. It seems to me that if you are using appropriate fasteners, the pvc couldn't hurt - just not sure how much it would help.
When I started planning a wall assembly with 6" of exterior foam, the idea of hanging clapboards on furring strips held to the wall with 9" screws felt all wrong to me. The more I looked into the properties of the fasteners, the more comfortable I became. Timberloks or similar at a slight angle down through your furring and insulation and penetrating 1.5" into a stud should hold your siding without trouble...in my opinion,which again, ain't worth much.
For what it's worth, one thing I had considered was a ledger extending under the insulation and providing a 1/4" lip for the furring strips to sit on. This would let the furring bear directly on the foundation.
I would talk with Albert Rooks of the Small Planet Workshop, who distribute the Heco Topix screws. They have a structural engineer who will specify a fastener pattern for you, including angling some of the screws to create a truss pattern.
http://www.smallplanetworkshopstore.com/heco-topix-therm-200mm-exterior-insulation-screw-box-of-100/
Burke,
I'm just guessing too. What about adding additional support for the battens by blocking out 6" at the soffit and fastening the top of the battens to this? I've seen this done with 3" of exterior insulation, not with 6 though. It wouldn't be much help where the battens weren't long enough to span from roof to foundation, or under windows, but two nails should provide somewhere around 200 lbs additional shear strength to each batten.
The PVC pipe seems like a nice way to get the spacing uniform, but it wouldn't do as much for improving stability against racking as angling some (but not all) of the Heco Topix screws. If Small Planet Workshop can provide help in designing that pattern, that sound great to me. Thanks for that info, Michael!
Thanks for the thoughts all! I will look into the Heco Topix screws, which I had noticed were able to help with depth adjustment in the Yanowitz project. They won't offer much help in preventing sag however. I had considered hanging the strapping from roof overhangs, as Malcolm suggests, but the cedar 1x3 would not span two full stories, where they occasionally need to. I may have to consider providing support from below, as some of you suggested. . .
Burke,
Another complication for these wall assemblies that rely on structural screws into the exterior studs is that both the IRC and our NBC allow unprotected wires up to 1.5" from the stud face. ( I think I saw the IRC has reduced it to 1.25"). So the sequencing of construction becomes quite important.
That's a great comment Malcolm. As you're suggesting, the rough-in work usually happens slightly ahead is exterior siding, so you're correct that it may mean holding it back until all the rain screen is screwed on. Hadn't thought of that!
Burke, If the framing is 2"x6", and the electrical isn't sloppy, it shouldn't be a problem. But a lot of the "exterior only" insulated wall assemblies start with 2"x4"s, and then it might be something to keep in mind.
So here's where I'm at with the continued analysis on this: I think it really needs to be self-supporting, and not be supported by some kind of angle iron base, or from above. As Malcom mentioned, anything below a window/door cannot be supported from the roof overhangs above, and likewise, anything above a window/door cannot be supported by some kind of angle iron bolted to the foundation. I do not want to install another angle iron above each window or door to support the materials above, as the thermal bridging that would create would likely defeat the entire point of doing all this exterior insulation in the first place.
So, I am left with the rain screen needing to support itself solely based on its attachment to the framing. Reviewing the tables which I have attached, it looks like the combined weight of the siding (most will be hardi-plank) and the furring, we are at just under 3 pounds per square foot. Comfortboard's density is listed as 8 lbs/cubic foot (see attached data sheet), so at 6" thick that is 4 lbs/square foot. If I have rain screen spaced 24" o/c horizontally, and the screws are every 24" vertically, that means that each screw is carrying the load of 4 square foot. The total weight of all materials being supported in a 4 square foot area is 28lbs. Quite a bit.
Given that, I am inclined to use 1x4 cedar rain screen strips, as that will add about 30% more surface area to spread the deflected load across than the typically spec'd 1x3 cedar. It should mean that I can suck the screws tighter, which should mean even less deflection, as the material will be pre-loaded, in essence. it may also mean that I should have a tighter spacing of my fasteners, perhaps at 19 ¼" layout, which would also reduce the loading of the fasteners by about 30%. So, that is what I am leaning towards at this point. I don't love it, but it seems like I don't have a whole lot of other practical options. Perhaps I will splure on buying a few of the Cascadia fibreglass standoffs that I could place at the ¼ points (top and bottom) of each piece of rain screen, which would add some backup insurance without breaking the bank.
I will have to run this by our structural engineer, I suppose, just to get another perspective on it. If anybody does come across any studies regarding this, I would very much appreciate having it posted here. I know BSC has done some work on cladding loads over exterior insulation, but I haven't found one with really thick layers of Roxul in specific. Thanks again for all the brainstorming on this!
PS- I just found an article that Martin wrote some years ago that covered many of the issues we are hashing out here! Even Martin can't remember how prolific he is! https://www.greenbuildingadvisor.com/blogs/dept/musings/installing-mineral-wool-insulation-over-exterior-wall-sheathing
It sounds like with 1x4 furring and heavy gauge screws (as a 8-9" screw would be) at 19 ¼" might just be okay, though perhaps 16" o/c would be better for areas with anything heavier than Hardi-plank or Hard-panel . . .
Burke,
I'm glad that my article was helpful.
I'll provide a link to another article that you may want to read; even though it discusses rigid foam, not mineral wool, it has some useful engineering calculations: Fastening Furring Strips to a Foam-Sheathed Wall.
Burke,
I'm not sure we were clear about the idea in comment number 3. If you put in 2 screws, one angled up and one angled down, you can make a triangle with the screw as two sides and a 6 inch length of either the stud or the strapping as the third side. That triangulation uses the screws in tension and compression to hold the weight easily, rather than using them as cantilevers where the weight is bending them and compressing the insulation. Figuring out exactly what pattern to use is a little complicated, but they have an engineer who has already figured it out available to tell you.
Oh, thank you Charlie! I hadn't picked up on the fact that there are two screws per location to create t his. That makes much more sense now. Funny; I use this technique often when I'm doing interior trim, but had never thought about the same principle working here!
I've done something similar to what you propose. We used a thinner layer of Roxul (2 1/2"), and bigger PVC pipe (1" or 1 1/2", I think). We stuffed Roxul in the PVC pipe before putting the strapping up. It worked to avoid the fussing of getting the strapping plumb, so our siding looks good - no waviness.
Charlie,
I''ve never heard of your two screw method. Sounds like a good idea. Thanks!
Malcolm, Thanks for appreciating my comment, but the credit should go to Small Planet Workshop's engineer and to Michael Maines for bringing it to this thread.
Charlie,
Your posts are always interesting and useful - whatever the sources.
I owe Mike Maines a beer for his FHB article some years ago on building kitchen island. I used it as inspiration for building three.
Interesting thread. While there are a lot of ways to build good walls in various climates, in my mind exterior mineral wool is becoming the default. (In my mind - I know it's not common yet.) Burke, we'd appreciate hearing about your experience after you decide on a way forward.
Our company is planning to build a house this summer/fall with 3" of exterior Roxul comfort board, but the 6" will be for my own house which won't be starting until spring 2018. However, I will certiainly try to submit something about both experiences when complete.
This might not meet your inexpensive criteria, but Roxul recommends using thermally broken strapping clips if you need to support heavy weight cladding (see page 18).
http://www.roxul.com/files/RX-NA_EN/pdf/Technical%20Bulletins_Guides/Residential/13A76%20ROXUL%20COMFORTBOARD%20IS%20Installation%20Guide%20FINAL.pdf
They appear to depict the Cascadia clip.
http://www.cascadiawindows.com/products/series53.php
@Burke
Don't know if you saw this.
http://www.roxul.com/files/RX-NA_EN/pdf/Technical%20Data%20Sheets-%20updated/Building%20Envelope/Technical%20Bulletins/FASTENERS_GUIDE_TECHGUIDE_EN.pdf
Roxul recommends input from an engineer for thickness over 4" and limiting loads to 10 lb/fastener
Charlie, thanks for the credit. Last fall I wrote a research piece for FHB on mineral wool; in talking with Al Rooks he recommended using their engineer to spec the angled screw pattern. Talking with Roxul reps, they stressed that there are standoffs other than Cascadia's that will also work.
Malcolm, I'm glad my "driveway cabinetmaker" article was helpful to you. I'd love to see the islands you built.
Mike,
I made them about five years ago as replacement kitchens for cabins I built at a nearby resort twenty years ago. You can see them in the bottom right photo on this link. Thanks again!
http://www.pointnopointresort.com/room/cabins-c-d-humming-bird-twinberry/
Jonathon, Chris & Michael- thanks for the document references and the continued push to speak with Albert Rooks. The documents both had some helpful info in each. I think the key to all of this is finding an INEXPENSIVE solution that is financially manageable for the average person in terms of both material costs and associated labour costs to install. While I have not scrounged up the price of either the Cascadia fibreglass stand-off, or the cost of doing two 9" Heco-Topix screws every every 16" vertically on the rain screen, it makes me cringe just thinking about it. I suspect we are talking well over $2000 in fasteners alone! Since each Cascadia clip requires 2 fasteners, I see no real advantage to using them if the triangular truss pattern can be created by just the two screws. (Though a longer, more expensive fastener would be required to cover the increased distance at an angle.)
I am starting to envy those people that live in cold, dry climates where they can just built a dead simple double stud wall packed with cellulose and throw a poly vapour barrier on the inside, and not have a thing to worry about! In the Pacific Northwest, however, the reports I have read strongly caution against double stud walls because of the extremely high and frequent potential for prolonged backside of sheathing condensation during the winter.
So, if we want to build houses that will last 100 years without rotting, we seem locked in to some kind of exterior insulation. If one decides to use mineral wool, for various reasons, it would be great to find some sort of solution that we could present as reasonably affordable to our clients for attaching that product without breaking the budget to do so. I will certainly talk to Albert Rooks and get a realistic price per square foot that could be expected for his Heco-Topix engineered solution, as well as get a cost per stand-off from Cascadia, and report back. (The exchange rate in order the Heco-Topix screws from Small Planet only deepens my despair!) I will also try to get ahold of a Roxul rep to see if they have other suggestions. It really should be in their best interest to try to provide some sort of cost effective solution for using their product in super-insulated projects, and providing the engineering to back it up. The structural engineers we typically use have zero experience with this kind of calculation/application, and so don't offer much in the way of solutions to that regard.
I will keep hunting away, and post any hard information I do find. And maybe take up drinking along the way. : (
Burke - "So, if we want to build houses that will last 100 years…" Another option is to build a double wall with an extra layer of sheathing or other air barrier in the middle of the wall. The mineral wool batts are significantly cheaper than the boards, like a third the price or less for similar R-value. But the extra sheathing or other air barrier costs, as well as the extra framing. It seems more straight forward to do a double wall than add 6" of mineral wool boards with all its potential problems.
Kevin- I DREAM of doing a double-stud wall with all of it's simplicity! But then I read the Building Science Corp research paper "High- R Walls for the Pacific Northwest: A Hygrothermal Analysis of Various External Wall Systems." (https://www.greenbuildingadvisor.com/community/forum/green-building-techniques/60806/inexpensive-exterior-insulation-stand-critiques)
It killed the double stud for me in our climate. 3000 hours of potential sheathing condensation for a double stud in a winter vs 0 hours of potential sheathing condensation for an exterior insulated wall in a winter. With the number of totally rotten framed walls I have renovated over the years, I just don't know if I can build something that might end up with the same result down the road. I love the idea of the exterior mineral, but the details of actually getting it to work in a super-insulated capacity (like 4" plus) just becomes an absolute bear.
Burke, I didn't realize you were in Canada. There is a Canadian distributor of Heco Topix, Adrian Hermann of Hermann Frames (http://www.herrmannframes.com/) which may help with the exchange rate.
Although I really like the idea of using mineral wool as continuous exterior insulation, for many reasons, it is a premium product with premium performance characteristics. There is more budget-friendly option, which is to use foam. Borate-treated EPS would be my first choice.
@Burke
Q: 6" of Comfortboard puts your outer wall at R24. Why would you want to do that?
In Canada using 3" (R12) Comfortboard with Comfortbatts you can hit R40 using 2x8 framing or R36 using 2x6 framing.
Burke - I just reviewed the article you referred to on "
Burke - I just reviewed the article on "High R walls for the Pacific Northwest…" I don't understand how wall #15 performs so poorly with moisture/ condensation compared to wall #14. #14 is a conventional double wall - understandably not ideal in the Northwest. But wall #15 has 71/2 inches of cellulose outside the sheathing keeping it warm. The data just doesn't add up. Wall#15 has the air barrier in the middle of the wall, and closer to the inside, and it's taped. It's pretty close to what Lstiburek later called "the ideal double stud wall" or some such superlative title. You can google it. This "ideal" wall used plywood or OSB for the sheathing which was on the inside of the inner wall. Most of the wall is outside this layer. This is a very robust wall. The condensation point can never ( or rarely) be reached with more than 1/2 the R value outside the sheathing/ air control layer. It does involve, most likely, 2 layers of sheathing, but has straightforward window, door, and siding installation. The outside wall can cover the band joists, if there is a second floor, protecting that thermally sensitive area.Don't give up on the double wall yet! Good luck with all these decisions.
Michael- thanks for the notification of Hermann Frames. I will get in touch with them regarding Heco-Topix pricing. I have sent an e-mail to Albert Rooks asking for some information and pricing on their engineered rain screen system.
I got a price sheet back from Cascadia Windows, and their 6" fibreglass stand-off's are $5.95 Canadian each, but still require two 8" fasteners per standoff. Still pricey, but I avoided a heart-attack.
Chris M- The 2x6 wall will indeed be insulated, so accounting for framing, air films, and drywall the true metric u-value of the wall I am considering is 0.149 W/(m2K) (according to PHPP v9.3), which is equivalent to R-38.1. If I use a 2x6 wall with 3" of Roxul and all other variables being equal, the true u-value of the assembly is 0.208 W/(m2K) or R-27.3. I have attached both PHPP calculations to show the assemblies and assumptions. That thermal bridge free Comfortboard adds up pretty quickly in terms of performance. Given the complication of making the 6" exterior Roxul work, I'm still having second thoughts, but it is an extremely efficient design in thermal terms.
Kevin- Wall 14 and 15 i that BSC paper, in my assessment, are pretty similar in terms of moisture condensation potential. Table 21 shows that the potential for moisture condensation on the inside surface of the outermost layer of sheathing (Wall 14= plywood, Wall 15= fibreboard) is almost identical, and WAY higher than a wall with a continuous layer of insulation outside of the sheathing. Vapour transmission has very little to do with where the air barrier is actually located. I trust that they used the same temperature differentials between interior and exterior, the same outdoor humidities and indoor relative humidities, and the same airtightness rating and only altered the actual material properties and arrangement in the assembly. So, it tells me that the latex paint and smart vapour retarder does not act much differently than the latex paint and interior structural fibreboard in their simulations. Perhaps because of our extremely challenging cold-humid climate that the outdoor conditions have a far bigger impact on the condensing potential of the exterior sheathing than the actual vapour profile of those interior layers. OR, the airtightness they assumed for the assemblies was actually quite poor, meaning that the far more serious condensation potential from air leakage was actually quite high, meaning that the vapour permeance of those inner layers is almost inconsequential.
Whatever the cause, both of their outermost sheathing layers end up with the same moisture content on the double-stud walls (and others without exterior insulation) by the end of winter/start of spring as shown in Figure 15. However, where wall 15 shines over wall 14 is in Figure 18, where it shows how quickly the assemblies can dry out. The fibreboard is a terrific product in that it can absolutely dump moisture out of the assembly when the conditions permit. The problem is, I am not aware of any fibreboard sheathing in Canada that is rated for structural bracing, especially in our high seismic activity region on the west coast. Additionally, as a carpenter, I think you'd have to be crazy to try to actually build Lstiburek's "ideal double stud wall." The only economy of framing a double stud wall is if you have the exterior wall as structural, with a typical layer of sheathing on the outside of that outer wall. You lay out all 4 plates identically, you build both walls stacked directly on top of one another on the ground, and you use rips of ¾" plywood dimensioned as whatever you want to be your finished wall thickness as the top and bottom plates to "spread" those two walls apart as they lay on the ground. Then you stand the whole assembly (kind of like a big box beam) up in one shot. Fast, easy, and 2x4 walls on 24" centers actually use about 1% LESS board feet of lumber than a 2x6 wall on 16" centers in an identical wall. Joe's double stud with that layer of fibreboard sheathing on the outside of the inner wall that needs to be air sealed before you try to frame that second exterior wall outside of your already standing interior wall is just ridiculous. Nice idea, but no thanks! (Of course, the 6" exterior Roxul is no walk in the park either!)
I am starting to think I might just put a dart board up on the wall with a bunch of thermally optimized assemblies on there and let chance make my decision. Then, when I am grumbling later about how miserable the details are to actually build, I can blame the dartboard instead of my poor decision-making skills!
Burke,
It will be interesting to see how the cost of the Heco Topix screws come in, but in the meantime, here's an idea for a a way to use the two-screw triangulated truss configuration without expensive specialty screws. The configuration shown in this diagram could, I think, work with any long screws. First put up the insulation with screws that go straight in, using big washers on the ends of the screws as is often used to hold insulation. Those washers can be the cheapest flimsiest ones you can find, because they are only needed temporarily, until you put up the strapping on top of those screws, with more screws going diagonally. The threads near the heat of the screw that Heco Topix provides are not needed because the diagonal screws are under tension and are held by the head. The perpendicular screws are under compression and so having the head underneath allows the strapping to bear on them.
That's probably more labor than the equivalent with Heco Topix, so it's not clear to me that it's worth it, but it's a way to use conventional long screws. A variation would be to use the Heco Topix for straight-in or diagonal-down screws and ordinary long screws for the diagonal up screws.
On the double-stud wall, I think you are misinterpreting Table 21 in the High-R Walls report. Table 21 is just based on an analysis of, if there was air leakage, would the leaking moisture have the potential to condense on the outside sheathing. It is not predicting how much leakage or how much condensation there would be.
I also note that they used fiberboard for the inside-wall sheathing, which doesn't act as a vapor retarder nearly as much as OSB in the same location would. I think that would have greatly reduced the winter moisture content in the exterior sheathing in their simulation.
But given there will always be some air leakage, the Table 21 results are somewhat relevant. One thing to consider would be fiberflass/gypsum sheathing instead of fiberboard: similarly vapor open but not damaged by moisture if it gets a little damp. But it sounds like you have already decided that that general wall type is too much of a pain to build.
Charlie- thanks for the clarification of Table 21, and your thoughts on the interior structural wall double stud sheathing. I have no problems with getting an airtight assembly. On my current build, our post-rough-in blower door test (using the bi-directional Passive House method) came in at 0.19 ACH50 (second tightest in Canada, woo-hoo!). So, understanding table 21 in the light that it is data from a poorly air-sealed envelope gives me far less concern.
Am I correct then, in assuming that Figure 15, on page 21, should be the real focus of the double stud wall analysis? Assuming that moisture content over 20% is the danger zone, building a wall that has 12" of cellulose would mean that it would take even longer for that assembly to dry, and that it would have moisture content over 20% further into June? And is that substantial enough to give me all my concerns about the double-stud wall in the first place? I'd appreciate people's thoughts on this.
I wouldn't even consider building Joe's double-stud walls for construction complexity reasons, but any ways to make the exterior structural wall double-stud assembly perform better would be greatly appreciated. The only way I have come up with improving it would be to install metal bracing as the shear resistance, and installing fibreboard sheathing (Agepan DWD Protect, etc) outboard of that. But I fear that the metal bracing straps would cause serious "wet spots" from condensation. Any other thoughts would be great. Perhaps simply using treated plywood as the sheathing would make all of this moot, as any high moisture content would have little to no effect on rotting the sheathing? Does anyone know what the vapour permeance of treated plywood is compared to regular, as that could affect the drying potential in those summer months.
I also appreciate the mixed screw strapping concept. I was kind of wondering about something similar but wasn't sure if the screw with the washer on it would resist much compression, or would just deflect in the squashy Roxul. Definitely warrants consideration, as it would no doubt reduce fastener costs by hundreds of dollars!
There are a bunch of ways you can improve the robustness of a double stud wall with the outer wall being structural.
One is that there are some fiberglass/gypsum boards that are rated as structural sheathing, and are also very tolerant of moisture and don't support mold growth. And are also quite vapor open. They are generally used in commercial construction more than residential, and I imagine they are expensive.
Another is to use diagonal bracing as you suggest, with some vapor open sheathing like fiberboard. The diagonal bracing doesn't need to metal. Let-in wood is also fairly standard, but is a lot more work. Fortunately, you can also put wood diagonal bracing on the cavity side, where there's plenty of room for it without letting it in.
Another sheathing material to consider is pine boards. It's more labor to put it up, but it's more vapor open than plywood and may be more moisture tolerant as well. It can make sense if you have a source of locally milled inexpensive rough-sawn pine. Opinions vary as to whether it provides adequate bracing if it's run horizontally. If you and/or your engineer and/or your code official want to be sure, the traditional, labor intensive approach is to run it diagonally. But I think it's less work to put up the sheathing horizontally, and add diagonal wood bracing inside the wall. One disadvantage of the pine boards is that they don't provide an exterior air barrier, so you need the primary air barrier on the inside and you need to be sure the WRB is detailed well enough as an air barrier to prevent wind-washing of the insulation.
A smart membrane on the interior side also reduces vapor transport outward during the winter. Intello Plus and MemBrain are the primary choices. Intello has lower permeability, so it does more to reduce winter vapor drive outward, but also impedes inward drying a little more than MemBrain.
Burke,
Looks like 3" Comfortboard would make your life a lot easier, but for the energy penalty. Is PHI certification a requirement and how much does the lower r-value of the 3" Comfortboard wall affect your heating demands and primary energy figures vs 6"?
Burke,
Being on the Island, with it's high seismic requirements, limits your choices too. I don't think any of the more resilient sheathing options would fly, except 1x diagonal boards - and that's a lot more work.
I really like the double wall assemblies where the outside of the interior wall is sheathed, as it seems to provide the most resilient air and vapour control layers. But as you say, if you have to add another layer of exterior sheathing it becomes a real boutique assembly. The alternative, which I'm still not entirely comfortable with although it's been done successfully, is to eliminate the second layer of sheathing and substitute a very robust WRB. This of course comes with all the attendant problems of flashing and fastening trim without a solid substrate to fasten to.
If you aren't philosophically opposed to foam, you can put together a responsible a very robust assembly with flash and batt (ComfortBatt and Lapolla 4G) along with 3 inches of exterior Comfortboard IS.
The closed call foam will prevent moisture problems on the interior, and the exterior mineral wool with keep the exterior dryer and allow it to dry more quickly than it otherwise would.
Hi all. Lots of things to think about. Charlie- your suggestions about alternate bracing ideas are good. I had never considered the thought of doing some kind of lateral bracing strapping on the inside face of the exterior wall. Coupling that with a fibreboard exterior sheathing product on the outside might be very simple and cost effective in a double stud wall that would permit maximum vapour permeance to the exterior. I would almost certainly be using a smart membrane on the interior face as well. I'm wondering a fibreboard, like Agepan DWD protect, is suitable as an air barrier if all seams are sealed? I was planning originally on making the exterior sheathing the air barrier, for simplicity, in either a double-stud wall or the 2x6 conventional wall with 6" of Comfortboard.
Because of high seismic potential in our location, we are not permitted to use anything other than OSB, plywood or 1x diagonal dimensional lumber for lateral bracing without an engineer on record. So, I will likely consult one to see if it would be seismically possible to have the exterior structural wall work with diagonal bracing on the interior face of it. If the amount of strapping that would be required to achieve this bracing is not onerous, that would make the double-stud wall a much more viable option again, economically. The exterior detailing is just so much simpler and less costly. Freeing up many thousands of dollars in materials and labour goes a long way towards paying for all that extra insulation and those better quality windows.
Jonathan- I think the energy penalty is too big of a hit. I am still entertaining the idea of Passive Certification, but I will also be doing an economic analysis between the most economical super-insulated wall I can come up with (hence this thread), and a 2x6 wall with some comfort board on the exterior (maybe just 1.5" or so) and PV panels to offset the extra heat loss. However, all of the comfort reasons for doing the Passive House standard still make sense. Net Zero is our ultimate goal, but "conservation first" is a good motto to design by for many sound reasons.
Malcolm- good thoughts again. I'm with you on both the "boutiqueness" of the Lstiburek double wall, as well as the oddness of eliminating that outermost layer of sheathing, whatever it may be.
Christoper- while flash and batt with a closed cell, a batt inside of that, and 3" of exterior comfort board would certainly be very robust and durable, it also imposes two high cost penalties: the spray foam is one expensive component to install, and the exterior comfort board is a second expensive component, especially once all the labour complexities of exterior detailing are added in there. That's really the push of all this, is to try to come up with an R-35-ish (effective) assembly that keeps the costs of both the materials and the labour down as low as possible. There is no point inventing a great wheel that few people can afford to buy.
That's my issue with the 6" of Comfortboard on the 2x6 wall. It is a fantastic wall in terms of performance, but the fastening of the rain screen and the incumbent detailing around openings are becoming so complicated that the cost seems to be getting out of hand.
For just fastening 6" of Roxul to the wall, my ballpark estimates suggest that for 3000 square feet of exterior wall surface, we would be looking at between $5500 and $10000. And that is just to fasten the rain screen to the wall and do the extra detailing. The cost of the Roxul would be about another $20,000 itself!!
I find it incredibly unlikely that the extra 2x4 lumber and the extra 6" of dense-pack cellulose for an inner non-structural in a 12" double-stud wall would add up to almost $30,000. The framing premium is only about another 40% in labour for the actual walls, and the extra framing materials are probably only about another $2000 at most, no engineering required, and the exterior detailing is no more expensive that a regular house with rain screen (which is code required here), so that's no premium. The dense-pack cellulose isn't something I have cost verified yet, but honestly, unless it's more than $25,000 (which I seriously doubt), then it the double stud wall option still comes out less expensive.
I didn't want this thread to be about the double-stud vs. exterior Roxul, as they are really apples and oranges, but the more I try to find an economical way to a thick layer of exterior mineral wool, the more unrealistic that seems to be. It is a Tesla Model-S kind of wall, and so has those prices. The double-stud wall is perhaps more like the Nissan Leaf kind of wall. It doesn't have all the performance charasterics of the Tesla, but is still pretty incredible at a way lower cost. The trouble is really that condensation drying concern at the exterior sheathing layer.
I will continue to look into both still, but I think the hunt is leading me down the path of how to address bracing that exterior wall, while utilizing a more vapour permeable sheathing layer. Thanks to everyone for your terrific knowledge and taking the time to weigh in on the quandary. You all continue to be what helps makes GBA such a wonderful resource!
Burke,
Hopefully you're still investigating options. Here are some other great options, and info for you to check out.
I'm putting 9" of exterior insulation (3 layers of 2.75" reclaimed EPS), and (6 layers on my roof). It is important to note that the absolute minimum length the screw must be fastened into the interior framing is 1.5". I am also supporting the EPS from below, as the EPS sits on granite, which sits on a brick ledge. There are definitely finer install details to get right, and I'm still figuring some of mine out a bit too. The Cold Climate Housing Research Center (CCHRC) in Alaska, has videos on installing 6" of exterior rigid (EPS) insulation on walls and 12" of rigid exterior insulation on the roof.
go to this link, to see the manual and also the VERY informative videos REMOTE Walls Part 1&2.
http://www.cchrc.org/remote-wall
I would recommend Tru-Fast SIP-TP screws which come in lengths up to 18" and are very reasonably priced too. The largest sizes come in boxes of 250 pieces/box. For lengths over 18" look to the SPAX screws - which come in lengths all the way up to 23"!!!!
Tru-Fast and SPAX are available in Canada, and available here in the states via Cor-Tenn.
If there was one engineering solution I could come up with, that was also accepted widely by the IRC/IBC would be prescriptive installation guidelines for large depths of exterior insulation on walls and roofs - especially in high snow load areas. Depths of insulation greater than which is prescriptively outlined in the latest IRC, (which may lead to faulty wall assemblies). There are a few details available via the internet that show large quantities of exterior rigid insulation on walls and roofs, they don't offer clear and concise direction of such installs though.
Here is what one wicked smart building scientist stated to me while we were discussing this exact issue:
"The engineering behind it though, can be difficult, and not straight forward." He went on to say, ...."the foam does not "creep", because it is one large sandwich.....This theory is that the screw cannot flex as it would if it was just screwed into the stud 1.5" and had weight hanging off the end. It is stabilized along it's length via the insulation and furring."
Building Science Corp has done lots of tests on exterior wall use of Roxul - the results are published.
There are buildings currently standing with large amounts of exterior insulation installed on them, that haven't had failures. It should be easier though to build this way - especially because more and more folks are building this way.
It looks like Tru-fast and SPAX only make up to 16" long screws now
Burke, fascinating discussion. Can you comment a little more on why you're rejecting the concept of bottom support brackets such as those used in the project Martin referenced in comment #1? In comment #10 you suggest the thermal bridging this strategy creates would negate the point of continuous exterior Roxul, and that windows and doors are a problem. The contractor on that job said he simply used the same sort of bracket above windows and doors. Plus, it wasn't a heavy steel angle bolted to the foundation, it seemed that lightweight steel was used only as a shelf and insect screen, with a piece of 2x wood doing the heavy lifting, all bolted to rim joists and headers. I have no idea about actual thermal bridging, but intuitively it seems tiny compared to the benefit of the very thick continuous Roxul. And the relative simplicity and low cost of the installation also seems appealing.
Brad- I am trying to avoid foam for several main reasons:
1. The flame spread and toxic smoke concerns in the event of a fire (which is rare, I realize),
2. I would prefer to use more naturally-based products rather than chemically based ones,
3. Carpenter ants and termites, which we have many of in our region, LOVE nesting in rigid foam, so it makes the pest control detailing much, much more critical and time consuming.
4. The global warming potential of foams still appears to be quite a bit higher than other fibrous insulations (though it is improving).
Andy- straight sections of exterior mineral wool are really not that huge of a deal, but anytime one has to deal with an outside corner, or an opening in the wall, those thick layers become a real chore. 1.25 or 1" isn't too bad. We have become fairly used to those on our jobs. I am doing one right now with 2", and it has been a bit more troublesome. 6" would be a pain. Here are some examples:
1. Imagine your outside corner. From the centre of your last stud, to the face of your rain screen on the adjacent face measures 7". Is your corner trim 7" wide? What will you attach it to, since your last piece of rain screen being attached to a stud is laterally 7" away from that outside corner? You will have to basically have a 9" wide rip of treated plywood (or a 1x10) on each side of your corner as your last pieces of rain screen, and 7" of it will just be floating out in "never-never land."
2. Your window sill rough openings should have continuous sub-sill flashing out to the drainage plane. (This is the rough opening, below the finished metal sloped sill which needs to interface with your window frame.) The drainage plane is sort of the house wrap behind the roxul, but REALLY it is the front face of the Roxul. Good luck getting a peel and stick product to stick to the Roxul, so now you have to put a ledger of rigid foam at the bottom of your window sills to run your sub-sill flexible flashing out to, and then have it transition to roxul below that.
3. The sides of all window and door openings need to have some sort of finished trim or cladding on them. Assume we are doing "in-betweenie" windows for maximum thermal performance, which are installed at the outside face of the framed wall, integrated with the house wrap. Outboard of that we have 6" of foam. What is that cladding lining this 6" rough opening going to attach to? All you have there is mineral wool and a ¾" thick edge of rain screen out at the 6" mark. So now you need to introduce some kind of material there that you can attach your window liners to at the jambs and head of all openings. So, to avoid thermal bridging, you pretty much have to do a 3.5" wide rip of 1.5" thick rigid foam, then place a 2x4 on it, then lap your last 3" layer of roxul over that 2x4. That's a lot of extra time and effort for three sides of every single opening.
4. While I have not been witness to any hard math, I have heard from very knowledgeable people that just the fasteners alone for attaching exterior insulation can reduce the effectiveness of that entire insulation layer by 10-20%. I would expect the latter (or worse) in the case of very thick insulation where you are having to install pairs of ¼" thick fasteners every 16" o/c, which is what it sounds like 6" of mineral wool would require.
5. Installing a broad "shelf" of bug screen metal along the underside of all walls, and above every opening (including their wood brackets returning right back to the framed wall) would probably introduce a similar thermal bridging penalty on the whole assembly in the order of 10% (guessing). So, with all the fasteners and the metal bug screens and the lumber brackets, we would probably be looking at a 25% penalty in overall r-value, which needs to be accounted for in the heat loads of the house or active technologies to offset those losses. More money.
The list goes on. The one thing I've always found is that no matter how long you think about and plan something beforehand on paper, once you are actually standing there on site building the thing, you will find more 3D complications that you never anticipated giving you trouble. It's just the way it goes. So, if I can anticipate all of these headaches now, in the planning stages, there will be many more time consuming issues that spring up on site when I am trying to deal with the fluffy 6" layer in the real world. It makes me scared to close my eyes at night, ha, ha!
I want to love the exterior Roxul, but 6" of it gives me real pause in terms of practicality and cost. And I want to love the double stud wall, but it gives me pause in terms of hygrothermal performance. Still trying to figure it all out.
Burke,
I was exactly where you are three years ago - struggling to figure out the equation. I like you had planned to use Roxul Comfortboard IS on the exterior. I was hesitant to build a double stud wall, or Larsen Truss. I tried to figure out how to financially afford using Roxul. I liked it for all the reasons you've described. When I found out that reclaimed foam was available, and at a huge discount ($35,000+ discount!) I figured I couldn't look back at other options. Using the reclaimed foam, also zeroed out (in my mind at least) many of the environmental impacts it has. Using reclaimed insulation material of any kind, will almost always certainly be more environmentally friendly then buying brand new material to use.
The energy penalty of fasteners through foam are not what you describe. J. Straube of BSC and many others have disproved that there is a significant energy penalty.
If you watch the videos from CCHRC on REMOTE walls - you will find that the installation methods will work for Roxul also - For instance your concern over how to attach corner trim when the insulation sticks out 6"+ each direction, how to install windows, how to flash and air seal.
There surely can be issues with insects and vermin in foam. I don't live in an area where there are termites, and I'm using perforated metal flashing to wrap the bottom of my foam to reduce the prevalence of them nesting. Water management is key for that too - but then water management is key anyways. I don't think you need a bug flashing above every window and door. I've never seen it detailed in any building document or study.
If you look around, and spend LOTS of time on the BSC website, GBA, CCHRC, EnergyVanguard, BuildingAmerica, BuildingGreen, JLC, FineHomebuilding, etc - you'll find that many of the details you're trying to work out, have already been worked out.
Good Luck.
Brad,
You are right, with a vented rain screen you generally don't provide an opening large enough to require a bug screen. The trim above the head flashing is usually held up just enough to allow any bulk water that gets into the cavity to drain. Ventilation for the area above is provided by gaps or staggering the rain screen battens.
Thanks Brad. I will definitely look into the CCHRC's REMOTE wall system. Basically Lstiburek's "Perfect Wall" from the sounds of it. The reclaimed foam would definitely be the deal breaker on that. I will also look into Straube's evaluation of fastener thermal bridging. I would be very interested to see how and why the prevailing information is incorrect. Good stuff!
Hi StollerB, I was wondering if you had an update to your dilemma? Going through a similar one in the same climate zone right now.
Intelliscreen by IMETCO solves a lot of these issues.