
More Building Science


In the article, “The Passive House: Green Without Gizmos,” Jefferson Kolle takes an in-depth look at the Passive House standard. Houses certified by the Passive House Institute are so tight and so well insulated that they use 90% less energy than code-built homes. Many design practices must be included when building such a high-performance home. One requirement is significantly reducing thermal bridging, which is a major cause of heat loss. Before you reduce thermal bridging, though, you need to understand it. Here’s how it works.
Thermal bridging reduces the effectiveness of insulation
In a typical stick-frame house, lumber occupies 27% of the wall area, leaving little room for insulation. Since the insulating value of softwood lumber (R-1.25 per in.) is less than that of fiberglass or cellulose insulation (R-3.6 per in.), each stick of wood lowers the wall’s overall R-value. Each piece of framing lumber acts as a thermal bridge, a conduit for heat to leak through the wall. Thermal bridging is more significant than many realize.
For example, you would think that a 2×6 wall insulated with R-19 fiberglass batts would have an overall R-value of 19. But according to hot-box measurements made by researchers at the Oak Ridge National Laboratory, the whole-wall R-value of such an assembly is actually R-12.8 if the batts are installed perfectly, and only R-11 if the batts are installed poorly.
Thermal bridging can occur in other parts of a house as well. Cathedral-ceiling rafters, window frames, uninsulated slab edges, and masonry chimneys all can serve as thermal bridges.
Energy losses are not the only concern. Thermal bridging creates cold spots on walls and ceilings, and can encourage interior condensation that contributes to moisture and mold problems.
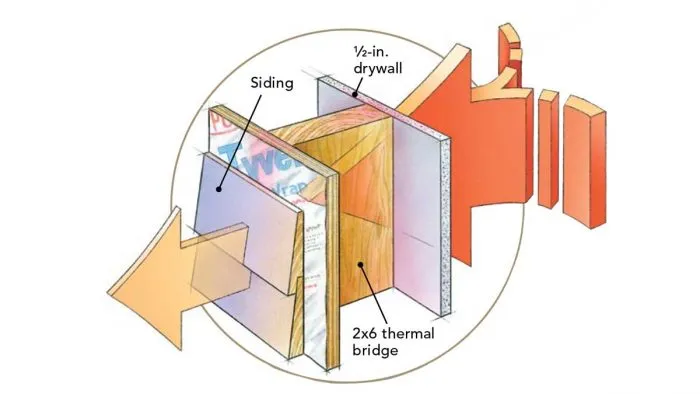
The flaw in a conventional wall
Studs are the weak thermal link in every framed wall. In the case of a wall cavity, heat travels through building components with a high thermal conductivity—framing members like studs, plates, and headers—at a greater rate than through building components with a low thermal conductivity, like insulation. Because conventional wall assemblies effectively link interior and exterior environments, they contribute to heat loss.
Break the thermal bridge
To limit the amount of thermal bridging taking place in a house, you need to detail the roof, wall, and foundation assemblies correctly. The facing page shows four problem areas in a conventionally framed house. While there are a variety of ways to limit thermal bridging in each area, we’ve outlined four specific techniques that work well.
Roof
Among the best ways to limit thermal bridging through cathedral-ceiling rafters is to insulate the underside of the ceiling with rigid, foil-faced polyisocyanurate. If carefully taped, the polyiso makes a decent air and vapor barrier, and if it’s held in place by 1×3 or 1×4 strapping, an airspace is created that adds to the R-value of the roof assembly.
Top plates
To address thermal bridging at the intersection of perimeter-wall top plates and roof framing in new construction, specify raised-heel roof trusses. In a conventionally framed roof and wall, add rigid foam to the exterior of the house. Extend the foam beyond the top plates, and notch it around each rafter tail.
Walls
While a continuous layer of exterior foam sheathing is the most effective way to limit thermal bridging through studs and headers, thermal bridging also can be addressed from the interior. Before walls are filled with blown-in insulation, 2×4 horizontal strapping can be installed, or walls can be covered with a layer of interior rigid foam before the drywall is installed.
Foundation
Thermal bridging at rim joists can be truly addressed from the exterior only with the application of rigid foam, which is often installed under a rain screen. Basement and crawlspace walls can be insulated from either the interior or the exterior with rigid foam. Slab edges should always be wrapped with rigid foam. Because it’s so durable, extruded polystyrene (XPS) performs best for at-grade and below-grade applications. Exterior foam should be covered with a protective coating, like fiberglass-reinforced stucco.
For diagrams and more information on when vapor diffusion causes trouble, click the link below.
_________________________________________________________________________
Martin Holladay is a retired editor who lives in Vermont.
Weekly Newsletter
Get building science and energy efficiency advice, plus special offers, in your inbox.


0 Comments
Log in or create an account to post a comment.
Sign up Log in