
Image Credit: Image #1: Building Science Corporation
More Musings of an Energy Nerd


Builders who install rigid foam insulation need to know what type of fasteners to use for a variety of substrates. One challenging situation involves installing rigid foam or furring strips over concrete, as might happen when rigid foam is installed on the interior of a basement wall. But even builders who are familiar with fastening methods for concrete might wonder if the same techniques are appropriate for brick walls.
In this article, I’ll try to provide advice on the best mechanical fasteners for concrete, brick, or CMU (concrete masonry unit) walls. I’ll consider a variety of scenarios, including the attachment of furring strips directly to the wall, the attachment of rigid foam without furring strips, and the attachment of furring strips through a layer of rigid foam. I’ll also look at the best fasteners for OSB or plywood subfloor panels when the subfloor is installed over continuous rigid foam above a basement slab.
Types of fasteners
There are two basic types of fasteners for concrete and masonry:
- The first category of fasteners requires a predrilled hole. Examples of this type of fastener include concrete screws (for example, Tapcons), wedge anchors, hammer-set fasteners (for example, Red Head Hammer-Set Nail Drive Concrete Anchors), certain concrete nails (for example, Trufast Tru-Grip fluted concrete nails), and plastic fasteners for holding rigid foam to a concrete wall (for example, Styro Industries Tapit fasteners, Rodenhouse Plasti-Grip PMF fasteners, or Hilti IDP anchors).
- The second category of fasteners does not require a predrilled hole. Examples of this type of fastener include powder-actuated fasteners, fasteners driven by gas-actuated tools (that is, tools with an internal-combustion engine that uses disposable gas cartridges), and old-fashioned concrete nails.
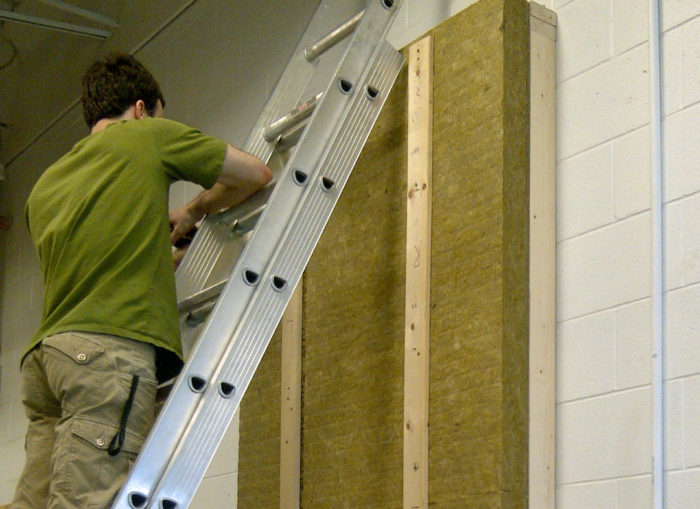
Drilling a hole in concrete
If you’re using a fastener that requires a pre-drilled hole, you’ll need a hammer drill…
Weekly Newsletter
Get building science and energy efficiency advice, plus special offers, in your inbox.

This article is only available to GBA Prime Members
Sign up for a free trial and get instant access to this article as well as GBA’s complete library of premium articles and construction details.
Start Free TrialAlready a member? Log in


6 Comments
mason jar lids or plywood as washers
In the interior of my walkout basement I've been using foil faced polyiso, either 2 or 4 inches (2" below grade, 4" in walls above grade). Polyiso seems favorable from a greenhouse gas standpoint, has a high R per inch, and meets the flame and smoke rating requirements here for basement walls, so I can avoid covering it with drywall. I've been using either 3.5 or 6 inch tapcon screws because they're easy to find. Where I want to hang tools or protect the foil from wear, I'm using a plywood sheet essentially as the washer. In areas where that's not necessary, I used a mason jar lid plus a wide washer. These distribute the strength of the screw and are holding the polyiso sheets very tight. Here's a picture plus detail of both--plywood where the tools are, and just mason jar lids behind the built-in cabinet.
-Shawn Salias
Shawn
If you run out of mason jar lids, you can buy cap washers at most big box stores. They are about 20 bucks for 500.
https://www.amazon.ca/Ideal-Security-Inc-SKPHC-Plastic/dp/B005TE3C1G/ref=sr_1_6?ie=UTF8&qid=1530754803&sr=8-6&keywords=cap+washers
Response to Shawn (Comment #1)
Shawn,
You wrote, "Polyiso ... meets the flame and smoke rating requirements here for basement walls."
You may be accurately reporting the interpretation of your local code official. But most code officials won't allow foil-faced polysio to be left exposed, because it's a fire hazard. Rigid foam needs to be protected by a layer of 1/2-inch drywall.
The exception is a brand of polyiso called Thermax -- a special type of polyiso that has passed fire safety tests. (I think there is at least one other brand of polyiso that has successfully completed Thermax-type testing and approval, but I forget its name.)
So most common brands of polyso need to be protected with drywall.
Malcolm makes a good point. Foam fastener washers (which I mentioned in my article) cost about 4 cents apiece, whereas mason jar lids cost 18 cents each at WalMart.
Of course, if you are talking about used lids, they're free (assuming you do a lot of canning, and you've been saving your used lids). Remember, though, there there may be a better way to use these lids. If you open your mason jars carefully, the lids can be re-used for your next canning job. That's what I do.
Hammer-Set Fastener Options
As an FYI, 3 inch lead and plastic tap-in/hammer in anchors are available; I have successfully used them to install 2 inches of foam to my basement walls. I used plastic washers (had to be drilled out for the 1/4" diameter fastener) to prevent pull-through of the fastener. The hammer-in fasteners had intermittent problems expanding due to the "bounce" of hammering through foam; I found that I had to "pre-expand" the fastener slightly to get it to work.
All this being said--if I had to do this all over, I'd just buy the Rodenhouse fasteners.
Mushroom Head Nail In Anchor Nylon 1/4 x 3 (Box of 100) weight 2.25 Lbs
https://www.amazon.com/gp/product/B07B6BCDMY/ref=oh_aui_search_detailpage?ie=UTF8&psc=1
1 3/4" Foam Fastener Washers, 100 Count
https://www.amazon.com/gp/product/B00FPQOJQK/ref=oh_aui_search_detailpage?ie=UTF8&psc=1
Also, for reference, this is how Joe's dad solved the problem:
BSI-065: But I Was So Much Younger Then (I'm So Much Older Than That Now)*
https://buildingscience.com/documents/insights/bsi-065-i-was-younger-then
Response to Kohta Ueno
Kohta,
Thanks for sharing your tips and experience.
If GBA readers are curious about Joe Lstiburek's father's home-brew masonry fastener, the relevant information is reproduced below.
Joe Lstiburek wrote:
"How to attach 8 inches of foam insulation to the outside of a block wall? ... Time to go see Dad. ... After about an hour he got up without saying a thing and I followed him to the car and we drove to Canadian Tire. He got a long masonry drill bit, some gutter nails, a bunch of really big washers and some lead plugs. He sketched out the solution on a pad of paper. ... Worked like a charm.
"[Caption to image] Dad’s Fastener - Gutter nails, a bunch of really big washers and some lead plugs. Put the nail through the washer. Push the lead plug onto the end of the nail. Lean the rigid foam against a masonry wall. Drill through the foam with a 5/8-inch diameter long masonry bit 1-inch into the masonry wall. Pull the bit out of the opening. Insert the fastener through the foam 'pilot' hole so the lead plug engages the hole in the masonry. Use a mallet to hammer the fastener home."
.
If I have a CMU wall here in Dixie Alley, Madison, Alabama (climate zone 3), I want to use .75" polyiso (R5 code minimum) as exterior insulation over a trowel applied class 1 vapor barrier. Vinyl siding right over top of the polyiso. Could I use something like the 2" Styro Tapit to secure the whole assembly? My thought process:
Hold polyiso over sealed CMU and predrill through the foam to 1.75" holes into the wall itself. This allows 1.25" penetration of Tapits. Install the plastic portion of the Tapit to hold the foam in place. Install the vinyl siding panel with the slot directly over the plastic Tapit and drive home the nail, leaving it just a little loose (1/32") to allow for expansion of vinyl siding. Could this secure the assembly? The plastic sleeve is appealing to me because it allows for a bit of a thermal break from the nails, and seems like the simplest/cheapest way to meet insulation code over CMU. I also see the vinyl siding acting as a washer to distibute the load/force of the nail over a wider surface on the polyiso.
Thanks,
Bob
Log in or become a member to post a comment.
Sign up Log in