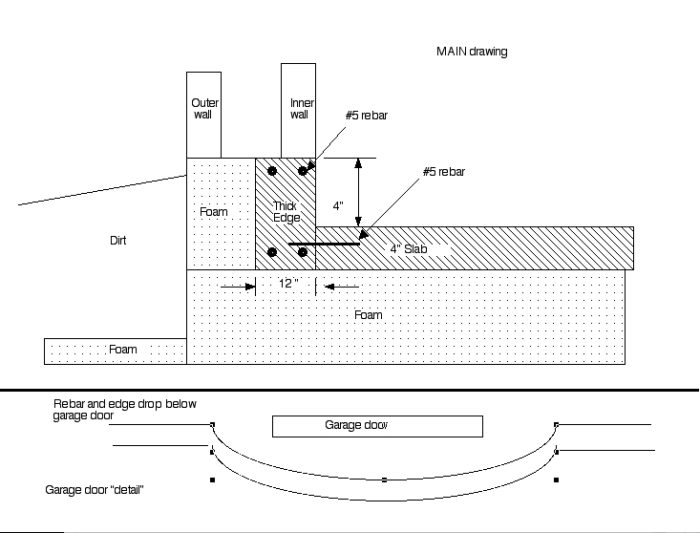
Inverted thickened edge slab. Work?
Having looked at a variety of foundation systems, I see problems with all of them. Any stem wall or thickened edge generates insulating or compacting/pouring issues, as far as I can see, especially w/ lots of foam underneath. This one is not perfect, either. Nevertheless, here is an option I thought of that gives you the rigidity of the thickened-edge slab but is easier to insulate… except at the garage door. It also better locks the house to Terra Firma than a SOG, should there be seismic activity, …. I think it does, anyway. This generates a 4″ lip to drive or step over. Firring out the floors w/ 2x4s or ramps would be work-arounds, or dropping the edge below the garage door and back up on the other side; not fun. Any feedback on the viability of doing this is welcomed. It is just a thought, after all. Thanks. john
GBA Detail Library
A collection of one thousand construction details organized by climate and house part


Replies
John,
I'm not an engineer, but I imagine it would work. However, it puts your slab below grade -- always a worse result than an above-grade slab.
Unlike with the distributed load on a standard insulated slab you have a concentrated load (wall, roof, possibly upper floor) imposed by the edge beam and you obviously you have to check the bearing capacity of the foam to transmit that load through to grade. Other than that, and the threshold issues (you mention the garage door but what about ordinary passage doors? Or is this just a garage detail?) it seems to introduce some complexity to the finish detail at the foot of the wall on the interior. If you don't furr up the slab how do you plan to fix drywall & base mold? And I echo Martin's concern for the flooding potential of a slab below exterior grade.
as martin alludes to, one of the issues with below grade is that your above grade siding, etc is now much closer to the ground
and it seems you just flipped over the stem wall concept upside down, which still means the same compacting issues are possibly there on that edge
to some degree you have a version of a floating slab minus the float
maybe start by listing your environment, goals and its challenges and solicit ways to work around it
A few more comments:
First, John's diagram is not technically a thickened edge slab but a separated edge-beam slab, which is certainly the better starting point for all but the most rudimentary construction such as an uninsulated shed.
Second, there are substantial constructional advantages in having top of slab level with the top of the edge beam, not least of which is that it makes it easy to form both with a single pour.
Having got that out of the way, it's important to realize that there are three separate needs to address at this intersection:
Condition A: subslab insulation, the thickness of which is determined by your overall heat transfer goals. Judging by the apparent thickness of the subslab foam in John's diagram, he's aiming for Passivhaus standards.
Condition B: insulation below the edge beam to prevent thermal bridging. If the edge beam does not extend above the slab, the contact of the beam with the interior is reduced virtually to zero and the insulation needs below the beam are minimal, and certainly much less than subslab requirements, just as thermal bridging protection for a framed wall does not need to be a thick as the overall wall insulation.
Condition C: edge insulation to protect both the subslab area and the edge beam from exterior temperature extremes. Again, minimizing the point of contact of the beam with the interior by making it flush with the top of the slab is a plus in this equation.
It's really not necessary or appropriate that all these insulation conditions are met with the same thickness of foam, which I suspect was John's intention with this proposal. If you let go of that unnecessary goal, a much simpler arrangement is possible, along these lines. Note the importance of the construction joint at the slab/beam intersection to allow for differential compression and settlement of the foam and dirt below.
Thanks for all the feedback, and I forgot to mention that this is for zone 8. James M: What you drew is what I have come to determine will be the way I go. When tweaking the dimensions thereof to minimize foam waste, I thought that if I inverted that beam the foam would be much easier to install; not a big deal easier, however. I have looked at a variety of iterations of that design (one posted here a while ago) and it is certainly the most "normal". The only rub I have, and it may just be my inexperience, is how to compact right inside the edge beam form before you pour monolithicly. If you don't pour all at once, say letting the slab float, then it's pretty simple. As for foam density, I am going to go w/ 60 psi EPS, or, if I get fretting about this, then 100 psi XPS, right under the beam. 25 psi under the exterior wall, and 15 psi elsewhere. The numbers indicate that 25 psi is adequate under the beam, but by the time you factor that down to 1/3, it is marginal, IMO. The cost difference between 25 and 60 psi is trivial and I'll sleep better w/ 60.
John, I'm not sure what you mean...
In both your's and James' details, it appears that the edge beam and slab are poured on top of the foam...
Am I missing something or wouldn't all your compacting be done before you lay the foam down?
I'll borrow Martin's earlier caveat (I'm not an engineer) but if you're worried about it, why not choose a slab design that uses a wider footing?
John,
Have you seen the engineered foam form systems for an insulated slab on grade? I think Martin provides a link to one in one of his blogs.
My German colleagues have told me that in Germany there is a practice of first pouring a slab on compacted ground and then laying the foam and then the slab. Extra materials but your creating a level base to work up from.
In your detail couldn't you raise the slab to the top of the bond beam by adding 4" of sand on top of the foam? Can't imagine the sand would add much cost.
Lucas: What I was referring was only if the edge beam/stem wall went below the foam. It would be N/ A here. As for the wider footing, it is the expense of concrete that occurs w/ one. I mentally roughed the numbers, and it looked like heavier foam was cheaper; I’ll have to calc that on paper. It would sure be nice to simplify the inventory of foam; good point. J Chestnut: Yes, I could raise the slab w/ 4” of foam, too, and that would be the easiest, as the edges of foam are defined, unlike sand. I have not seen the foam forms to which you refer, but apparently Thorsten Chlupp is working w/ a local foam plant to manufacture some. It will be interesting to see what they come up with. Well, inverting the edge beam was just a thought, but I see that I’ll put it on the Scratched List and go back to the design I had like James’, and tweak it. Thanks again for the opinions/information. john
OK, so I'll stick w/ convention. This is iteration #319, and likely IT. It is still fiddling w/ foam pieces, but I did my best to not have scraps and yet have structural integrity. Once I see the engineer to confirm/tweak, I'll be happy as a pig in mud. Later days, better ways. j
John, beautiful details. Post the cost spreadsheets both estimated and then post construction actuals if you would.
AJ: Thanks. I did a fairly accurate approximate last night, and like several other iterations I've looked at, the cost will be about $26,000. The killer, of course, is the $15,000 below the slab, 3636 sf. When this all happens, I will post actual cost. The ROI is beyond me, but the next folks may appreciate it.
John, that's a very robust detail.
I'm all for "belt and suspenders" but I'll bet you could save some money here and still have a very "safe" foundation.
I see two, maybe three capillary breaks under the concrete (gravel, "stegowrap" and foam). Once cured, your concrete will be dry...
I also see two, maybe three capillary breaks under the wall (bituthene, "Drylok" and EPDM gasket).
I might suggest that you terminate the bituthene somewhere along the the top edge of the foam before it reaches the concrete (possibly sooner depending on how you plan on finishing the exterior of the foam), eliminate the "Drylok" and replace the "Timbersil" with standard lumber.
Not sure where you plan on installing your weeping tile...If
If you are going to put it against the foundation, on top of the horizontal "wing" insulation, I would consider also including extra weeping tile around the perimeter of the gravel pad (under the foundation), drained to daylight or french drain if this is at all possible.
Just my two cents.
Lucas: Thanks for the comments. I am always interested in feedback. Here is part of what you said, followed by my comments (after ••)
I'm all for "belt and suspenders" but I'll bet you could save some money here and still have a very "safe" foundation. •• OK, where? Is that detailed below, implying to cut back on the capillary breaks? My detail page (not posted) has 3 rebar in the edge beam, near the bottom, and will be checked over by an engineer. However, I will not have less than 3. The horizontal pieces going into the slab may not be necessary, but I saw them in Thorsten's slab and thought they were a good idea. He has no edge beam; just an 8" slab.
I see two, maybe three capillary breaks under the concrete (gravel, "stegowrap" and foam). Once cured, your concrete will be dry... •• Cured? Concrete cured, or problem cured? The Stego may go on top of the foam; top or bottom is a bit debated here. One engineer at CCHRC likes his below to keep the radon out of the foam. I am on schist, and the P(radon) = .999. I have no strong opinion on either way, but Martin's comment long ago about having water by the pool-full (w/ Stego on the bottom) was a good point.
I also see two, maybe three capillary breaks under the wall (bituthene, "Drylok" and EPDM gasket).
I might suggest that you terminate the bituthene somewhere along the the top edge of the foam ... •• Roger that.
... eliminate the "Drylok" ... •• Cheap insurance.
and replace the "Timbersil" with standard lumber. •• Again, probably a bit overkill, but if the stuff is not that spendy (and I can get it up here w/out selling my skid steer) then WTH? Cheap insurance.
Not sure where you plan on installing your weeping tile...•• That is something I need to check on. I am not aware that it is used much here, especially on schist. I will check on that, for sure, though.
Just my two cents. •• Appreciated. john
Hi John,
I was thinking that with the "Stego" and foam over well-drained gravel, the concrete (after it cures and the thousands of pounds of water has left) will stay dry. One capillary break (EPDM gasket for air sealing) will be plenty to protect the wood above from any incidental moisture from below...
Mostly I was thinking that you would save on:
1. Less bituthene (even covering the top of the foam -12"- all the way around the perimeter will add up quickly)
2. "Drylok" - not sure you need any insurance here even if it is cheap...
3. "Timbersil" - same as above...
4. "Time is money" - you could be doing other things (or paying someone else to do other things) instead of applying "Drylok" and bituthene.
I know the savings will probably look like a drop in the bucket compared to the concrete work and foam but every bit will count - maybe you'll save $1000 you can put toward a solar thermal system or masonry heater ;-)
Here's a photo of my foundation back in August.
I used "Resisto" brand "ICF waterproofing membrane" - it was what was locally available. You can't tell from the photo, but I only went up the vertical foam 6" with the "Resisto". After that the exposed foam was parged using "Tuff II" ICF coating. Nothing fancy, but at least it doesn't look like "blue board".
I installed 4" weeping tile over the horizontal foam and against the foundation.
I had also installed more 4" weeping tile in the gravel underneath the foundation to drain the perimeter.
I think it is wise to make sure the gravel underneath any FPSF foundation is as well drained as possible.
Lucas: Thanks for clearing that up, and the suggestions. Hey: A grand is a grand, and nothing to sneeze at. I do tend to overkill; just my nature. I'll have to be careful about overkill vs gross and obscene overkill. I've never heard of the ICF coating, but it sounds like a great deal. I will inquire about it locally. How thick is the foam under your slab and in that WIDE apron, and what is your climate zone?
John,
I'm in CZ 7A - a little more than 10K HDD (but warming).
The foam that you can see is all 4" Dow "Square Edge" XPS (25 psi) and the apron extends 4' from the footing along the edge but 6' at the corners. It's all corners in the photo.
The apron layout was determined by an engineer and seems to exceed the NAHB's guidelines for heated buildings, but since the underside of the foundation is insulated it makes sense to beef up the apron.
Around the footings and under the slab I used 3" Dow "Roof Mate" XPS (35 psi).
I was happy/lucky to find a local source of reclaimed foam for my project.
Have you thought of how you want to finish the exposed foam on your project? I'm always looking for some new ideas...
OK. Thanks. No great ideas for covering over the foam. I was just going to flash over it w/ galvanized flashing, likely custom made. I hear you about "but warming". We still have not hit zero yet.