Image Credit: Daniel Ernst
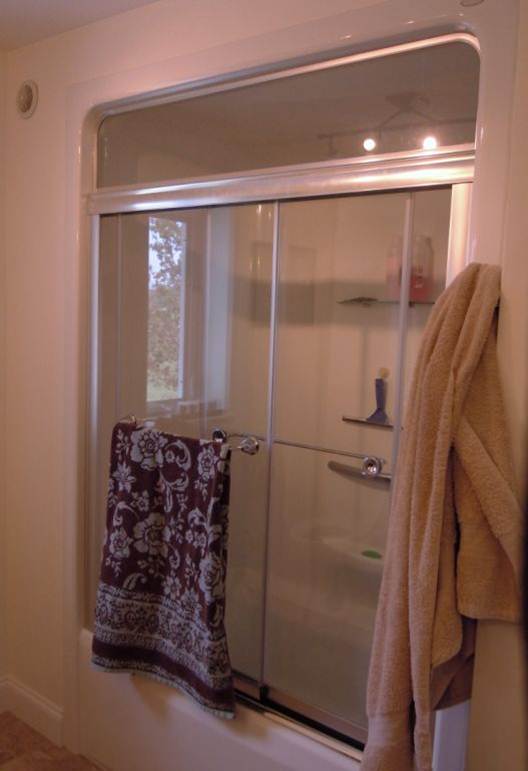
Image Credit: Daniel Ernst Comfort and durability in one handy package. Steam-rated shower enclosures prevent water vapor from traveling and condensing on bathroom surfaces (thereby limiting the chance of mold growth). As an added benefit, there’s no cold air rushing into the shower.
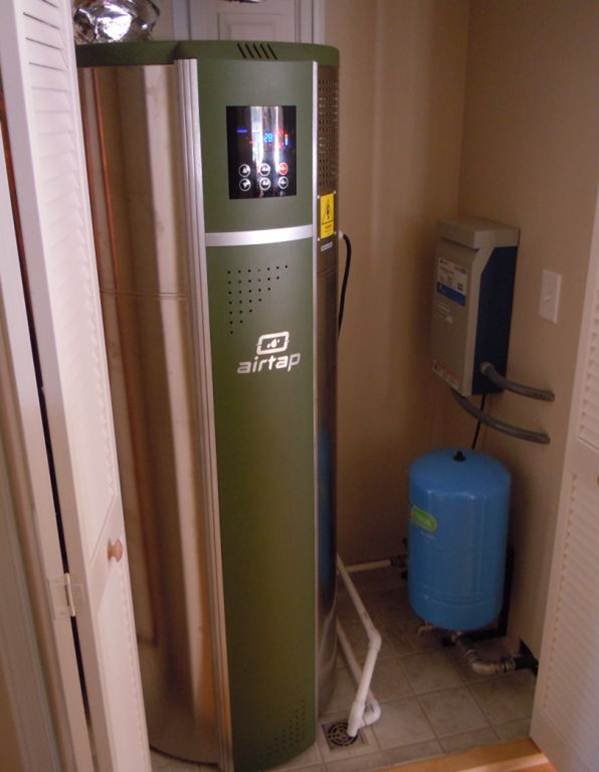
Image Credit: Daniel Ernst Mechanical room in a box. A “plumbing closet” contains the well pump controls, PEX distribution manifold, and a heat-pump water heater. The water heater exhaust air (which is cool and dry) is ducted to a register on top of the refrigerator. A floor drain captures both the water heater condensate and the minisplit condensate.
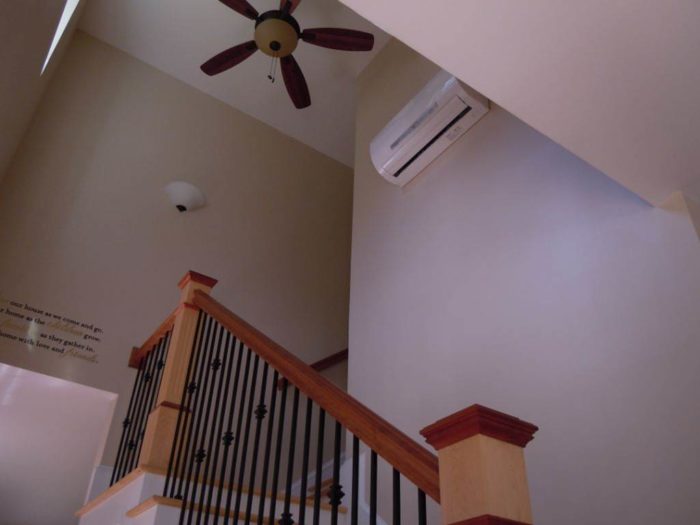
Image Credit: Daniel Ernst Space heating and cooling. The main two-story section of the house is heated and cooled with a single-head minisplit heat pump, installed high in the open stairwell. A second minisplit head serves the single-story wing.
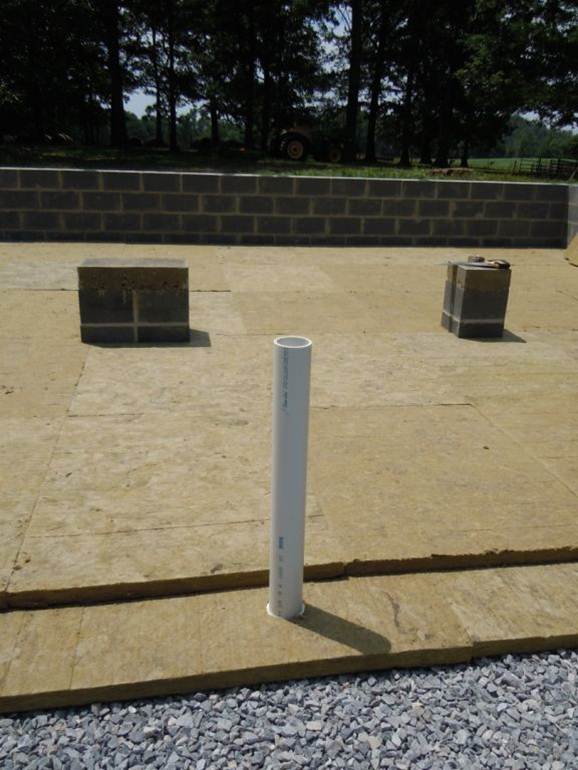
Image Credit: Daniel Ernst Board insulation without the global warming by-product. Mineral wool rigid board insulation covers a bed of clean gravel (installed as a capillary break). I installed a polyethylene vapor barrier over the insulation, then topped it with a 2-inch-thick concrete “rat slab.”
Image Credit: Daniel Ernst A warm, dry crawl space. I insulated the foundation walls with two staggered layers of polyisocyanurate board (Thermax, which includes a thermal ignition barrier). I then installed termite flashing and sill seal beneath the sole plate.
Image Credit: Daniel Ernst Sealed, insulated, and ready for joists. This sealed and conditioned crawl space will allow access for future repairs and renovations, without the troubles associated with traditional (vented) crawl spaces.
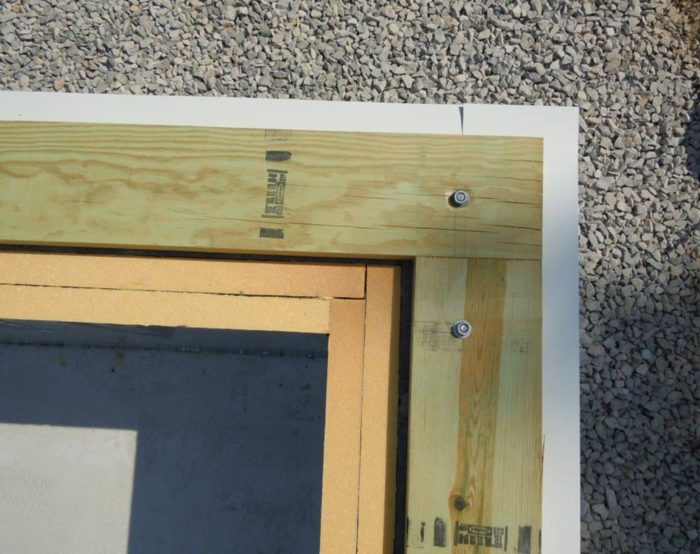
Image Credit: Daniel Ernst Waste not, want not. Leftover polyioscyanurate crawl space insulation was used to fill the space between doubled 2x header stock, maintaining a consistently high R-value throughout the double-stud wall.
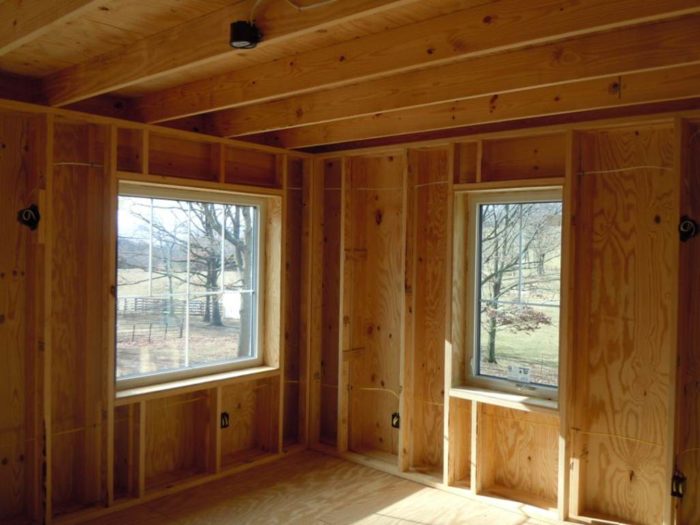
Image Credit: Daniel Ernst Thick walls that don't waste wood. The exterior row of studs supports the floor and roof loads; the interior row of studs is non-structural. Plywood sheathing acts as an air barrier for both the wall assembly and the attic ceiling. Advanced framing techniques reduce the number of studs used.
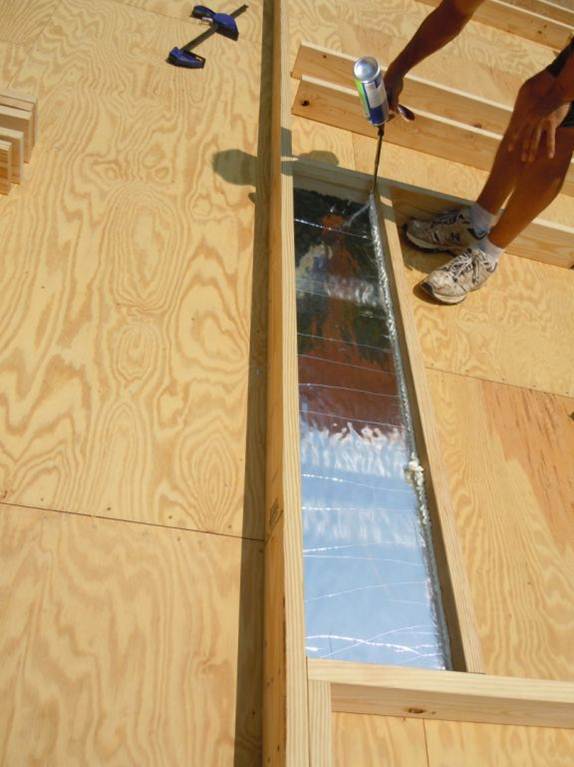
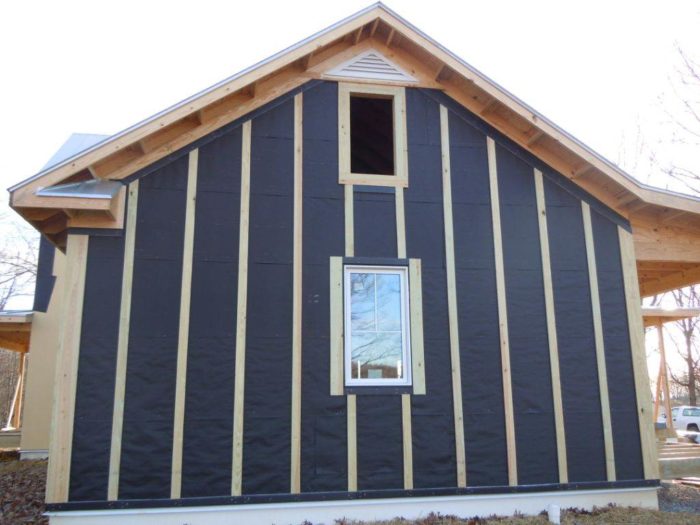
Image Credit: Daniel Ernst Paint-on housewrap. Joints in the plywood sheathing were sealed with StoGuard, and then the entire wall surface was covered in Gold Coat to form a permeable water-resistant barrier (WRB) as well as an excellent air barrier.
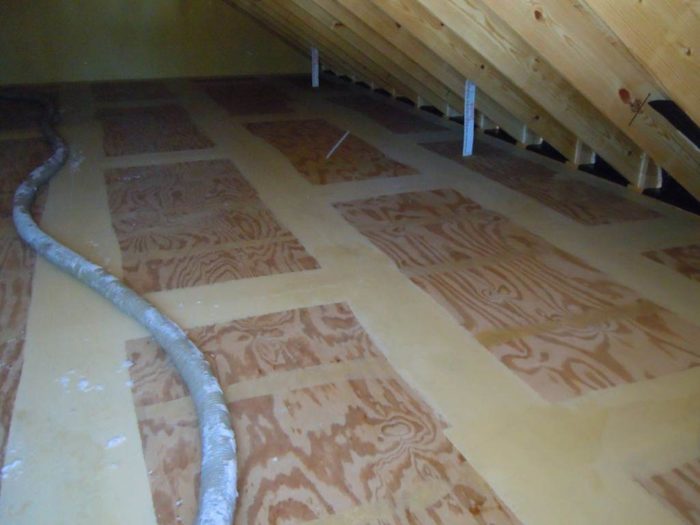
Image Credit: Daniel Ernst An airtight attic floor. The plywood subfloor was treated with StoGuard to form the ceiling-level air barrier. Here, workers prepare to install loose-fill cellulose in the attic.
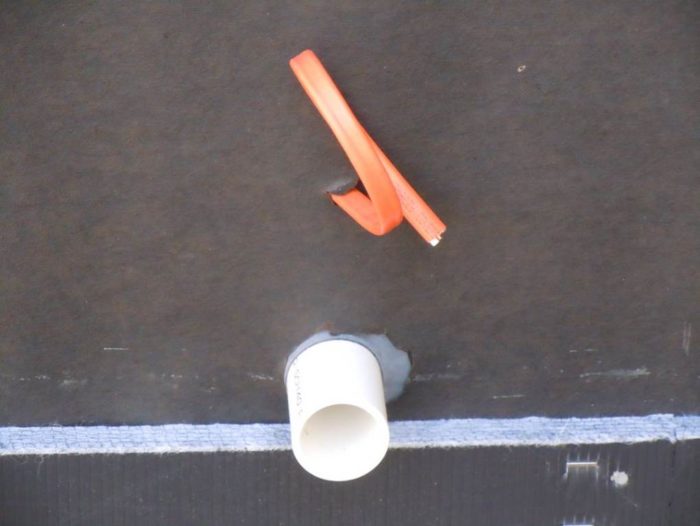
Image Credit: Daniel Ernst Cheap insurance. EDPM sheet rubber was used to seal all wall and ceiling penetrations. The choice proved both practical and economical. I sealed each penetration with a custom cut piece (rather than using a preformed proprietary system).
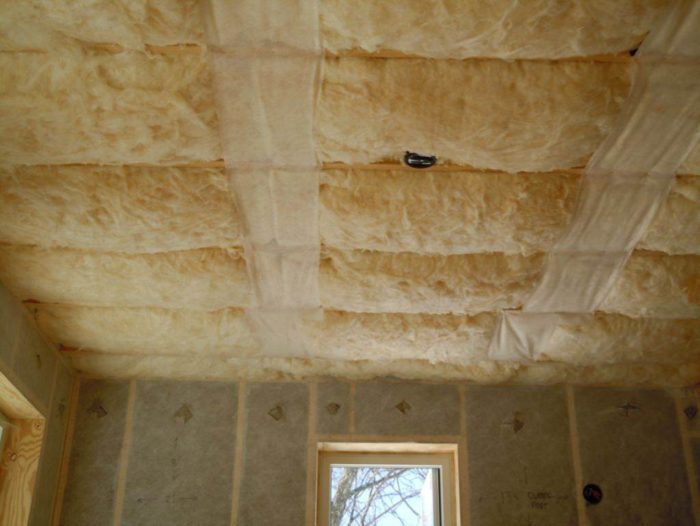
Image Credit: Daniel Ernst Inexpensive insulation can be effective. 24-inch-wide fiberglass batts filled the ceiling joist cavities. (Netting helped support the batts before drywall installation.) Dense-packed cellulose filled the double-stud wall cavity.
Image Credit: Daniel Ernst Simple durability measures. I installed a rainscreen to encourage drying (addressing the possibility of wintertime moisture accumulation in the cold sheathing), to protect the air barrier (by minimizing siding fastener penetrations), and to enhance siding durability. Note the attic access: just say no to indoor attic hatches!
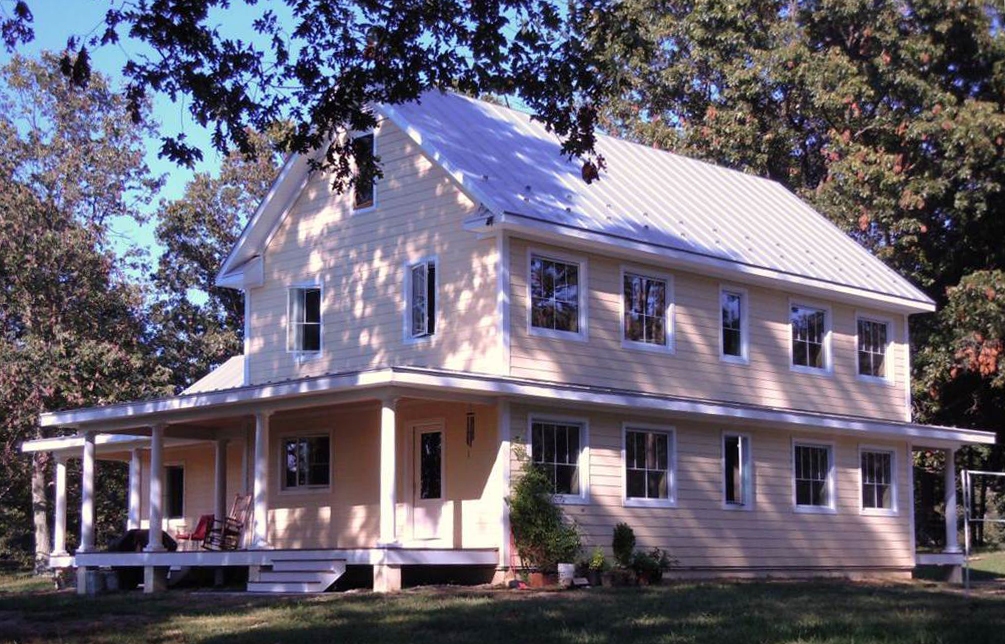
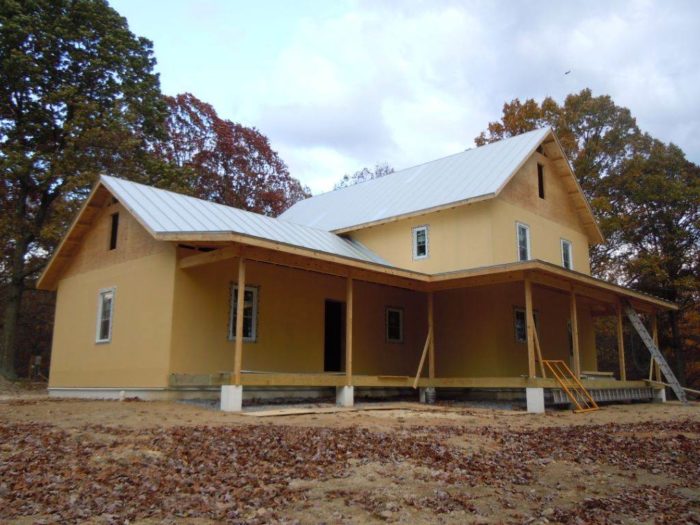
Modeled after the vernacular architecture of a Shenandoah Valley farmhouse, this multi-generational house was designed and built to meet the Passivhaus standard. I call it the Passive Bauernhaus.
By Daniel Ernst
When my family made the decision to move to Virginia, we agreed that somehow, some way, we would find a home that could comfortably accommodate seven people, across three generations. On a working farm. On a budget. Winding our way through an economic downturn, it made sense to consolidate our resources, minimize our family footprint, and maximize our efficiency.
Although we looked for months for a possible house renovation project, the dollars and cents of the market pushed us toward purchasing a site for new construction.
Evaluating site potential, deciding on appropriate architecture
The land that we purchased included a grove of open hardwoods, mature trees that added to the diversity and beauty of the property. We considered the land carefully before settling on a building site in a natural opening of the grove. Although we would have to cut down some of the oak trees for the site, the building would benefit from an ideal mix of sun and shade. Trees to the east and west would provide generous shade for Virginia’s hot and humid summers, while an open southern face would allow full passive solar potential in the colder months.
Having selected the site, we then discussed house designs. The Shenandoah Valley has an odd mixture of antebellum farmhouses, brick ranches from the ‘50s and ‘60s, and vinyl-clad subdivisions. I had an eye for the early architecture, built at a time when resource efficiency was taken for granted. Most of the older farmhouses started with a simple two-story rectangle and gable roof. Layered onto this basic geometry, succeeding generations often added one or two-story wings, creating the classic farmhouse style.
For a multi-generational house, this architecture offered my family the chance to balance our public and private needs. The main first floor would provide the meeting place, the second floor would give my family bed and bath, and the first floor wing would furnish the in-law quarters with some sense of privacy.
Starting with some principles, and some numbers
I met with an energy consultant, John Semmelhack of Think Little, before starting any detailed drawings. At that point, I only had a sense of the architecture and a rough idea of house size. John explained the various programs he used for energy modeling and a number of certifications available (EnergyStar for Homes, EarthCraft, and Passive House). We discussed passive solar principles and building materials, local building techniques and new technologies. That discussion helped refine a list of ideas that we would use during the designing and building phases.
As I started drawing, I focused my efforts on designing an all-electric, net-zero-ready house, with the potential to certify the house to the Passivhaus standard. John easily persuaded me that the PHPP spreadsheet would provide the most accurate energy model. And although I was aware of the criticisms of the Passivhaus standard and PHIUS (for example, no feedback loop on cost-effectiveness), it was hard to argue with the level of detailed inputs and calculations found in the PHPP.
Compromise as a matter of course
In building, every choice demands a compromise. Few decisions are simple or straightforward. The designer and builder must balance a number of disparate perspectives in an ever-changing world. Durability vs. cost — aesthetic flourishes vs. simplicity — long-term operating costs vs. short term budget. Decisions may be driven by hard numbers, or emotional prejudice. There is no single answer. That is the joy and the burden of the architect and the builder.
During the design phase, I grappled with a number of these decisions. In the end, all of that wrestling produced a design that is architecturally similar to 19th-century farmhouses, but only at the surface level. Looking closer, there are some dramatic departures from the older houses:
- Sealed, insulated, and conditioned crawl space
- Double stud walls, dense packed with cellulose
- Airtight sheathing, with liquid-applied WRB
- Triple-pane windows > R5
- Heat pumps for air conditioning and domestic hot water
- Balanced ventilation system (ERV)
Novel crawl space construction
To use a witticism of John Brooks, I am not a Basementist. On the other hand, I am leery of using foam insulation surrounding a slab, at least in regions with moderate or heavy termite infestations. The thermal break between a footing and a slab is typically hidden beneath an exterior wall bottom plate — so it can never be inspected. Our oak grove had (has!) a remarkable abundance of termites, so I chose the oft-disputed middle ground — a crawl space.
The PHPP revealed a delicate balance for insulation levels on the crawl space floor, one that is unique to mixed climates. Too little, the heating load increased significantly; too much, the cooling load crept higher. I chose to use 4” of rigid mineral wool insulation below a 2” thick rat slab. The mineral wool would not provide a nesting site for termites and ants. The rat slab would protect the insulation and vapor barrier, create a clean surface, and add thermal mass. Although I was not able to find an example of this technique, the technical department at ThermaFiber gave approval for using their 8-pound-per-cubic-foot density product in this application (and eliminated their minimum quantity surcharge to fill my order).
Achieving a high level of wall insulation
Based on his modeling experience with PHPP, John Semmelhack thought that R-30 would be a minimum starting point for wall insulation levels (in this climate). Given a less-than-optimal building geometry, that value climbed closer to the R-40 mark. By using a double stud wall, I could achieve this value in a cost-effective manner, simplify the flashing and trim around penetrations, and avoid the complications of exterior insulation.
Although the double stud wall has been used for many years, and is still used by many builders of high-performance homes (see homes built by John Abrams of South Mountain Company, or Andy Shapiro in White Pine Co-Housing), building scientists continue to caution about the risks of this approach. To alleviate this concern, John evaluated the wall assembly using both Therm and WUFI software models, comparing it against the historical housing stock for this area.
Liquid-applied air barrier and airtight sheathing
I used the airtight sheathing approach for the building’s air barrier. Since I planned to do most of the construction myself, I used Sto Corporation’s liquid applied air barrier system — StoGuard and Gold Coat. This product was costly (approximately twice the cost of 3M’s 8607 tape), but had several important benefits: it was permeable, durable, and rated for six months exposure.
To complete the barrier at the ceiling/attic level, I wrapped plywood sheathing over the ceiling joists, and applied the StoGuard joint treatment to these joints also (note that Sto does not approve using this product on horizontal surfaces). Having an attic floor simplified the roof framing process, creating a safe and secure platform for setting the ridge board and rafters.
John completed the first blower-door test before insulation and drywall (single-point depressurization). The results were impressive: 117 cfm50, or 0.33 ach50. Six months later, the final blower-door test essentially showed no change in the depressurization result.
Capping it off
I admit here that I like durable roofing materials. Initially, we had planned to use slate for the main roof, metal for the wing and lower sloped porch roofs. We had hoped to use Buckingham slate (the quarry is across the Blue Ridge mountains, so it was a local source); however, the cost was prohibitive — substantially more than Vermont slate, with which I had some experience. After weighing the options, we settled on standing-seam metal for the entire roof. Because the metal stock was Follansbee TCSII — formed from 304 stainless steel — it would last as long as a slate roof.
A local roofer, Bruce Senger, formed the pans from 1,000 ft. coils, then installed them using techniques that have existed for hundreds of years.
Heating and cooling strategies
Considering our mixed climate and design temperature (16°F), a heat pump made sense. Looking at the small heating and cooling loads, this was one decision that didn’t require a lot of debate (finally!). I chose the Mitsibishi Mr. Slim as the source; the only question that remained was the model and head location(s).
Having lived with a wood stove for much of my life, I was comfortable with point-source heating. However, I didn’t have any experience with point-source cooling. The PHPP showed that a single 9,000 Btu/h head could handle the cooling load for the entire house (and nearly handle the peak heating load). But would distribution suffer?
To provide autonomy for the in-law quarters, I installed a single head minisplit to serve only the wing. For the main house, I installed a single head unit, high in the open staircase, to serve both the lower public area and upper story bedrooms. Although this decision introduced the risk of temperature stratification, I was aware of several other houses that had used this technique. During the hottest days of the summer (100°F), we measured a maximum 4°F temperature differential between the first and second floors — and the minisplit never operated above low speed. I will note here that temperature variation and comfort are extremely subjective, so this technique might not be satisfactory for some homeowners.
_—Daniel Ernst is currently starting a design-build firm in Steele’s Tavern, Virginia. You can reach him at prometheanhomes(at)gmail.com_
Weekly Newsletter
Get building science and energy efficiency advice, plus special offers, in your inbox.
Lessons Learned
We speak a different language
The fact remains that many in the residential construction industry (suppliers included), are not familiar with high-performance homes or techniques. Surround yourself with those that are knowledgeable.
Find your suppliers months in advance
Although I knew that certain supplies and vendors would be difficult to find, this proved one of the more frustrating aspects of construction. Just because you know about a product doesn’t necessarily mean you can source that product. Thinking about using foamglas or mineral wool insulation? Plan ahead.
Sealed crawl spaces need fast dry-in times
Due to my extended construction schedule, and a very rainy September 2011, mold developed on some of the crawl space framing. Resolved? Yes! Fun? No!
Orientation-specific glazing can be problematic
There are a lot of chances to make a mistake during manufacturing and installation. In my case, the glazing manufacturer's labels (from PPG) did not match the window manufacturer's labels (from Accurate Dorwin).
Preparing open-web joists for dense-pack cellulose is tedious
Vertical blocking in-line with the interior stud wall would have saved a lot of time.
Little things can hold you up
Most floor registers are unsuitable for balancing an ERV/HRV: they have multi-angled fins and foot operated dials that cannot be locked into place. Lockable registers are special order, have long lead times, and are expensive.
General Specs and Team
| Location: | Climate Zone 4A: Steeles Tavern, VA |
|---|---|
| Bedrooms: | 4 |
| Bathrooms: | 3.5 |
| Living Space: | 2676 |
| Cost: | 85 |
(Note: Reported cost of $85/square foot does not include most of the labor costs.) Designer: Promethean Homes (Daniel Ernst), with help from John Brooks Builder: Promethean Homes (Daniel Ernst) Energy Consultant: Think Little (John Semmelhack) Insulation Contractor: Southland Insulators (Ivan Sandau)
Construction
Foundation: Sealed, insulated, and conditioned crawl space (CMU walls parged with surface-bonding cement)
Rat slab insulation: Horizontal layer of insulation under the slab: two staggered layers of Thermafiber VersaBoard 80 (2” thick mineral wool rigid board insulation) totaling R-16
Foundation wall insulation: Two staggered layers of Dow Thermax 2” thick polyisocyanurate with thermal ignition barrier (R-26)
Foundation air barrier: 6 mil Dura Skrim and surface-bonding cement
Wall frame: Double-stud wall construction; outer load-bearing 2x6 walls, framed 24" O.C.; interior 2x4 walls (non-structural) framed 24” O.C.
Wall sheathing: Exterior rated 5/8” plywood
Wall insulation: Dense-packed GreenFiber 765LD all-borate cellulose (R-40)
Wall air barrier: Plywood sealed with Sto StoGuard (Gold Coat)
Siding: James Hardie HardiePlank pre-painted cement board siding, installed over rainscreen (3/4” thick furring strip) - Stables Construction Co.
Exterior trim: MiraTEC composite board trim
Windows: Accurate Dorwin ADC Series; triple pane, orientation-specific glazing; combination of fixed and casement windows (R-5)
Roof / ceiling: Ventilated attic space, 2x (sawn lumber) joist and rafter construction
Roof sheathing: Exterior-rated 3/4” plywood
Ceiling insulation: Fiberglass batts, loose fill cellulose (R-70)
Ceiling air barrier: Plywood sealed with StoGuard
Roofing: Follansbee TCSII (terne coated stainless steel), Senger’s Roofing
Energy Specs
PHPP Specific Space Heat Demand: 4.71 kBTU (ft2/yr)
Blower-Door Test Results: 0.39 ach @ 50 Pa (average of pressurization and depressurization multi-point tests)
Estimated Site Energy Use: 8,320 kWh/yr
Actual Energy Use: July 2012: 674 kWh; August 2012: 661 kWh
Heating/Cooling: (2) Mitsibishi MSZFE09NA / MUZFE09NA Mr. Slim ductless minisplit heat pumps, 9,000 BTU capacity, 10 HSPF, 26 SEER
Ventilation: UltimateAir DX200 Energy Recovery Ventilator
Well pump: Gould Constant Pressure system (variable frequency drive)
Domestic hot water: AirGenerate AirTap ATI66 heat-pump water heater
Appliances: Energy Star rated appliances (where applicable), 24” compact clothes washer and condensing dryer, induction range
Lighting: Philips AmbientLED (Edison base LED), tube fluorescent
Water Efficiency
• Low-flow plumbing fixtures
• Toto Vespin II 1.28 gpf toilets
• Manablok water distribution manifold and PEX piping
Indoor Air Quality
• Low- and no-VOC paints
• Solid wood and tile flooring
• Balanced ventilation system provides fresh air to living spaces and bedrooms
Green Materials and Resource Efficiency
Regionally sourced Southern Yellow Pine (SYP) used for framing, sheathing, furring strips, decking, and ceiling boards. Materials were certified through various agencies:
• Maple flooring sourced from Appalachian region, certified by AHMI
• Follansbee TSCII (terne coated stainless steel) roofing is designed for 100+ year lifespan, eliminating painting, replacement, recycling, and waste associated with reroofing


16 Comments
great post, great house
Thank you for such a thorough and detailed article. I'm curious about the reported cost of $85 per square foot. This is about half of what I would expect to see for such a house if built in my area. Is part of the affordability here due to the fact that most of the labor would be considered "sweat equity?"
Response to Rachel Wagner
Rachel,
Good question. The roof alone (standing-seam roofing made from terne-coated stainless-steel -- nice!) probably cost more than the average house in my neighborhood.
Project Cost
Hi Rachel,
You are correct. The cost does not reflect what it would cost to build this house for a client. From start to finish, I only sub-contracted seven jobs (including well and septic). So, the largest part of the labor does not appear on the balance sheet---skewing the figure substantially.
Awesome photos.
Really grateful for the details shown, and for the post in general. Hitting CTRL + D. I never knew you could use mineral wool boards under the rat slab as you've done.
great job, daniel.
great job, daniel. contextually, i think the metal roof is much better as well.
Excellent
Kudos to Daniel
I agree!
Daniel,
Great job - great house.
In case there was any misunderstanding: I really like the roof. It's every roofer's dream. Who wouldn't want a terne-coated stainless-steel standing-seam roof?
TSCII Roof
Martin,
No misunderstandings here. The roof turned out to be the biggest single ticket item for the entire project, but I doubt it cost more than the average house in your neighborhood. ;-)
But what defines shelter, if not the roof?
Materials costs for the underlayment, coil stock, cleats, and fasteners approached $600 / square. The installed cost was closer to $800 / square. You have to take a long term view to justify such an expense. Around here, asphalt shingles get installed for $225 - $250 / square---and they get replaced every 20 years (more for looks than leaks). If the roof lasts as long as expected, then compared to asphalt, its total "lifecycle" cost will look like a bargain.
To show how everything is a compromise, for the same amount of money, we could have put down an architectural asphalt shingle and a 6 kW PV array---and gone net zero. The idea was EXTREMELY enticing. In the end we chose durability and aesthetics. And we plan to install a PV array on the barn roof in coming years, which should take us to net zero.
As a side note, a few months after the install, my supplier called to say that Follansbee was closing its doors (after 100+ years). The fate of terne coated products is now up in the air. They are looking for buyers; it's possible that Revere Copper might pick up the product line . . .
Thanks to everyone for the cheerful compliments!
Glad to see it here in VA
Thanks for posting. Totally agree w/ the advice to surround yourself with those that are knowledgeable. May I also suggest that homeowners "do your homework." Conducting research on your own before making calls to contractors pays for sure. You wouldn't believe some of the things I've been told by builders and contractors; especially concerning the cost of building an energy efficient addition. I've concluded, in many cases, it is less expensive when you just focus on smart building solutions.
We are building an energy efficient addition here in Glen Allen, VA. The addition is large and it is being added to an existing farmhouse. Conditioned crawl, SIP walls, truss roof system, standing-seam metal roof, ERV, etc.
It has been a journey trying to put together the right team of contractors and suppliers that understand the efficiencies associated with modern building science. I've learned a lot about building methods and how they are evolving but far too many in the building industry are lagging behind. Again, thx. for posting. The article is very helpful.
Air Sealing
Hi Daniel great project. I teach residential construction at a vocational school in Maine. We build double wall super insulated house with our students. The last house we built had a final blower door test of .70 ach @ 50 Pa which is pretty good, I'm proud of our students. I am intrigued by your technique of air sealing. I would like to try this approach on the next house we build. If you don't mind could you contact me I have a few questions I'd like to ask you. Thanks
Kirk Nygren
Building Trades Instructor
Westbrook Regional Vocational Center
[email protected]
Thermax Insulation Supplier
I am located in Central Virginia where is appears to be difficult finding suppliers for the thermax. Can you tell me where you purchased the thermax insulation by any chance? Virginia supplier? Any assistance you may provide is appreciated.
Thermax Supplier
Hi Greg,
You might talk to Appalachian Insulation. Although their headquarters are in PA, they have a distribution center in Ashland, VA. They sold both the rockwool and polyiso for this project.
http://www.ais1.us/AIS2009/index.html
Timeframe
Hi there,
I am writing a case study for a school project about your fabulous construction job. I have a few questions that weren't covered in this article. First and foremost, I was hoping to gain some information on the timeframe of this project. How long did this project take and how long did you expect it to take. Were your plans flexible? DId you build with phased expansion?
Also I was hoping to gain information on the house's performance and maintenance. What is the life cycle of the house and materials within it like? I know about the outstanding lifespan of the roof, but what about other materials used and what is their expected lifespan?
Thank you very much. I appreciate you taking the time to read and answer these questions.
Best,
Zoe
Response to Zoe
Hi Zoe,
You have a lot of questions. I'm not sure I could answer them well enough here. You are welcome to contact me by email. You can find my email address here: http://www.prometheanhomes.com
sheathing
The use of plywood instead of OSB siding. Why so? Also the 5/8 sheathing on the siding and 3/4 on the roof. I like the ideas in both cases. Just wondered what the thinking was behind those choices.
Response to Bruce Hoppe
Bruce,
Researchers have found that OSB is more susceptible to rot due to occasional wetting than plywood. Of course plywood can still rot if it gets wet and stays wet -- it is just more robust than OSB, and it doesn't turn into oatmeal quite as quickly when water gets past the siding.
In the old days, sheathing was always either 3/4 inch or 1 inch thick, and was made of solid lumber (boards). Old timers have always grumbled that the use of 1/2-inch thick sheet goods for walls or 5/8-inch sheet goods for roofs seems a little cheesy. Thicker sheathing feels better and holds fasteners better than thin sheathing.
When I built my own house, I used rough-cut 1-inch boards for wall sheathing.
Log in or create an account to post a comment.
Sign up Log in