
Image Credit: All photos: Allan Poole
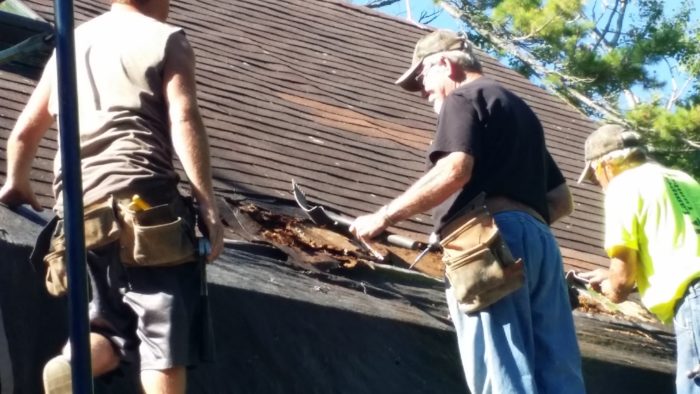
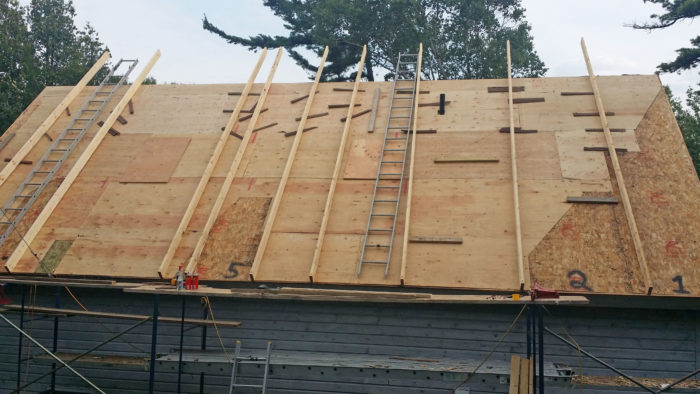
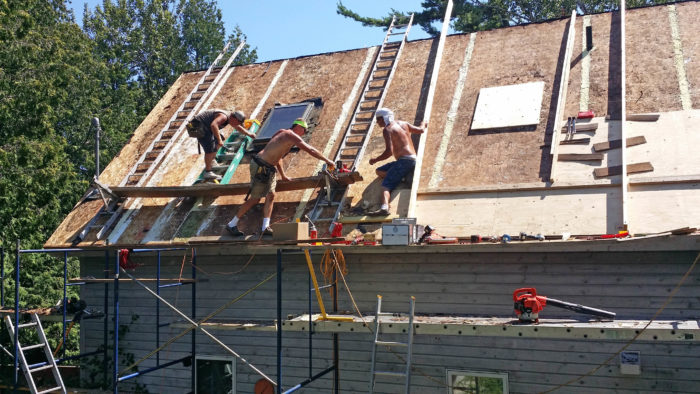
Image Credit: All photos: Allan Poole Terry Lindenberg is opening up the roof to discover the extent of the OSB rot caused by moisture accumulation. Rot was extensive. Workers scraped the rotten OSB off of the foam panels with garden hoes. At each SIP seam, some of the EPS spline was removed. The channel formed by this operation was filled with canned spray foam. The cured foam was later trimmed flush with a Japanese saw. On the north side of the roof, most, but not all, of the exterior OSB facing on the SIPs was so rotten that it was removed and replaced with new plywood. The 18-foot-long 2x6s in the photo were temporarily installed to enable pressure to be applied to the new plywood sheets as they were being glued in place. Once the glue had set, the 2x6s could be removed. There was less OSB rot on the south side of the roof. Once the SIP seams were re-foamed, new plywood sheathing was fastened to the existing OSB. Jim McCarthy: a hulk, a sage, and the business owner of UP Top Roofing. He likes to go windsurfing after work.
More Guest Blogs


A year ago, I looked on the web for information about repairing a poorly designed SIP (structural insulated panel) roof system. I found Green Building Advisor and posted questions here. It was suggested that I share my roof repair experience for the benefit of others who may be grappling with the same misfortune as mine. Here is my story.
In 1997, my two sisters remodeled a summer cottage built by my great-grandfather, Victor Poole, in Bailey’s Harbor, Wisconsin. They replaced most of the house with a SIP system. At the time, this was a new method. The roof is made of 16 foot long panels, either 3 feet, 4 feet, or 6 feet wide, spanning from the ridge to the eaves. Each panel has a groove in each edge which receives a 3 3/8-inch spline made of extruded polystyrene (XPS) faced with OSB on the inside and outside surfaces. There is no structural lumber incorporated in the panel joints.
The core of each panel is made of 7 1/4-inch-thick expanded polystyrene (EPS); the EPS is faced with 1/2-inch OSB on both the inner and outer surfaces. The total panel thickness matches that of a 2×8.
No help from the SIP manufacturer
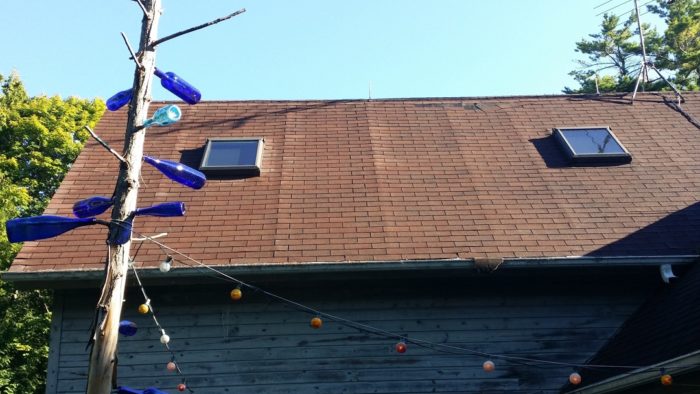
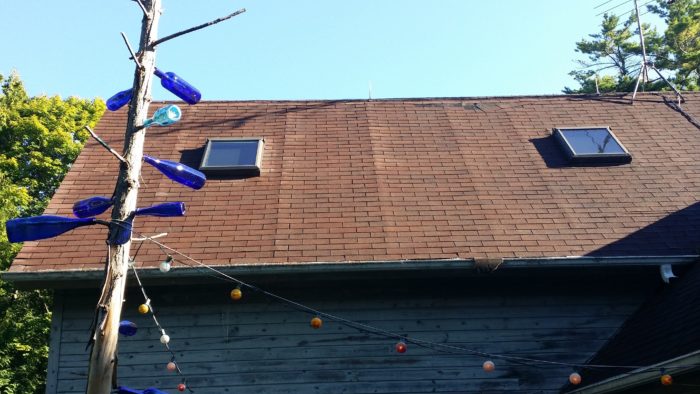
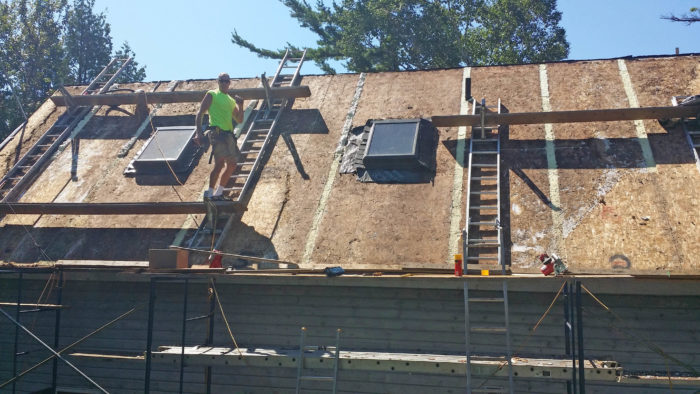
Three or four years ago, the mounts for the rooftop TV antenna gave out and we began to notice swelling under the asphalt shingles where the seams between the roof panels were splined together (see Image #1, above).
The design of the SIPs and caulking method prescribed for sealing the seams between the panels did not prevent moist inside air in wintertime from traveling upward within the seams and eventually condensing on the asphalt felt underlayment. Over the years, water accumulated on the OSB, especially at the seams. A spot inspection over a seam revealed that the glue that held the OSB chips together was decomposing from the excess moisture. Galvanized roofing nails were rusting through and some shingles were coming loose. Though the outside OSB on the panels was structurally compromised, and the panel’s unsupported span was 16 feet in many places, structural failure was not a concern.
I sought help from the company that sold us the panels. I knew that the SIP design and the prescribed caulking material were at least part of the problem. Other SIP roofs with similar construction details must also be failing or have failed. The company should have already encountered these problems and I hoped that they would be eager to help their customers with proven remedies. However, they were quick to refuse any guidance at all. They advised me to look to the building contractor for solutions and seemed unwilling to acknowledge that their design was flawed.
On the north side, most of the OSB was rotten
The most important thing, I felt, was to find a way to stop air movement in the panel seams. If that could not be accomplished, the problem would eventually return. I had to wait till the roofing was torn off before I could decide what to do.
My sister located a coalition of two locally well-known contractors: Up Top Roofing, operated by Jim McCarthy from Sturgeon Bay, Wisconsin; and Appleport Builders, operated by Terry Lindenberg of Sister Bay, Wisconsin.
Terry had experience with SIP construction. He and his crew were involved in the job for as long as we needed them to adequately address the unique problems of repairing a rotting SIP roof. The combined manpower of the two crews was enough to get the roof done quickly.
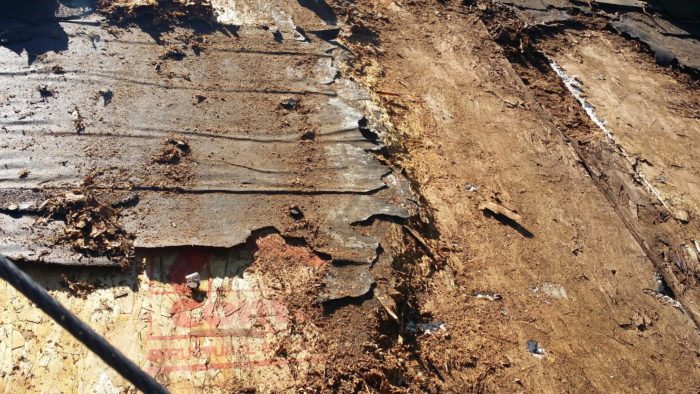
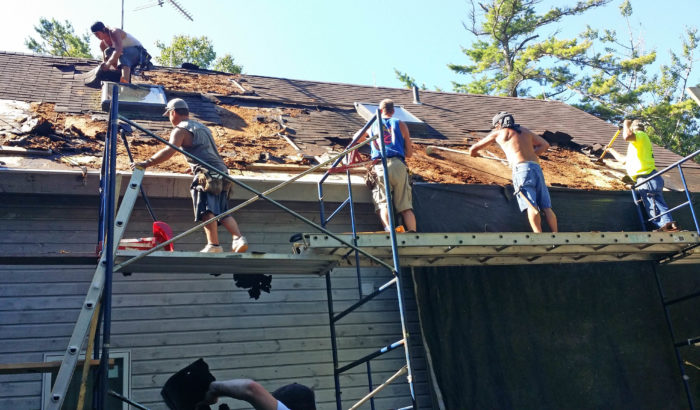
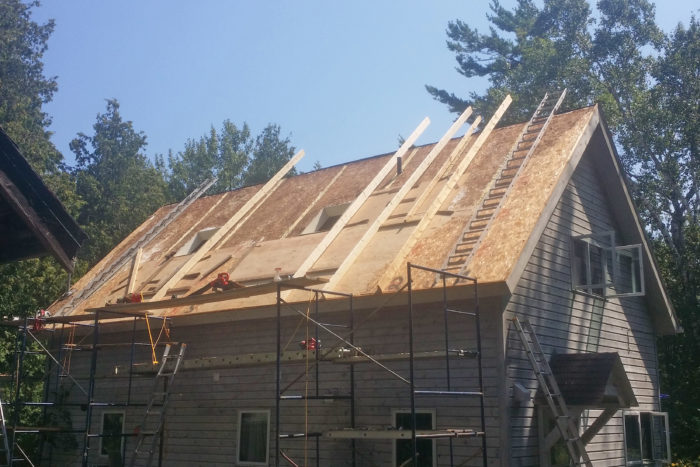
On August 1st, we set up scaffolding for the north-facing roof, which has a 12/12 pitch. Terry adapted two long ladders so that they could be hooked over the peak. The asphalt shingles were loosely attached and came off in large gobs (see Image #2 at the bottom of the article). We quickly learned that that the OSB was rotten — not just at the seams, but across almost the entire roof (see Image #3). Our plan for repair and cost estimates were discarded.
I found two garden hoes in the shed, and they became our most useful tool for removing the OSB chips from the EPS panels (see Image #4, below).
Adding canned spray foam to the SIP seams
I began to hope that all the OSB on the north roof was soft and rotten — that would have made removal of the OSB easier — but that was not the case. After the panels were scraped clean of the rotted OSB, they still looked like OSB, because the texture and color was embedded in the foam.
All the rotted OSB on the roof was scraped off the foam panel surface. We pulled the partially rotted 3 3/8-inch-wide OSB strip from the block spline of each joint.
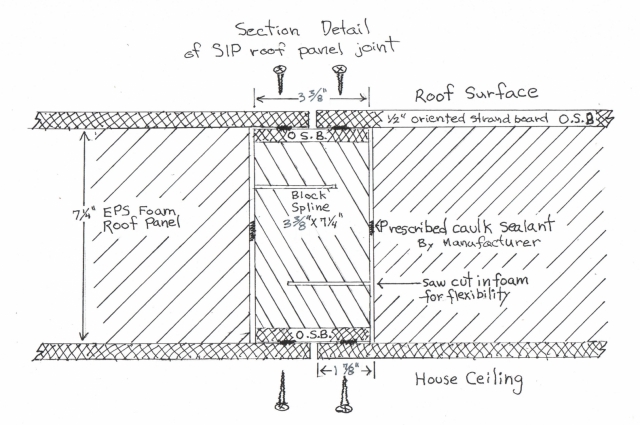
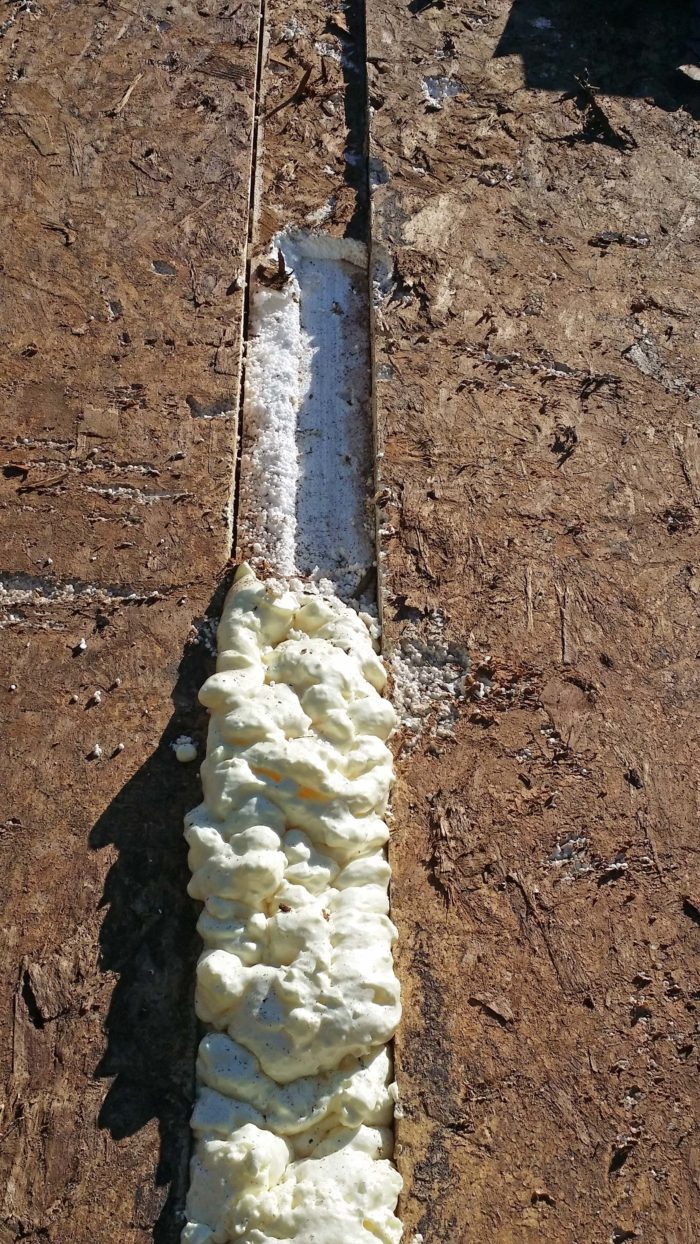
When these splines were manufactured, the foam in the block splines was kerfed with a saw to a depth of about 2 inches, presumably to give the splines some “give” (see the illustration above). We broke out 2 inches of the EPS spline, down to this kerf, to create a channel to lay down a layer of spray foam in the panel joint where there was once space that allowed interior air into the seam. I then drilled 3/8-inch holes on 8 inch centers, to blow Great Stuff canned spray foam into the space between the block spline and panel. (Canned spray foam produces more volume and cures faster if it is sprayed with a mist of water.)
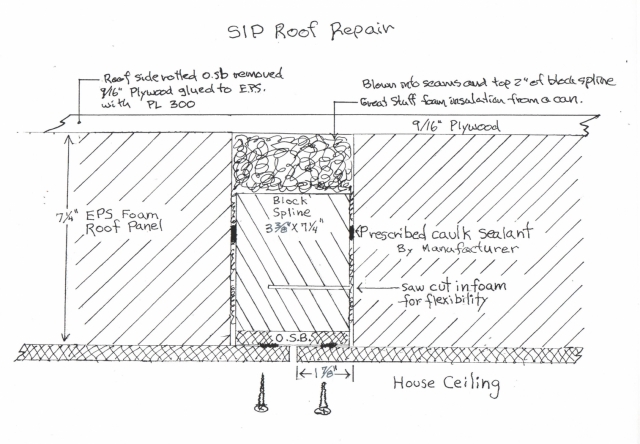
The illustration above shows, top to bottom: (1) the block spline with the 3 3/8-inch-wide rotted OSB strip removed, (2) the EPS foam broken out to the depth of the kerf, (3) the resulting space filled with Great Stuff canned spray foam.
Image #5 (at the bottom of the article) shows how we re-foamed the seam splines. A Japanese pull saw was great for sawing the foam flush with the roof once the foam had cured.
Gluing new plywood to the EPS panel cores
Once this work was done, the roof was swept and blown clean with a leaf blower.
We needed a system to apply pressure to the new layer of 9/16 inch plywood that we were gluing to the EPS panels. The roof was too steep for weights to be a reliable solution.
We talked about using 8-inch-long screws to go through the 7 1/4 inched of foam to the inner OSB (which was also the ceiling). We settled on an idea that used the 2x8s that were located in the ridge and at the eave for fastening a series of 18-foot-long 2x6s, on edge, using 8-inch hex-head wood screws (see Image #7, below).
We would lay down a grid of PL300 foam adhesive from a large caulk gun, match the surfaces of the rigid foam and the new plywood, hold them apart till tacky, and then reset the piece of plywood and quickly bolt down a few of the 18-foot 2x6s on edge over the plywood.
To focus the pressure on the glued plywood, we used 2 or 3 opposing stacked cedar shingles, and drove them together with a hammer until we had the plywood pressed against the roof. Glue setting time was 20 minutes. We ran the 4’x8′ sheets of plywood horizontally and avoided having a plywood seam break over the EPS panel seams.
The south roof wasn’t as rotten
The south-facing roof was in much better condition because the sun baked out more of the moisture from the OSB. Though the panel edges were swollen and crumbling, the OSB elsewhere was solid enough to be nailed into.
We decided to glue and air-nail a layer of 9/16-inch plywood over the original OSB (see Image #8, below). As I did on the north roof, I drilled holes on 8-inch centers along the panel edges to blow Great Stuff canned spray foam into the spaces between the splines and the panels.
Once we had new plywood on the roof surface, the rest of the roofing project proceeded predictably and quickly. The whole job took about two weeks.
We ended up with an unvented “hot” roof
One other approach that we considered, but did not use, would have been to strip the OSB, then glue 1×3 nailing strips on 16 inch centers, vertically, then nail or screw the plywood to them. This would have created ventilation channels for the roof. The ridge and eave would have had to be vented.
SIP roofs can get really hot. Installing asphalt shingles over foam insulation without ventilation channels can reduce the lifespan of the shingles. Some shingle manufacturers void their regular warranties on such installations. Providing ventilation channels would also have allowed any moisture that migrated through the panels to drain off or evaporate.
The ventilation channels would have kept the roofing shingles cooler, and would also have kept the outside layer of OSB (the nailing surface) drier.
Catastrophic rot
This project was a can of worms. Moist air movement in SIP seams can be catastrophic. I was so afraid that my roof was in terrible shape that I considered tearing off the roof and replacing it with an energy-inefficient roof.
I took a vacation from my regular life to be on site for this project. The two crews I hired were great to work with. Their philosophy was that they would find a way to solve the problems that came up, and they did.
The roofing crews tried to give us a quote based on what we thought we would find, but what we found was different. They adapted quickly. They were good at thinking and hashing out ideas in a genuine and diplomatic manner. Since I was right there, we made decisions in five minutes that could have taken hours or days otherwise.
This project took 14 work days to complete, but that time frame included 154 square feet of conventional re-roofing.
Advise to owners of SIP roofs
SIP construction requires extremely tight joints. Joints should be filled with foam continuously or at close intervals so that there is no chance for air movement. If there is any way to incorporate an air barrier on the inside surface of the roof, then that should be also be done — with great care and attention to detail.
Wiring and plumbing passageways in foam panels should be foamed-in where possible to block air movement. Indoor humidity levels in winter (especially in cold climates) should be monitored and controlled.
If you are not good at details or obsessing over a tight fit, then you should not attempt to install a SIP roof. But if your SIP roof has crumbled, my experience is that it can be successfully repaired.
For a SIP roof repair project, these questions must be answered:
- Is the roof structurally sound enough to be worked on?
- Can the upward/outward movement of moist house air be stopped?
- Can I find a contractor who understands this kind of work, who is willing to take on a project of uncertain scope?
For my project, we discovered a roof with no viable outside nailing surface. We were able to scrape off the rotten OSB and apply a new nailing surface on a 12/12 pitch roof. A small amount of the OSB was sound, so we had to fit the new plywood around it. We encountered the most difficult roof conditions and managed to prevail.
I feel that we have adequately addressed the causes of the failure and restored the roof to its original structural and functional condition. Let’s see if the test of time agrees.
____________________________________________________________________
Allan Poole is a Connecticut Licensed Arborist who lives in Middlefield, Connecticut. He has owned and operated his own tree service business for the past 36 years. He and his wife Nancy designed and built their own energy-efficient oak timber frame home in 1981.
Weekly Newsletter
Get building science and energy efficiency advice, plus special offers, in your inbox.


47 Comments
Allan
Thanks for the great follow-up. Good for you - that's a lot to coordinate and a lot of decisions to make on the fly. Glad it turned out.
I agree with Malcolm
Allan,
Thanks for your detailed write-up on this project. I especially appreciate the information you shared about the method your crew used to apply pressure to the plywood while the adhesive was setting.
Great Stuff Pro - vapor barrier ?
I have used a lot of rigid foam and Great Stuff Pro Gaps & Cracks (red can).
How confident are you the Great Stuff Pro creates an effective vapor barrier? I have not found vapor permeance figures for the line of products.
What I have found in the literature describes Great Stuff Pro as an "air barrier" and "weather resistant."
I have also read that Great Stuff Pro is a closed cell foam, so perhaps that is enough of an assurance.
Response to Erich Riesenberg
Erich,
I don't think that the vapor permeance of the Great Stuff spray foam is relevant in this case. What matters is air leakage.
If the air leakage can be stopped, then everything should be OK -- there isn't going to be much moisture moving through this roof assembly by diffusion.
Advice to owners of SIP roofs
Not also taping the joints sounds crazy to me.
Response to Jon R
Jon,
In his article, Allan Poole provided this advice to owners of SIP roofs: "If there is any way to incorporate an air barrier on the inside surface of the roof, then that should be also be done — with great care and attention to detail."
The usual way this is done is with SIP tape at the seams. Here is a link to one product that is often recommended for this purpose: R-Control SIP tape.
(In other words, I think that Allan's advice covered this point.)
RE Taping and Adhesives
Allan, Thanks so much for this report.
Nowadays, high quality air barrier tapes are available from Siga, Pro Clima and others. The industry seems to trust them, and they should be the solution for SIP builders going forward. As you've stated, injectable foam should be used in any voids as well.
In my experience with home-made SIPs, I would recommend Great Stuff as the panel adhesive as well. Polyurethane is what most of the SIP manufacturers use for the foam to wood bond, and it doesn't require the "contact cement" method you describe.
https://www.youtube.com/watch?v=9FABz-xEnQA
If the problem was vapor
If the problem was vapor passing through the joints, I would expect the disintegration and rot to be concentrated above the joints. However, it appears to have been fairly evenly distributed over the entire surface and not just over the joints. If it was vapor carried by air leakage, how did the air produce a flow? It seems to me that even if it were free to move through the joints, the roof felt, pressed down with the weight of shingles, would have created an effective barrier to air flow, both to passing through the felt, and also to the flow spreading out under the felt to cover the entire area. Air won’t flow into a space if it cannot find an exit path, or move in and out of the space by a convection loop.
I guess the damage is greater at the joints as indicated by greater swelling there. Maybe the airflow could not reach out to spread vapor to the entire field, but after depositing the water above the joints, the water just spread out by wicking action.
Response to Ron Keagle
Ron,
The type of SIP roof failure that Allan Poole describes in this article is well understood and well documented, most notably by Joe Lstiburek in a series of reports about the cluster of SIP roof failures in Juneau, Alaska, almost two decades ago. The mechanism for the failure is air leakage through the SIP seams (and in some cases, convective looping of interior air in air pockets at the seams), not vapor diffusion.
In all cases, this type of rot could have been prevented if the builders had included an adequate interior air barrier -- for example, by taping the SIP seams on the interior.
A few simple calculations will show that vapor diffusion through these panels or through the splines couldn't possibly transport enough moisture for the type of rot seen on these roofs.
You wrote, "It seems to me that even if it [exfiltrating air] were free to move through the joints, the roof felt, pressed down with the weight of shingles, would have created an effective barrier to air flow." You're wrong on this point. Asphalt felt and asphalt shingles are not an air barrier -- in fact, they are quite air-leaky. Remember, due to the stack effect, the indoor air near the roof is at positive pressure with respect to the outdoor air. The indoor air is eager to escape through cracks in the roof assembly.
No building scientist recommends the use of asphalt felt or asphalt shingles as an air barrier -- because these materials are air-permeable.
You're right that sideways wicking of the moisture in the OSB contributed to the rot in this case.
I thought the strength of a
I thought the strength of a SIP panel came from the OSB skins. Once they have rotted (either on just the outer surface or completely breaking up and delaminating from the foam) wouldn't the strength of the panel be compromised? I can see in the article that a lot of effort was made to weatherproof the panels and seams, but did additional support in the form of interior beams have to be installed?
Response to Scott Wilson
Scott,
The same thought occurred to me (and evidently, Malcolm Taylor) too. In the original Q&A thread started by Allan Poole, Malcolm Taylor posted this comment: "The panels rely on their exterior skin for their structural integrity. You need to get the manufacturer, or an engineer, involved to approve any remedial fixes."
To his credit, Allan Poole did contact the SIP manufacturer. As Poole wrote, the manufacturer's representatives "were quick to refuse any guidance at all. They advised me to look to the building contractor for solutions and seemed unwilling to acknowledge that their design was flawed."
It would seem to me that the structural integrity of this SIP repair depends on:
1. the size and orientation and strength of the new plywood panels;
2. the strength of the glue that was used to adhere the plywood to the EPS cores.
I'm not sure how an engineer would evaluate how such a job-site fix would compare to the conditions in the SIP factory where the panels were originally manufactured.
probably OK
If the worst case load is a heavy snowfall, the weight of the snow will help keep the plywood pressed against the foam, which would help prevent delamination or lateral slippage. So my guess is that it will be fine. Engineers don't like to certify designs based on guesswork, so my guess is that it would be hard to find an engineer who would be willing to sign off on it.
I'd say that 100% glue
I'd say that 100% glue coverage and contact (between the foam and OSB) is important to the structural strength. Given that's it bonding to weak EPS, the glue strength is pretty much irrelevant. I also think it's safe to say that the repaired roof is stronger than the rotten roof (which didn't collapse).
Risk
This is perhaps an entirely personal prejudice, but including a building assembly in your house which appears to be inherently risky, and difficult to remediate if things do go wrong, just seems like too big a gamble. I'm glad it worked out for Allan, but you wouldn't find me specifying SIPs no matter how many redundant layers of sealing they provided.
Sip Failure Repair
Martin,
I should not have used the term “air barrier”. What I meant was that the sandwich of upper sip OSB, roofing felt, and shingles would have offered a lot more resistance to the lateral airflow; as opposed to the resistance offered by the shorter vertical path through the open joint to the upper skin of the sip.
So my first conclusion was that the area over the joints should have more deterioration than the rest of the field. Yet those two areas were said to have been equally deteriorated. So, apparently the moisture spread out over the field from the joints, and the process continued long enough for the field to completely deteriorate even though the area above the joints deteriorated first.
However, it does appear that the OSB swelling is greater over the joints than in the field, suggesting that the deterioration of the two areas is not identical. It would be interesting to see what the top of the sips and joints looked like just as the roofing and felt were lifted off.
When I first read this piece, it raised several questions in my mind about the failure, the repair, the original installation, and the design and installation technique for the splines. I was particularly concerned with losing the structural integrity because of the complete disintegration of the upper OSB, as others here have mentioned. Certainly the OSB could be replaced with plywood, thus restoring perfect structural integrity. However, there would be a great challenge to produce an adequate glue joint in the field.
I also went back and read where this sip failure was first introduced in the Q&A section. I see there was discussion there about how the deterioration and replacement of the top OSB of the sips might involve engineering issues. In any case, I guess it is water over the dam now since the repair seems successful.
As a SIP builder and industry
As a SIP builder and industry insider, I've been intimately involved with this type of failure before. In the clear majority of cases, it's an improper install. However, here are a few other points:
In 1997, SIP tape and the detailing that included taping joints was just taking hold. This build was either not provided with tape or the installer ignored it. The SIP industry first began to recommend such details because of too many poor installs and a taped joint is far easier to inspect. It acts as a suspender to the belt that is the recommended internal sealing.
If a SIP enclosure or any high-performance system is detailed and installed to be both airtight and act as a vapor barrier (Like a SIP assembly typically performs), the addition of tape is not just unnecessary, it's detrimental to potential drying towards the "warm side" Hence, merely applying tape is not the panacea that some would suggest. A far better approach would be to test your assembly with a blower door (or similar) to verify proper air-tightness in your entire enclosure. The application of tape should be sparingly applied to only the areas that prove to be leaky or are known to be areas of potential internal failure.
The method of repair is as bold as it is questionable. A factory pressed SIP uses pressures that can be approaching 10PSI. If we do some quick math, you’ll note that a 4 x 8 stack of SIPs in the press could see the equivalent of 40K pounds uniformly being applied to the stack. This level of pressure could never be achieved in the field much less on an active roof assembly. Given the repair used a construction adhesive and not an “approved” SIP adhesive, the structural capacities are completely unknown. The repair may last a lifetime. I just wouldn’t want to guess whose lifetime we’re talking about.
The suggestion that “glue strength is irrelevant” is incorrect. In any SIP, yes, the foam is the weakest element. However, it is the strength of the bond that keeps the two skins in parallel while the foam defines the separation and completes the continuity of the structural assembly. In many ways, the strength of the glue defines the strength of the system.
The use of a single component foam in the joints is admirable but only if installed correctly. This material, when injected in an oversized crack, will not cure correctly and may result in collapsed foam and potential cracks. I suspect the dimensions of the void being filled would have been better sealed using a two-component foam system.
Lastly, this type of failure is not isolated to SIPs. If we look at the big picture, we have a failure of detailing for the climate zone, a failure of the installer understanding the most basic building science principles, a failure of the assembly being designed for durability by promoting drying, and a failure of the builder to test the assembly for air-tightness. Every one of these failures is happening on structures around the country as we speak. These failures will continue to come out of hiding (long after the structure is completed) as long as we push the envelope of performance without learning from our mistakes and using building science to guide us on the path to durability.
Response to Al Cobb
Al,
You're right that failures of unvented cathedral ceiling assemblies are not limited to SIP roofs. That said, this type of failure teaches us something about whether certain construction practices are robust or fragile.
You're also correct that there is no substitute for starting with a basic understanding of building science principles and an understanding of the importance of airtight construction methods. These understandings will guide us well, whether we pursue stick-built construction methods or use SIPs.
I'll leave it to GBA readers to reach their own conclusions, having read this story, about whether SIPs are a robust or fragile approach to residential construction.
Allan does not comment on the
Allan does not comment on the construction of the entire building. but since it is a remodel, the SIPs are probably not truly structural, in that they are probably laid over standard rafters. Looking at the long vertical layout would seem to confirm this. If this is the case I would not worry much about the structural integrity of the repair, compared to the large spans that a SIP is capable of. It would appear SIPs were used for labor saving, not structural need.
Sip support question:
The article says this:
“Though the outside OSB on the panels was structurally compromised, and the panel’s unsupported span was 16 feet in many places, structural failure was not a concern.”
It also refers to the panels being 16 ft. long, and spanning that distance from ridge to eaves.
The reference to the unsupported span of the sip being 16 ft. leads me to believe that there are no rafters under the sips. Can anyone please clarify this? I would be surprised if the sip panels are capable of spanning the 16 ft. and carrying the roof load with no structural framing support between the ridge and eaves.
But if the sips are supported by rafters under the sip seams, it raises a question about what the photos are actually showing.
If there are supporting rafters under the sip seams, the first photo suggests that the humps at the seams are not caused by OSB swelling, but rather by the sips sagging between the supporting rafters at the seams.
Detrimental Interior Seam Tape
Mr. Cobb, I'm not sure I understand your concerns about taping SIP panel seams. You state: "If a SIP enclosure or any high-performance system is detailed and installed to be both airtight and act as a vapor barrier (Like a SIP assembly typically performs), the addition of tape is not just unnecessary, it's detrimental to potential drying towards the "warm side"
Since SIPs are designed to be both structure, insulation and vapor barrier all in one product and SIP manufacturers recommend foaming all seams to prevent air and moisture movement through the seams why wouldn't you also tape all interior seams so that air and moisture can't get into the seams at all? If the moisture can't get into the seams (either from the exterior or the interior) then there wouldn't be any concerns about needing to "potentially dry towards the warm side".
Also, if your roof panels both have a lumber spline edge in them wouldn't it be extremely difficult to get an adequate foam seal between the panels? Wouldn't you have to use a seam tape in this case?
Scott
That caught my eye too. A blower door test captures performance at one moment in time. It provides a good snapshot of how well the building has been air-sealed, but it doesn't necessarily guarantee that it will stay that way over time, or reduce the need for redundant safeguards at what we know is an unusually vulnerable join.
response
Scott, The assumption that moisture can't get into an assembly because of an effective sealing detail is, in my opinion, a position that will bite you. Moisture comes in many forms and Murphy has a way of putting it in places we don't want it. Hence, I stress that detailing to allow moisture to get out is more important than detailing for trying to keep it out. That's not to say we shouldn't use proven water shedding and moisture resistant details. I'm taking the position that increasing an assembly's drying potential is paramount to durability.
Since no structure has ever been tested to show zero air-changes per hour, it should stand to reason that some air is leaking through the assembly in some location that may never be found or plugged. If that leak allows vapor to migrate into an assembly and it finds it's way through (And up, based on the stack affect) that vapor may condense and accumulate in an area that has little or no capacity to dry because of tape or some other form of vapor barrier. At this point, we have an accumulation of moisture with no potential for drying and that leads to articles like the one we're referencing.
The SIP industry uses many different types of sealing including foams, mastics, and gaskets. Knowing which one to use and where is the key to a good performing system. Layering tapes on top of an already properly sealed and air-tight joint is not improving performance but potentially reducing durability.
I find it disingenuous when the salesmen of high performance products (including SIPs) suggest that their system is, somehow, automatically more durable as-if to suggest high performance and durability go hand in hand. When in fact, these two attributes are diametrically opposed to each other. High performance goes hand in hand with air-tightness and when we reduce air movement through a structure, we have reduced the drying potential. The very drying potential that keeps assemblies from rotting under the accumulation of water.
You're correct Scott that IF we could guarantee that moisture could never get in, I wouldn't be opposed to taping the joints. I might not want to spend the money unnecessarily. But, I wouldn't object to its use. I'm just betting nobody will ever guarantee me that moisture wont find a way in.
Your reference to wood splines is exactly the type of joint that I described two days ago as "areas of potential internal failure". A lumber spline is not only harder to seal but it is more expensive and slower to install than the block spline detail used on our subject house. A good SIP designer and installer both know that a lumber joint should be used sparingly and extra precaution in sealing is warranted with a properly installed joint tape. Our subject home used no lumber between panels and a properly sealed joint (without tape) would have eliminated this situation. If it were my project, I would have also detailed some additional back ventilation to the shingles considering the climate zone. Again, I'm always looking toward increasing the drying potential! Think for a moment why the article described; The South roof wasn't as rotten. South facing roofs have more drying potential.
Malcolm, Yes a blower door will define air-sealing which is directly related to the building's performance. No the test results could not guarantee that the envelope will not change over time. However, if the test is performed properly and at least twice during construction, you get a pretty good shot at finding and sealing all the major sources of air-infiltration. It is the designer and installer who need to employ proven details and methods that provide a long term seal that (hopefully) maintains that initial Low ACH during construction. If your suggestion is that this homes roof used a vulnerable joint and should have used a redundant safeguard in the form of joint tape, then I'll have to disagree. The surface spline (Or block spline) joint is the least vulnerable joint due to it's lack of thermal bridging and the fact that its easy to seal for maximum air-tightness with either an expanding foam or a SIP mastic.
I have doubts Jon
Jon R.
I prefer to get my recommendations from a 3rd party based on scientific or historical evidence as opposed to the guy trying to sell me the product he carries. Having said that, I've used SIGA tapes on 2 Passive House builds and the product works very well. However, I did't install it on every joint for the reasons outlined above.
But, I want to respond to is your reference to Peter's article about SEE Stack. The reference to foam failure die to cyclical movement is, as Peter states, a hypothesized position. In fact, I would suggest that the T&G that penetrates the envelope is the primary problem. I've had this detail result in dripping condensate on at least 4 builds. I can't explain why it took 10 years to become an issue on Peter's project. However, I can guarantee you that wood T&G passing uninterrupted over the SIP walls to create the wood sofit will result in substantial air-leaks. These air leaks will lead to dripping in either the middle of summer or middle of winter depending on location. I anxiously await a definitive source or test that shows how foam, when properly installed, will over time crack to the point that air movement becomes a concern.
For anyone with doubts about
I agree, the structural concerns should be clarified - before others adopt this repair method.
For anyone with doubts about the use of tape on the exterior of SIPs:
https://sigatapes.com/siga-tapes-sips/
Interior concerns - read some SIP installation instructions. Four out of four that I just looked at recommended it.
For anyone believing that can spray foam that air seals today will continue to air seal indefinitely (not definitive, but it fits the facts):
https://www.greenbuildingadvisor.com/blogs/dept/building-science/see-stack-cool-stack-effect-tool
An adhesive like PL300 (and most others) has a tensile strength in the hundreds of PSI. Obviously far more than is relevant to a material with a tensile strength in the tens of PSI.
Al Cobb
I'll defer to you much greater knowledge of SIPs on the question of interior tape.
I'm not sure I share your more general suggestion that air-sealing makes high performance assemblies less durable. The drying path of most assemblies is one of diffusion through high perm materials. Relying on air movement as part of a drying strategy only makes sense when there is a ventilated cavity, such as a ventilated roof or rain-screen. Intentionally fostering air movement, as opposed to diffusion is a sure way to draw moisture into an assembly.
Drying to the Outside, Taped on the Inside
I would tape the sip joints with sealant at the interior side of the living space as extra insurance against sealant failure, or use tape alone as the primary air seal in that location. That would limit airflow carrying vapor into the condensing temperatures higher in the joint. If sealant was used in addition to the tape, I would locate the sealant near the tape in the lower part of the joint.
I would leave the roof side of the sip joints un-taped, also with no sealant in that higher location in the joint. That way, any moisture that happens to get past the barrier near the ceiling side of the sip joints will be able to freely dry outward through the joints, passing through the permeable roofing materials.
Response to Al Cobb (Comment #23)
Al,
You wrote, "When we reduce air movement through a structure, we have reduced the drying potential."
That generalization is untrue. In most cases, leaving air leaks in a wall or roof assembly is more likely to add moisture to the assembly -- make it wetter -- than sealing air leaks. Airtight walls and roofs perform better, on average, than leaky walls and roofs.
There has been a lot of debate on this page about how to detail seams on SIP roofs. To most building scientists, these issues are not as contentious or confusing as the comments on this page imply. I contend that these facts are well established:
1. To prevent potential moisture problems at the seams of SIP roofs, it's essential to provide an interior air barrier. The most common way to do this is to use interior tape at the SIP seams.
2. To provide a drying path toward the exterior, cold-climate builders should include vented air channels above a SIP roof. This is most commonly done by (a) installing a vapor-permeable roofing underlayment above the SIPs, and (b) creating 1.5-inch-high air channels by installing 2x4s on the flat, either 16 inches o.c. or 24 inches o.c., from the soffit to the ridge. Above the vented air channels, most builders install OSB or plywood roof sheathing, followed by roofing underlayment and roofing.
This advice is fleshed out in the following article: Air sealing SIP seams.
Marten, I absolutely agree
Marten, I absolutely agree that leaking air can add moisture to a wall but is it not true that this condition only occurs when a dew point can be reached. This condition may only be realized a few months out of the year. The rest of the time, the air and any heat present in that air is working hard to dry the assembly. This concept was first presented to me by Joe 15+ years ago when he spoke at the Structural Insulated Panel Association. It was his suggestion that many old buildings were surviving happily on the fact that they leaked air and thus remained out of trouble because (In his words) "the rate of drying exceeded the rate of wetting" By adding insulation and sealing up these types of structures it was proven to be the kiss of death because they began to rot.
We agree that airtight walls "perform" better than leaky ones. But only in the sense of energy performance. I'm not disputing (or attempting to be contentious) the performance but the durability of a SIP assembly given various details.
I may be in the minority, but I prefer to let the SIP assembly act as both the air barrier and the vapor barrier when possible. I do this by properly sealing the joint internally and then testing the assembly to confirm it was done properly.
I have personally witnessed skin deterioration behind joint tape. It was the the tape that caused the problem as opposed to preventing the problem.
Structural Question:
As I understand it, the double nominal 2” lumber embedded in the sip roof panels acts as structural support from ridge to eave, just like a roof rafter. Why is this structural lumber feature not included in the sip panels that are the subject of this blog piece?
In those panels, it appears that the objective is to splice in what amounts to another narrow sip section that in effect, makes the individual panels continuous. However, this does not add the structural effect of a rafter as the inclusion of 2” lumber would.
Can someone explain why the 2” lumber is necessary in some cases and not in others?
Ron
The strength of a SIPs panel is almost entirely in the skins. Like any (non vertical) element, it has a neutral axis in the centre of the foam, and the top and bottom chords bear the compression and tension loads. The material in between, in this case foam, is really only there to allow the assembly to act as one piece - just as the webs of a parallel chord truss do. The inclusion of 2x lumber has more to do with attachment than loead-bearing capacity.
Ceiling Beams
I think the best method of detailing a SIP roof (the choice of using SIP panels usually resulting in a cathedral ceiling inside) is to run the panels from eave to ridge in one piece and have all the panel side seams centered on ceiling beams. The pressure of the panel edges on the beams will also help to seal the seams and lessen or prevent any flexing of the panels along their lengths. Placing a strip of SIP seam sealing tape on top of the beam would just be added insurance. Attaching drywall to the underside of the panels would prevent moisture vapor from migrating through the interior OSB skin. Building a second cold roof on the exterior would also be added insurance. I can't see any way for moisture to get into the panels or seams this way.
The one thing I will take away from this discussion is the idea to replace the wood edging lumber with SIP splines. As long as the spline is over a beam I still get the benefit of having less thermal bridging through the panels and the beams will still provide the extra support. Wouldn't this method be an ideal solution?
Malcolm,
Thanks for
Malcolm,
Thanks for clarifying that. I understand the structural principle of the skins acting like truss chords. But using 2x structural lumber for the sip joint connection strikes me as less than ideal. It would seem to have drawbacks such as shrinkage that would break the sealant bonds, and thermal bridging. I assume there are several different methods of the seam attachment, and maybe the structural lumber connectors are not that common.
The type of spline connection shown in the sketches with this blog seems ideal if the sealant is properly applied. Pumping foam into holes to fill a machined out void seems like it would be difficult to control. I don’t understand the purpose of those saw kerfs shown in the drawings of the splines above. I see that some sips have a large tongue and groove in the adjoining sip sides.
Ron
I keep dipping in and out of this thread because although I know a fair amount about structures, a little bit of building science, I don't know much at all about the intricacies of SIPs - or have any useful answers to your last interesting questions. Hopefully they will be answered as this discussion goes on.
Malcolm
Your description in post 30 was spot on until the last sentence. SIPs are structural and have the capacity to span known distances based on loading, thickness of panel and TYPE of joint. The subject roof in this blog used a thickness of panel that was capable of handling the loads over the specified span without using dimensional lumber in the joint. Hence, the SIP is doing all the work. I'm a big fan of this design as we don't have the cost and thermal bridging of the lumber. the "block spline" joint (Or similarly the surface spline joint) allow uninterrupted foam that delivers greater thermal performance and is easier to seal internally. The connection of panel to panel at the in-plane joint can be accomplished with either type of joint and will allow the entire roof to act as one diaphragm.
Lastly, I'm with you on the confusion surrounding the saw kerfs in the block spline.
are there any 30 year old sip
are there any 30 year old sip roofs out there that haven't experienced a problem like this?
My aunt and uncle are undergoing the same nightmare in their 20 year old post and beam house, the roof sheathing is mush.
If the panels are strong
If the panels are strong enough to carry the span load from ridge to eave, I assume that the only reason to interlock their side joints is to create a bridging effect, so that a point load on one panel will be borne somewhat by both adjoining panels.
Otherwise, point loads, such as a person walking on the roof, would cause the panels to deflect individually, and induce shear stress on the roofing, which could damage it over time.
Response to Trevor Chadwick (Comment #35)
Trevor,
Yes, there are 30-year-old SIP roofs that haven't turned to mush. The most durable roofs are those with an excellent interior air barrier (confirmed by a blower-door test) and with ventilation channels between the top of the SIPs and the roofing.
That said, I am hearing more and more reports like yours -- reports of rotting SIP roofs. We need to share these stories widely. Only when the risks of any building method are well understood can we avoid future failures.
We used a lot of SIPS on
We used a lot of SIPS on timber frame homes in the 80's, and were careful to follow most of the manufacturer's recommendations. I say "most" as we never actually vented the roof. In the early 90's we started to see these SIPS failures (on other houses, not ours) and started learning repair techniques; all of which included venting the roof. (I should note that all of the manufacturers we worked with also told us "this was the first they'd heard of the problem" and "had no idea how to do the repair"- not helpful) Ten years ago we did repair the roof of a Bensonwood house which we had GC'd when new, which had the beginnings of the problem. On this house, the SIPS were installed by the most experienced SIPS installer in the area, (one we used regularly) and the installation was flawless; the cause was not installation failures.
One issue is that In timber frame houses, interior tape is impossible to install if the panel is landing on a beam.
My takeaway is that the seam closure used in most installations is spray foam, but spray foam can and does crack with movement. And houses; especially roofs, move slightly over time; cracking the foam joint and opening a path for air movement.
An EDPM gasket, such as those sold by ConservationTechnologies, applied to the top of a beam would greatly help with air sealing in the interior of the panels.
The ideal repair would first repair the panels, then then air seal the exterior by a installing a second layer of fully taped sheathing, then venting the roof.
From a Structural Insulated Panel Manufacturer
My name is Charles Leahy and I am president of Eco-Panels, a closed cell polyurethane structural insulated panel (some call "SIP") company - http://www.eco-panels.com. My educational background is applied physics - and I come to the building industry from the Tech Industry, not the construction industry, and I find that my physics and hardware tech background helps much in understanding many of the problems - and opportunities - in the construction world today. We have shipped our panel product all over the world, from deserts to polar regions, from tropical to arid, and this allows us to learn about more environments and site conditions than most will ever encounter. Stories like these are much appreciated to those of us with intimate knowledge of the industry and the product. I am very sorry that this manufacturer did not stand behind their product. For those of us trying to make the best product on the market when we see poor product design, (in hind-sight) poor installation and then poor company follow-up it does not at all help to promote alternative building systems. I believe this story is again another reason why "sips" remain on the sidelines in much of the industry - great idea, poor product and poor execution of both assembly and support.
I count ourselves fortunate in that we have been able to learn from the mistakes of both ourselves and others and have tried our best to learn and adapt in response. I believe we were one of the first on the market that required joint sealant at both the interior and the exterior seam of our panels because we understand that moisture/vapor drive occurs not just from the outside in, but the inside out (and a bead "down the middle" will never suffice) and our panel profile allows for this specifically, and now we have changed our guidelines even further to require taping with non-permeable tape - where possible - the interior seams of the roof panel joints (there are exceptions but this is now the general rule). I do not understand why some in the above comments do not advise this, but we do. Moisture on the interior of the building envelope should be handled exactly there - on the interior - with mechanical systems.
I also question the willingness of selling panels for as many applications as I see or hear of them being employed every day. Just because a panel CAN do something doesn't mean it SHOULD do something. Hardly a week goes by where we are not talking clients out of using our panels for flooring (inside of conditioned space! - because the competing company offered them), or for roofs (it often does not make sense). There are times indeed where this may be appropriate, but we believe that often the best solution is one which involves several different technologies working together instead of just one. As this example reminds us, roofs are not simple things. And what happened here can happen over attic roofs as well as vaulted.
Regarding taping the outside seams of the roof panels - we do not require this but we do believe in having an active discussion with the builder. Was it raining before the overlayment was put down? Are you locking in moisture? Could a semi-permeable tape - instead of a non-permeable tape - be the right solution JUST IN CASE moisture rises into gaps between the panels - or is trapped at the install stage - so it still has an opportunity to get out? Or should we have no tape at all on the top surface? If we are using Huber ZIP as the top skins of our panels (and this is not warranted by Huber BTW) would you use their tape (after reading this discussion) or a different tape? Of course it very much helps this discussion if your product design itself allows for fewer opportunities for error in the assembly process, which is where we should be pushing the discussion. Better design => better outcomes on a more repeatable basis.
And Again...
What I find problematic about all the discussion around sealing SIPs is that they are not a new product. I knew a builder who lost his company to a SIPs roof failure over 20 years ago (a project on which he diligently followed the manufacturer's guidelines). Yet here we still see differing opinions on how to make sure they will not fail.
It's fine to dismiss the problems as being due to a poor manufacturer or installer, but the reality of the building industry in North America is that product or processes that demand a very high level of craftsmanship or knowledge are going to fail at a steady rate.
Deciding to use SIPs on a project needs to be done with your eyes open. You need to ready to accept there is a good chance of failure which will be difficult to remediate.
OSB failures
Mr. Cobb,
I have seen numerous times OSB failures with SIP installs, and it wasn't the installers fault. It IS the inherent design of using SIPS - a single straight seam that connects the outside to the inside.
Mr. Leahy - Warm, moisture laden air is bound to make it into the gap between panels.
If moisture gets trapped at a seam (under the tape), it can still create condensation under the tape because of the warm air meeting the cold air. Tape on the outside doesn't solve the problem on it's own. For over 20 years I've wondered why the SIP industry can't address the single link from the outside to the inside?
Are there no ways to provide overlapped interlocking joints to reduce or eliminate air travel?
Anyone that has tried to get the seams between the panels sealed adequately with foam into a blind seam, knows it isn't easy to ensure the install is done correctly. Whether the seam uses foam or rubber as it's seal, it's not perfect, and the structural detailing with plates and, rafters/roof panels, etc - only makes it harder to get right. There are too many single pathways to failure for my liking to ever suggest SIP's as a viable building technique today.
My experience with asphalt
My experience with asphalt shingles is that they eventually fail and this sometimes results in the need to replace some roof sheathing. What do roof SIP manufactures say about this?
It would be interesting to see more discussion about using EPDM gaskets vs spray foam (which AFAIK, doesn't even have an ASTM C 719 or similar movement rating).
Jon
That's an interesting point. Most re-roofing bids include a 5 to 10% contingency to replace rotted sheathing.
Response to Mr. Hardie
Yes sir I agree with you that poor panel design can be inherently problematic. Our panels have a multi-laminar edge (think of putting the knuckles of your two hands together) and it is foam to foam that compresses, so we are trying our best to make the install more reliable. We agree with your - and others - contentions that the "sip" industry has been trying to figure this out for far too long. But polyurethane panels can do a lot that EPS panels can not (or do not) easily do. The refrigeration industry has been using cam-locking polyurethane panels for 50 years for grocery & restaurant walk-in coolers - we are simply adapting that product to a house. No one knows better about interior climate control than the walk-in cooler industry and we have learned a lot from them. With that said, they also do not know how a house goes together or how to deal with lots of other issues, so we are trying to bridge that divide. But if you build your home like a walk-in cooler (or beer cooler as I believe one of the prominent building science guys say) you'll do pretty well.
Your discussion of tape I agree entirely with what you are saying but I think you miss my point.
Who's to blame for poorly sealed SIP seams?
The debate over who is to blame for leaky SIP seams have been going on for a couple of decades. Here's what I wrote on the topic in an article in the November 2003 issue of Energy Design Update:
“When SIP installers leave uneven gaps between adjacent panels, as sometimes occurs when installing very heavy panels, sealing seams becomes much more difficult. The challenges arising when installing large SIPs, especially long roof panels, are acknowledged by many builders. In an article in the Spring 2003 issue of OnSite@SIPA, the official newsletter of the Structural Insulated Panel Association, Michael Morley wrote, 'At about 4 pounds per square foot of panel, a jumbo panel weighs almost 800 pounds. Mechanical assistance is mandatory to move these things. … It is often necessary to nudge a panel the last few inches. Friendly persuasion from a sledgehammer and beater block can do the job. Try a nylon ratchet strap about 30 feet long to pull the panels into place. I modify the flat hook that usually comes with these things and open it up to about 85 degrees. It will grab a square panel edge better this way. Bring along your ropes, straps, big pry bars, come-along, and carts; and while you are on the road, maybe think about how you could modify that widget to work the way you want it to.'
“The decision by SIP manufacturers to establish as an industry standard the requirement that 'panel joints must be sealed in such a way to ensure no air infiltration or exfiltration' has the effect of shifting the burden of liability from manufacturers to builders. As long as this new industry standard remains in place, any SIP builder who questions the feasibility of achieving zero-infiltration seams has reason to worry -- including even conscientious builders fully equipped with sledgehammers, beater blocks, ratchet straps, ropes, straps, pry bars, come-alongs, and carts.”
NOVEL IDEA TO REMOVE OSB FROM SIPS:
Build or fit a router trolley over the affected areas and use the router to remove chunks of OSB. This would allow easy removal of not only the bad pieces, but sound pieces, such that perfectly square and/or rectangular sections could be removed, and square pieces of replacement material be put in place.
The trolley system could be manually operated by an operator moving the router by hand. Or it could be operated at a distance by wireless camera on the device and monitor/controls on the ground. If remote, software could tell the workers the exact size of material needed for cut and installation. Using GPS or laser proximety, it could also plot a full remediation diagram to scale.
The machine could have a vacuum hose, verses blowing debris all across the neighborhood or lawn.
A resonance sounding mallet could ride the same trolley, hitting the skins, determining and recording the vibration from a second probe in contact to determine what area was weak and what was solid, then use AI to give the operator a suggested area to clear, in which they could simply click "go".
Such a device could even allow cutting and setting in of increased panel-to-panel bridge lumber, to decrease panel deflectuon relative to one another. It could cut small grooves for carbon fiber cables to be impregnated across the panels to strongly retension them together, and with sealant, rejoin them as one solid mass. If a second layer of plywood was retrofitted over the original OSB, it could cut small pockets or grooves for placement of adhesive.
Lastly, the trolley could be heavy enough that it "weighed itself down" from movement, possibly tethered only from a high peak edge, and moved along by a raising system on remoted controlled wheels, or skyhook from ground aerial equipment.
Patrick A Perry
Paducah, KY
Roof repair of flat roofs can be a DIY project. Determine what material the substrate is made of and then choose the appropriate repair method.
Butyl Liquid Rubber is a coating chosen by many people to repair a leaking roof. Butyl Liquid Rubber is a one coat application that will take standing water 365 days a year. It water proofs within a couple of hours after application. Once cured it will form a seamless membrane. It is ASTM tested and Energy Star approved.
See link: https://www.epdmcoatings.com
Log in or create an account to post a comment.
Sign up Log in