

More Building Matters


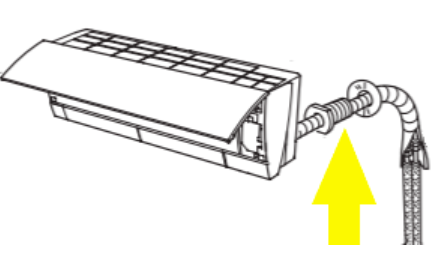
The simplest and most common spot to install a ductless minisplit heat pump head is on an exterior wall. Once the head’s location has been established, a hole is drilled behind the unit for refrigerant pipes, communication wire, and drain hose. Typically, this hole is 2-1/2–3 in. in diameter and slopes slightly downward to the outside to ensure condensate will drain well. The communication wire is fed through the hole and attached to the unit. Then, as the ductless head is secured to the wall, the excess wire, refrigerant pipe stubs, and condensate hose are fed out through the hole. The remaining connections are made outside the building.
The final step is to seal the wall penetrations, which is important for several reasons:
Energy savings. An unsealed hole will allow cold air to enter in the winter, and hot-humid air to enter in the summer, thereby driving up energy costs year-round.
Humidity and condensation control. Summer air leaking into the wall assembly behind the ductless head may cause condensation on refrigerant lines and other cold surfaces. Left unchecked, mold can grow. The outside air also adds extra latent load, making it harder to dehumidify the living space.
Vermin, dust, and pollutants. An unsealed hole is a superhighway for vermin—from spiders and insects to mice and small snakes. It also gives outdoor dust, pollen, and insulation fibers a path into the ductless head, where they can build up on the fan, coil, and filter and make their way into the living space.
Temperature control. Most ductless heads use a thermistor mounted inside the head itself, rather than a remote thermostat, to monitor room temperature. A poorly sealed hole behind the head can allow outdoor air to leak more or less directly onto the thermistor, wreaking havoc on the head’s ability to sense and control temperature.
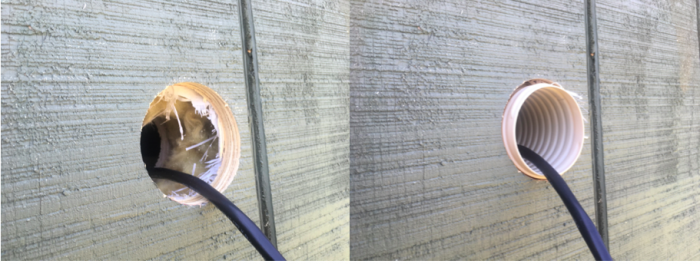
Sealing the wall penetration is straightforward in a wall filled with rigid material, whether it’s poured concrete, a structural insulated panel (SIP), or a frame wall insulated with polyurethane foam. Once all of the piping connections are made and tested, a generous squirt of expanding foam sealant does the job. The challenge comes with empty wall cavities and frame walls that are insulated with fibrous materials like fiberglass and cellulose. With nothing to contain the expanding foam, it rarely forms a tight seal. Even if the expanding foam does a good job of stopping outdoor air at the sheathing, the interior hole remains open to the wall cavity.
This is where the wall sleeve comes in. It’s a plastic tube that lines the passage through the wall cavity. I’m aware of three models from manufacturers Rectorseal, Diversitech, and Pioneer. They look slightly different but perform the same function. The Rectorseal model, which is the one I’ve used, telescopes to accommodate different wall thicknesses. The others are fixed tubes that can be cut to length with a utility knife. They all provide a rigid liner that can be filled with expanding foam to form a durable seal. Where rodents are a concern, I recommend stuffing the sleeve with copper wool before applying the foam. Although not necessary for air-sealing penetrations in a poured concrete wall, wall sleeves can be used in this application to protect line sets, insulation, and wiring from contact with sharp and corrosive materials in the concrete.
Detailing wall penetrations in this way takes little effort and comes with significant payback, which, in my opinion, means it should be standard practice.
_________________________________________________________________________
Jon Harrod is founder of Snug Planet, a contracting company in Ithaca, N.Y., whose mission is to reduce building energy use in ways that make sense for people and the planet. Jon holds multiple certifications from the Building Performance Institute and has published numerous articles on energy efficiency and green building.
Weekly Newsletter
Get building science and energy efficiency advice, plus special offers, in your inbox.


14 Comments
The sleeve is better than bare insulation, but it still doesn't address the issue of preserving the air/water control layer seals that can be well inside the wall system in some cases. I find that advance planning is the only way to go, employing one of the QuickFlash products, or something similar. In my projects, I typically spec. schedule 20 PVC pipe with a QuickFlash flashing installed to the WCL/ACL before any claddings or insulation are installed.. The cladding, insulation and finishes can then be installed around the pipe, with the pipe cut to length as a final step. If this is done at all utility penetrations, the WCL/ACL are preserved, and the conduit/pipe can then be sealed inside as the author recommends. Aside from nominal extra cost and labor, I've had little pushback with the trades, as most are familiar with installing sleeves through concrete before it is placed and this is the same concept.
This is a great point. In new construction or a deep energy retrofit the type of detail Peter describes is definitely a best practice. In a more typical retrofit scenario, we're generally not removing cladding or flashing the opening. However, we are caulking the wall penetration and covering it with a PVC wall inlet cover, which provides some extra protection against the weather. So far this approach has been trouble-free for us, but it does seem like there is an opportunity here to better preserve the drainage plane around these openings..
Jon, I absolutely agree. Integrating a retrofit penetration with the drainage plane is difficult or impossible. Frankly, that's one of my biggest concerns about the fancy wall systems we talk about here and elsewhere. We seem to be converging on a standard treatment where the air and water control layers are installed on the outside of structural sheathing, with several inches of "outsulation", an air gap with furring, and the cladding. That's all fine and even reasonably buildable, but we seem to be pretending that this ideal wall system will remain static for its lifetime. In practice, things change and walls get new penetrations. Often, these happen before construction is even over (whoops! forgot about THAT light fixture). Making these penetrations air- and water-tight is going to be a nightmare and because of that, it will never be done. That leaves the potential for particularly bad performance.
“[Deleted]”
Jon, can you or someone please link the PVC inlet cover you’re speaking about. Thanks
Hi Will,
This is the product we use; it is a part of a system of lineset coverings:
https://rectorseal.com/slimduct-3-75-wall-inlet-white-100/
Got it. I thought this was something separate that would go under the line set cover. Are you using additional electrical putty over the line set coming out of the foamed sleeve, under this cover? I had also purchased liquid flashing and was thinking about using that on top of the line set.
“[Deleted]”
My mini split came with one, but it was at least a foot too short to make it through the wall. Had to use ABS pipe instead. The air barrier and vapor retarder is the interior sheathing, so sealing it up wasn't a problem.
I'll use a piece of 3" - 6" PVC drainage pipe with a 1/8"- 1/4" slope towards the outside then use various ways to insulate / seal the pipe/wire/tube that is run through.
This blog brings up an interesting point about the location of air-barriers. While burying them deeper into the wall makes them less vulnerable to damage, it also means they are less accessible f0r repair.
I have an external air barrier around the whole house (Lstiburek's perfect wall concept.) But the foundation walls are ICCF block, and that's where the majority of the penetrations will be. Thoughts about how best to air seal these? I've looked at the LinkSeal/InnerLynx type, the gaskets, plain caulk or acoustical sealant. It's just not clear which is going to work best with an ICF block that has an external air barrier.
Here is an example I came across.
http://www.iowanest.com/index.php/2019/06/09/penetration-details-puncturing-the-envelope-of-an-air-tight-house/#more-308
I assumed ( ya ya I know ) my installer would use a wall sleeve but apparently the Mitsubishi 'diamond platinum ' installers had never heard of it.... The ones I ordered came late so unfortunately my install(s) look like the picture on the left and the way I see it there's really no easy way to install the sleeves after the fact.
Log in or create an account to post a comment.
Sign up Log in