

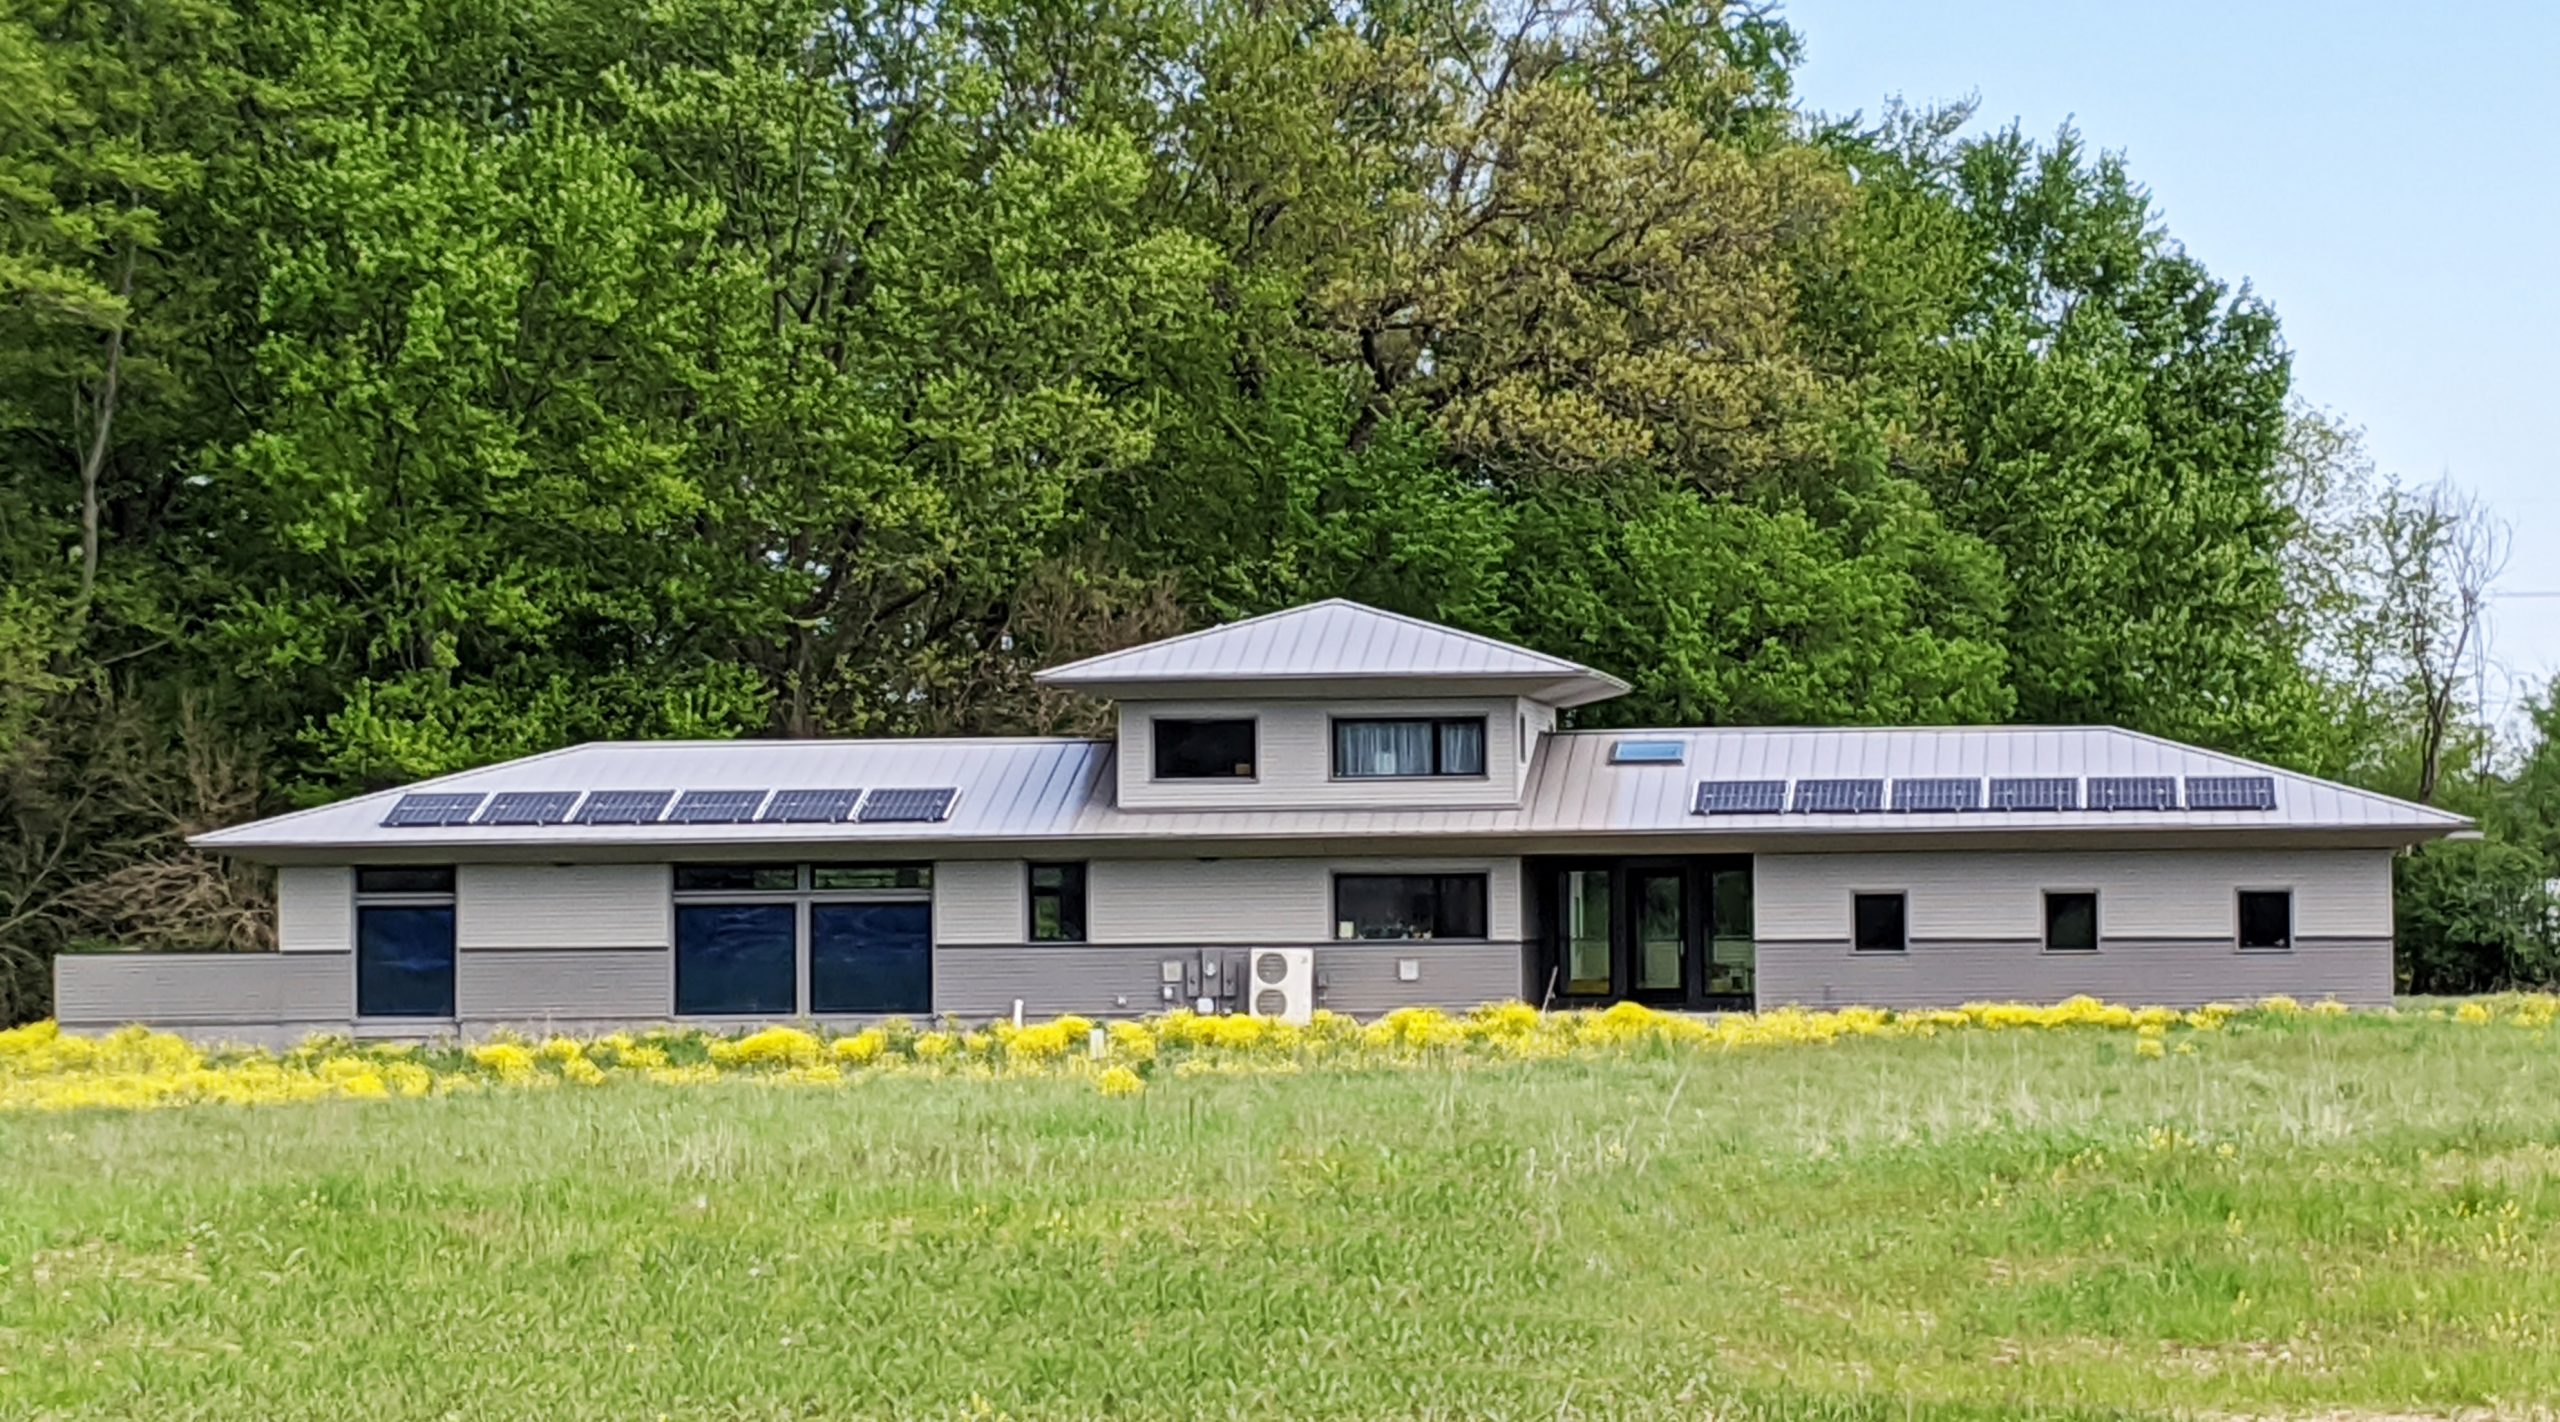
Everett Kramer is not a builder—by trade, anyway. Yet building science drives his every decision these days. He designed this house for his family, and is well into its construction. Located in Germantown, NY—climate zone 5—the three-volume shed-roof structure is intentionally simple for two reasons. First, it makes things easier for the first-time builder. And second, it supports Kramer’s hope for a carbon-neutral house operating at near-Passive House levels. He also admires modern design, and wants the house to be practical for a farming lifestyle.
Kramer put three years of research into his design plans, which include a 2300-sq.-ft. main house, a 430-sq.-ft. studio/office/guest house, 1000 sq. ft. of combination deck/patio space, and a garage.
Of course, cost was a consideration. “I spent a few years nerding out about Passive House and strategies for building a super-durable, low-maintenance home,” he says. “After looking at lots of options for prefab and predesigned houses, I decided I could save a lot of money on the project by designing and building it myself.”
Although he started out aiming for Passive House performance, his thinking changed after reading about the Pretty Good House on GBA. “That made a lot of sense to me—using Passive House principles but not being completely attached to all of it,” he explains. His mindset allowed for some flexibility, as in the case of the large lift-and-slide doors, which don’t meet Passive House standards but they enable the house to be smaller. When they are open, they create 10-ft. openings in two walls, which results in one large space connecting the main house to the studio. “We get this big house when everything is open in the summer and we are entertaining,” Kramer says, “but in the winter, we close it off and…
Weekly Newsletter
Get building science and energy efficiency advice, plus special offers, in your inbox.

This article is only available to GBA Prime Members
Sign up for a free trial and get instant access to this article as well as GBA’s complete library of premium articles and construction details.
Start Free TrialAlready a member? Log in


20 Comments
What window/door company did you end up going with? Considering lift-slide doors myself, would be interested to hear more about the installation process.
Hi Brian, I’m using Alu 75 doors and windows from Zola. They are great, but the install process is definitely challenging. We had a tech from Zola come for a day and walk us through it, I don’t know how it would have been possible without that. But Zola is a great company and it’s awesome that the tech is available.
Very interesting project! Many thanks to Kiley and GBA for bringing us such content.
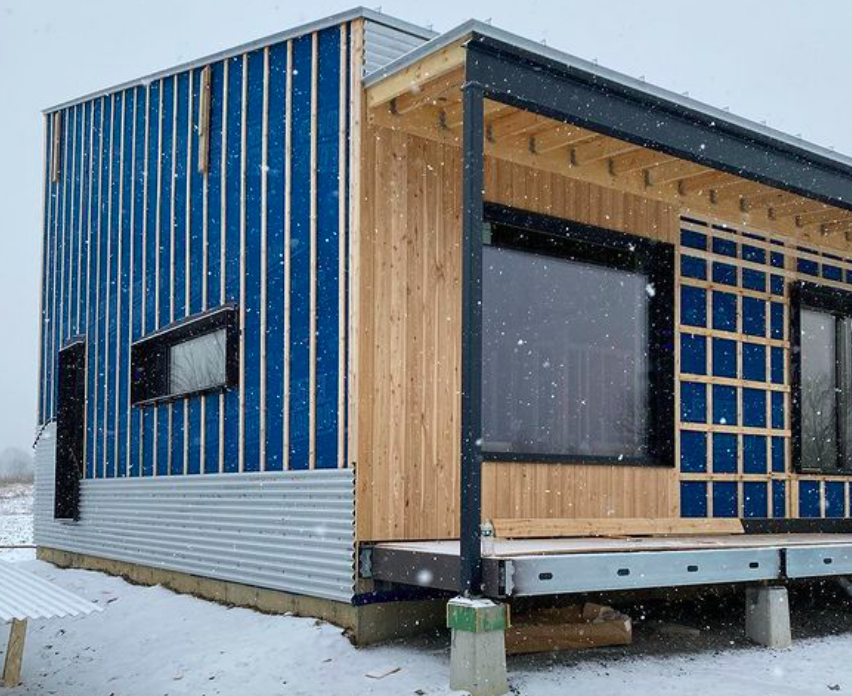
I’m curious about the rainscreen over the roof deck. Does this mean there is no ccsf below the roof sheathing and no rigid foam above? In other words does a rainscreen above the roof deck qualify this roof design as vented?
Thanks,
Aaron
Hi Aaron,
It's sort of a hybrid, we have 16" deep I joists forming our roof structure and those are going to be filled with dense packed cellulose. Our WRB, Solitex adhero completely wraps the roof sheathing and connects to the walls. The idea is that our WRB is airtight, but it's also vapor open. Eventhough it's not "vented" to air, water vapor can dry up through the assembly. The double rain screen should help to wick away that moisture. As the sun heats up the air in the rain screen it should constantly be drawing up and out and pulling with it any moisture.
Very interesting beginning to this series, looking forward to the remainder!
I know it's a sensitive subject for some, but I'd be really interested to hear what the estimated cost of prefab/pre-designed houses for this project was, vs. where the project is ending up, if Everett would be willing/able to share. I'm currently designing a home not far away (just across the Hudson River) and baseline pricing for a passive/PG 2,000 square foot 3BR/3BA house without garage, not counting septic, well, design/architect fees, permits, etc., is around $650k-$700k - and then add another 20+% to account for those additional items.
Prefab options like Ecocor Solsken, Brightbuilt, Unity, etc. bring that down a bit (something like 5%-20% from my inquiries, though I'm not positive since I decided to go the semi-custom route). I'm guessing this project will come in significantly below this range going the DIY route and making smart design/build choices, but I'm curious how large that margin is!
Anyway, just something I'm interested in since I'm in the market. Watching a lot of Grand Designs has been pretty eye opening too, given they are very open talking about budget (and the frequent overspend) on that show!
Either way, thanks for the post, and I'm excited to follow along.
Hello! happy to share. I'm not done with build, so it will be really interesting to get that number to you at the end. But, if we look at a completely weathertight and insulated shell with windows installed, and not include any foundation or site work, it's about $350,000, and $90,000 of that is the windows themselves. It's important to keep in mind though, I've been working full time on the house myself for the past 6 months, and outside of an engineer to put together consturction docs and a great passive house consultant, I did all the architectural work.
That’s great, thanks for sharing. Sounds like very solid savings doing things yourself. That’s really impressive you did all the architectural work, too.
Definitely inspiration for my next go-around - looking forward to the next update!
Grand Designs should be required watching for anyone who gets the urge to go build a custom home that's ANYTHING other than a basic box using box-store materials.
The level of hubris/ignorance of the people on GD almost never fails to impress me. You see business owners, middle managers, teachers et al blithely telling themselves they can 'save money' doing it themselves (which variously means hiring some random guys on an open-ended hourly basis to rank noobs who pound the nails yet who barely know which end of a hammer to use). Invariably costs skyrocket and the schedule blows out.
Saw a recent GD Australia episode where a '12-month $450K build' eventually took 6 years and $>900K. While that was one of the worst cost/time overruns, it's extremely common to see 25-50% overruns with many projects 'finished' to a very dubious standard because owners ran out of money. In almost every show, there's either no contingency or a ridiculously small contingency on a 'I have no clue what things cost' budget pulled from thin air. It's shocking how cavalier so many people are with what is typically the biggest purchase of their lives. Even worse is how many are forced to go deep into debt because they grossly underestimated costs - problem is once you've started, it's nearly impossible to stop because an unfinished home is effectively worthless - and an unfinished house is extremely difficult to get additional loans, and resulting financial pressures push dubious decisions.
Reality is it's extremely difficult for inexperienced owners to match prices a contractor would otherwise charge. What most people seem to fail to appreciate is the difficulty of managing the builds in a cost-effective manner - it's not something you can just 'wing it', although many nevertheless do.
It's an absolutely fascinating show, both from a psychological and engineering perspective. Some of the boondoggles people get themselves into are remarkable. And on the other hand, the deep dive into engineering the show goes into on some of the builds is also really interesting. Some of the techniques used I've never seen elsewhere (like the Kent Eco Arch episode), and the commercial architects who design their own houses do some pretty cool stuff engineering-wise.
I realize we're totally off topic here, but it's totally worth a watch for anyone who enjoys this site... a few favorites of mine that are on Netflix (2 of 20 UK seasons are there and on Amazon):
S10 Skye: beautiful, simple, feel-good episode (also the first time I'd heard of a blower door test)
S15 Malvern: guy doesn't know what he's doing, has a bad time
S15 Blackdown Hills: house design inspired by ammonite
S15 Herefordshire: crazy long, ambitious project
Anyway, all of this is to say, Grand Designs helped dissuade me from the notion that I could build my own house, at least without a ton of research and legwork like Everett has done. It's clearly possible, but takes appropriate preparation (and the right situation) for it to go well.
Everett,
Nice project, with some really well thought out details. I particularly like the idea of raising the slab, and continuing the exterior wall down outside it.
I hear builders speculate about drywalling before interior partitions, and can never quite understand how you could sequence that. I suppose it might be easier for an owner/ builder, but I still have a hard time wrapping my head around the logistics of roughing-in services in the exterior walls and making them continuous with those interior partitions, as well as the scheduling of all the trades (plumber, electrical, boarders) who will have to make twice the trips. The benefits don't seem worth the increased complexity.
Good points Malcolm! With the central mechanical block design, all of our plumbing is in internal walls, so that part isn’t a concern. But our electrician is not that psyched about the idea. I think I can convince him though! We’ll see. Luckily everyone on our project is local and primarily are single tradespeople so they are a bit more flexible about multiple trips.
Everett,
I'll be interested to hear how it goes. It may be easier than I think.
Looking forward to Kiley's next update.
Everett,
Great work on your build!
Venting your roof above the sheathing rather than below is certainly an unconventional approach. But cellulose adds resiliency and Im sure you will do an excellent job of providing a bomber air barrier on the underside of your I joist rafters.
If you haven't insulated yet, it would be great to attach moisture sensors to the underside of your roof sheathing for ongoing monitoring. If this assembly can succeed (as I suspect it will) then it constitutes a much more simplified method of building cathedral ceilings.
Thanks! Yes, I’ve definitely been thinking about sensors and where to put them. I’ve been looking at Omnisense, if anyone has experience or advice on sensors and best locations, I’d love to hear it!
The roof assembly is not much different that an air-sealed baffle, as described in this FHB article:
https://www.finehomebuilding.com/project-guides/roofing/ventilation-for-the-prohome-roof
The FHB assembly is ventilation baffles built out of ZIP sheathing with joints sealed with can foam. Celluose fills the bays. I've brought this up on GBA before, and from what I have researched, the FHB house assembly is not an accepted best practice as the ZIP is not "vapor open" as, say, a piece of cardboard.. Not any different than decking the roof with zip and filling the bays without venting, and a rainscreen roof, in my judgement. And yet it's published in FHB, so who knows, maybe it works.
Tim,
The fundamental difference between roofs vented below or above the roof sheathing is that the moisture in one vented above has to move by diffusion through the sheathing before it can be dispersed by the ventilated air. With a low perm material that is very difficult, so I'd argue that a roof sheathed in Zip behaves quite differently depending on where the ventilation occurs.
I agree. The roof ventilation is probably most effective placed below the sheathing using highly permeable baffles. Vapour-closed baffles mean the moisture has to rely on moving through the framing members to escape.
Unrelated to the moisture from the interior, is whether creating a cavity between a metal roof and the sheathing isn't setting up a gap the will cause more moisture to condense due to night sky radiance. My own feeling is: no gap = no moist air.
As a side note. I'm not convinced air-sealing the baffles makes any appreciable difference. It seems like a lot of work to gain a secondary air-barrier, and prevent wind-washing, which doesn't affect most types of insulation.
Everett,
Normally, the ridge sees the most risk. In your case, I would add one to the underside of the roof decking (plywood) on the high side of your shed roof.
Placing one above bathrooms and one above the kitchen might be useful as well.
Tim,
Good point and I agree. I think I'd rather use something that is either vapor open or a material that is not as suspectable to moisture damage (like a plastic). I wouldn't use OSB for that purpose if it were me. (No offense to the builder in the article. I've met him and he is a very, very good dude.) The baffles aren't structural but I still wouldn't want to risk a lot of sorption in the OSB.
Rick,
Using something like OSB as baffles also represents a huge increase in both the materials and labour necessary to build the roof.
This post is almost a year old. Is there an update to this project? How did it turn out and are there any lessons learned after living in it?
Log in or become a member to post a comment.
Sign up Log in