In March of 2019, at the Johnson County, Kansas seminar for Continuing Education for Licensed Contractors, I met a guy selling something. That guy was Joe Nickels and what he was selling was high-performance building products like Alpen Windows and Zehnder HRVs and ERVs. He had a booth, as many do at these functions, and I asked him for his thoughts on Aerobarrier. My business partner Joe Cook and I started discussing air sealing with Nickels and a number of building science related topics which led to me lamenting the great and inconvenient distance between Kansas City and Portland, Maine where the first BS* + Beer discussion groups were happening. Joe (Nickels), Joe (Cook) and I agreed that we would probably never get to make one of those meetings so Nickels suggested we start our own group, locally. We held our first meeting in April of 2019 and have been enjoying monthly presentations and discussions ever since.
We were uncertain of the level of enthusiasm for, and depth of understanding of building science here, so we deviated from the format Mike Maines and Dan Kolbert had been using by opening our meetings with a presentation by an expert followed by a substantive discussion with all in attendance having at least a baseline understanding of the topic. This educational element has been tremendously popular and I think we’ve all learned a lot from these presentations and even more from each other.
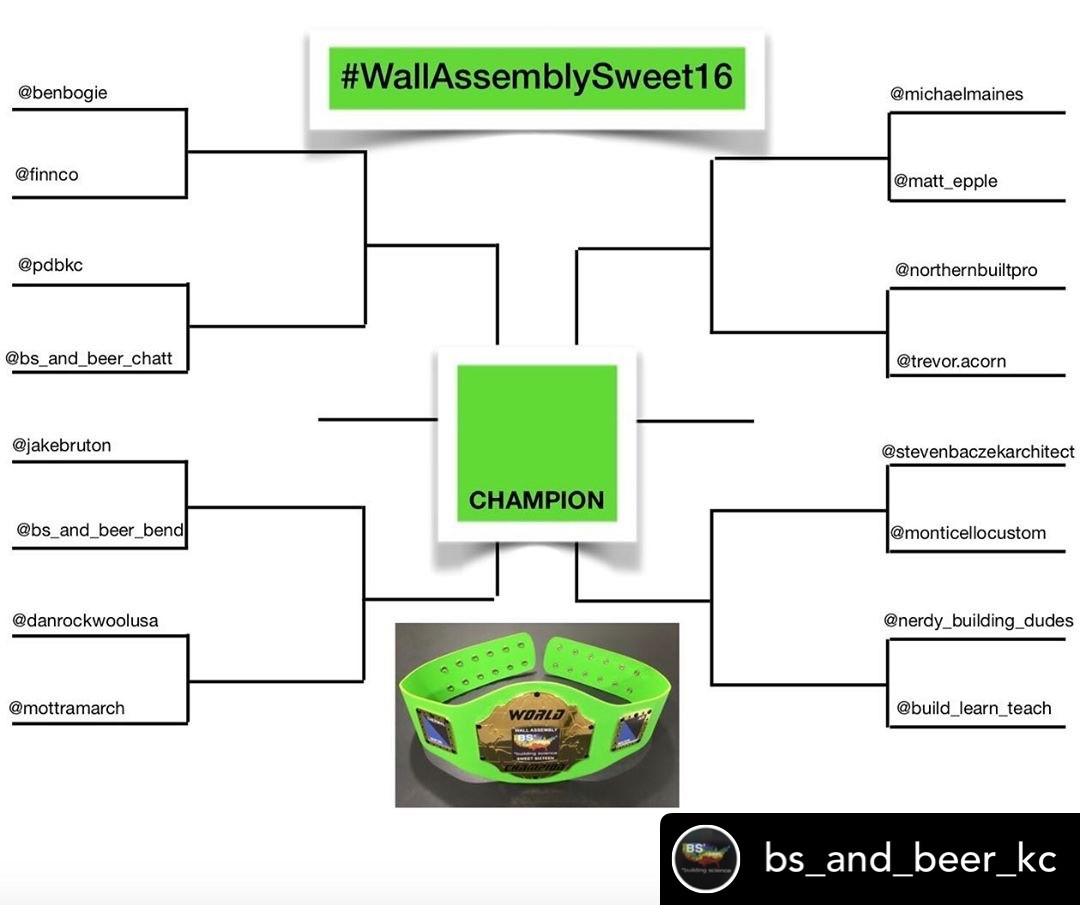
As Joe, Joe, and I began to invest in planning these events and organizing presenters we found that there was a tremendous enthusiasm not just for the learning and discussion, but for the fellowship and social aspect of gathering with our peers. The fun of talking through projects and problem solving with crowd-sourced knowledge led us to seek ways to stay connected between meetings. We were already offering some opportunities for this through our Instagram page and I thought it would be fun to get something going on social media that could engage the other BS* + Beer groups as well as any other building science enthusiast, so we hatched the #WallAssemblySweet16 competition.
The plan for the competition was simple: anyone who posted a hand-drawn sketch, CAD drawing, Sketchup model, mock-up, or real build photo of their wall assembly to their Instagram page with the hashtag #WallAssemblySweet16 and @bs_and_beer_kc tagged would be entered. The first 16 walls submitted would be included in the competition, which would allows us to have a tournament-style voting process.
Since the typical comparisons of performance, durability, cost analysis, and ease-of-construction vary from market to market, climate zone to climate zone, and crew to crew, there was no way to select a real best wall assembly. Instead, this is intended to be a vehicle for education and discussion with a strong possibility of spirited debate. The winner will be established by tabulating votes cast via Instagram leading up to our April 28th meeting. The real fun of this isn’t the trash talk from one entry to the next (I see you Bazcek, Bruton, and Bogie), the voting, or even awarding the prize (pictured above). For us, it’s going to be discussing the merits and drawbacks of all the assemblies.
With that, I reached out to GBA to see if we could share the assemblies that have been entered here, another place where great building science conversations are happening. You can place your votes in the comments below and we’ll see if they align with our winner, which I will circle back and announce at the end of the month. So, here are 16 wall assemblies for your consideration.
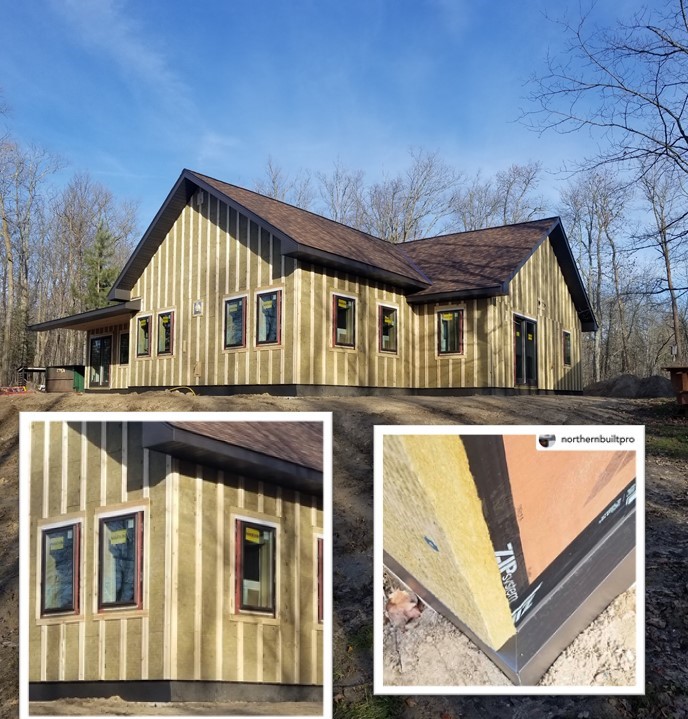
The first submission came from Ben Bogie, the lead carpenter for Kolbert Building in Portland, Maine which shares many of the details from Dan’s recent GBA article.
From Ben Bogie: A double-stud wall for a colder climate with Siga taped base joint, a rainscreen cavity that is connected to attic to promote convective drying, plywood window bucks that are 11 7/8 inches for economy of material use, and a dropped inner wall that creates a service chase from walls to ceiling for ease of wiring.
The next submission came from Randy Williams who provided photos and information about his concrete-less slab-on-grade house featured here at GBA, and also in his presentation at our February meeting.
From Randy Williams: From the outside in, these walls have LP SmartSide, 1×4 vented rain screen with CorAVent bug screen, 2 inch Rockwool Comfortboard 80 continuous exterior insulation, ZIP System Sheathing, Thermalbuck 2 1/2 inch window buck, 2×6 framing with R-21 fiberglass batts in the wall cavities, Intello smart vapor retarder, and drywall. Vapor open from the ZIP out and vapor permeable (up to 13 perm) inward to drywall.
At his point things started to get a little heated when Steve Baczek got in the mix. He’s as sharp as they come and enjoys getting the competition riled up so his submission came with a little trash talk to accompany the description.
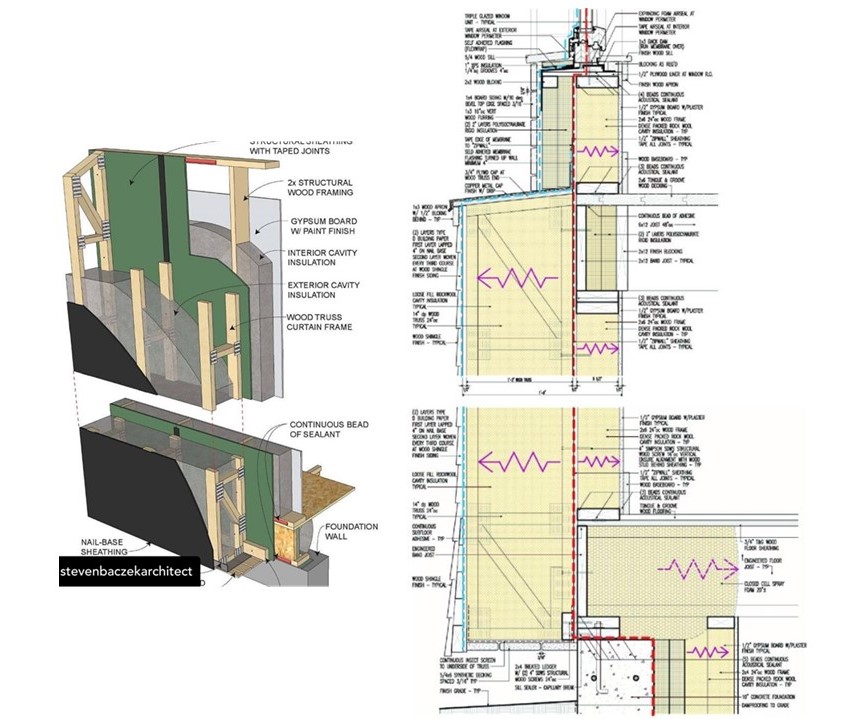
From Steve Baczek: This 2×6 wall is framed 24 inch on center with a 14-inch deep wood truss hung on the outside. The air barrier is embedded in the middle of the R-79.9 wall. The cavity insulation is air-permeable blown Rockwool (both stud cavity and truss cavity) that allows drying in both directions. The truss cavity is a water managed cavity with the ability to drain and dry. Upon completion the residence had an average blower door of .35ACH50…Long Live Our Buildings!
With some heavy hitters of building science already in the mix I was worried that our local members (namely myself) might be too bashful to put their ideas out there, but the messages rolling in showed no evidence of intimidation—just enthusiasm. Similarly fearless were Matt Blomquist, Dan Edelman, and Jake Bruton who got right after it with their assemblies.
Matt came in with a solid answer to Steve’s submission citing his real-world construction of this assembly, built by his Taylorville High School students. It actually looks great on his Instagram post as it’s a whole Sketchup video walk through of the details.
From Matt Blomquist: This assembly was built by my Taylorville High School students. Let’s call this the “Keeping it simple” wall. It has 2×6 studs 24 inches on center with R6 ZIP insulated sheathing, R23 Rockwool in the cavity, closed-cell spray foam in the box sills, open-cell spray foam above the top plate for insulation and to prevent wind washing, rainscreen added before lap siding, and triple-glazed Marvin casement windows. It was designed and built for Climate Zone 4. Blower door test (depressurized) on the envelope with windows and doors installed scored .58ACH50.
Dan Edelman also had a nice set of details as well as a thorough, but concise explanation of the methodology behind his submission.
From Dan Edelman: This is the VOAT wall, or Vapor Open, Air Tight assembly, and my 4 season wall assembly, as most of us have different seasons. Why are we building for one season only with vapor barriers that can be on the wrong side of the wall for another season? My ideal wall assembly would actually only have an R-15 interior of Rockwool Comfortbatt with no vapor retarder. Between the studs and the drywall is an air barrier that is taped to the the floor and continuous. A 2×3 chase would then be in front of that for wires, plumbing, and electrical boxes so insulation and air barriers have zero holes. Next on the way outward would be plywood as plywood holds on to moisture way better than OSB. On the plywood, I’d install Henry’s Blueskin VP100, with a perm rating of 30 and self-sealing characteristics to reduce air penetrations. A double layer of 2-inch Comfortboard 80 to get you an R16 outbound and increase the drying potential being vapor open. Then 1×3 strapping and siding. The reduction of interior R-value will keep the sheathing warmer reducing potential condensation issues, still with 50/50 insulation split inward and outward. The amount of continuous insulation will keep the dew point temperature out of the cavity for even the coldest climates. R-value won’t decrease over time with Rockwool. It also won’t shrink or off-gas.
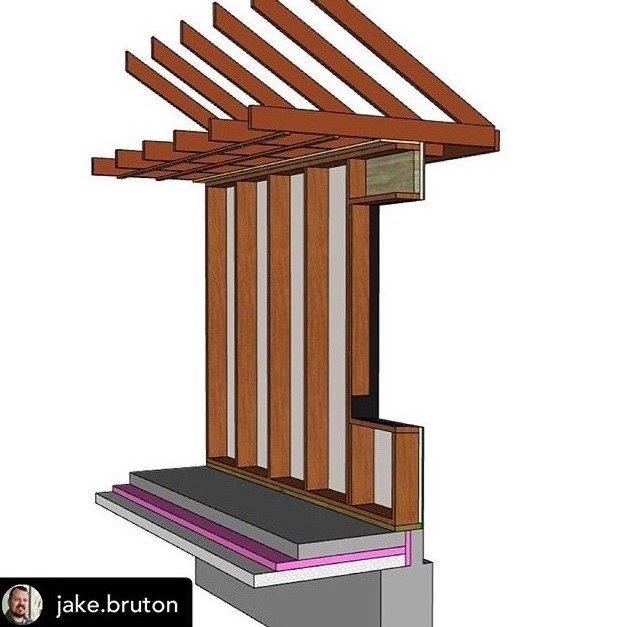
Jake Bruton joined the melee with a Sketchup submission and description focused on air sealing details and advanced framing while trying to exclude specialty products that wouldn’t be readily available in many markets. This prompted Steve Baczek to issue “Fourteenth Runner Up” trophies to Jake and Ben as a means of continued pot stirring, which is precisely the type of fun we intended when we conceived of this contest.
From Jake Bruton: This assembly sits atop a thermally broken turn down slab, but could easily work on a crawlspace or basement. The 2×10 treated bottom plate is ripped to 8 3/4 inch. A bead of acoustical sealant is placed on the slab, foam sill sealer, then another bead of sealant is offset toward the exterior side on top of the sill seal. The plate is installed, and wall framing begins. The 2×8 studs spaced 24 inch on center provide ample cavity for fiberglass or Rockwool insulation to be blown in place, while the ZIP R-sheathing with an R-6 continuous insulation is able to remove thermal bridging from the assembly. The base of the wall receives a vapor open Siga tape, bridging from the sheathing to the concrete as a belt-and-suspenders approach to sealing that sill plate. All of the sheathing seams are detailed using the manufacturer’s tape, including the top of the wall and the 3/4-inch OSB upper top plate. This tape and the 3/4-inch OSB will allow for the air barrier to transfer to the interior and connect to the drywall (also the air barrier). In the course of framing the window openings, the rough opening sill has been sloped with positive drainage to the exterior side and waterproofed with liquid flashing membrane. The header has been properly sized using a single framing member to maximize the amount of insulation in the header cavity. Above the top plate rests a row of 2x blocking intended to limit wind washing of attic insulation by the fully vented attic. It’s built with materials mostly available at the local lumberyard that are familiar to the carpenters on site.
One of the things that has been most enjoyable about the BS* + Beer community on Instagram has been the continued growth of Mike Maines (and really Steve and Dan’s) concept to include a nationwide network of these groups and our subsequent connections with those organizers. When we first got started, I reached out to Mike to seek permission to use the name “BS* + Beer.” Not only did he agree to that, he also shared a number of resources including Dan’s 2012 article in JLC about founding the group, a document laying out the basic operation, structure, and informal rules, as well as a list of every topic they’ve ever discussed. As a result of that gesture, and the general altruism of the building science community at large, I have been led to share any resources, logos, and experiences (occasionally even advice) to the now twelve (or more) other groups.
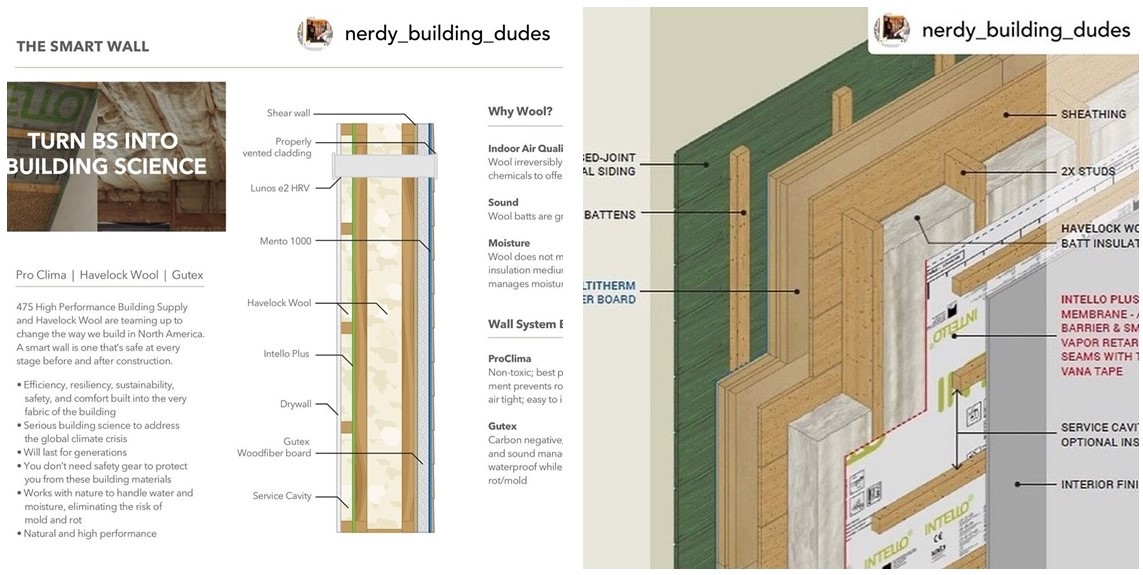
We have enjoyed the benefits of these connections equally if not more so with our recent invite to The BS* + Beer show discussions hosted by Mike and Emily Mottram and sponsored by GBA, but before that the generosity of Jake Bruton and Randy Williams to make the trip to KC and present and discuss topics with our members. Since we have been enjoying these and other connections it was no surprise to hear from Lucas Johnson who organized the SW BS* + Beer discussion group. Lucas submitted details from the Smart Wall (from 475 High Performance Building Supply) as well as a number of photos of the construction details in use on real job sites as “inspiration.”
From Lucas Johnson: The Smartwall, a design promoted by 475 High Performance Building Supply, is based on two decades of building science research and construction experience. It is built using conventional methods with materials that are very easy to install. It is also Living Building Challenge and Passive House compliant using Red List approved and carbon storing materials expected to last 100-plus-years. We’ve included sketches, some real world examples ranging from BC to CA, and finally some words of inspiration. In short, this is a game changer.
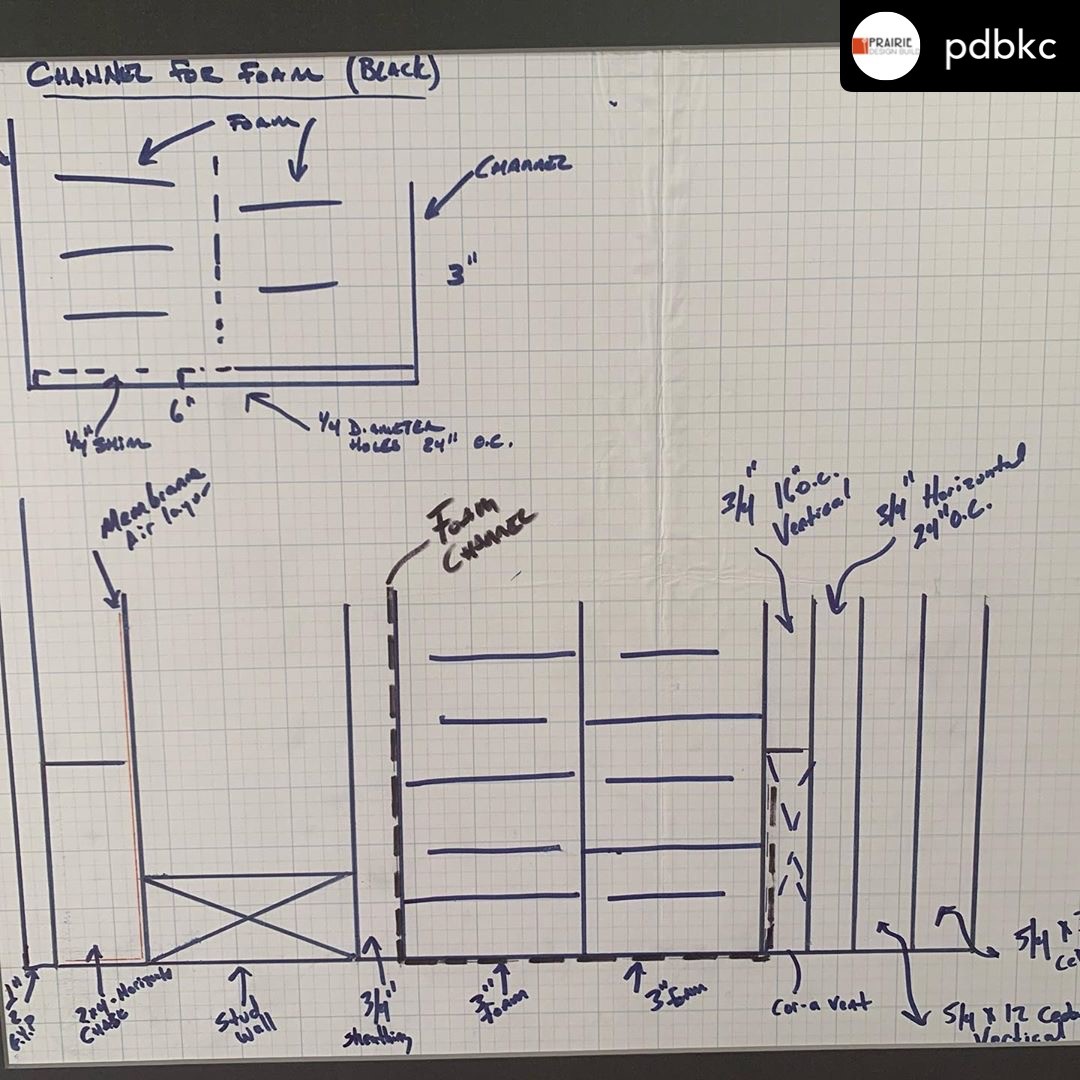
After the post from Lucas things went quiet for a couple weeks until we got something from one of our local members. A Passive House certified builder and past presenter at our group, David Schleicher of Prairie Design Build is one of those guys who walks the walk. A “true believer” as I call it, David is so fully committed to the idea of improving the world one-build-at-a-time through efficient, sustainable, durable design and execution, I was thrilled that he was willing to share his ideas once again. After David’s conversion to Passive House, he rebuilt his personal home based on the ideals he had embraced. The wall section detail he posted is a photo of the sketch his wife had framed for him as a gift and that hangs on the wall in the home it inspired.
From David Schliecher: As a Passive House certified builder, this wall is part of a Passive House retrofit of my personal 1954 home built with 2×4 walls, 4/4 sheathing, felt, and 4/4 batt-and-board cedar. All cedar was de-nailed for re-use. I added 6 inches of EPS foam over the 4/4 sheathing, a WRB, a vented rainscreen, and re-used the batt-and-board cedar siding, replaced windows and door with triple-pane units, filled the stud walls with blown fiberglass, used an Intello air barrier on the interior face of the stud wall, and built a 1 1/2-inch chase wall outside of Intello, before the drywall was installed.
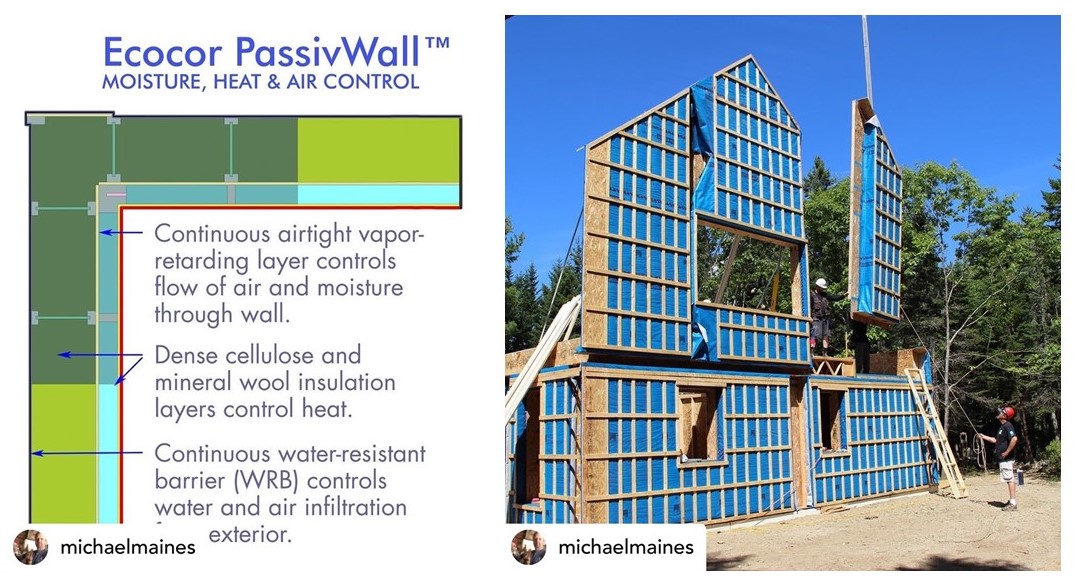
As with many things during these unusual times, the momentum of the competition dissipated and the submissions promised fell victim to the re-prioritization of essential activity. In advance of preparing this article I reached out to several of those who had tipped their hand and showed me the details they planned to submit previously. One of my favorite designers since I first became aware of him and his work on FHB’s ProHome in 2016 is Michael Maines, and he was kind enough to finalize his submission for the competition.
From Michael Maines: I was trying to choose—of all the different wall designs I’ve used, what would be my favorite? Then it hit me — although many different wall assemblies can work well, hands-down the best I have used is Ecocor’s. Similar to Steven Baczek’s submittal, it’s a Lstiburek Perfect Wall, with structure on the interior and most of the insulation on the exterior, vapor-open in both directions, performing at R-58.6 using environmentally-friendly materials. It is essentially airtight, thanks to ZIP System sheathing and high performance membranes by Pro Clima resulting in homes that reliably tests below 0.4ACH50, and it has a robust rainscreen on the exterior so natural siding materials can dry readily. Not only does it have impeccable specs, it is built as part of Ecocor’s shop-built panelized system, a smart collection of panels and connectable details for super high-performance homes. I worked at Ecocor during their start-up period and helped develop some of the details and processes, but even if I hadn’t, I would find this system hard to beat. Images pulled from their website without permission (hope you don’t mind, Chris).
We got our next submission from Steven Delgado who is another of our local members. It was great to see that he embraced the spirit of the competition—seeking to learn and share ideas through discussing solutions. His Sketchup detail shows the proposed retrofit to his existing home and he invites the help of the building science community to improve it. He may not get the championship belt, but crowd sourcing solutions for his own home from the some of the best and brightest will likely yield him a more valuable win.
From Stephen Delgado: This is for my my current house—a 90s suburban tract house. The construction is 2×4 exterior wall with R-11 batt insulation, exterior panel sheathing, and on the inside some sort of poly vapor retarder and drywall. It’s incredibly leaky and inefficient. I sort of ran out of time and didn’t detail any windows or the actual soffit. My goal from the start of this was to try and improve on my existing assembly without tearing off all of the siding, insulation, cutting out the poly, and just starting over. I’m simply not going to spend the money to do that, and if I can pull off significant improvements, hell, any improvement, it’s a win! I just want to make what I have as good as it can be, without spending $30k plus on a new system. The plan would be to leave the siding which is in decent shape, except the front which has been replaced within the last ten years with a newer fiber cement lap siding, I would like to tear the rest off to re-sheath and and apply some kind of rigid continuous exterior insulation, XPS R-7.5 or R-10 and tape all seams, use a rainscreen detail, and some kind of lap siding. Initially I wanted to wrap up to and over the existing soffit, but I’m not sure it makes sense based on how the soffit is actually built. Foaming in the attic would probably help me out more there. My biggest concern is the poly in the interior, but as long as everything is water and mostly airtight I don’t see it being a real problem, it’s not now, but I have a leaky house. Anyway I’d love some feedback on how to improve it. I plan to blower door test prior and see what kind of result I can get after.
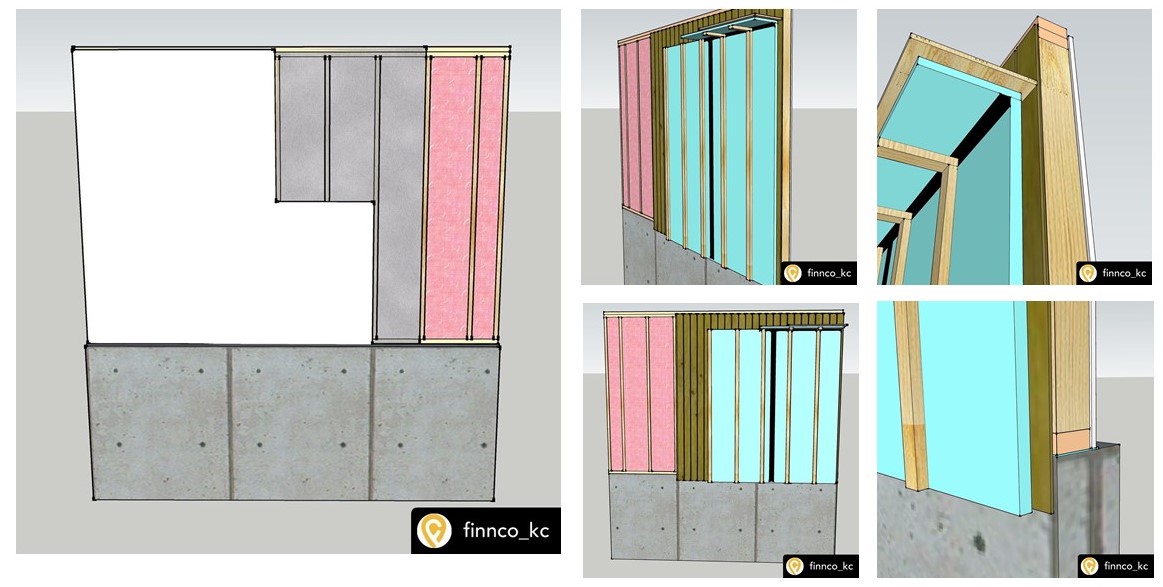
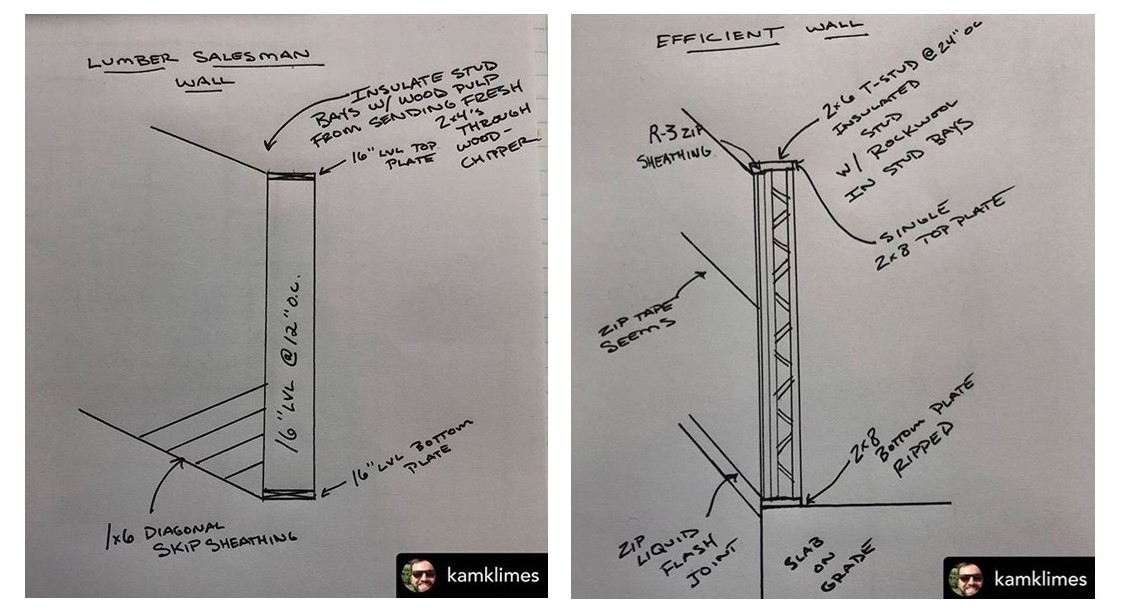
The next day we got a pair of submissions from Kameron Klimes who, in addition to being a local member of the our group, also happens to be my lumber salesman. This detail is important to remember when you see his first submission which has 16 inch LVLs on 12 inch centers with diagonal skip sheathing labelled “Lumber Salesman Wall.” The Efficient wall submission he sent with it was pretty well thought out and still included a premium lumber product: the T- Stud!
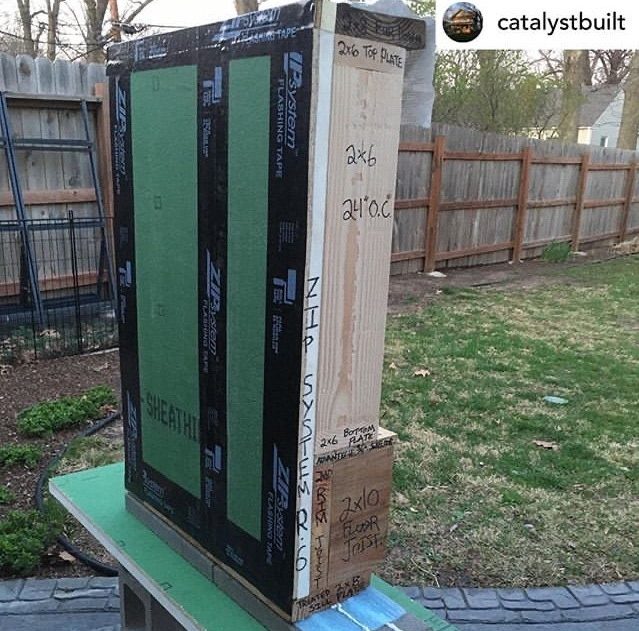
From Kameron Klimes: Let me begin by saying I know nothing about CAD, but you might have already guessed that. I also am not very talented at sketching, but nevertheless wanted to give my two-cents. I hope people see the humor in my first wall, but if they don’t and actually want to build a bomb shelter, myself and McCray Lumber and Millwork would be happy to take care of you. The second wall would actually perform well. T-Studs have struggled to get into the market and would likely need to come down in price a little, but they seem to be a fantastic alternative for minimizing the effect of thermal bridging in a traditional wall. While quarantined I have enjoyed learning from my man Travis over @catalystbuilt and look forward to the day we can see his mock up wall and share an IPA.
While I appreciate Kameron saying he’s been learning a lot from me, I think he’s more accurately referring to the presentations we host at the BS* + Beer discussion groups here in the Kansas City area. We begin our events with a presentation on a topic from someone with expertise so that we can then discuss with a common baseline understanding. I like to say “you don’t know what you don’t know, y’know?” and these opening presentations are meant to address that.
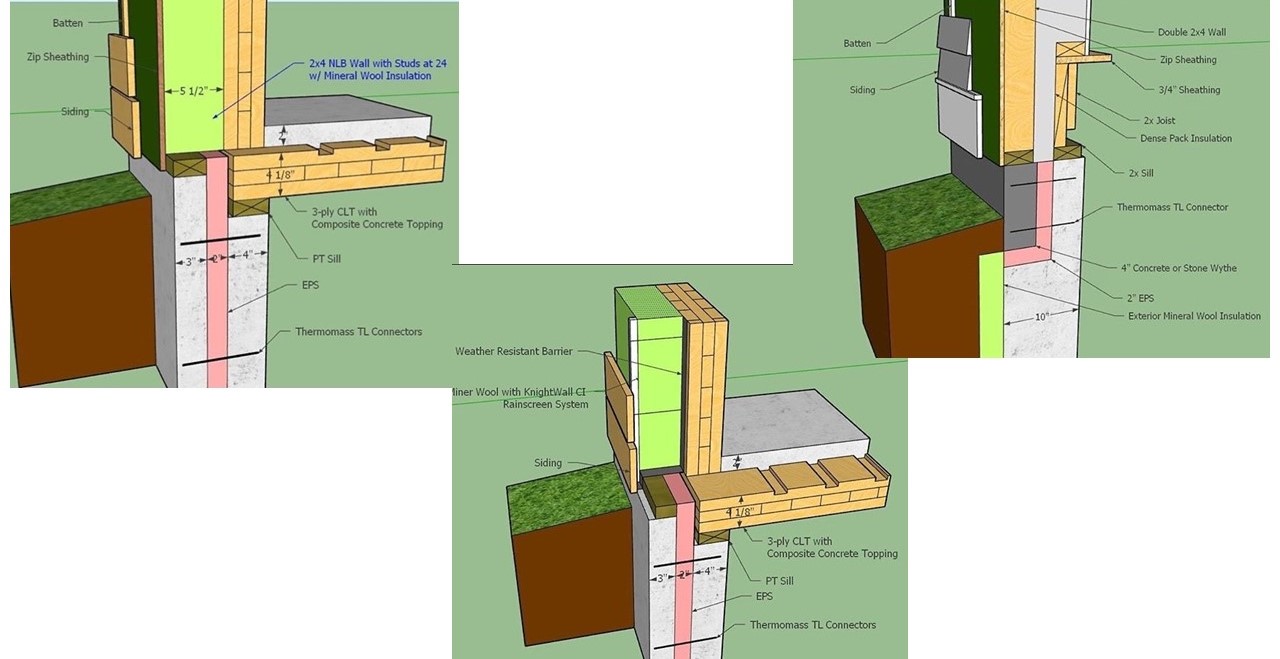
That impending deadline must have lit a fire because the next few days saw multiple submissions, including three variations on a theme from structural engineer Trevor Acorn who is a regular at KC BS* and Beer. As excited as I was about the T-Stud sighting in Kam’s submission, I was elated to see a CLT component here from Trevor.
From Trevor Acorn: This is an assembly I invented today thinking through how one might marry exposed wood ceilings and walls with a modern aesthetic and a high-performance building envelope (drawing left). Many of the details are missing, but the idea is to use CLT planks (there is a new plant in Arkansas) as prefabricated exposed structural elements bearing on a site-cast concrete thermomass wall. The CLT and the concrete floor are the exposed finish. Utilities are laid out and routed in the walls and floors at the CLT plant (the middle images shows some improvements on the design). Here’s another improvement on the assembly (drawing left). This one gets rid of the zip sheathing and adds a rain screen system and WRB applied to the CLT. It includes 1) Continuous insulation via concrete/stone wythe, Thermomass composite connectors, and high load EPS insulation. 2) Exterior mineral wool (no need to fur out interior of foundation wall). 3) Double 2×4 wall construction. Interior wall is load bearing. 4) Traditional aesthetic with lap siding and water table. 5) Air sealing and WRB by ZIP sheathing. 6) Traditional 2x or engineered joist floor system.
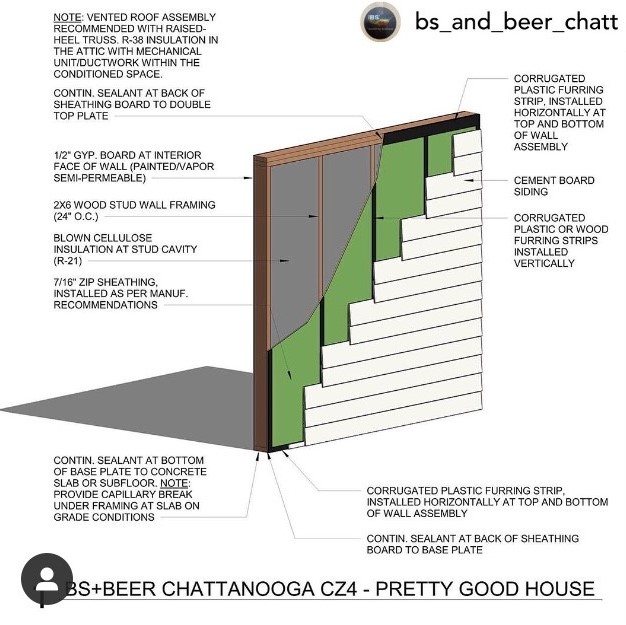
From Nathan Shirai: While it seems quite basic compared to many of the other submissions, we felt it important to add something to the mix that would be easily achievable for the average code-minimum builder who may not yet understand, or may be fearful of, higher performance assemblies. Think of it as a “gateway wall.” We selected the the following details to increase performance without an unpalatable amount of deviation from our standard practice, thereby shortening the leap to the more robust assemblies seen elsewhere in this friendly competition. Those details are: 1) Advanced framing using 2×6 studs spaces 24 inches on center (not hard to change from 2x4s at 16 inch spacing). 2) Dense pack cellulose cavity insulation—better R-value and cavity fill than fiberglass batts without any scheduling or sequencing disruptions. 3) Zip System sheathing—we see a lot of this here but we are calling out the critical details of sealing it to the framing at the top and bottom, an often overlooked step with important performance ramifications 4) A rainscreen—important anywhere it rains! And potentially somewhat mind blowing for the builder who’s used to nailing fiber cement directly to OSB covered in house wrap. But yet, not hard to accomplish and provides big gains in durability. It’s our hope that an assembly like this could act as a stepping stone away from the code-minimum building and toward better water, air, and thermal management in our area. It is also the springboard for our local BS+Beer chapter’s endeavor toward designing a “Pretty Good House” for Climate Zone 4, mixed humid (although we may find ourselves annexed into Climate Zone 3 before long!).
At this point, I was worried that I was going to have to change the name of the competition since we had yet to assemble 16 submissions and the deadline was fast approaching.
I had been talking through the details with my partner at Catalyst Construction, Joe Cook, and we agreed that we wanted to submit an assembly we could actually convince a local architect to specify and a client to pay for. Our focus was to limit complexity, keep labor in check, and borrow excessively from our betters. As a result, we submitted the “Catalyst Wall” in mock up form.
I’m not quick to learn software and I rapidly forget the things I do learn, so Sketchup and CAD are not my strength. Mock walls are also handy for expressing to clients exactly what will get built in the field, so we put this together fully expecting to haul it around to client meetings.
From Catalyst Construction: It starts at the bottom with a couple beads of Big Stretch under standard foam sill seal and another bead up the middle on the top of the foam gasket. The 2×8 plate extends under the ZIP R-6 sheathing to protect the polyiso. Then we roll the tape to complete the WRB and air seal at the bottom of our assembly. Our floor system gets Rockwool R-23 in the rim and inside the wall cavity of our 2×6 framed 24 inches on center. The ZIP System tapes wrap all window and door penetrations as well as wrapping up over the top plate and 2×8 perimeter strapping as shown. This was the debate: Do we spend the time to self-perform the air-sealing at all boxes, partition walls, and wire penetrations for airtight drywall approach or steal the Randy Williams’ full 2x strapping under Intello to complete our air barrier or calculate the cost of either of those and apply it to continuing the ZIP up over the roof? I’m second guessing it even now. This wall has Jake Bruton’s air sealing details top and bottom with Randy Williams’ ceiling/attic detail. If I had to start a build today I’d probably go ZIP over the top like Matt Risinger to avoid the Intello detail and in favor of the simplicity of having only one system that one subcontractor can consistently perform correctly. The savings to go airtight drywall might be substantial on steeper roof pitches so just pick whichever approach you prefer, assume I agree and vote for this wall accordingly. The “Catalyst Wall” is (mostly) thermally broken R-29 with labor including only one trip around one super simple assembly I can order in one call to Kameron Klimes with no weird stuff or exotics. I can also build this at a price point my clients will entertain and feel confident in the vast improvement in durability and performance over many competitors in our market.
You would think I’d be done now, with 16 entries rounding out the field. But wait, there’s more!
In trying to rally the building science community to enter the competition and get us to 16 submissions so we could have a fun discussion and enjoy the sweet sixteen bracket madness, I created a bit of a late surge and we got two more entries at the deadline. The first came from Emily Mottram who is an architect in Maine, host of the E3 podcast (Energy and Efficiency with Emily) and a huge part of BS* + Beer, Maine.
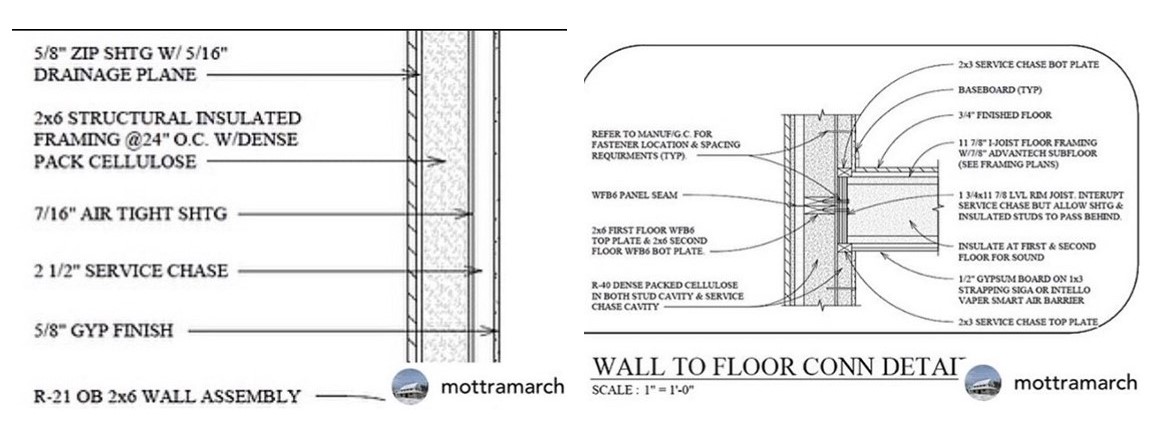
From Emily Mottram: I’m a huge fan of panelization. I went back and forth on what to submit here because double-stud walls are our go-to—we do that more than anything else—but I thought this was also a slick system that had a lot of merit. So here you go from outside in: siding (if I get my preference, it’s wood) ¾ inch strapping, continuous wood-fiber insulation, sheathing taped and sealed with diffusion-open WRB, airtight interior sheathing, taped and sealed, service cavity to be insulated on site, Sheetrock. This was panelization with some really slick double-bead European gaskets. And I love that the structural wall is on the interior so you can get continuous insulation at the band joist, but also so that it can overlap your foundation if you have exterior insulation allowing for full bearing which makes the structural engineer happy and can be more difficult with double-stud walls. I also like that the 2×6 layer can be expanded outward to get more insulation if you want or need it without impacting the interior layout. Nearly everything but a few vents and plumbing penetrations are kept out of the thermal and air barrier layers. No fancy Sketchup 3D walls today like some of the other submissions. I love that. May have to recreate those for our “typical walls”—so easy to understand visually.
The last submission to arrive came from Jason Bekebrede who runs Monticello Custom Homes in Springfield, Missouri and is also the organizer of BS* + Beer Springfield. I had been encouraging Jason to submit something and with Emily’s submission and now Jason’s we had arrived at a new problem. With twenty submissions (eighteen if you count only the Efficient Wall from Kameron and only one CLT wall from Trevor) I had an embarrassment of riches to resolve.
I ended up calling Kameron to ask if he would mind excluding his submission from the competition, and we pulled the “Catalyst Wall” in the interest of keeping the simplicity of the sweet sixteen bracket works intact. Kameron generously agreed, and we reduced Trevor to just one wall, so that Jason could round out the field of our now numerically accurate “Sweet Sixteen Wall Assemblies.”
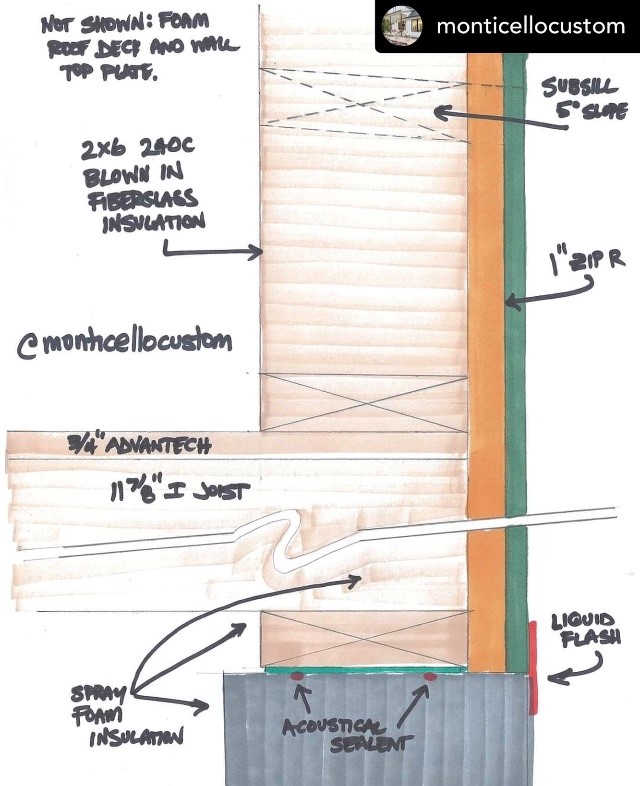
Jason posted his wall section with the details spelled out on the drawing rather than in the text.
From Jason Bekebrede: Here’s my #WallAssemblySweet16 entry. Don’t have the Sketchup skills like Jake Bruton or the many others.
With the field finally set, the deadline behind us, and the fun really about to start, I leaned heavily on Joe Cook and Joe Nickels to get the brackets into shape. Modeling our “selection Sunday” after the NCAA basketball tournament meant we had almost no hope of avoiding someone feeling unfairly “seeded,” so we just steeled ourselves for the criticism, swallowed hard and shared this:
Much to my surprise, there were no cries foul or general malaise to defuse. We were off to the races and on to the task of once again making the rules very clear. This is not a competition comparing real world performance, cost, durability, or constructibility. It is impossible to get people with different cost data from dissimilar markets and widely varying climates to agree on one scientifically superior and somehow still affordable assembly. Instead this competition must be decided by perhaps the least reliable resource, the vote of the people.
On the morning of Monday, April 6th voting began, along with excellent discussion as well as some really fun trash talk. Tonight we’ll finalize the second round of the tournament and tomorrow we’ll announce the final four. You can check out the competition on Instagram if you’d like. If you don’t use social media, I’ll be back to update this post with the winner in a couple of weeks.
I wonder if that's whole assembly, or center of cavity. Given how small a proportion the structural section is in terms of insulation, it seems like it would make sense to just make that 2x4 instead of 2x6. I'd go one step further and just leave the 2x4 cavity empty to run services in, putting the air barrier on the outside of it.
I like it!
Is there a way to expand the pictures so that it's easier to read the details? Or are they gathered at a website somewhere? Could be user error, but the pictures don't expand as they often do...
I made it so all the photos open up in their own window now. I'm not sure how helpful it will be since we were working mostly with screenshots from Instagram, not hi-res files. I hope it allows you to see some of the details and small type better.


13 Comments
You can go ahead and ship me the belt now, we both know how this is gonna end.
You have to beat out Mike first!
Where’s your wall assembly Kyle?
Such a fun competition to be involved in!! The amount of information that came through just one Instagram posts is amazing!!!
I got a kick out of Steve Baczek's R 79.9 wall😊.
I wonder if that's whole assembly, or center of cavity. Given how small a proportion the structural section is in terms of insulation, it seems like it would make sense to just make that 2x4 instead of 2x6. I'd go one step further and just leave the 2x4 cavity empty to run services in, putting the air barrier on the outside of it.
I like it!
Is there a way to expand the pictures so that it's easier to read the details? Or are they gathered at a website somewhere? Could be user error, but the pictures don't expand as they often do...
Thanks for putting on this tournament.
Hi Andrew.
I made it so all the photos open up in their own window now. I'm not sure how helpful it will be since we were working mostly with screenshots from Instagram, not hi-res files. I hope it allows you to see some of the details and small type better.
Thanks Brian, that's an improvement.
Why not fight for free energy instead....???
I can't figure out how to get T-Studs here in NY!
Trying to figure out Ben Bogies wall... what do you mean in the caption "dropped inner wall "
This may make it clearer- https://www.greenbuildingadvisor.com/article/a-case-for-double-stud-walls
Or last months issue of FHB has a deep dive as well-
https://www.finehomebuilding.com/2020/04/08/a-case-for-double-stud-walls
Log in or create an account to post a comment.
Sign up Log in