
Image Credit: REGREEN Guidelines (detail by Steve Baczek)
More Green Communities


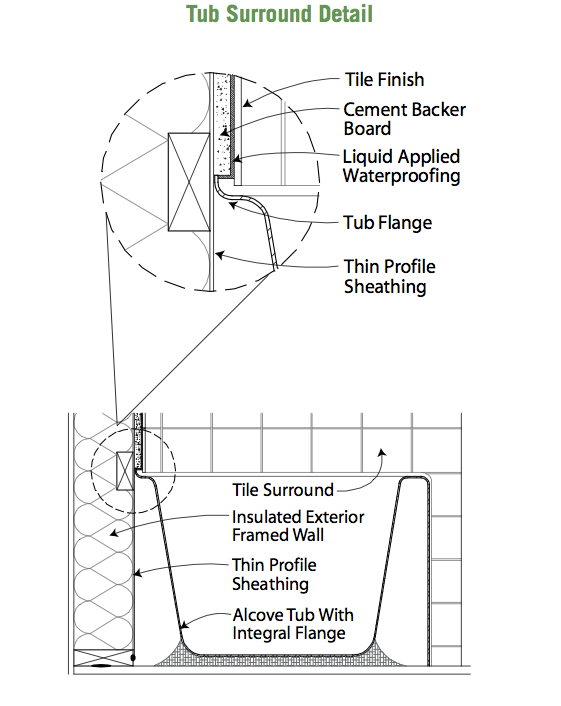
I sat down one day and figured this out: two people each taking an 8-minute shower every day is equivalent to the tub surround seeing 100 inches of driving rain a year. That means we should be building our wet walls for tub and bath surrounds with the best moisture management we can muster. And just about everyone agrees that means using a non-paper-faced tile backer board. The question remains: which non-paper faced tile backer board?
Enterprise Green Communities Criteria Checklist
For those of us working with Enterprise Community Partners, the reference to consult is the Green Communities Criteria Checklist. It states:
“7.9b: Materials in Wet Areas: Tub and Shower Enclosures. Use fiberglass or similar enclosure or, if using any form of grouted material, use backing materials such as cement board, fiber cement board or equivalent (i.e., not paper-faced).”
Types of backerboard to consider
There are four major types of non-paper faced tile backer board from which to choose: cementitious, coated glass mat, fiber cement, and fiber-reinforced gypsum board. Only the first three are appropriate for wet areas, such as tub and bath surrounds.
Cementitious boards have a cement core and glass mats on both sides to strengthen the board. Common examples include Wonderboard and Durock. These boards are relatively heavy and hard to cut, but they are very durable, dimensionally stable, and have a great bonding surface. While they don’t “care” if they get wet, they are not waterproof.
Coated glass mat boards typically have a gypsum core with glass fibers sandwiched between fiberglass surface mats. The most common example is GP’s DensShield. DensShield has a waterproof surface and water-resistant core. It is much lighter and easier to cut than cementitious boards.
Fibercement backer boards have reinforcement throughout the core but no differential facings. The most common examples of this type of backerboard are Hardiebacker and CertainTeed’s fibercement backerboard . In both cases, the fiber is wood rather than glass. These backerboards are less expensive than other backerboards and are relatively easy to cut and while moisture-resistant, they are not waterproof.
The last type of non-paper faced backer boards are fiber-reinforced gypsum boards. These boards, while moisture-resistant are only appropriate for areas experiencing infrequent wet conditions. They include USG’s Fiberock. While these are great non-paper faced backer boards, they are NOT recommended for truly wet areas like a tub or bath surround and should only be used where wetting potential is slight.
Material Considerations
A primary material concern for cementitious and fiber cement backerboard is the energy intensity of portland cement production. Fly ash, a byproduct of coal combustion, is sometimes used as a less energy intensive replacement for portland cement. Given recent scrutiny, the GBA Product Guide (based on BuildingGreen’s GreenSpec) only supports fly ash use where it reduces embodied energy of the product and is chemically or physically locked up so that the risk of leaching is kept acceptably low—such as in cementitious products (EBN editorial on flyash).
GreenSpec uses publicly available information like MSDS to gather information on the ingredients in a product. Not all ingredients are listed on MSDS though. At times, GreenSpec will pester manufacturers and other industry-insiders and dig into patent literature in order to find whether there are unlisted ingredients of concern—particularly if the team becomes aware of a potential issue within the category. GreenSpec has recently partnered with the Healthy Building Network’s Pharos project (http://www.greenspecpharos.com/) in order to better support that kind of deeper dive. Pharos has not yet addressed backerboard; GreenSpec (and consequently the GBA Product Guide) takes a pragmatic approach, basing judgment on the currently-available information.
Care should be taken when cutting any board product, particularly ones with silica, as airborne crystalline silica is a potential carcinogen. Products that can be easily scored instead of cut are preferred.
While paper-faced gypsum board is recyclable and often made from recycled content, no backerboard product we are aware of is easily recycled—if there were, that would be a plus.
Based on all this information, a stand-out product is one like DensShield because it has superior moisture performance and has a lower-embodied energy gypsum core.
For more information on this topic, see Fine Homebuilding: Tile Backerboard Options.
Weekly Newsletter
Get building science and energy efficiency advice, plus special offers, in your inbox.


26 Comments
Add Schluter Kerdi and Kerdi-Board to the list
Schluter produces the one waterproof product that is performing perfectly for us.
Once you go Schluter, you will not turn back. It is not a natural product. It is worth using because it works so well that if installed properly will never be the failure point in your waterproofing.
For natural methods I would defer you to Robert Riversong who by far is the most knowledgable source I know of for natural building systems.
Where do shower walls fail?
Shower walls fail at the seams, the corner seams and the bottom edge seam. If you use Denshield or any product the way to stop the corners from leaking is with properly applied silicon. But if you really want a leak free seam tape the seam with Schluter Kerdi tape. The corner will now be bullet proof. You don't have to Kerdi the entire wall but if you are doing high end longterm high use work, Kerdi on the whole wall is my preferred method.
Incomplete information leaves your viewers hanging
The tub seam is an important detail to your viewers. What do the viewers do when they go to use your drawing? They can't go to a building supply store and ask for "thin profile sheathing" or "liquid applied waterproofing." Could you add an example of both that GBA would recommend to your viewers?
Thank you
in some areas the waterproofing goes behind the backer board.
In our area we line the area behind the backer board with 6 mil poly as water proofing attached directly to the studs over the insulation and draped out into the tub a few inches. The backer board goes over this and is held above the tub flange as you have shown and not nailed within six inches of the flange. the tile goes over this running down to about an eight of an inch of the tub deck. The tile is generally grouted except for the inside corners and the deck to tile transition which are caulked to allow for seasonal movement. The poly gets cut back at the very end of the process and touched up with a little bit of caulk over the cut edge.
We too have bought into the Shluter Ditra and Schluter Kerdi systems though. Very high degree of confidence for not that much more money. We even built a custom tile bathtub with the stuff.
We use regular green board (I
We use regular green board (I know, ugh!), but we use 2 layers of black paper over it and we trowel 1" of mud over the paper. I've never had a problem but have discussed ways to improve with my tile contractor. I think as mentioned above, the corner seams are the most vulnerable.
I also do a lot of steam showers and have used I&WS.
Thoughts?
If building steam shower use
If building steam shower use a sheet membrane not a liquid . The liquid paint on membranes are great at waterproofing but no so good as vapor barriers. We use kerdi on all our steam showers.
To Allan Edwards
Greenboard + 2 layers of paper + 1" of mud seems like an awful lot of effort when 1 sheet of Durock with taped & mudded seams will do the trick. Plus, you're introducing cellulose (mold food) into your system and relying on the other layers to keep it dry. As the article says, it would be best to eliminate the paper (including the face of the greenboard) altogether.
denshield
Another advantage to denshield, which we have used for years is that it comes in a 4'x8' sheet. Most other backers are 3x5 or 4x4. Our sheetrockers will hang this stuff along with the rest of the sheetrock.
Poly behind the backer board. Rainscreen.
Dear Michael,
Have you had any troubles with moisture running down the poly and getting trapped by the caulk. I appreciate that it shouldn't have anywhere to go but water is insidious stuff.
As a general question has anyone out there used an equivalent approach to a rainscreen wall?
As I imagine it, the backer board (equivalent to the WRB) comes down to, and is flashed into, the tub or shower tray and the tile is attached to the equivalent of furring strips. The gap would also run right down to the flashing. Or is this over-kill?
To AJ Builder - thin-profile sheathing and waterproofing recs
You are right--generic only helps so much. Keeping it generic in this detail is a hangover from days at Building Science Corp. when Building America work meant we were supposed to keep it generic.
1. "thin-profile sheathing" - this pretty much refers to Thermo-Ply (http://www.berryplasticsbpg.com/products.aspx?page=thermo-ply-total) but it could be any sheathing material that encloses the interior of the tub wall as an air barrier.
2. "liquid-applied waterproofing" - the one I have used is the C-Cure Pro-Red (http://www.c-cure.com/doc/ds/ds_prored.pdf).
And taping the seams/joints as the weakest link in the water barrier chain--great idea and thanks for mentioning. I have not used the Schluter system but have heard from many others that it is bombproof.
PS - I decided not to include XPS-based backer board in this blog because the global warming potential of the XPS is a big issue and we really don't need to get the R-value out of an interior wall sheathing in a tub surround. That said, I should have explained this reasoning in the blog; thanks for catching this.
Peter
Green Board
Although now unanimously condemned, 30 years ago I used a single layer of green board under cheap Korean 1x1 tile on our shower walls, and miraculously it is still holding -- with no leaks to the floor below. Perhaps I was just lucky. When I redo it, it will be either tile on cement board per the detail, or 1/4" thick sheets of Corian applied to Denshield. A sheet product like Corian reduces the number of joints and probable leak points. It also assists in maintenance, since there are few grout lines to accumulate scum.
I too.
I've also had excellent results with tile over greenboard for tub surrounds (soaking tub, no jacuzzi, no shower), using cement backer board for showers and floors, with 6 mil poly as vapor barrier behind shower wall backer board.
Any of the backer boards work for walls, but I use nothing less than ½" cement board for tiled floors. Nothing else has the stiffness and dimensional stability as well as excellent bond for thinset.
poly behind backer board
Poly behind the backer board (Durock or WonderBoard or greenboard) is an invitation to mold growth because the poly doesn't breathe and moisture can still wick through the backer board and get trapped by the poly. Has anyone tried Tyvek on the walls prior to cement based backer board?
to Timmy
kerdi solves these issues, keeps moisture away from backer board, tile bonds directly to kerdi with thinset.
Backerboard
Sure it is a good idea to stop any water from wetting the wall behind a tub or shower. Not everything needs to be bomb proof. I think there is a hysteria about this. If you maintain your tile and grout very little water will make it through the tile. Water runs down the face of the tile. I have torn out dozens of surrounds with nothing but drywall behind them. All with tile in reasonable shape, not perfect shape, were just fine. Brother and now we are talking about rainscreening showers.
That said
That being said, I use cement board.
Fred and Timmy
Water clearly does get through the tile and through the backer board but it runs back out over the caulk joint and into the tub at the bottom which is just there because of the crack potential of the hard and brittle grout up against the cast iron tub or in the inside corners which are subject to seasonal movement. Same theory as the weep holes and pebbles in a sub-drain assembly for a tile floor.
I suppose some mold may grow on the poly where it isn't in direct contact with the cement board but back behind the tile and grout in an extremely alkaline environment it doesn't seem likely to have much to feed on so I'm not worried about it becoming a problem. Greenboard is absolutely not acceptable in a shower wall unless it has Kerdi over it.
Kerdi rocks. I don't see me going back to the old ways but they did work well and were much less expensive up-front than the Kerdi membrane at $1.70 / sf.
Kerdi and thinset
To those considering Kerdi, please read all their materials carefully , I believe that their warranty is dependent on using a non latex modified thinset to bond the sheet to the substrate and to bond the corner seams and overlays to the Kerdi itself. Apparently, extended exposure to moisture can cause the latex component to fail. The tileman on the steam/shower job thought it a bit odd, but did it to the spec called for. Maybe it has changed from a few years back, but best check. The job still looks flawless.
Directions are important with Kerdi
One of the bonus's of learning the trades by oneself is..... reading directions thoroughly! Kerdi is not the same as a mud base or a cement board job. And as to tile not failing on drywall? I have never seen it not fail. I love Kerdi and non drywall systems now. What do you do when tiles fall off a shower wall and break but the customer wants it just fixed for a few dollars? A mess. I would rather not have to deal with fixing something that never needed to fail. 10-20 years zip by. I started as a house painter. My first taste of seeing jobs I did needing redoing. I like my jobs to be once in my lifetime and the owners. Peace.
wedi
I have used Schluters system for a long time and am very happy with the product. I recently used WEDI system and was very impressed with the product, so much so that I used it for the last 3 showers I constructed. Anyone else have any experience with this product
WEDI
I was a big believer in Schlutter - Kerdi, until I saw a WEDI system get put together. I have build several showers with the WEDI system and it goes together very quickly and easily, and you get a completely waterproof shower system to install your tile on. I can install the WEDI base and walls in 2-3 hours, and start setting tiles right after that. Much quicker than installing a backer board and Kerdi.
Kerdi
Two points. One, I don’t think Schluter advises putting a poly sheet behind whatever backer board you use if you use Kerdi. Since Kerdi is a fuzzy poly, you would have two layers of poly in a wall with a pervious layer in between. From what I have read, this is never a good idea since any incidental moisture would be trapped. If you don't use Kerdi, it seems you are supposed to use the poly behind the backer. You would rather have it on the front so it wouldn’t have a bunch of nails penetrating it but the tile won’t stick.
Second, Schluter recommends unmodified thin-set in almost all cases for its products because modified mortar contains latex and requires some air to cure properly. Regular thin-set cures stronger if kept damp so encapsulating it between two impervious materials allows for a strong cure. Since Kerdi and the tile are impervious, moisture is contained. Oddly, DensShield would seem to have this same property but GP recommends latex modified mortar. On Ditra, Schluter recommends latex modified mortar below the Ditra on wood subfloors and unmodified between the Ditra and the tile. When installing Kerdi on a porous board like Durock, they recommend you wet the board first so that it won’t suck all the moisture out of the mortar. In all cases, you have to use unmodified mortar between Kerdi and Kerdi or Kerdi and Ditra.
I would only use Kerdi over Durock or an impervious material like DensShield with Kerdi seams and nooks. Durock with a poly backer should be fine too, but I would layer other cement boards with Kerdi since some of them delaminate if they get wet.
On your next floor project, try Ditra and you will never use another piece of cement board. It’s a plastic product and may not be as green, but you don’t have to breath that nasty dust from the other boards so you probably come out ahead in the long run.
.
WEDI
David and Les. Thanks for the WEDI tip too. This looks like an interesting product, especially the Nonstep floor product to reduce noise.
Clarfication
In the diagram it says "just as important is the detailing of the free-draining bottom course of tile" I believe this to mean the bottom course of tile is not run flush to the top of the tub....I have read several options on this "joint" . Namely whether it should be as thin as a 1/16 or as great as 1/4?
Secondly and more importantly whether this joint is left open. Caulked? Or is grout used?
If its left open I would say 1/16 may be even to much? Of course you have the "lip behind it" but still having an open seam seems risky.
Grout seems acceptable in the short term but would think over time will crack and the homeowner would be faced with re-grouting this joint
Caulk seems ok but would be worried about any inadvertent moisture collecting or running down the and being able to be released as the caulk is blocking it.
Whats is the author or others opinion on this joint?
that free-draining space at the bottom edge of the bottom course
In my experience, grouting or caulking the bottom edge of the bottom course of tile does not work; they both eventually fail and hold moisture rather than keeping it out. Leaving grout or caulk out makes the space free draining and much easier to keep clean--it's almost like a shadow line detail.
How
Fair enough.....How big a gap are you leaving? I suppose even flush without it being sealed will allow for moisture dispersion.....or do you leave a gap. If so how much?
Log in or create an account to post a comment.
Sign up Log in