

Image Credit: All images: Kent Earl
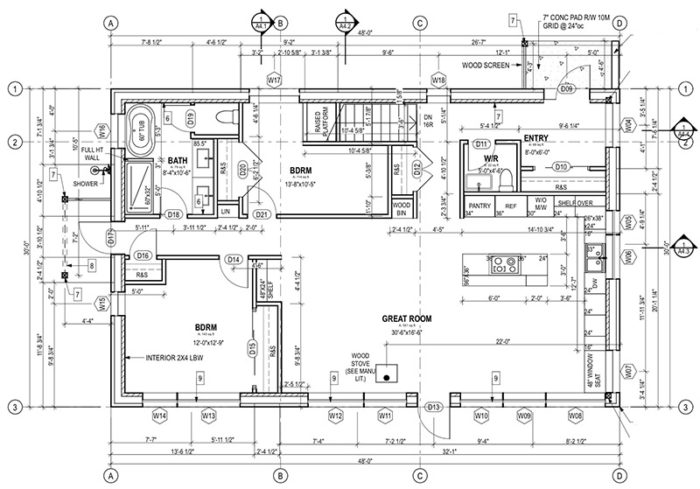
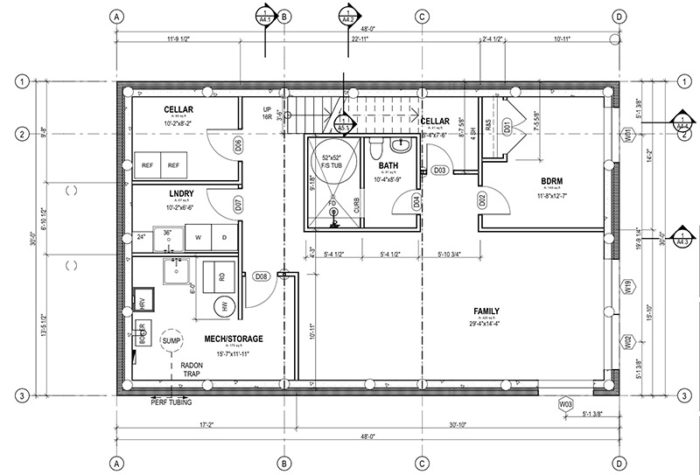
Image Credit: All images: Kent Earl Including a basement allowed the square footage of the main floor to shrink while still providing the space the couple needed. In all, the house has three bedrooms and 2,300 square feet of conditioned space on two levels. Basement floor plan: A bedroom, family room, bathroom and laundry are among the features of this below-grade space.
More Guest Blogs


Editor’s note: Kent Earle and his wife, Darcie, write a blog called Blue Heron EcoHaus, documenting their journey “from urbanites to ruralites” and the construction of a superinsulated house on the Canadian prairies. Their previous blog on GBA was called Choosing a Superinsulated Wall System. The blog below was originally published in March 2015.
Well, I’m about done with planning and designing. About 3 or 4 months ago, we thought we were close to being done designing the house. Like really, really close. However, even though it was “close” to being done, it was not feeling right. There was something off about it and we weren’t really sure why or what it was.
It was tough to admit that as we had already spent a considerable amount of time and money getting the house to the point that it was in mid-October. We’d done eight designs by that point, which is quite a few when the design is still not complete, or when you aren’t quite feeling good about it. The pressure was also mounting as we were getting close to our first deadline — to have construction drawings started by December.
But the fact was we were not feeling good about the design and were a bit discouraged.
In the back of my mind, also, was the price tag of this place. It was creeping up and up. There were some costs that we had not accounted for when we first put together the budget, such as the cost of the septic system ($18,000), the well hook-up ($8,000), the water treatment system ($10,000), and kitchen appliances (not sure how those were forgotten — $10,000 to $14,000).
Also, the footprint of this slab foundation on pilings was increasing. We really wanted to keep it to less than 2,000 square feet. But that was just not happening, and the rooms that we didn’t care about as much but needed (mechanical room, storage) were really taking up a large chunk of the space — taking away from the spaces really wanted to be a certain size (the living room, kitchen, and bedrooms).
Getting an outside opinion
My mom is an interior designer, and we had been a bit reluctant to ask her to give us feedback on our plans. Well, Darcie had been a bit reluctant. Understandably. Who wants their mother-in-law to design their house?
However, we thought we better ask her what she thought and what changes she might suggest.
“Be honest,” we told her. Now, the one thing you have to know about my mom is that she is one of the kindest and most caring people in the world. Everyone who has met her agrees. After looking at the plans for a while, she said, “I’m sorry to say this, but this is just… bad.”
Our hearts sank. We’d spent so much effort on this, and, well, it sucked, I guess. Though this was followed shortly by an overwhelming sense of relief. We knew it was not good, but we were too close to it to see the truth.
Over the next few days we spent pretty much every moment that we weren’t either at work or sleeping (there was not much sleeping though) brainstorming, thinking, and redesigning the space.
There were some very important things we needed to figure out:
Maybe a basement wouldn’t be so bad
We needed to start questioning the things we thought we wanted (an office, a third bedroom, a vaulted ceiling, a wall of windows to the east, a kitchen separate from the living spaces) and those that we had adamantly refused to consider beforehand (a basement, an open kitchen).
Initially we had not wanted a basement. Basements are very popular in this part of Canada. It is highly unusual for a house to be built without one. In a lot of other places, basements are not common due to high water table or rocky land. But that’s not the case here. Still, basements can really suck due to the lack of light compared to spaces above ground. You still have to be careful to grade and landscape properly to make sure that water doesn’t want to find its way inside. But really, why were we so against a basement? These problems could be rectified.
A basement is more expensive than a slab or a crawl space of the same size, but if we reduced the main floor size and put those things that didn’t need to be upstairs in the basement, we could thereby reduce the overall footprint, making the extra cost of a basement justifiable. We started crunching some numbers. The slab with piles and grade beam was going to cost about $37,000 for 2,000 square feet. I figured that if we could reduce the main floor size by 200 square feet at the anticipated cost of $250 per square foot, this change would balance out the extra cost of building an ICF (insulated concrete form) basement.
OK — but how do you make a basement nice, comfortable, bright, and inviting?
Everyone suggested a walk-out basement. I don’t know why, but “walk-out” makes me cringe. I think it’s all of the fancy snobby acreages and suburban houses that have a “walk-out.” Everyone is all like, “Oooo, a walk-out.” It seems like it’s a pretentious thing that people with a lot of money do. Maybe (probably) that’s an unfounded statement, but something about a walk-out basement just felt too… pedestrian. Too upper-class. Too suburban. It reminded me of a perfectly manicured lawn or maybe even an astroturf lawn. On a 1-acre “acreage” with a 7,000-square-foot house for two people and their chihuahua. Gah.
I had to prove to myself that a walk-out would be OK. We went on a house tour, visiting the acreage of some middle-aged hippie folks who live across the river from us. They had built an Eco-house about 20 years ago on their land. The land has a natural hill, and they tucked the house neatly into it. You still entered the house on level ground but then it opened to the south on the other side. The rooms in the basement were bright and airy and there was a nice little courtyard out the basement door.
Hmm. Maybe. Maybe we could do this.
Smaller started to look better
Trimming off a mere 200 square feet from the main floor was super easy — we lost one bedroom and the laundry room. Done. But why stop there? The smaller we made the footprint, the more money we would save.
Weirdly enough, as we made the main floor smaller, it seemed to make the rooms and spaces more functional. Suddenly a lot of the issues with flow and function that we had with our larger basement-less bungalow were being solved by simplifying and making the house tinier.
Finally we got it down to (I think) as small as we could, with 1,160 square feet of interior space. (Including the 16-inch-thick walls, the total area was 1,440 square feet.) Interestingly, though, that gives us 2,300 square feet of conditioned floor space with the basement and main floor combined. So, making the house “smaller” and therefore cheaper actually made it larger overall. That seemed like the best of both worlds. It kinda felt like cheating.
Making the main floor the size we did also allowed us the option to leave the basement unfinished. I know that’s kind of lame, but it allows us flexibility now that we didn’t have before with the one-level house (which would have all needed to be finished). This way, if the budget gets overrun in other areas, we can wait to finish the basement until later. The main floor has everything that Darcie and I need. The basement allows room to grow when required.
The sense of relief that came over us was immense. Although it set us back in the process by a month, I’m so glad we took the time to analyze this more and really figure out what our needs were and where we want to spend our money.
Now we needed to figure out if this crazy walk-out basement idea was going to work or not. (Yes, more money is needed. Sigh).
Making the basement inviting
The question had now become: how do you make a non-walk-out basement inviting?
Natural light is obviously a big thing. Our main level is going to be very bright with considerable southern exposure. Our topographical study, in addition to (almost) crushing our dreams of a walk-out basement, showed us that in order to have a ground-level entrance with no stairs to the front door (on the north side) and a deck on the south side, we would have a hard time getting much southern light to the basement.
Most people who want a ground-level entrance to the main floor get light into the basement with window wells. But if there’s one thing I like less than ugly basements, it’s window wells. They seem tacky and unnatural to me.
We realized that we would only be able to put at most three or four windows in our basement, primarily along the east side. The basement was simply not going to be as bright, open, and airy as the upstairs. It was just impossible, unless we wanted to change everything on the main level, which just didn’t make any sense. So how do you make it a place that you wouldn’t mind hanging out and spending some time in?
Basement experiments
In our last house, the basement was dark and poorly lit, and had very low ceilings. Most people who have basements like that simply avoid the space and use it as a place to dump the things that they don’t really care about: laundry, the Christmas tree, maybe some old paint.
But when we were renovating that old house, I wanted to experiment down there. The rest of the house was quite grand and “executive.” The basement was different. So I had some fun. I built a floor-to-ceiling shelf with plumbing pipe in an area that I used as a workshop for wood carving.
In the little bedroom, we painted the walls, floor, and ceiling in bright white. We used the room as our summer bedroom; it was uninsulated and way cooler in the summer.
The third room I covered with OSB sheathing, turning it into a wine and beer cellar.
Before, I’d completely avoided the basement. But after that reno, I loved spending time down there. So we got thinking: Why not just embrace the underground space? The upstairs would be bright and open. The downstairs, dark and cool.
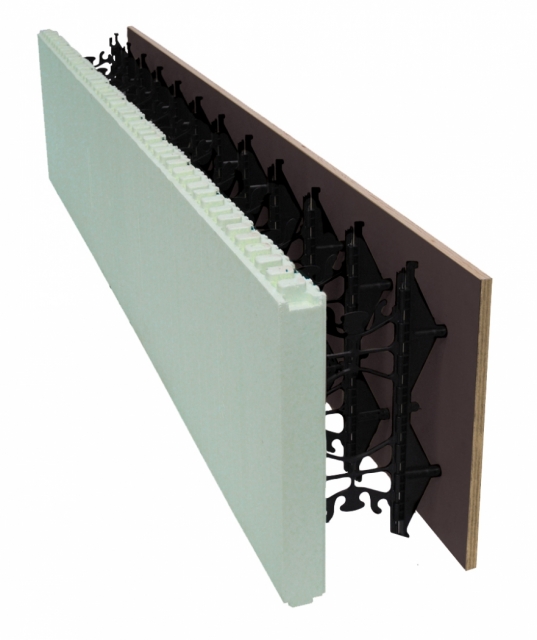
An ICF that makes sense
We came across an ICF (insulated concrete form) system that was pretty much perfect. It’s called Nudura One.
In a standard ICF, a certain thickness of foam on the outside is chosen, depending on your desired R-value, then there’s room for 8 inches of concrete, and then there’s another 2 inches of foam on the inside. This is required so that the concrete has a “form” to sit between (the two layers of foam). The unfortunate part about this was then you have to frame up (or at least drywall) the inner foam layer. This results in a fair bit of cost in materials and labor to finish it (although your airtightness is excellent with ICFs).
The Nudura One solves these inherent problems. Instead of foam on both sides of the wall, all of the insulation foam goes on the outside of the wall. The form is made by using a jig to secure sheets of plywood to the inner layer and concrete is then poured between the foam and the plywood. After the concrete dries, you unscrew the plywood and – Ta Da! – you have yourself a finished, highly insulated, airtight, bad-ass concrete wall. Yes, if you want, you can still finish the interior wall, but why? You got a bad-ass concrete wall right there. Done.
Weekly Newsletter
Get building science and energy efficiency advice, plus special offers, in your inbox.


9 Comments
$$?
Kent: Are your numbers in Canadian or US dollars?
Canadian
Hi Stephen,
Yes, all prices/costs in this post are in Canadian dollars. This was originally posted in March 2015 when the Canadian dollar was about $0.90 to the US dollar... not the $0.69 that it is now (yikes). Prices might have fluctuated from those stated above given our terrible currency right now.
Furniture Plans?
Did you come up with at a workable furniture layout for the second bedroom on the ground floor? The "Ls" appear to be extremely narrow in both directions.
Re: Furniture Plans
Hi Charles, when designing the house we measured all of our furniture to ensure the rooms would fit what we already had as he did not want to be purchasing anything new. For the 2nd bedroom upstairs, this was a tricky spot due to the placement of the stairs. This is a kid's bedroom. The south side of the "L" is 80" wide to accommodate a twin bed or bunk beds. A queen size bed can also be positioned lengthwise to allow access from one side. The other side of the "L" is also 80" but feels a bit wider as there is an open 'reading nook' above the stairs. This is indeed not your typical 10x12 bedroom, but works very nicely a kids bedroom, which was the intent.
Hire an Architect?
Just curious if you considered hiring an architect to help with the design? We are trained to look at space needs, land, topography, budget, site conditions, climate, construction options, etc. to right-size buildings and some also have a residential specialty. Typically the amount of "fat" that we can save or cut out of a plan (and therefore lower construction costs) more than justifies our fees which vary based on the services that you choose and the amount of drawings that are needed.
Yes. What Debra said.
There is much room for improvement in your plan. You'd be well rewarded by hiring a residential design professional before you solidify this in costly bricks and lumber.
Another vote
Because many of the houses featured here use building techniques conventionally trained architects may sometimes not be as familiar with as the well informed, self-taught owners, it's tempting to dismiss the usefulness of a professional designer's input. But all houses share common attributes we want whether they are energy efficient or not, and it's well worth the while getting the fundamentals right before starting to build.
Nudura One insulation thickness
The Nudura One is an interesting choice. I had not seen that before. I looked at the brochure and can't tell if the EPS portion can have variable thickness. If so, what thickness are you using for the EPS portion of the Nudura One?
Architects and Nudura
Debra, James, and Malcolm - We hired an architectural designer (who has built a number of modern high performance homes) in combination with an interior designer, and a structural engineer with heavy input from ourselves to design the house. I am happy with the space in the end (we are already living in the house as it is done and built - aside from some minor midstream changes during construction). And truthfully, at this point there is nothing that I can think of that I would change. It works well for us and our needs/wants. That being said, if I was to build another house someday - having so many "cooks in the kitchen" during the design stage was challenging and not always efficient - I probably would consider hiring an architect to streamline things.
ET - Yes, you can choose whatever thickness you wish (there is probably some endpoint), but we chose 8" thickness.
Log in or create an account to post a comment.
Sign up Log in