

More Building Science


I’ve written a lot of articles about ducts here, but I haven’t yet addressed today’s topic: common problems with ducts and how to fix them. This one is for homeowners or renters who want to save money and be more comfortable. And the nice thing is, these are relatively easy things to fix if you’re a handy do-it-yourselfer. With the guidance I provide in this article, you can go into your attic, basement, or crawlspace and spot the problem areas. And then you can fix your duct system.
The fundamentals of ducts for heating and cooling systems
Before I dive into the problems and fixes, though, let’s review the fundamentals of heating and cooling with air. The heart of a forced-air heating and cooling system is the air handler. That’s where the air gets heated or cooled. It’s also where the blower is. It’s the fan that moves the air.
As with any other fan, air gets pulled in on one side and blown out the other. Unlike a box fan or a ceiling fan, though, the air is constrained to move through ducts. The ducts on the pulling-in side are called the return ducts. The larger piece of duct return duct connected to the air handler is the return plenum. The ducts on the blowing-out side are called the supply ducts, with a supply plenum connected to the air handler.

There are some important things to know about the air moving through the ducts. First, the pressures are highest near the air handler. That makes problems there more important than problems farther away. Second, the air on the return side is at room-temperature. That means insulation is more important on the supply side, where the air is significantly hotter or colder than room temperature. Third, ducts in unconditioned spaces—attics, basements, crawlspaces, or garages—are where you should focus your efforts since losses there matter more than losses in the conditioned space.
Got all that? OK, let’s dive in.
Disconnected ducts
This should be the first thing you look for. I can’t tell you how many times I’ve seen supply ducts blowing conditioned air into attics or crawlspaces and return ducts sucking superheated, freezing cold, or really humid air into the system. Heating systems and air conditioners work much better when they pull all the air from the house.
Sometimes the disconnected duct is obvious and can be seen from far away. I found the one below blowing cold air into a hot attic.
Other times, you have to get closer to the duct and maybe even move insulation to see the disconnect. They don’t always fall off completely or open giant fissures.
There’s another way you sometimes can find disconnected ducts, too. If a supply duct has come completely disconnected, the vent at the end of the duct won’t blow any air into the house. So make sure the system is on and check all your vents for airflow inside the house. That can give you an idea of where to look when you go into the attic, basement, crawlspace, or garage.
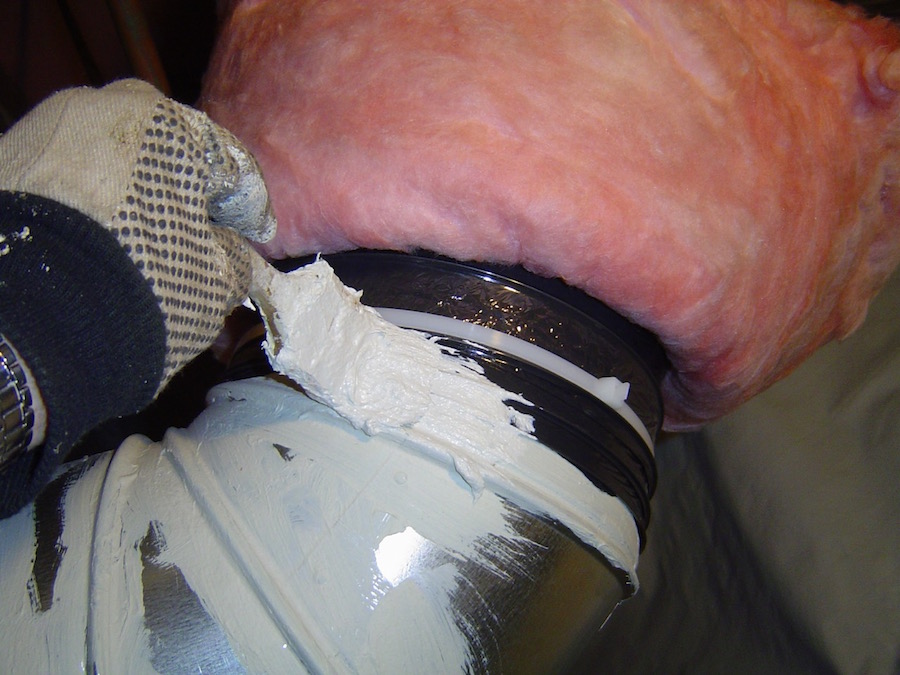
Once you’ve found a disconnected duct, the fix involves putting them back together. But take a good look at the connection and try to understand why it fell apart. Often it’s because the two parts weren’t mechanically attached to each other well enough. You can’t rely on tape only to hold them together. Use zip ties, hose clamps, screws, or staples, depending on the type of duct. Then seal the connection with mastic (as shown above) or mastic tape. (See the resources at the end of the article for more detail.)
Excess duct length
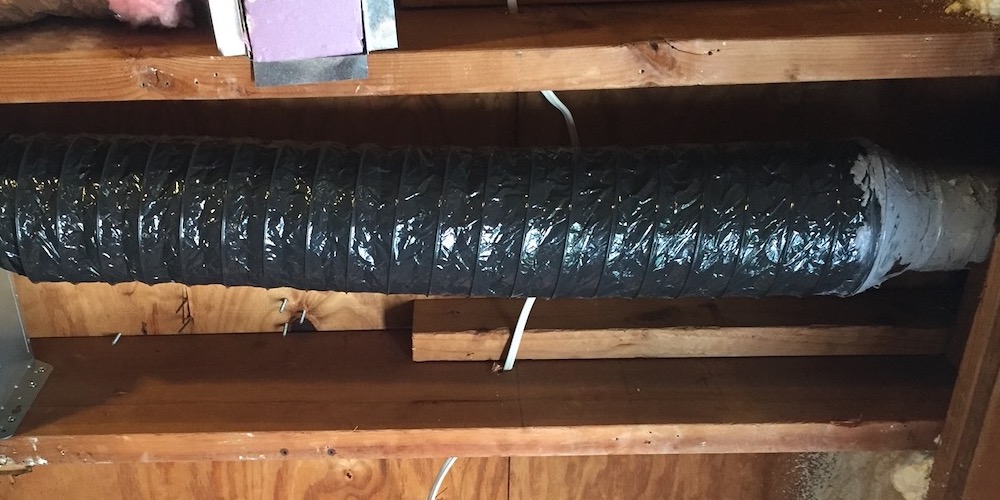
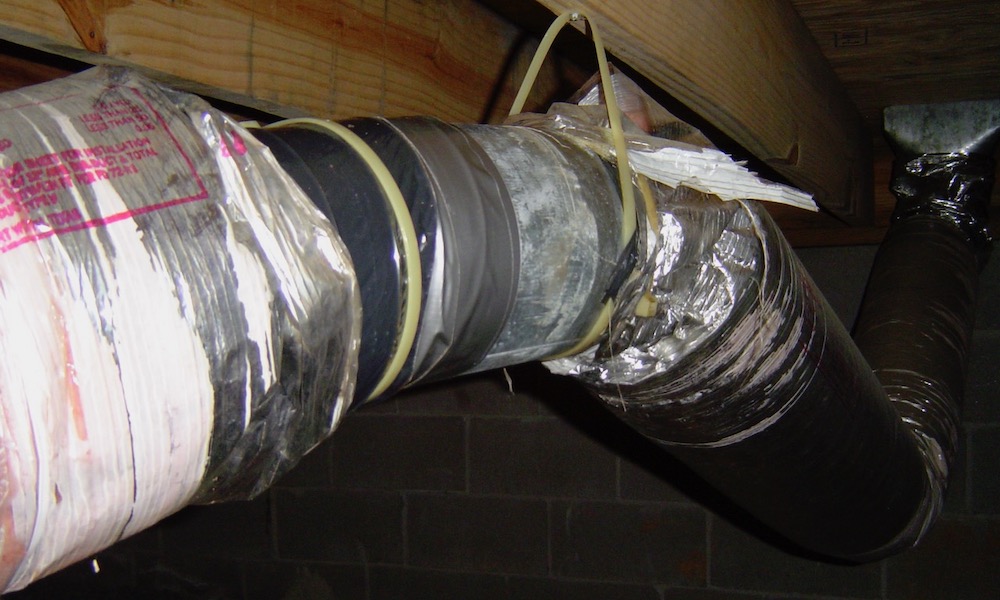
This problem adds resistance to the duct system. Resistance in the ducts can reduce the airflow or cause your system to use more energy, depending on the type of motor turning the blower. Sometimes installers leave extra duct length to cut down on noise. Sometimes they just don’t want to make that extra cut.
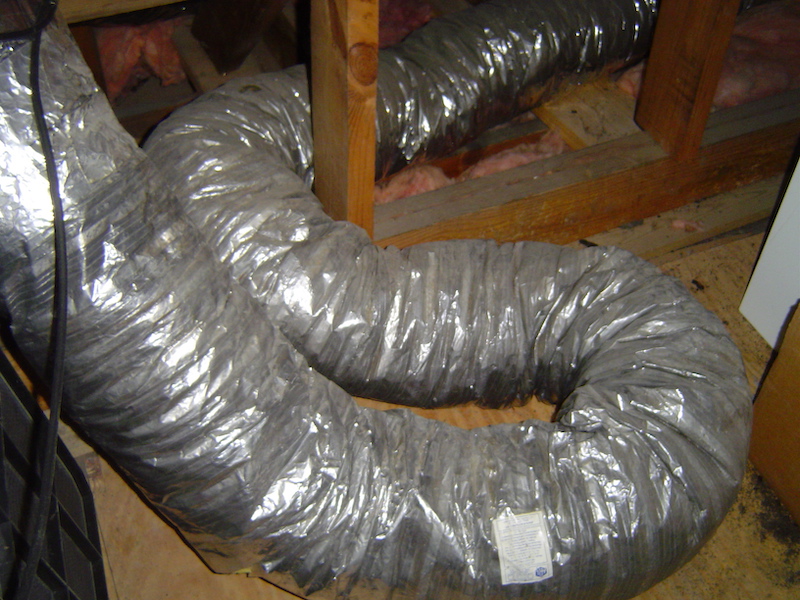
In the photo above, the duct you see is maybe 10 or 12 feet long. But it has as much resistance as about 100 feet of properly installed duct. If you see something like that, disconnect the duct from one end, cut as much of the excess length off as you can, and reattach the duct with the inner liner pulled tight. (See next section.)
Flex duct resistance
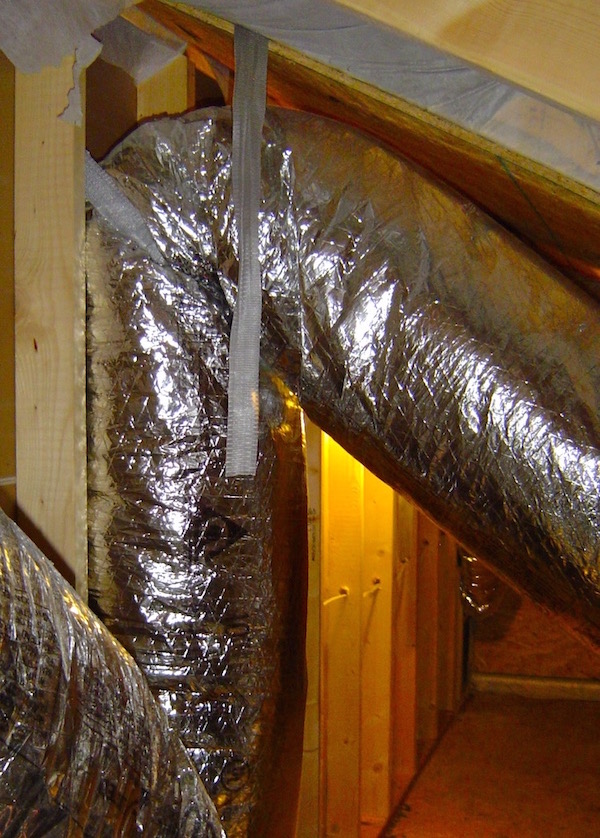
Removing excess duct length is an easy way to improve the airflow in your system, but resistance increases in flex ducts in other ways, too. In the photo below, the two flex ducts are poorly supported. Rather than being connected in a straight line between the two endpoints, they’re hung in a way that increases resistance to airflow. The inner liner isn’t pulled tight. They’re pinched a bit at the support. Air doesn’t really like roller coasters.
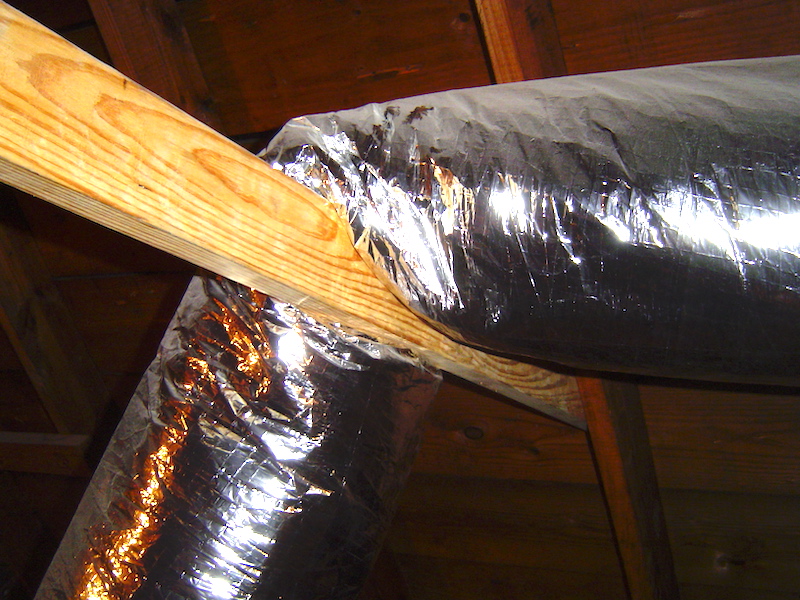
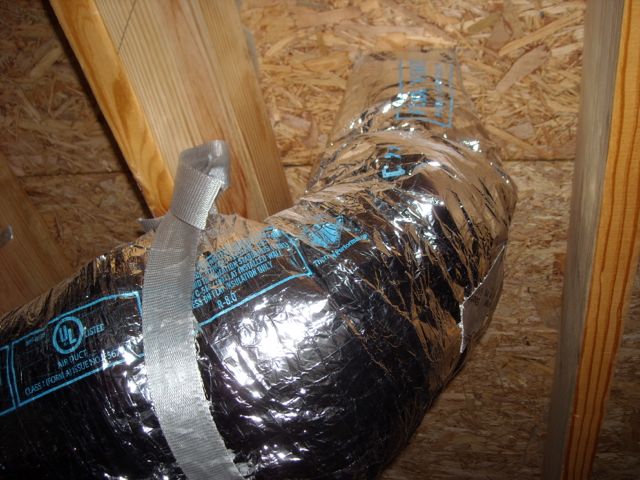
Ah, you can see another sign of a lazy installer in the photo below. “Hey, let’s just drape this duct over the collar tie in the attic. That’s good enough.” No, it’s not. Again, the duct’s inner liner isn’t pulled tight, and the duct is pinched right there.
One nice thing about flex duct is that it’s easy to work with. If you’re ever installed rigid ducts, you know what I mean. But that just makes it easier to abuse, too. When you see flex duct turning like the one in the photo below, you should immediately start looking for ways to reroute that duct.
The keys with flex duct are:
- To run it as straight as possible, and
- To pull the inner liner tight.
That’s how you reduce the resistance to airflow and fix your duct system.
The photo above shows a short section of flex duct I installed in my 2016 bathroom remodel. It wasn’t mechanically fastened on the left side yet, so the inner liner isn’t pulled as tight as it should be there. I did this just to take a photo of the inner liner, which is the important part for airflow. The plastic liner between adjacent pieces of the embedded helical wire should be as flat as possible. The right side of the duct is about how it should look when it’s installed.
If you have flex duct, these problems are pretty easy to find. Fixing them is all about finding ways to run them as straight and tight as possible.
Uninsulated or poorly insulated ducts and boots
When ducts are in unconditioned spaces, you don’t want them gaining much heat in summer or losing much heat in winter. That’s why we insulate them. But don’t just look from afar and be satisfied if you see insulation. Get in there and look at all the ducts. A little bit of uninsulated area can make a big difference. That’s as true for ducts as it is for attics.
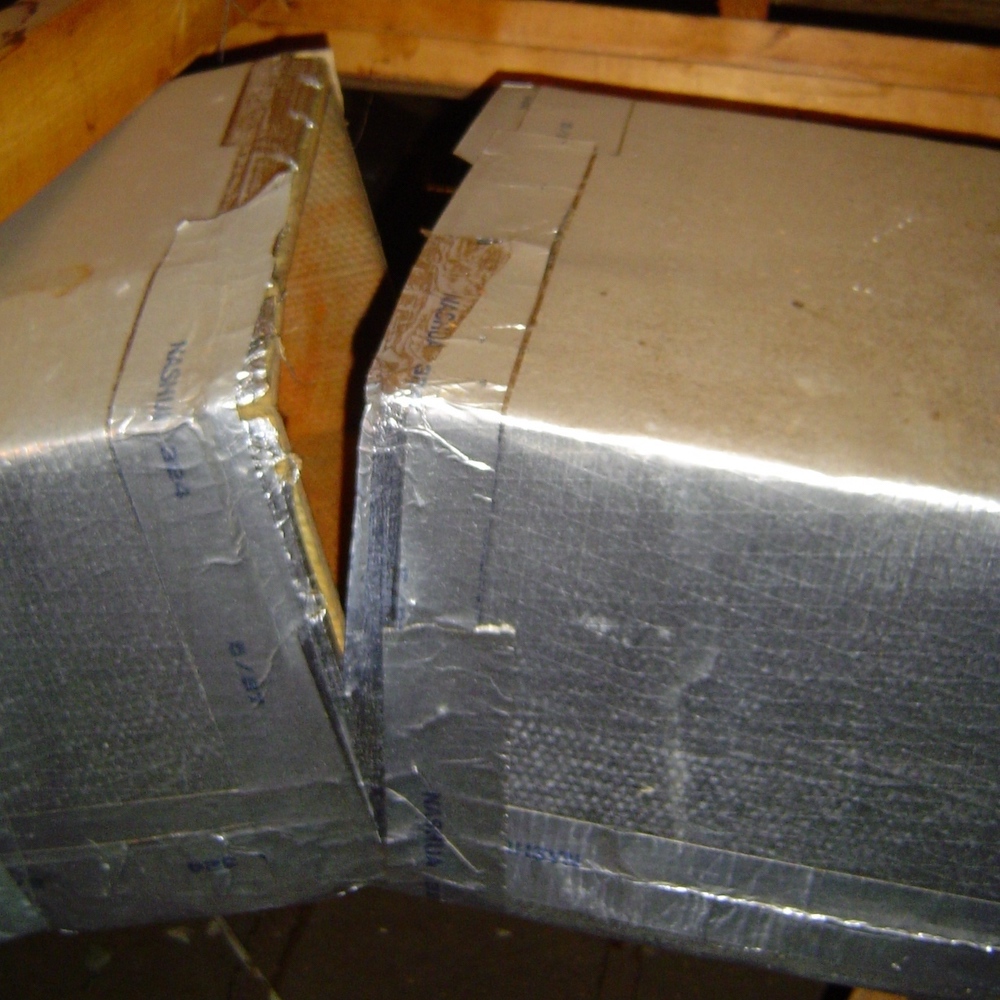
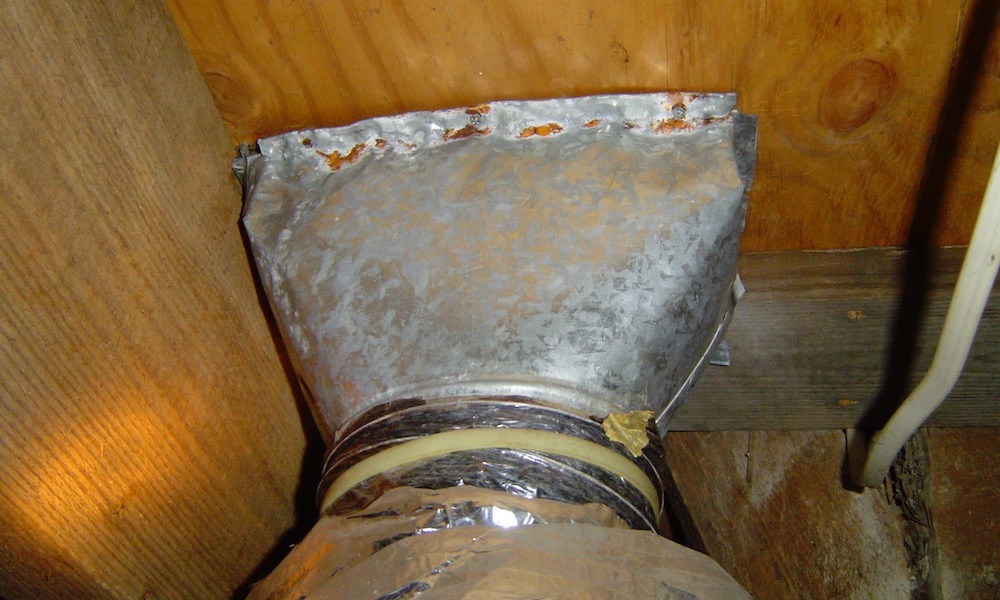
The parts that always seem to be the worst for insulation are at the connections. The photo above shows a particularly bad butt joint. In this case, I’d redo that whole connection and make sure it’s connected, sealed, and supported properly in addition to insulating it.
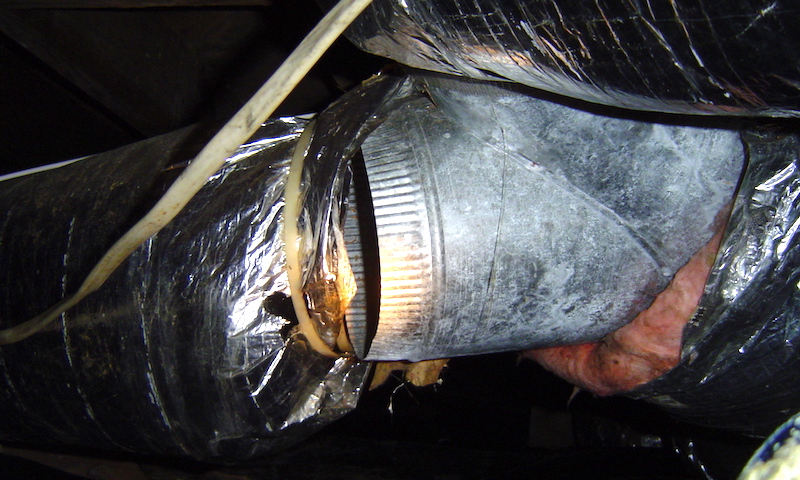
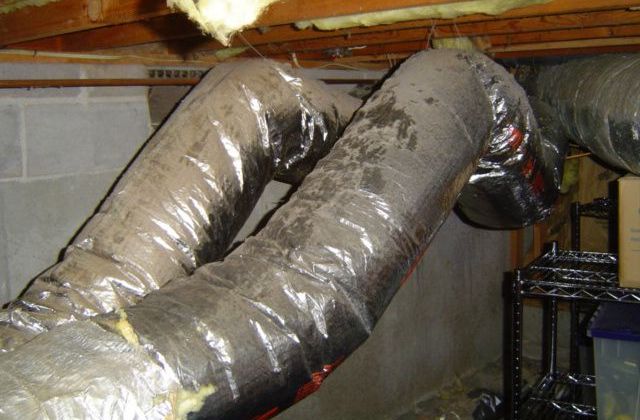
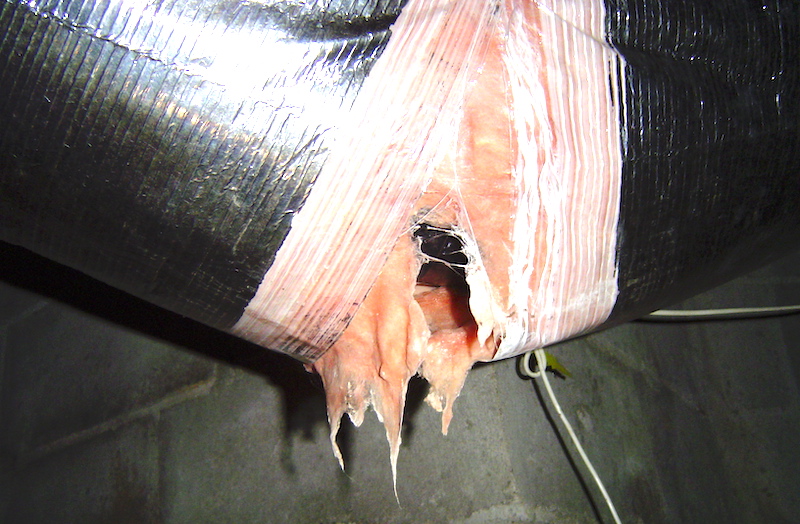
Another kind of connection that can make a big difference is where the duct connects to the boot (photo above). A duct boot is a sheet metal fitting with a duct connected on one side and a vent on the other. When it’s uninsulated in an unconditioned space, it can do more than just add or steal heat from the conditioned air. In a humid basement or crawlspace, that uninsulated boot becomes a condensing surface. That water then can drip down into the duct and blow out the outer jacket on the duct, as you can see below.
The photo below shows a fully insulated duct boot. Note that the outer jacket is taped up to keep humid air from getting in and finding the cold boot in cooling season.
The key with uninsulated parts of a duct system is finding them and getting them insulated. But also, pay attention to what you’re insulating over. Sometimes it’s best to do some repairs and sealing before adding insulation.
Airflow and other considerations
Some of the fixes I suggest in this article can increase the airflow. Some can decrease it. When you reconnect disconnected ducts or seal the leaks in a duct system, the airflow can decrease. If you have natural draft combustion appliances, you should seek professional help to ensure you don’t make a change that causes backdrafting of those appliances. It’s usually a gas water heater, but others might be susceptible as well. Look for a professional with a certification through the Building Performance Institute (BPI) or some other credential for testing the combustion appliance zone (CAZ).
I’ve pointed out some of the biggest, ripest low-hanging fruit for how to fix your duct system. The fixes are within the realm of possibility for handy DIYers, but beware that working in attics and crawlspaces isn’t for everyone. Also, I didn’t get into all the details of how to fix your duct system. The type of fix depends on the type and location of duct, so here are some good resources for more information:
- Building America Solutions Center resource guides on ducts
- Building Science Corporation duct sealing info sheet
- Weatherization program Standard Work Specifications (See the relevant sections under heating and cooling.)
Heating and cooling accounts for about half of the energy use in many existing homes. By addressing the problems I’ve shown above, you can reduce your energy use and make your home more comfortable. Even if you don’t fix your duct system yourself, if you find the problems, you can direct someone else to do the work.
Doing the kind of repairs I discussed here will improve your home a lot more than caulking the windows and weatherstripping the doors. Which is why I’ve said in the past, don’t caulk the windows.
________________________________________________________________________
Allison A. Bailes III, PhD is a speaker, writer, building science consultant, and the founder of Energy Vanguard in Decatur, Georgia. He has a doctorate in physics and writes the Energy Vanguard Blog. He also has written a book on building science. You can follow him on Twitter at @EnergyVanguard. Photos courtesy of author.
Weekly Newsletter
Get building science and energy efficiency advice, plus special offers, in your inbox.


8 Comments
Allison,
Those photos will give me nightmares. I may have to bill you for therapy!
Malcolm, at least he didn't show the dead opossum in the crawl space next to the open return duct.
jerhullp,
Small mercies I guess.
Ah, are you saying it's time to resurrect the possum again? ;~)
Sorry, Malcolm. If you want to go the #ElectrifyEverything route, you could try electroshock therapy. Or maybe that's what some of those installers had?
"There are some important things to know about the air moving through the ducts...."
That paragraph is a great starting point.
I am not sure of the local codes in area of photos, but in the Chicago area and if a permit is pulled they are very strict about flexible duct.
603.4 Flexible Air Ducts and Connectors.
Flexible air connector lengths shall be not more than 5 feet (1524 mm) and shall not penetrate a wall, floor, or ceiling. The temperature of the air to be con- veyed in a flexible air duct or connector shall not exceed 250°F . I am a mechanical contractor that is 80% commercial and a small fraction of residential. 60% of my residential calls are related to poor air distribution.
When I install duct work, its all hard piped.
Log in or create an account to post a comment.
Sign up Log in