
Image Credit: All photos: Carl Seville
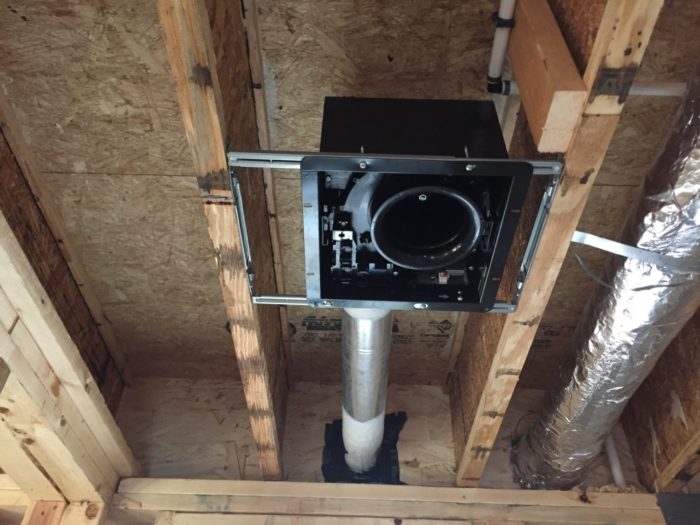
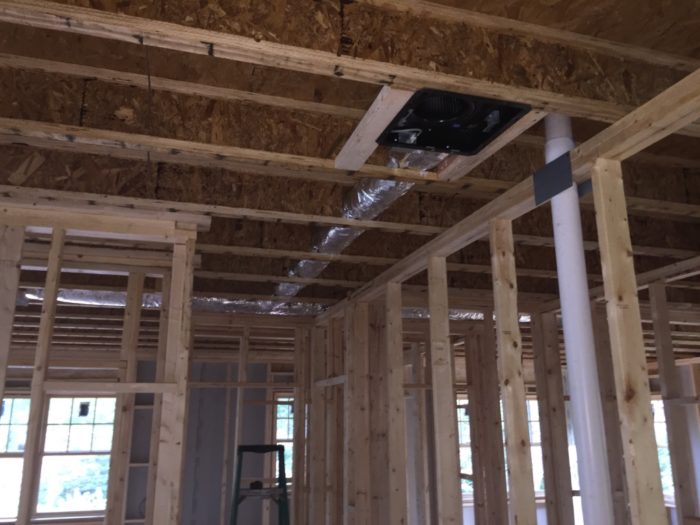
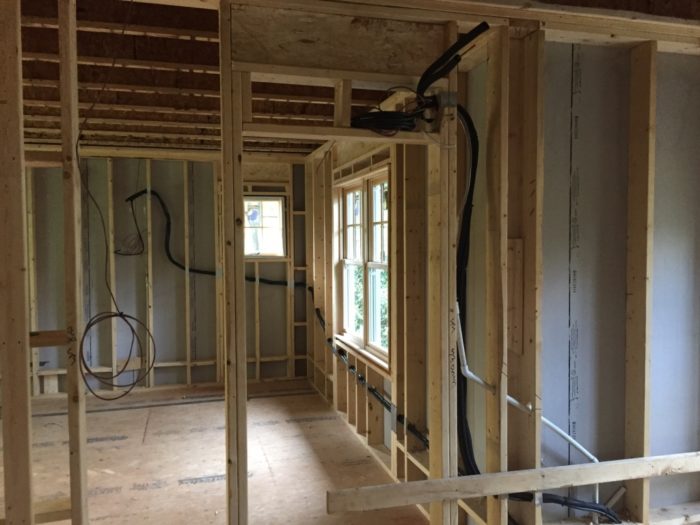
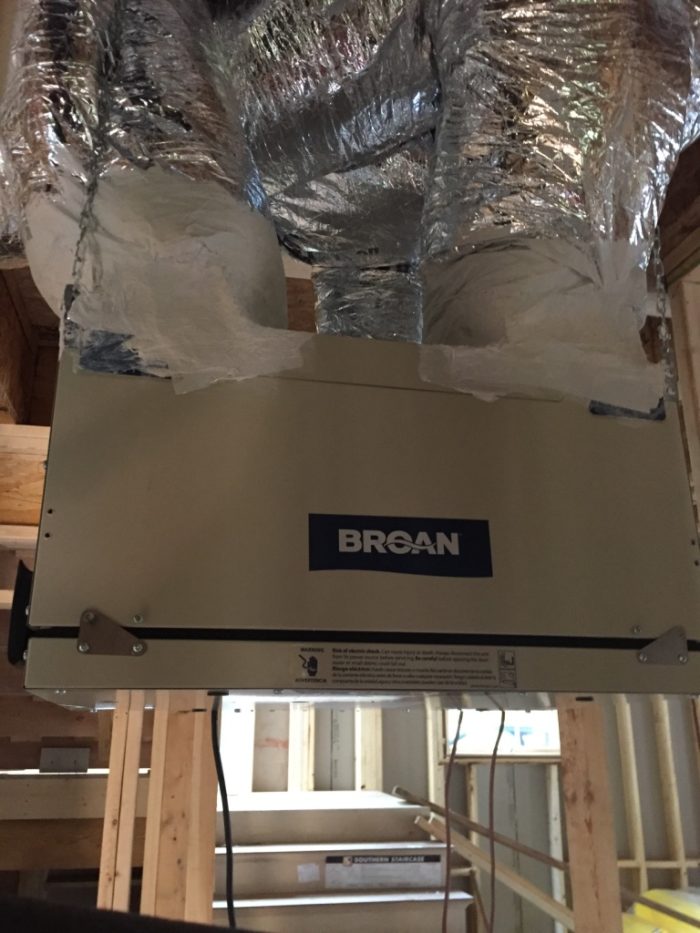
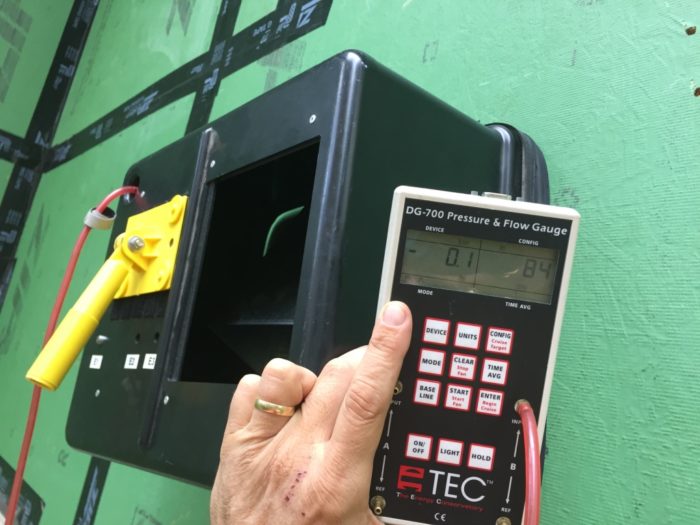
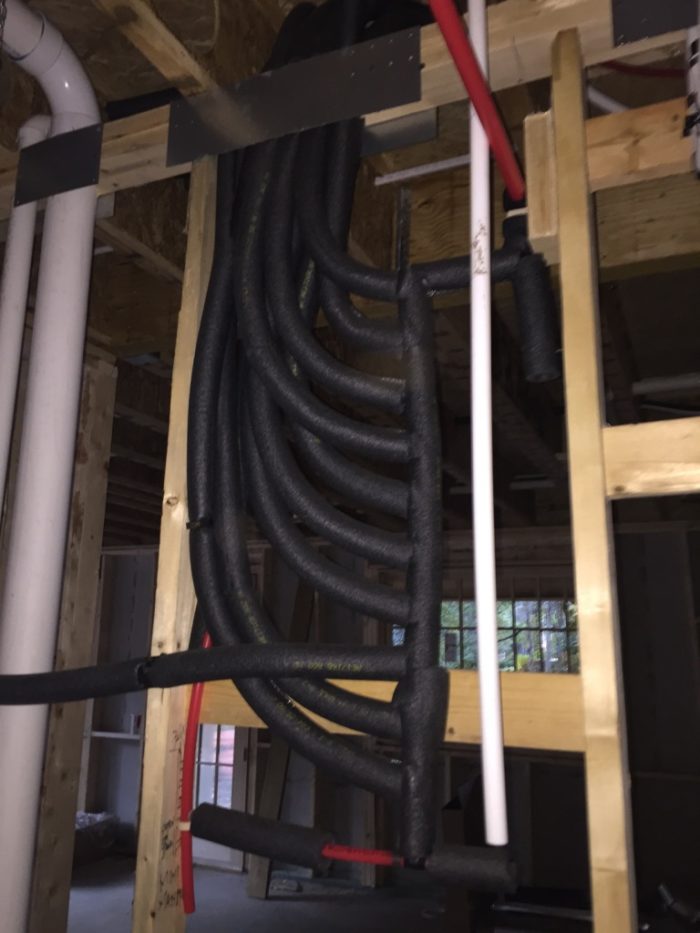
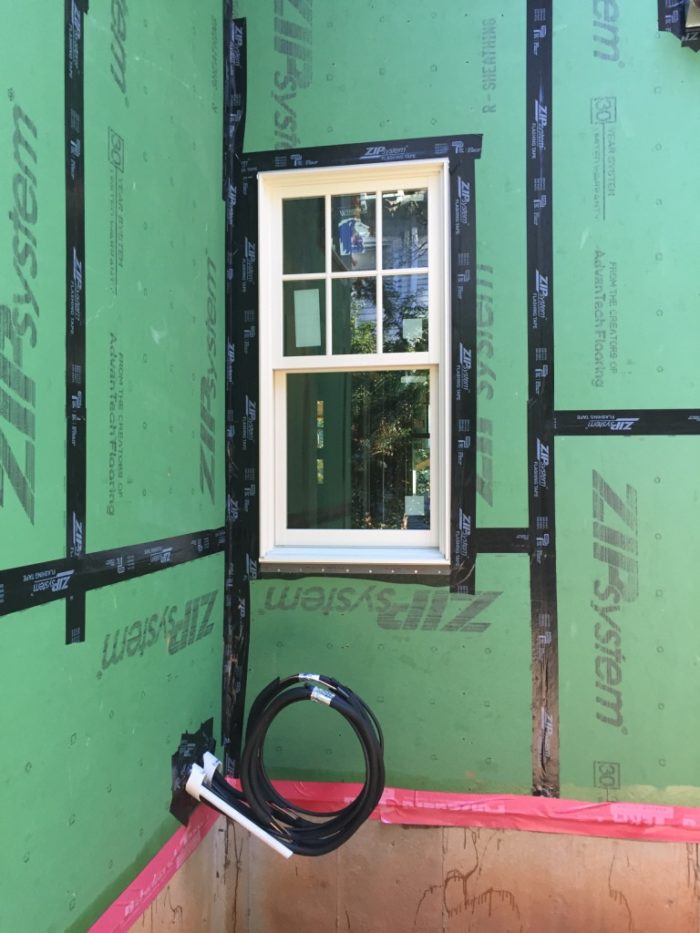
Image Credit: All photos: Carl Seville This 190 cfm fan will be used to transfer conditioned air from the hallway minisplit to the two front bedrooms. The installers had to do some careful work to get the minisplit refrigerant lines through the walls to the exterior. The ERV will provide outside air. It will also help circulate conditioned air from the first floor minisplit to the back side of the house. The ventilation system was installed with hard duct except for where the duts tie into the top-mounted intake and exhaust ports. The ERV intake air flow measured out at a rate exceeding the minimum required for ASHRAE 62.2, LEED for Homes, and Energy Star. Happy to have that item checked off. The site-built hot water manifold will get hot water to all the fixtures quickly with minimal waste. The Zip sheathing is taped and windows are installed. HVAC refrigerant lines are run through PVC pipe angled down through the sheathing. The PVC conduits are taped to the Zip sheathing for a solid weather barrier, and will be sealed with foam before insulation for a compete air barrier.
More Green Building Curmudgeon


Carl Seville and his wife are building themselves a new home in Decatur, Georgia. The first blog in this series was titled The Third Time’s the Charm. Links to all of the blogs in this series can be found in the “Related Articles” sidebar below.
The process of building a house reminds me every day how happy I am to be out of the construction business. I realize now that I wasn’t cut out for the daily stress of the construction industry — in part, I believe, because I care too much.
I wake up in the middle of the night obsessing about details and methods. I think and rethink minor decisions. And sometimes, I am too nice and forgiving of inferior workmanship.
I take responsibility for some of the problems we are having, mostly due to not making decisions early enough, or not thinking through all the details thoroughly. The biggest problems, however, have come from trade contractors and vendors not meeting my expectations. Material orders are incomplete, late, or just wrong. Carpenters seem uninterested in listening to what I want, instead simply doing what they always do: framing things fast and loose, and in some cases, just framing things wrong, including out of plumb and level, with doors and windows incorrectly sized or located.
Recent weeks have been spent coaxing carpenters back to the job to complete their work and correct mistakes — and thankfully, we are closing in on completion of that phase of the work.
Enough complaining — on to our progress
Now that the house is dried in, work on mechanical systems is underway. Plumbing rough-in is complete, and thankfully worked out mostly as planned.
I decided to install a home-run hot water supply system to minimize the wait for hot water and to reduce the amount of water wasted in the process. The plumbers installed a site-built hot water manifold with ½-inch insulated lines run to each fixture.
We were able to keep all the hot water runs to less than 30 feet through a combination of a centrally located water heater and careful placement of the PEX pipes. By minimizing run lengths as well as elbows in each line, I expect that we will have hot water to each fixture within 20 seconds, wasting less than a half gallon of water in the process. While this not optimum, and my friend Gary Klein would probably be very upset with me (since he likes to waste no more than a half a cup of water in his designs), I am happy with the results.
Gary suggested that I install an insulated circulation loop that ran right next to each fixture, supplied by a demand pump. I did consider this method. I have both used and recommended demand pumps over the years, but (as with many things in this house) I wanted to try something different. We will see how it works once the project is complete, but I have confidence we will be happy with the hot water system.
Ductless minisplits, exhaust fans, and an ERV
HVAC rough-in work is complete. One unexpected problem was the challenge of installing the refrigerant lines for the Mitsubishi ductless minisplits. Not wanting to have them snaking around the outside of the house, the installers drilled out studs to run the lines through the walls (our only option since there is no crawl space). Unfortunately, in the process of pulling the line sets through the walls, most of the insulation was torn off, and although it has been corrected, a sleeve under the slab for these lines would probably have simplified the installation.
I worked closely with the installers on the exhaust fan ducting, and they did an excellent job installing short runs of hard pipe for the Panasonic exhaust fans — something I rarely see in most homes I inspect and certify.
The Broan ERV is installed, and since it has a standard 110-volt plug, I was able to test the air flow rate before completion. I am happy to say that it exceeds the required minimum for ASHRAE 62.2, and while I probably won’t use it most of the time, the ERV helps the house comply with LEED and Energy Star requirements, as well as my local green building ordinance requirements.
Electrical work
Electrical work will begin shortly. Without adequate solar exposure, I am not able to install PV panels, so the installation is a pretty standard affair.
The house will be illuminated with mostly surface-mounted fixtures and a few recessed wall washers. I recently ran across a surface-mounted LED that has the look of a recessed light. The Lightolier SlimSurface LED fits in a standard depth 4-inch box with the look of a recessed downlight. The 2700 K temperature combined with a 90 CRI (Color Rendition Index) give it a light quality very close to incandescent at a very reasonable price. (For more information on the SlimSurface LED fixture, see these two GBA articles: Rethinking Recessed Lighting and Canned Lighting Conundrum.)
We are currently selecting pendants and sconces, most of which will likely be standard Edison-base fixtures into which we will install LED lamps. The selection of integrated LED fixtures is still limited, and those that are available are quite costly, so using standard fixtures is an easy decision.
Coming up next
Siding and exterior trim will commence shortly after the electrical work is complete. No exterior finishes will be installed until all of the mechanical penetrations — including wires, pipes, and ducts — are installed, weather-sealed, and air-sealed.
Following that, we will be installing a HomeSlicker vented rainscreen on all the walls, covered by Boral TruExterior siding and trim. The TruExterior is a good-looking product comprised of coal ash and recycled polymers. I haven’t yet used it but look forward to trying it out. It is similar in finish to mineral-fiber products; however, it is available in a much wider variety of sizes, including a 1×6 resawn siding, tongue-and-groove beadboard, as well as 1x, 5/4, and 2x dimensions up to 12 inches wide. With the exception of the lookouts at the soffits, we don’t expect to use any wood on the exterior of the house.
On the interior, the next steps are to complete the installation of the Term vapor and termite barrier on the slab, install the plywood subfloor, apply borate treatment to the framing, and install the air sealing details and insulation.
We are currently planning to do a blower-door test on the house after the windows and doors are air sealed to confirm the effectiveness of the Zip sheathing air seal. Following that, the Owens Corning Energy Complete sealant and blown-in fiberglass insulation will be installed in preparation for drywall.
It’s a long, slow process, much of the time more stressful than satisfying, but I am looking forward to the finished product.
Weekly Newsletter
Get building science and energy efficiency advice, plus special offers, in your inbox.


18 Comments
ductless mini-split with separate ducts
I'm curious about the use of a fan and ductwork to transfer air from a room with the ductless minisplit to the bedrooms (photo 2). It looks like a clever idea. How do expect this set-up to compare with a ducted minisplit in terms of performance, installation cost, and energy usage? Will the fan run continuously or only when the minisplit is on?
Mini Splits
Harry - I have not done this specific installation personally, but have spoken to others who have. My personal experience with ductless mini splits in my current, not consistently insulated home is that they will provide adequate conditioning in several rooms as long as the doors are open. I did not compare the cost of this installation with a ducted model as didn't have a good location to install a ducted system the way my house is designed. I expect that the performance will be as good or better than a ducted system. There may be a minor temperature differential at the far ends of the house, but in this new house, with continuous exterior insulation and well air sealed and insulated walls, I expect that the ductless units will condition the house well most of the time without the fan. I am setting it up so that the fan will only run when the mini split is on with an override switch to turn it off if we don't want it, which I expect will be most of the time when doors will be open. If we find that the fan does a good job of air distribution we may leave it on more often. In terms of energy use the fan uses only about 42 watts, so even if I run it 24/7/365 it will only cost about $40 per year, and it is very likely that it will only run a small fraction of that time. I guess I will find out soon how it works.
Response to Carl Seville
Carl,
I'm glad you are conducting your experiment, but I feel duty-bound to inform GBA readers that your fan is unlikely to do much. (This topic comes up often on GBA.)
During the winter, a forced-air furnace can heat a room because it is delivering 140°F air (or in some cases 160°F air). You are trying to use 72°F air to heat a room that is at 66°F -- and that is much more difficult than trying to heat a room with 140°F air or 160°F air. The volume of air you would need to move to raise the temperature of the adjacent room is huge -- so I don't thing that your 42-watt fan will do much.
But you can let us know if it works.
Fan power consumption
For readers considering a similar approach, a Panasonic Whispergreen fan will give you 150 CFM using 13 W, which is less than half the power consumption per watt.
To put some numbers on Martin's scenario, 190 CFM at a 6 F temperature difference provides 1231 BTU/hour, or 615 in each bedroom. That's not a lot, but then again you don't need a lot. Of course if the temperature difference is only 2 F, the heat supplied goes down accordingly. It's more than the 300 BTU/h you'd get going through an R-2, 100 sq. ft. uninsulated partition wall at the same 6 F temperature difference.
Good point Martin
Martin - I appreciate your input but I think your northern bias may be showing a bit. While we do slightly more heating than cooling in the Metro Atlanta area, we don't do a whole lot of either, and for all but a few days a year, the delta T is pretty low, usually around 30-40 degrees maximum, and even less most of the time. With a tight well insulated (at least for the south) building envelope, and open interior doors, I am confident that the house will stay pretty comfortable without the fan running. Based on the experience with my current inconsistently insulated house (3/4 of the exterior walls have no insulation) one mini split keeps the place comfortable most of the time. In the summer, with a very shaded site, most space conditioning will be dehumidification which also won't need too much circulation to work effectively. I have faith.
Response to Carl Seville
Carl,
I agree with everything you just wrote. Your house will be fine. All I'm saying is that the fan is unnecessary. You are unlikely to use it, and if circumstances arise that dictate a need for supplemental heat, the fan you have installed won't work.
What the lipstick-on-mirror math reads.
The brutally dumb arithmetic:
190cfm x 60m = 11,400 cubic feet per hour.
At specific heat by volume of about 0.018 BTU per cubic foot per degree F and a 5F delta-T you're looking at:
11,400 x 5F x .018= 1026 BTU/hr
At a 3F difference it's about as much heat as 3 sleeping humans, or two standing humans are emitting.
At a 35F temperature difference (65F indoors, 30F outdoors- roughly the 99% outside design temp) a better than code-max U0.30 window is losing ~10.5 BTU/hr per square foot. There's something on the order of a combined 100 square feet of window on front two bedrooms, so at your 99% outside design temp the benefit of the 190cfm fan might just cover just the window losses at a delta-T of 5F from the rest of the house when the doors are closed, but that's about the extent of it, unless the windows are triple panes.
Dumb Arithmetic
Dana I appreciate your calculations but that 35 delta T is infrequent where I live most of the year. Based on my experience with my current house with bedroom doors open there is a minimal temperature variation between rooms. The fan is primarily to move air into rooms when doors are closed for infrequent guests. We will have an override switch to turn the fan off which will likely be most of the time. I never intended for the fan to provide adequate conditioned air to heat and cool those rooms. It is there to help out a little as needed. Not very scientific but I'm ok with that. My shoot from the hip style has served me well for 59 years.
Response to Martin
I find it enormously unlikely that a room that maintains a suitable temp just by opening the door would not maintain a similar temp with forced convection. How much natural convection is occurring at the open door? More than 50 cfm?
Plumbing question.
Did you opt for the site built manifold because it would allow the plumbers to attach insulated tubing whereas a typical PEX block manifold doesn't have sufficient space to individually wrap the lines?
Response to Jason D
Jason,
The consensus on GBA seems to be that an open door is worth a 100 cfm fan, so you're right: Carl's 190 cfm fan (which is obviously more powerful than the typical bath fan) is likely to perform better than an open door.
Lots of previous threads on this topic.
Kevin Dickson: "An open door can swap over 100 cfm, and it doesn't even need a thermostat."
Nick Welch: "I experimented with other R values, other CFM rates, other temperatures, and basically the theme is the same: the fan does help, but maybe not enough to be worth the hassle. The trend seems to be that you need around 100cfm to cut the temp differential roughly in half, and doing much better than that gets into ridiculous cfm numbers -- the cfm-to-temp-differential doesn't scale linearly."
Dana Dorsett: "If you moved 200 cfm of fully conditioned air into the room the temps would only drop 2-3 degrees, but that's a bit of a breeze- with the wind-chill 200 cfm of 70F air feels like a cool draft- great in summer, not so much when it -10F outside and the air is dry. This is just the rough handle on it, but it's the right order of magnitude. You can fine tune it on the real window & wall areas. An open door is probably good for 100cfm of convection at a room-to-room temperature difference of 10F."
Marc Rosenbaum: "How many cfm move through an open door? I think it’s different depending on where the door is. If it is up a floor, it has more air flow through it than if it is on the same level — the difference in height between the heated room and the door opening helps that movement of air and energy. ...I tend to think of an open door as being equal to a decent bath fan — it’s worth 50-100 cfm."
Thanks for the links, Martin.
Thanks for the links, Martin.
Return air path
If the fan is intended to provide air to the bedrooms when the doors are closed, what type of return air pathway did you provide?
I calculate 300 CFM through
I calculate 300 CFM through an interior door with a 5F temperature difference. For closed doors or tighter temperature control - consider a Chiltrix with fan coils. I would carefully avoid using any type of powered fan to accidentally pressurize or depressurize a room.
Re: Dumb Arithmetic @ Carl
I get that the 35F delta is the 99% or 99.5% condition, not the norm. My point was the at the benefit is so small (even for those few hours where it might be needed) that it's not worth the trouble & expense of installing it. The other 98-99% of the time it's benefits are really "in the noise".
The only project I've been involved with where fan-moved air was "worth it" was on house that had about 12 square feet of U0.18 window on each of the doored off bedrooms. By using exhaust-register only in those rooms on the ducted HRV, it was then possible to guarantee (to the inspectors) the code-minimum 68F room temp @ the +5F 99% outside design temp with the doors closed without adding supplemental heat. In practical terms it didn't mean squat from a heating/cooling point of view, but since the HRV was already going in it was a means of satisfying the letter of the code without additional expense.
Had there been an active supply of cooler than room temp tepid HRV output air into those rooms it would have failed. But by pulling in fully conditioned air from the adjacent spaces the dumb-math on the heating requirement worked without having to jack the temp in the open space with the mini-split to some torrid level.
Great discussion
Thanks for all the feedback, much preferred to having posts ignored. Regarding the return air path, I have jumper ducts from the bedrooms into the hallway (I believe they were installed after the photo was taken). I don't expect that we will use the fan much. I plan to experiment to find out when and if we need it. If it ends up being superfluous I'm ok with having wasted a little money on the experiment. It's reasonable insurance against having to retrofit something later. In the meantime I will continue building and posting.
Ductless MiniSplits and Cold Rooms
Our NZE passive house in northern NJ (PHIUS project 1054) is heated and cooled by two 12k BTU Mitsubishi ductless Mr. Slim HyperHeat minisplits, with one on the first floor and one on the second. The first floor has an open floor plan except for a guest bedroom. The bedroom stays at the temperature of the rest of the first floor except when its door is closed. Guests sometimes like the door closed for privacy, and in winter it tends to get a little cool.
So we bought a Honeywell space heater (HZ-855) that has a very quiet fan, a thermostat and a few fan speeds. It cost around $50.
It does the job.
Why don't you plan to use your ERV much?
Log in or create an account to post a comment.
Sign up Log in