

More Green Building Blog


We were building a new deck on the back of a house when we had to break for a couple days because of heavy rain. When we returned, the client asked us about a puzzling problem that two roofers had been unable to solve. Occasionally, after a day of rain, the garage floor had a puddle of water that seemed to weep out from the bottom of the back wall where the garage joined the rest of the house. I had a sense after looking in the back of the garage that the leak was at the first piece of step flashing where the garage eave joined the main house wall.
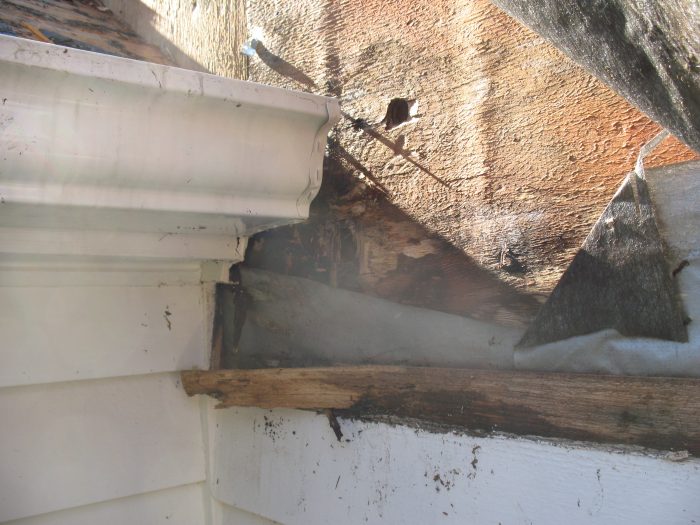 I had to remove only two pieces of lap siding where the drip edge on the garage roof met the house wall to see the saturated and decaying plywood sheathing. And the damage only got worse as we removed more clapboards and housewrap further down the wall. When the 25-year-old house was built, the first piece of step flashing was installed against the wall and the housewrap was installed over it, which makes sense for every other piece of step flashing—lap the water-resistive barrier (WRB) over the wall leg of the flashing, shingle style. But the first piece of step flashing in cases where the main body of the wall continues beyond the eave of a lower roof needs to be turned away from the wall, and the WRB has to be sliced so it covers the wall leg of the step flashing and goes behind the turned out leg.
We removed the siding on both the back wall of the garage and the adjoining wall of the house. The water damage was more severe and wider lower down on the wall. The…
Weekly Newsletter
Get building science and energy efficiency advice, plus special offers, in your inbox.

This article is only available to GBA Prime Members
Sign up for a free trial and get instant access to this article as well as GBA’s complete library of premium articles and construction details.
Start Free TrialAlready a member? Log in


7 Comments
Good explanation.
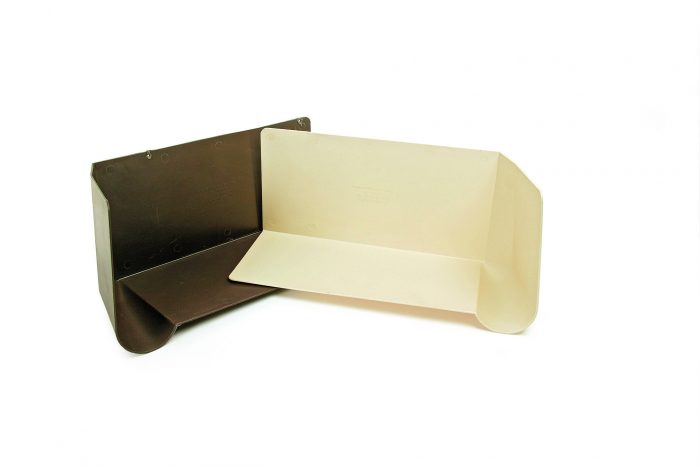
One other associated point: The accompanying illustration shows a short leader which dumps the upper gutter's water onto the shingles below - and does so at right angles. Particularly when the gutters are so close together it's a much better idea to run the downspout directly from one to the other, avoiding adding that much bulk water to one small area of the shingles.
That's a good point Malcolm. And another trade that needs to be included in the overall water management strategy.
Perhaps a thicker gauge metal or more reinforcement should be used in snow/ice country? That thin of flashing looks like it could be damaged and/or ripped out by snow/ice sliding off of a roof.
David,
Considering that the kick-out flashing should never move, or need to be replaced when the roof and step-flashing is, a thicker more permanent material and installation might be a really good idea.
There are preformed stainless steel kickout flashings available for just that reason. They are a bit pricey, but you only need a few of them on most houses.
I may not be seeing this correctly, but it seems the gutter is a bit close to the siding. Won't that close proximity result is increased moisture retention, poor drying? And then, "mold-like" growth? I have generally recommended the gutter stay back from the siding at least one inch, and if the step flashing is installed correctly, it can be out even two inches.
Walter,
Good point.
Log in or become a member to post a comment.
Sign up Log in