

More Building Science


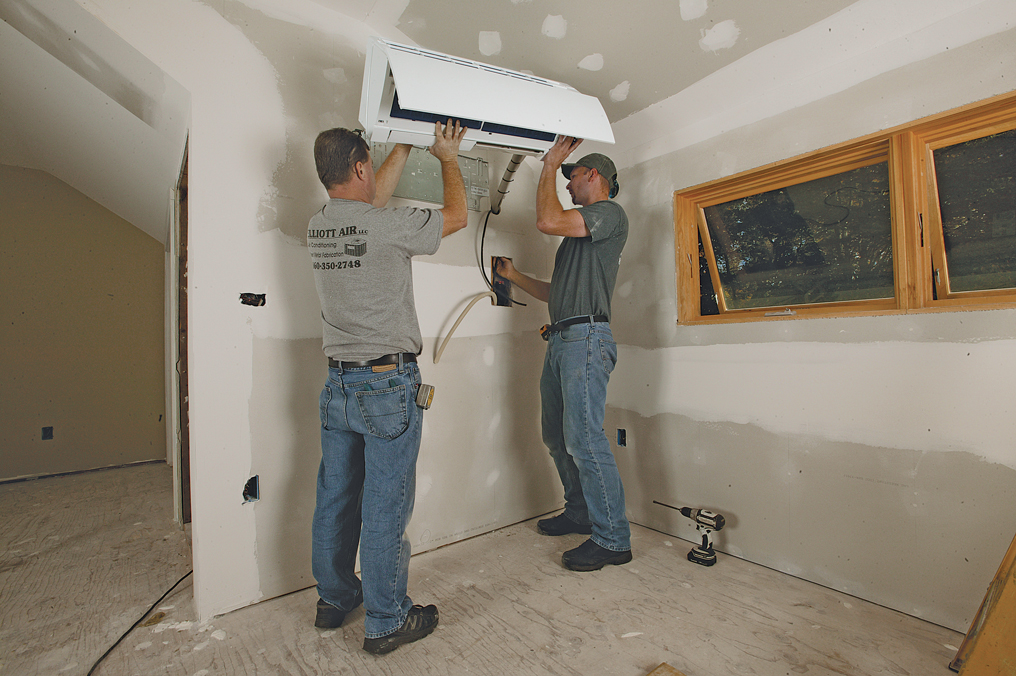
I installed ductless minisplits for the HVAC in my new house because I had a good experience with them on my earlier renovation, and I wanted to run an experiment in eliminating ductwork. The experiment worked out well, but the equipment and installation have been problematic from the beginning.
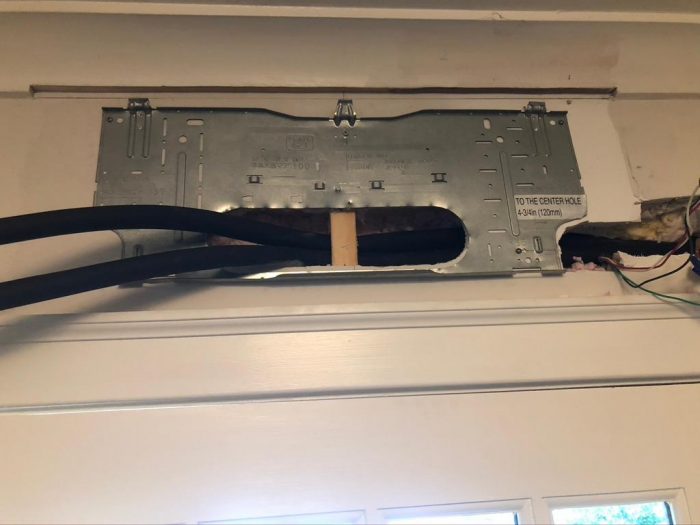
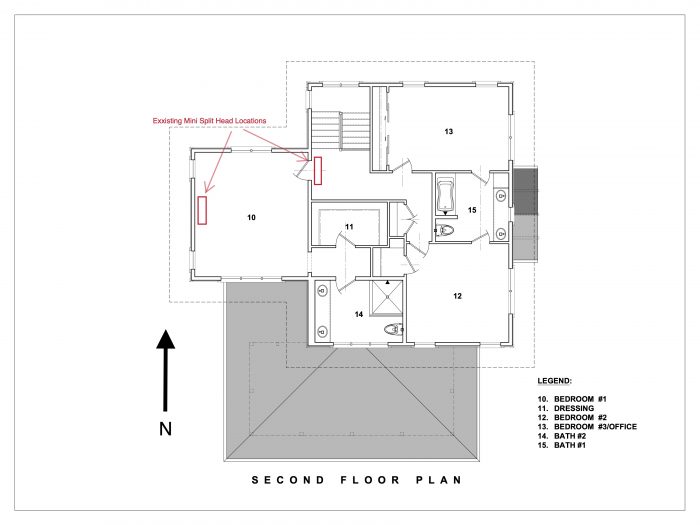
For starters, the installer I selected—a Mitsubishi Diamond Contractor, a program that is supposed to recognize the most qualified installers of the company’s equipment—made mistakes in the installation that I was not experienced or observant enough to identify. They installed the line sets on the wrong side of all three indoor heads, requiring drywall removal to disconnect the refrigerant lines to service the equipment. Had they installed them on the correct side, the heads could have been removed by separating the flare connections outside instead of inside the wall.
The issue became apparent when another problem arose—the failure of an indoor coil. The first coil started leaking about two years after the house was completed. Less than a year later another coil leaked. I have no idea why two out of three coils have failed within three years. I have three older units in another project that have been trouble-free since they were installed almost 10 years ago, so I attribute it (without any evidence) to problems with the manufacturer’s new design.
Mitsubishi did not have any suggestions as to why my units failed, and I was told that there are no reports of excessive failures in the field. To add to my frustrations, although they were still under a parts warranty, the labor costs were over $2000 per unit to repair. After the first repair, I elected to switch HVAC contractors. The new contractor identified the second coil failure during a routine maintenance visit. While this company appeared to be more knowledgeable and experienced, they had their own issues.
Everyone makes mistakes
When the second coil was replaced, we opened up drywall again, but this time the installers brazed the connection in the wall and rerouted the lines so any future service requirements can happen without removing drywall. Everything seemed to be working but a few weeks after the repair, I noticed dampness in the wall next to the head. In the process of repairing the coil, they had inadvertently scraped off the ribs on the thin plastic corrugated condensate drain line, allowing water to drip into the wall cavity. Luckily, I caught this before any structural damage occurred, so the repairs were limited to insulation, drywall, trim, and paint. The installer accepted responsibility and covered the cost of the repairs, and all is well. I will make the same changes the next time a head fails. I plan to bite the bullet for the wall repairs, and hopefully I will not have to make them ever again.
What could I have done differently?
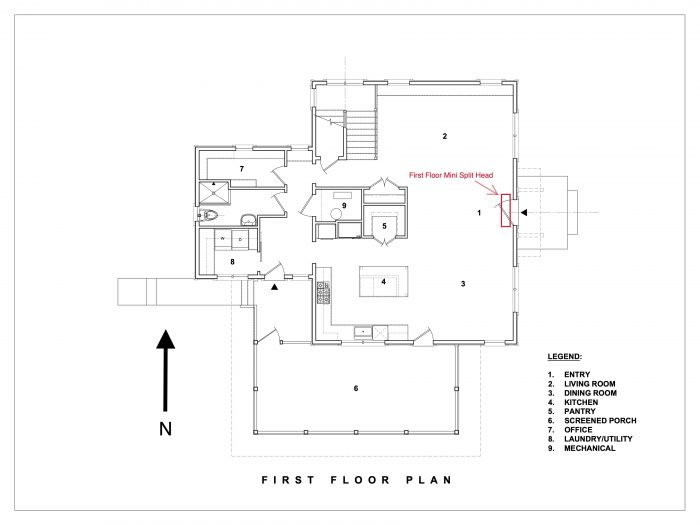
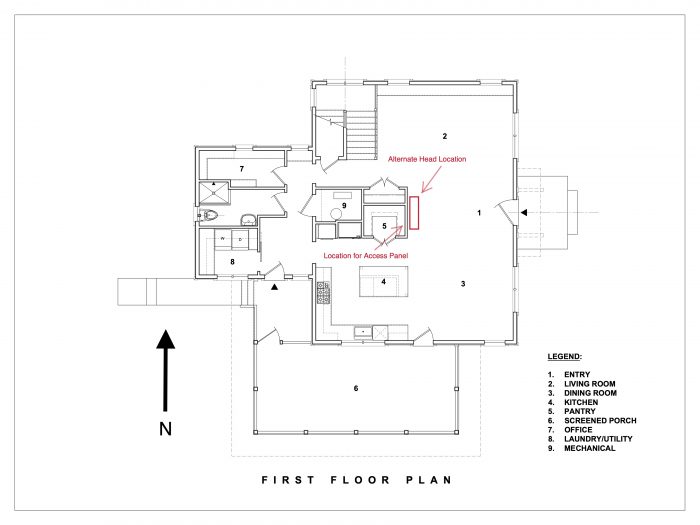
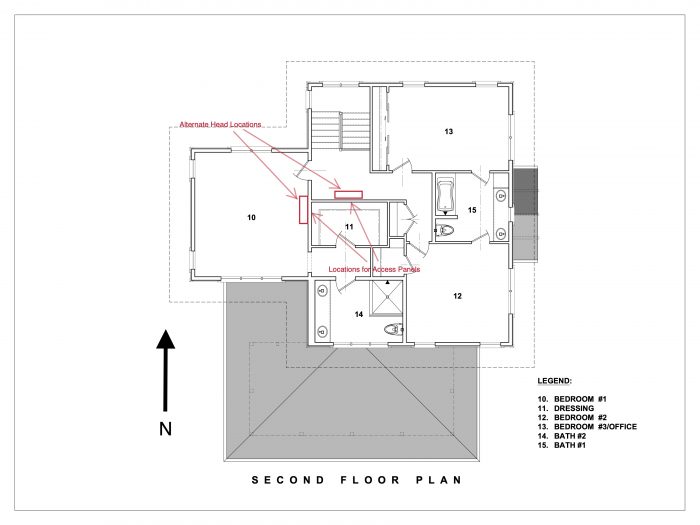
All of this got me thinking about the original house and HVAC design, and what I could have done better. Based on a design by Allison Bailes of Energy Vanguard, I installed the indoor heads on two exterior walls and one interior wall, as indicated on the plans in the gallery of images above. These locations condition the house well, but based on my experience with the repairs completed to date, even if the refrigerant lines had not been incorrectly located, I would have been better off placing the heads on interior walls, where I could have installed panels inside closets to provide access for repair and replacement. (See the gallery for potential alternate locations.)
A minisplit installer recently told me that he always recommends installing the line sets on the exterior walls rather than the inside walls for maintenance. While I wouldn’t do this on a new house for aesthetic reasons, it does make some sense, and providing access panels would have been a good idea regardless.
I suppose designers and contractors with more experience may have come to these conclusions already, avoiding some of the mistakes I’ve made. While I have learned from this experience, I could have done without all the trouble.
_________________________________________________________________________
Carl Seville is a green builder, educator, and consultant on sustainability in the residential construction industry. After a 25-year career in the remodeling industry, he and a partner founded SK Collaborative. Photos courtesy of the author.
Weekly Newsletter
Get building science and energy efficiency advice, plus special offers, in your inbox.


14 Comments
“[Deleted]”
“[Deleted]”
Carl,
Thank you for the article. If the ductless units are installed on exterior walls and the lineset goes straight out through the wall (with wall sleeve, airsealing etc), per this statement "A minisplit installer recently told me that he always recommends installing the line sets on the exterior walls rather than the inside walls for maintenance," then there shouldn't be an issue?
Will - you are correct, if the linesets had gone straight out the wall to the exterior, and the flares connected in the right location, I would not have had the same problems, but that is not a desirable look for a new high-end home. Aesthetics do matter.
Thanks Carl, agree aesthetics do matter. I wish I had a new high end home but beggars can't be choosers I guess! I'm trying to understand what is the ugly part? A long line with line cover to the compressor?
I think this is something architects and designers need to think through early on, not as some extraneous equipment to be somehow worked into an already thought-out floor plan. Over time we have managed to incorporate all sorts of fairly ugly mechanical devices and appliances in our houses. Sometimes they get hidden, like refrigerators and dishwashers often do, sometimes celebrated as features, like wood stoves and their chimneys. It's just another thing that should be included in the dance between looks and function.
James - there is a serious shortage of qualified HVAC installers almost everywhere. We work with a lot of single family builders on green certification and the HVAC is consistently installed poorly with incorrectly installed ventilation systems, unsealed ducts, and twisted and crimped flex duct. Most quality installers won't even look at standard new construction because they can't charge enough to make it worth their while.
What a PITA.
Quick question. If your house was built with a basement would it have been possible to re-position the heads as you suggested and then run the lines down an interior wall and outdoors?
Carl
Do I correctly recall reading somewhere that you installed PVC sleeves under your slab and in your walls as "conduit" for the linesets? It sounded like a terrific idea. Just wondering if it worked.
John - the one issue with the linesets is that they brought them out of the wall at rough in on the wrong side of the head. If they had put them where they were supposed to be they could have made the connections without opening up the wall. The installers just screwed up.
thx!
CL - The only conduit in the slab was for the water line to the kitchen sink and some floor outlets. The connection issue only has to do with where the lineset was positioned near the head.
Thanks for sharing. I can tell a southern house by the plumbing fixtures located on exterior walls and no relationship to location of unit. Up north, I have plumbing fixtures on interior walls and designed in advance for access panels or external valves like Grohe where I couldn't have an access panel. My ducted Mitsubishi units are all accessible (e.g., closets) and the lines run less than a foot outside from the heat pump into an insulated wall. I think Dr. Bailles advice for keeping things in conditioned space is good, with your advice as to access panels too, reminds me of a boat, access panels for nearly everything ;-)
When they installed the new head units did they also replace the line set? There is a huge problem beating up the ductless industry again due to the white insulation on the line sets corroding the copper and causing leaks in the line set itself. That may have been your issue to start with. I just removed my shortest run on my 3 zone ductless that was leaking to find pin holes over 15 ft span. The copper looked like it was 20 years old in spots and then other spots looked new. https://youtu.be/W-h12aakHcg
Log in or create an account to post a comment.
Sign up Log in