

More Building Science


Our company has been providing green building certification and duct and envelope testing for single- and multi-family buildings for almost a decade. In recent years, we have added building enclosure consulting that includes weather barrier and waterproofing inspections and testing for our multi-family clients. The owners and contractors appreciate and benefit from having an extra set of eyes on the project, inspecting the workmanship and confirming the quality of the installation with spray rack testing of a sample of the windows on a project. This work fits well with our green building certification process, as we are onsite frequently and there is a certain amount of overlap, particularly with durability requirements.
To date, we have worked on projects that have house wrap, such as Tyvek, and integrated sheathing/weather-resistant barrier (WRB) products like Zip System sheathing. Projects with fluid-applied and self-adhered WRBs are on the horizon. We start by reviewing and marking up plans and specs to make sure product selections and installation details are appropriate for the project. Like most products, when WRBs are installed correctly they perform well. However, in a highly competitive labor market, getting installers to pay attention to the details can be a challenge. On one of our first projects, the installer used staples to fasten the housewrap to the sheathing on a 100-unit apartment building. Since cap-head fasteners were required by the manufacturer, they had to apply small pieces of tape over every staple and then re-attach the material with the proper fasteners. This resulted in some unhappy installers but a better performing product.
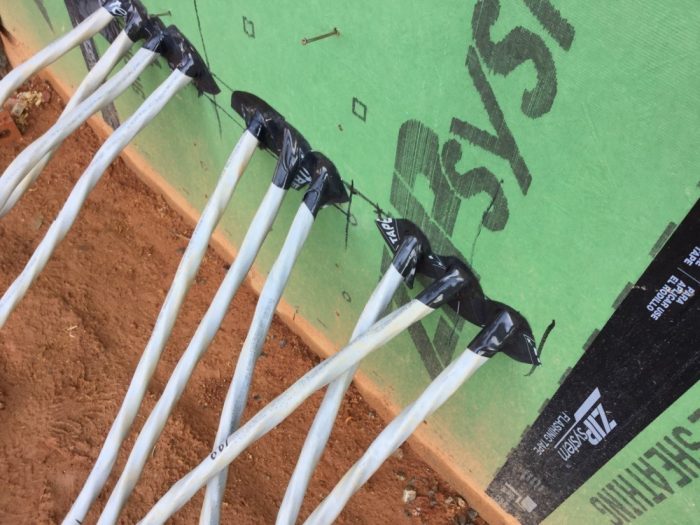
We find that Zip sheathing works well but is subject to leaks when the installers do not properly apply and roll out the tape. Gaps in the tape, referred to as “fish mouths,” particularly in horizontal runs, are a considerable source of leaks. Tape that is not rolled with adequate pressure will not seal completely, also leading to potential leaks. When the tape is rolled out fully, after about 72 hours, it makes a complete bond with the sheathing and is pretty much impossible to remove without taking some of the OSB along with it.
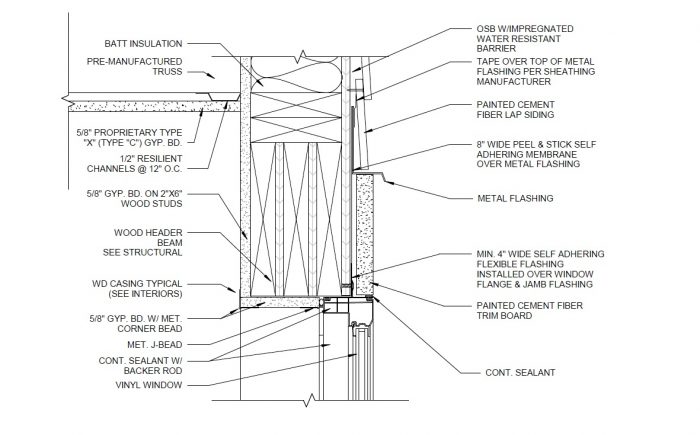
Generally, we don’t find many leaks in the WRBs themselves. It is the penetrations that cause problems. Windows and doors tend to be sealed properly but the quality of the workmanship varies. Proper flashing of pipes, ducts, and wires is too often missed. We strongly recommend that every penetration be sealed to the WRB before any siding or masonry is installed—a task that is more complicated than it seems. On a recent project, masons were installing brick veneer, and although most of the air-sealing was complete, the penetration for the pipe for a hose bibb was not sealed and nobody took responsibility for doing it. We advised the project manager and were told that it was done, but because we are not onsite 24/7, we can only take their word for it—or verify from photographs that it was done properly.
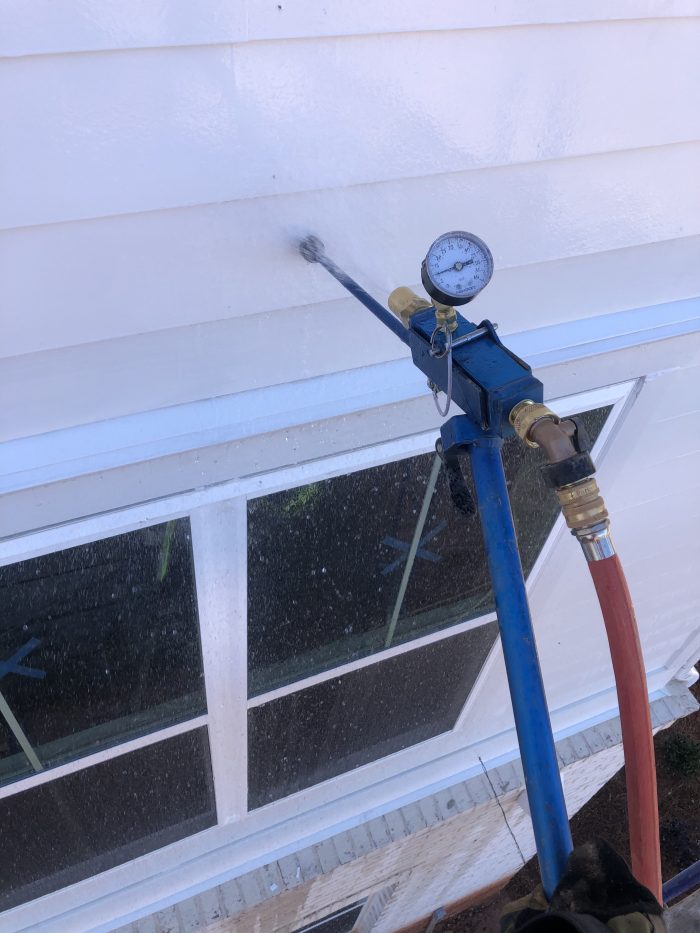
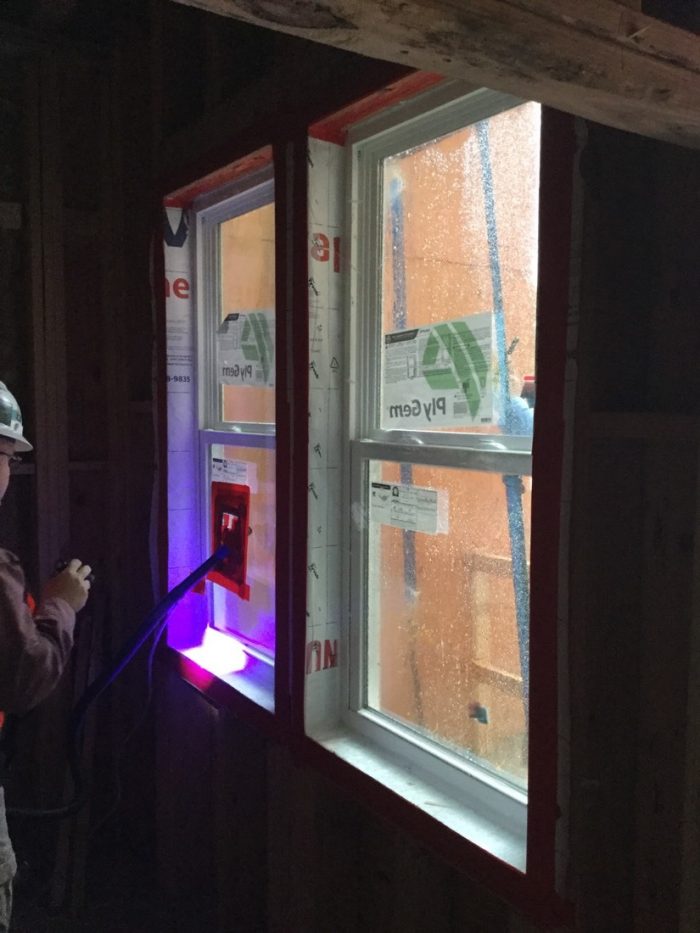
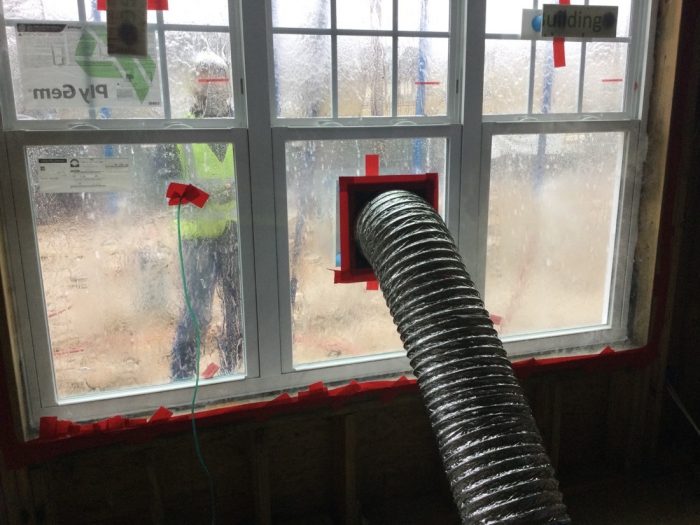
The true test of WRB installation is the spray rack testing. This procedure is based on standards from the American Society for Testing and Materials (ASTM), a.k.a. “Another Stupid Test Method,” and the American Architectural Manufacturers Association (AAMA). ASTM E1105 and AAMA 502 are two versions of essentially the same procedure for testing installed windows for leakage. A calibrated spray rack with multiple sprayer heads is installed 12 in. from the window with 12 PSI of water pressure. The standard test includes creating a chamber with sheet plastic on the exterior of a window, and using a fan to create negative pressure on the interior, which simulates severe weather conditions and confirms whether or not the windows will leak.
Some projects do not require the negative pressure; they rely on the water spray alone to identify leaks. We find that the negative pressure method can be overkill for low-rise buildings; it often creates leaks where they would not otherwise occur. A second testing method uses a spray wand with a single-head calibrated sprayer. This is commonly used to test storefront windows for leaks, as well as diagnosing and identifying the cause of visible leaks.
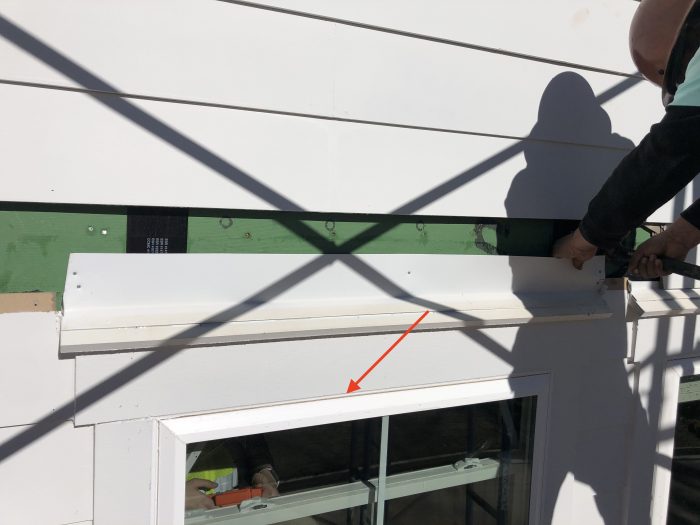
On a recent project, we completed our inspections and spray rack testing before the siding was installed, and none of the tested windows had any leaks. The contractor called us several weeks later to help diagnose some water intrusion at the windows. This project had flanged vinyl windows installed on Zip sheathing. Using both the spray rack and the spray wand, our team determined that a bead of sealant applied between a piece of head trim and the window was prohibiting the water that inevitably gets in behind the siding from draining, which created a buildup of water and hydrostatic pressure against the WRB. The key here is that the R in WRB means “resistant” (not impervious) to water, and when there is a head of water built up against a WRB, it will almost always cause a leak.
After identifying this problem, we reviewed plans on this and several other projects and saw that architects commonly spec a sealant bead at this location. It is something that clearly should not be installed. We went back to another recently completed project to make sure they did not have the same problem. Luckily, even though the plans showed it, the contractor did not install sealant at the window heads. We now know to watch out for plans that show sealants at this location, and we make sure it is not installed in order to avoid future problems.
_________________________________________________________________________
Carl Seville is a green builder, educator, and consultant on sustainability in the residential construction industry. After a 25-year career in the remodeling industry, he and a partner founded SK Collaborative. Photos courtesy of the author.
Weekly Newsletter
Get building science and energy efficiency advice, plus special offers, in your inbox.


8 Comments
".... On one of our first projects, the installer used staples to fasten the housewrap to the sheathing on a 100-unit apartment building. Since cap-head fasteners were required by the manufacturer, they had to apply small pieces of tape over every staple and then re-attach the material with the proper fasteners. This resulted in some unhappy installers but a better performing product...."
Yikes! I wonder if the sub lost money on the project?
"We now know to watch out for plans that show sealants at this location, and we make sure it is not installed in order to avoid future problems."
When you need to modify an architect's detail, how does the process work? Is it an RFI process or a job site decision made by talking with the GC/window installer? Something like a bead of sealant may seem too minor for an RFI but it seems like the contractor/installer is inviting additional liability if those windows leak down the road and it is found that the installation did not follow the architect's detail.
An added benefit is the opportunity to educate the architect; they may even modify their typical detail, avoiding this problem on future projects!
Andrew - We typically mark up drawings and submit them during the pre-construction process. Our site inspections confirm the workmanship is correct. The issue with the leaks on this project was something we had not seen previously but it will be top of mind going forward.
“[Deleted]”
I went with a peel and stick WRB for my build and never again. Very labour intensive, and since it’s winter, we had to apply some primer for the WRB to stick well to the exterior sheathing... With the primer on there was no margin for errors... Liquid applied WRB is the future, even if it's more expensive, the saving from the labour alone is well worth it. On top, you don’t need a lot or skilled tradesmen to apply it. For us folk who auto-build, you can to it and pocket the labour savings.
Eric,
There is a third alternative - which is a sheet WRB like Tyvek or Typar. It's a lot cheaper and easier to install than either of the others you mention, performs well and is by far the most used option. I can't see adhered or liquid WRBs supplanting it any time soon.
Especially if you use staples rather than cap-head fasteners! hahaha ;)
Great piece, Carl - thanks.
Log in or create an account to post a comment.
Sign up Log in