

More Building Science


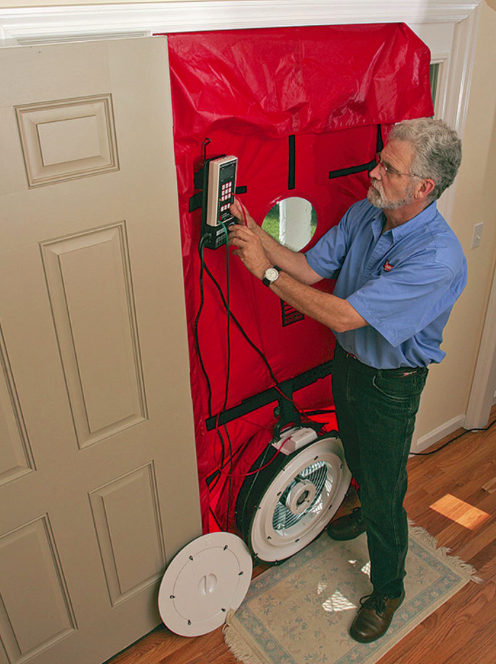
In 2012, the International Energy Conservation Code (IECC) started requiring residential construction pass an air leakage–rate test, better known as a blower-door test. My area of the country mandates test results at or below three air changes per hour at the test pressure of 50 pascals (3 ACH50). In warmer climates, 5 ACH50 is typical. In my experience, most new construction passes the test, but I have seen a handful of houses fail.
Failure costs
My current fee for a code-required blower-door test is $250 (the fee increases for large and complex houses). If the home does not pass, I look for the causes at a per hour rate of $100. Once the issues are identified, someone—usually the general contractor or insulating contractor—will do some air-sealing to correct the deficiencies, and a second test will be performed. My rate for a second test is $150; the fee is reduced because I’ve already calculated the volume of the home, which greatly limits the time onsite. This process is repeated until the home passes. Without a passing test, most jurisdictions will not issue an occupancy certificate, so it’s beneficial to pass a test the first time.
Passing the first time
The best approach to passing a blower-door test is to understand where houses leak air and design an air-sealing strategy with that in mind. Performing a mid-build blower-door test is also good practice. This test is typically done after mechanical, electrical, and plumbing (MEP) systems are installed, and windows and doors are in place, but before insulating.
The biggest difficulty when performing a blower-door test is how to address a vented attic or roof, which is often open to the outside. A method I’ve used is to install polyethylene sheeting on the ceiling, sealed to the wall framing. (I live in a cold climate, where polyethylene is commonly used. In other areas, it is more common to use drywall or a smart vapor control product.) I’ve also tested with closed-cell spray foam installed in unvented roofs and conditioned attics. Problems can be identified with a test and corrections made before insulation and finishing materials are installed.
Another option is to use a third-party air-sealing technology, such as Aerobarrier. This process is typically performed at the same point in the building process as the mid-build blower-door test—after MEP systems are in place but before insulation and finishing. The Aerobarrier installation process includes pressurizing the house and then releasing an aerosol sealant fog suspended in air. The sealant floats until it is caught in an air current. This current will lead to a hole to the exterior where it will build up around the opening until it is sealed. Advantages of this method include time-savings; usually it takes just a few hours. It also provides a high level of airtightness, although the tighter the home, the more time the sealing process takes and the higher the cost.
Reasons for a failed test
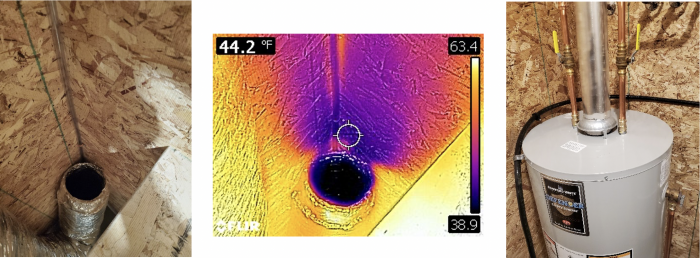
There can be many reasons for a failed test. Sometimes products are at fault. For example, I saw several failures in a group of duplexes that were built over the course of three years; they failed, in part, because of the water heater spec’d. It was a natural venting gas unit installed in a small mechanical room (photos below). The water heater used interior air for combustion and required a vent to the outside. Per the ANSI/RESNET/ICC 380 testing standard, these vents, and the flue for the water heater must remain open during a code-compliant blower-door test. Simply moving to an electric or some type of sealed-combustion water heater would have eliminated the required combustion air vent and the homes would have passed.
Recessed lighting fixtures are another culprit. I recently tested a new home that failed, in part, because of this lighting type. The same home had an unsealed attic hatch too. These two conditions, combined with the home’s small size (8000 cu. f.t) contributed to the failed test results, even though the home was only leaking a little more than 500 CFM at 50 Pascals.
The attic hatch was an easy fix that just required caulking the access panel shut. Air-sealing the recessed cans, especially in a cathedral ceiling, was more difficult. In this case, the contractor caulked the recessed fixture housing to the drywall, which helped a bit. A better choice would have been to eliminate the convetional can lights, and instead use a thin-profile LED fixture with a standard flanged electrical box sealed to the drywall.
As a side note, the 2021 International Energy Code has an option for blower-door testing of small structures using the cubic feet per minute of airflow per square foot of surface area (CFM50/ft² of surface area). The structure needs to be 1500 square feet or smaller and must achieve a leakage rate of no more than 0.30 CFM50/ft² of surface area. The small home discussed above that failed the standard ACH blower-door test achieved 0.15 CFM50/ft² of surface area. If tested against the 2021 code allowing the CFM50/ft² of surface area, this home would have passed.
Key areas to air-seal
The biggest area of deficiency in air-sealing that I see in both old and new construction is the ceiling or roof. Even a simple roof can be a challenge to air-seal correctly. A continuoulsy sealed transition between the wall and roof is often missing. Then a bunch of holes are punched in the air barrier for plumbing pipes and electrical wiring and boxes. Add a forced-air heating system with ducts in the attic space, and now there are even more holes in the air barrier. Change the simple roof to one with multiple roof lines, dormers, and cathedral ceilings, and air-sealing gets even more complicated and difficult to get right—and the ceiling is the most critical area to get right.
The second most important area to address is the transition between foundation and wall framing. Tying dissimilar materials together to form an effective air seal can be tough. Concrete foundations and slabs rarely end up perfectly flat. The dips and humps can create a pathway for air to move into the structure. This is where I prefer a belt-and-suspenders approach in the form of gaskets and tapes or sealants.
I see fewer issues with walls, but there are some areas that need detailed air-sealing and waterproofing including holes made for electrical wires, vents, and outside water spigots.
Blower-door testing is not going away. I wouldn’t be surprised if in future energy codes the requirements for building tightness become more stringent. With a basic understanding of where homes leak air, a strategy can be designed, and a code-compliant blower-door test can—and should be—passed the first time.
________________________________________________________________________
Randy Williams is a builder and energy rater based in Grand Rapids, Minnesota. Photos courtesy of the author.
Weekly Newsletter
Get building science and energy efficiency advice, plus special offers, in your inbox.


8 Comments
We built a "pretty good house" and chose a builder that would build towards Passive House air sealing rating of 0.60 ACH 50. The first blower door test registered between 0.60 and 1.0 but did not meet the spec of 0.60. Aerobarrier came in and their own initial blower test measured 0.41 ACH50 before starting their work. This initial reading was, for some reason, lower that the very first test and nothing had changed. After completing Aerobarrier process, the structure registered below 0.20 ACH50 (with hood vent hole sealed - see below).
Details for the roof/ceiling
We have a flat roof (don’t worry, there is a built-in vent on top of that roof to ensure that any moisture can migrate out of the roof). The point here is that the wood panels on the walls meet the wood panels on the roof and the seams are air sealed.
The interior ceiling has 2x4 laying on the flat, screwed to the underside of the roof trusses. There is a rigid air/vapour barrier sandwiched between the 2x4 and the roof trusses. The gap provided by the 2x4 allowed us to install electrical boxes without compromising the air/vapour barrier… for the most part.
Limiting holes in the envelope
We spec'd an electric condensing clothes dryer (no holes in ext. wall). The hot water tank is electric (no holes in exterior wall). The electrical supply was installed underground and comes up through the floor (again no hole in the ext. wall). There are no gas appliances because we did not want any in such an air tight home.
Holes in the envelope
We do have a conduit through the wall for the heat pump electrical wires and line set. Interesting to note that I could feel the cold air coming in through the conduit during the blower door test, despite the contractor filling the conduit with spray foam. We have the plumbing vent through the roof. We have the air exchanger exhaust and inlet that required holes through the envelope. We also have a hood vent which required a hole on the exterior, something we require because we often cook some very pungent dishes. Note that the building contract specified that the hole for the hood vent would be sealed shut for the blower door test because our contractor was pushing for a recirculating hood vent.
Cleats and gasket around euro windows
We have European windows installed with metal cleats/clips. An expanding foam gasket was placed on the widow opening rough frame and the windows were positioned inside the slow expanding foam gasket (this is a gasket, not spray foam). One source of air leakage was caused by the meatal cleats, which hold the window in place, depressing the foam gasket. Aerobarrier applied some spray foam at all the spots where there was a metal cleat as part of their sealing process.
There were many priorities to manage as part of this build and the air sealing was one of them. Like any other aspect of a build, air sealing requires attention to detail.
All good choices on your part, congrats on the .20 ACH50. I've been wanting to try the expanding foam window gaskets. I've used a similar product in valleys of corrugated steel roofs and know, at times, you don't have a lot of working time. Other than the air leaks around the window straps, any other challenges or advice when using that product?
Other than the air leaks around the window straps, any other challenges or advice when using that product?
*** A bit more context ***
- I am the owner and watched the framing crew install the window/doors, so understand that I did not install them myself.
- All the windows/doors were white PVC, triple pane, manufactured in Ireland. They are very heavy.
- Most windows do open, a few are fixed.
- I watched parts of the window install but did not fully understand how the process worked with the expanding gaskets.
- All gaskets used on our project were the exact same specs. They were relatively slow to expand so I did not witness any issues with the installers fighting against time.
*** Items identified after the install... related to the expanding gasket ***
- A few doors and windows (windows that open) were not closing as well as I expected. I took a framing square and checked if they had been installed square. A few were in fact not installed square.
- When I asked the framers/installers to explain how this could happen, they explained their process in a bit more detail. This is what I understood. They would first install the metal cleats on the perimeter of the windows/doors. They would then install the gasket around the framed rough opening. Then they would put the window in place - without any shims - and simply let the foam gasket expand. Once the foam gasket had expanded, they would screw the metal cleats to the rough frame. They did not necessarily check that the windows were installed square, or at least that is what I understood.
- A few windows (with the opening mechanism) were 61" tall and doors were 84" tall to 92" tall. The foam gasket expansion specs, I was told, would allow the gasket in question to be used on gaps sized 1/4" to 3/4" (I may be off a bit here). So this particular gasket on my house exerts quite a bit of pressure on the taller/longer window side jambs and door side jambs. There was so much pressure that some doors and windows were not closing properly. The solution the framer/installers used was to put a screw through the side jambs to "suck" the jambs towards the rough frame. The force of the screws would compress the foam gasket.
- While the builder argued that the expansion capacity of the foam was engineered to fill the gap size between the rough opening and the door/window side jambs, I was not fully convinced.
- I concluded that doors and windows are subject to many different forces exerted on them and the foam gasket expansion pressure needs to be taken into account. We all know that sprayfoam comes in different varieties and there is low expansion sprayfoam designed for sealing around windows. With this in mind, I felt that the pressure from the foam gasket was too much for PVC doors/windows. It may not have been an issue if we had metal or wood framed window (instead of PVC) but at at the end of the day it all depends on the engineering specs of the windows/doors.
- Because the larger windows were very heavy, the foam gasket that was under the larger window did not expand to speak of - in part because there were no shims used. On the less heavy smaller windows, the foam gasket under the windows did expand quite a bit.
- Where the foam gasket did NOT expand, it created a bit of a problem when it came time to cover the rough exterior window sills. Our walls are 12+ inches thick and the window are only 3 inches thick. The windows were placed in the middle of the wall assembly. We therefore have window sills on the exterior that needed to be covered with waterproof materials. We had bought, in advance, 1" thick PVC planks to use as exterior "finished" sills. After installing the windows, the framers/installers told us that the 1" thick PVC was too thick and would block the weeping holes at the bottom of the windows. We ended up using a 3/8" PVC instead and the 1" PVC planks are still in the yard under a tarp.
- I was following Jake Bruton on the "Build Show Network" for a while and he indicates the he builds extremely air tight homes (to passive house ratings) using carefully applied spray foam and high end tapes around the windows. He argued that the cost of the expanding gaskets is not justified, in particular because of the issues with how the metal cleats compress the gasket. The argument is also that any money saved by obtaining a better seal with the foam gasket (assuming it is better) will never pay itself back over the life of the house because the minimal difference in air sealing and the cost of energy.
- Note that everything I related here about the info my builder and staff shared with me is based on what I understood from them. I may have gotten some of the details wrong about how and why they employ the methods they use. I do not mean to imply that they did anything wrong when I relate the information in my response above.
Can anyone recommend a good air sealing consultant? I live in northern Indiana if that matters...
If you don't get the ideal answer from someone else, I would suggest speaking with any builders that focus on Passive Homes in around your area. I had learned tons from the internet (Matt Risinger Build Show) but our builder, who normally does Passive Homes, used his own methods.
Asking a builder is maybe the best if this is a new build. I found it terribly difficult to get my builder to do anything that was not part of their routine. Luckily, they appear to have nailed the air sealing with a 0.40'ish ACH50 with their regular methods.
If you don't find any locally, I suggest finding someone further away and work on the plans and any site visits from a distance.
I would suggest talking to the closest builder that builds Passive Homes. They would likely have contacts. If there are none in your immediate area, I suggest expanding the search area. If this is a new build, you can likely do lots of work with the expert you hire through video calls and exchanging plans online. This is just based on my experience.
1) Please do not mention the prices you charge in articles like this.
2) I think Aerobarrier is a waste of money especially in Southern climates.
3) In the South, build your house relatively tight and put in under slightly positive pressure with your
HVAC system and never let it go negative and you will be in good shape.
How do you seal the ceiling drywall (my air barrier) prior to the blower door test? Without the drywall on the walls, how can you seal up all the top plates? I was going to use Great Stuff Flexible Foam Drywall Gasket…
Log in or create an account to post a comment.
Sign up Log in