
Image Credit: Protecto Wrap
More Product Guide


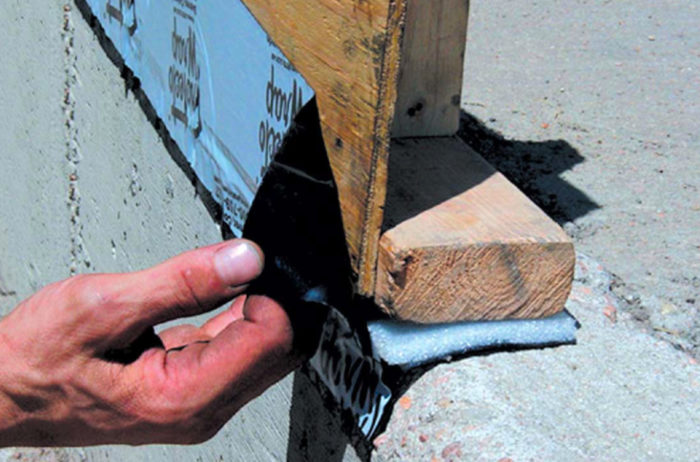
Sill seal made from closed-cell foam does a pretty good job of stopping air leaks on smooth-topped foundations. When the concrete is rough, however, it’s hard for sill seals to bridge the uneven gap under the mudsill.
To address the problem, Protecto Wrap, a Denver manufacturer of peel-and-stick flexible flashing products, has developed, in my opinion, the world’s best sill seal. Called Triple Guard, the sill seal includes a gasket of closed-cell polyethylene foam, just like many competing products. But to address the problem of air leakage through gaps caused by irregular concrete foundations, Triple Guard has thicker than usual foam — 3/8 in. thick instead of the more typical 1/4 in.
The foam layer is bonded to a layer of 20-mil peel-and-stick rubberized asphalt, so that the gasket adheres to the top of the concrete foundation. The sill seal has a T-shaped cross-section, with a 4 3/4-in.-wide peel-and-stick flange at a 90° angle to the foam gasket.
The bottom half of the vertical flange is designed to adhere to the outside face of the concrete foundation. Once the walls are framed, the top half of the flange is adhered to the wall sheathing.
At that point, virtually all air infiltration has been blocked.
Lab results back up claims
At the Oak Ridge National Laboratory, senior research engineer Jan Kosny tested the airtightness of sills sealed with Triple Guard. When sealed with conventional foam sill seal, the gap between the concrete and the mudsill in a 9-ft., 6-in. wall assembly had an equivalent leakage area (ELA) of 3.6 square in. When the gap was sealed with Triple Guard, the ELA dropped to 0.3 sq. in.—a 91.7% reduction in air leakage.
“This product gives almost 100% protection against air leakage, as well as moisture leakage in two directions—horizontal and vertical,” said Kosny. “This is a great product.”
Kosny also spoke highly of Triple Guard’s tenacity. “After we were done with our testing, we had some questions about some of the results, and we wanted to repeat some of the testing,” said Kosny. “We said, ‘Let’s remove the Protecto Wrap from the concrete and test the other sealant.’ But can you believe that three people couldn’t take off a ten-foot-long piece of Protecto Wrap in three hours? It’s a very tough product.”
Triple Guard is sold in 25-ft. rolls in two different sizes. It isn’t cheap; the smaller size, intended for use with 2×4 sill plates, costs about $47 per roll. The larger size (for 2×6 sill plates) has a 5 1/2-in.-wide foam strip and costs about $72 per roll.
For more information, visit the manufacturer’s Web site or call the manufacturer at (800) 759-9727.
________________________________________________________________________
Martin Holladay is a retired editor who lives in Vermont.
Weekly Newsletter
Get building science and energy efficiency advice, plus special offers, in your inbox.


17 Comments
Not working for me
This looks like one of those things they think up at grad school or something. It will never find a place at my jobsite because it doesn't really matter how good the connection is to the bottom plate and the exterior sheathing, the critical connection is between the house wrap and the concrete.
Joe Lstiburek's "FEMA header wrap detail" from the old Canadian R-2000 program still works for me and is way, way cheaper, easier to install, and can be used with termite shields which this product cannot. With that system we fasten a 12" roll of 6 mil poly between the termite flashing and the bottom of the bolt-drilled mud sill and then cover the termite flashing with sill seal before rolling the mud sill down onto the foundation or slab. After the assembly is up and sheathed we simply caulk the edge of the sill seal to the termite flashing and the foundation and pull the poly up onto the sheathing before taping the house wrap to it. Joe's detail also had a top plate component where you ran a twelve inch roll of poly between the top plate and the upper top plate and pulled it down over the house wrap to seal the top plate to the house wrap at the top of the wall to sheathing juncture. (And we gasketed the top plate to the drywall back then, "the Air-tight Drywall Approach." We don't use drywall gaskets these days because we're spray foaming our conditioned attics.)
I rolled my eyes when I saw this the first time, primarily because we are in a place where termite shields still make sense (though no longer required by code and so mostly abandoned) my typical house uses 200' of mud sill, so this product would cost $576 for 2x6 mud sills assuming my crew didn't accidentally wad it up and ruin it during installation. Not a winner to me,
Great feedback
Michael,
Great feedback — thanks. Every new product needs feedback based on field experience, so all of your comments are valuable.
sill seal
Several years ago we built a research house to determine what new products and techniques we could implement on a production basis. We used the Triple Guard sill seal and it worked well, although it was quite expensive. Subsequenly we found that it became difficult to use during cold weather construction and did not adhere well to the concrete. The area of the foundation that accepts the vertical leg needs to be clean, dry, and in cold weather you need to apply a primer to the concrete, also sold by the manufacturer, to better assure a good bond, increasing the linear foot cost of this detail.
You also needed to keep the product warm, another challenge when building in cold weather. Although this particular product did not make it into the production process, the concept did by using flexible flashing at this junture but without the integral connection to the sill seal.
This combined with other air sealing measures including the airtight drywall approach, flanged electrical boxes, and strategic caulk and foam application greatly reduced air infiltration rates and became standard procedure in production houses.
FEMA header wrap detail
Do you have a schematic of the FEMA header wrap detail? How is the 6mil poly attached to the undersurface of the mudsill? Is the sill seal sandwiched in between the undersurface of the 6 mil poly and upper surface of the termite shield or is the sill seal placed under the termite shield directly onto the concrete?
Response to Tim Ward
Tim,
I can't help you, but I have just sent an e-mail to Michael Chandler with a request that he post his response here.
More info for Tim Ward
Tim,
John Brooks just pointed me to this post by Michael Chandler:
"The way we’ve been doing that is through a “header wrap” detail where we run inexpensive, 9” wide black non-adhesive six mil poly “window wrap” between the sill seal and the bottom plate wrapping up the exterior of the sheathing and taped to the house wrap and also between the top plate and upper top plate wrapping down over the sheathing and taped to the house wrap. This seals the joint between the sheathing and the exterior of the top plate and terminates the top and bottom of our house wrap."
That is Comment #24 on this page: https://www.greenbuildingadvisor.com/community/forum/energy-efficiency-and-durability/19107/airtightness-sans-sprayfoam?page=5
See the detail below. I hope this helps.
.
yes that is correct
You put the header wrap on the bottom of the mudsill after you drill it for the bolts. just roll it over and tack on the 9" black poly, the termite flashing and the sill seal then roll it over and beat it down onto the bolts. the poly will now be on top and the sill seal will be against the concrete. Fait accomplis
On the top plates you just tack on the header wrap as you install the upper top plate (so you aren't walking on slippery poly while setting the trusses) If you are using drywall gaskets you have the insulation sub attach them to the lower top plate as they insulate. This way they are less likely to get trashed by the sheet rockers as they hang the ceilings.
Sealed crawl prep
When we are doing a sealed crawl we typically drape the six mil clear poly over the walls with sufficient lap to break out onto the crawl space floor about twelve inches prior to setting the mud sill. The eight mill white floor poly (from crawl space depot) goes in after the plumbing is roughed in.
I drape six mil black poly over the exterior foundation wall to cover the asphalt foundation damp proofing from getting on people's clothes and from damage during backfill. We cut this off after the final grading is done when we stucco the foundation exterior.
Triple sill seal from Protect Warp
Be aware, Martin...that Michael Chandler never actually field tested this product, so his comments IMHO are just conjecture, and/or assumptions. He did mention, though.."that the critical connection is between the house wrap, and the concrete foundation"...and I fully agree. Ironically, though....his solution via the "FEMA Header wrap" doesn't even touch the concrete foundation, but rather..is simply a sandwich collection of std. 1/4" thick sill seal, a termite barrier of sheet metal, and his 6 mil wrap which attaches to the vertical bottom surface of the house wrap/sheathing. From my own point of view, I still don't see any x mil thick barrier that extends from the bottom of the vertical wall...to the concrete. The only person who had valuable input on this product, was Jeff MedanichAnonymous. On a personal note, I am not affiliate with Protecto Wrap, or any sellers of the product. I am, though....interested in it's concept, and might very well pay the extra bucks to install, while keeping in mind, a few of it's inherent flaws about how it attaches to concrete. Am also well aware that just about anything that is evaluated "in a lab", may not pan as well in real life!
I'm working with a homebuilder in Arizona. The framers forgot to install the sill gasket. Does anyone know if this is code? Should I be concerned with the lack of a gasket?
Are the sill-plates treated?
Yes, its green PT wood I think.
Does anyone have any more recent experience with Protecto Triple Guard, especially with a cold weather install using the recommended primer?
I'm building a new house in NY and my builder is about to start framing (it's cold out). My architect specified the Triple Guard and the idea of the product sounds smart. One added piece of info is that we're using Zip-R sheathing, so the Triple Guard also seemed smart to seal up the bottom edge of the Zip-R panels.
However I'm concerned about the installation during cold weather as noted above. My builder has noted that the product isn't readily available (I'm sure he can order it online, but his local supply houses apparently don't have it). Due to these concerns, I'm considering offering up the FEMA Header Wrap detail Martin sent above, unless there are newer/better solutions to this problem.
One additional question - if I do go with the FEMA Header Wrap solution, should we be putting sealant between the sill seal foam and foundation, and between the sill seal foam and the Poly?
Thanks and Merry Christmas!
I have not used it myself but I used to specify it on my projects, until Siga Fentrim tape came to the US market--now it's all I spec for the transition from framing to foundation. It sticks incredibly well and can be installed in relatively cold weather. It's also vapor-permeable which I think is safer for that location than a vapor-closed product. I order it here: https://performancebuildingtapes.com/product/fentrim-430-grey-4-siga-tapes/.
Thanks Michael - looks promising (and apparently VERY sticky). For the "transition from framing to foundation" where/how do you normally detail its application?
Just saw a video with Matt Risinger and Steve Baczek that showed this detail. Screenshot below. Video here: https://www.youtube.com/watch?app=desktop&v=E67H47gPTcI
I used fentrim to seal the transition from Zip to foundation. The tape does not specify rolling like zip tape, but I rolled it where I could and use a plastic scraper everywhere else. The split backer makes it easy to apply either bottom up or top down. I usually did it to down and used the scraper to adhere it to the overhang.
I used 6 inch tape where there was a brick ledge and it served as brick flashing. Four inch is not wide enough for that, or you need to overlap two pieces.
Only downside is that stuff is not inexpensive. I originally considered the protecto product but glad I didn't. Getting the framers to lay it down evenly without gaps and keeping it intact during the work would have been a challenge.
Log in or create an account to post a comment.
Sign up Log in