

More Building Matters


When I first started planning the water and air control details for this project, I knew the windows were going to be one of the tougher parts. Window framing for a typical post-and-frame building consists of a simple 2x wood frame extending horizontally between two posts, which, in the case of this structure, are 6 ft. on center, with two vertical boards fastened between the upper and lower horizontal frames (like in the illustration below).
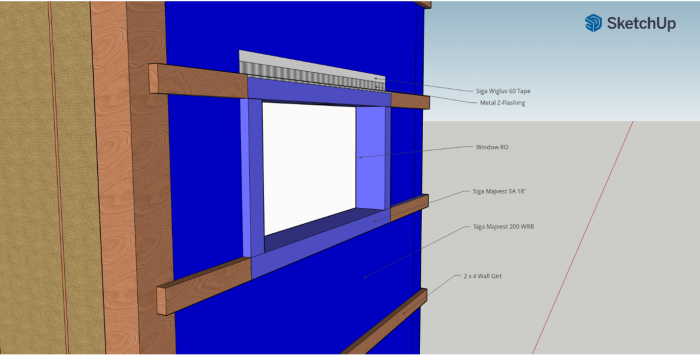
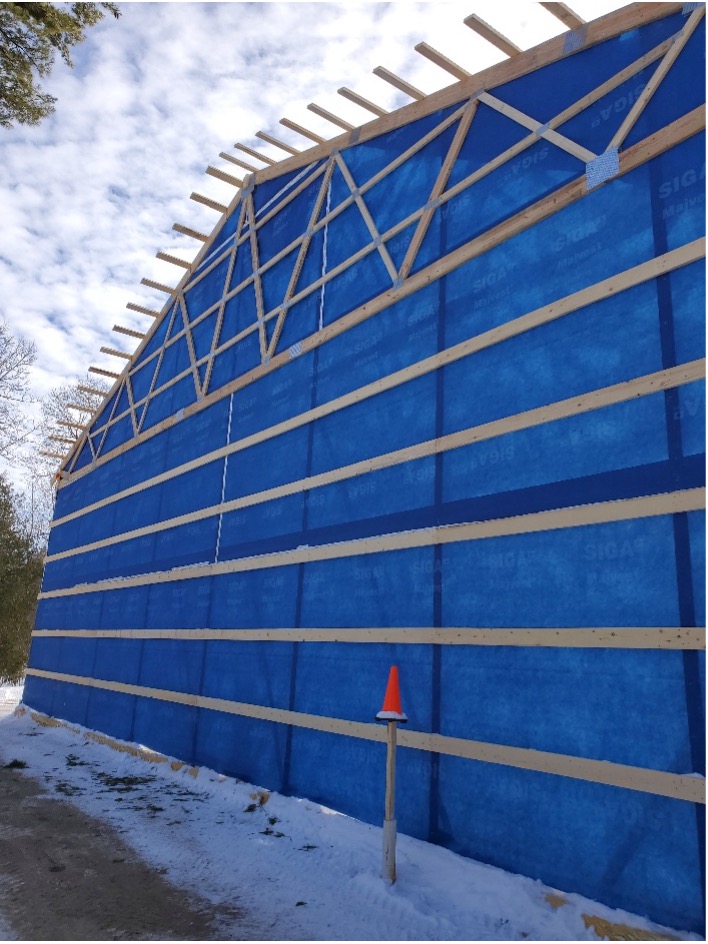
Once the basic frame is constructed inside the wall cavity, horizontal wall girts are placed over the framing, a kind of window buck, if you will. My original thought was to have the buck placed around the window rough opening, flash the buck so I could extend the window flashing back to the water-resistive barrier (WRB), then add the wall girts for fastening the cladding.
In my mind, this wouldn’t be a difficult assembly to build; the framing crew didn’t agree. They insisted on not changing their usual assembly (having the exterior wall girts installed first). This meant I had to figure out how to extend the window flashing to the WRB.
There are two different window sizes for this project. The first is a roughly 3-ft.-wide by 3-ft. 6-in.-tall triple-pane casement window. The second is a 5-ft.-wide by 2-ft.-tall fixed-glass triple-pane.
Working through the details
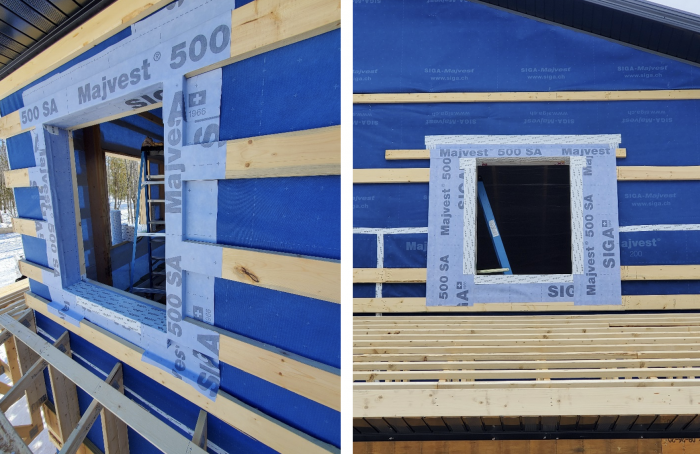
We are using Siga’s Mavjest 200 and the manufacturer’s tapes on this project, so I referenced their “Ultimate Guide to Window Flashing” to help detail the rough openings. Unfortunately, there were no details showing how to flash a window when a wall has horizontal girts. However, there are details for how to flash a window buck, so that’s what I used.
My window detail includes…
Weekly Newsletter
Get building science and energy efficiency advice, plus special offers, in your inbox.

This article is only available to GBA Prime Members
Sign up for a free trial and get instant access to this article as well as GBA’s complete library of premium articles and construction details.
Start Free TrialAlready a member? Log in


11 Comments
Should be a great looking building when complete. Am eager to hear your lessons learned in the next article.
Thanks Erik, lots of lessons learned. There's a couple more articles before I get into the good, bad and ugly. Next one is on the air/vapor and thermal control layers with the one following about the mechanical systems. The well drillers are currently on-site drilling twelve 150-foot wells, eleven are for the heating/cooling system and one for the domestic water supply.
A pox on the framers! They are lucky someone as pragmatic as Randy was involved who could come up with workable details.
Thanks Malcolm, I have to thank Siga for making the trip north to help out as well.
Hey Randy, we have noticed the large gap between the RO and the window jamb with the Marvin units, too. It was always a head scratcher until we used their project multiple times and face palmed every time it happened. Eventually we learned to expect this. Not sure why they do this, it makes for a more difficult air barrier detail. My hunch is that isn't their focus...
Marvin's tech specs seem to show 1/2" gaps between the window unit and the rough opening: https://www3.marvin.com/WebDoc/Marvin_Signature_Ultimate_Collection_Elevations_Casement%20and%20Casement%20Push%20Out.pdf
Do you typically see larger gaps than that in the field? Or is it that 1/2" gaps are larger than other manufacturers use?
Brendan,
The windows I use call for a 3/4" difference between the RO and the heel dimensions - leaving you 3/8" a side. I like to reduce it to 1/4", but that does mean you need to be pretty careful about your framing to make sure everything is level and plumb. My thinking is the less cavity you have, the less problems with the cavity you will have.
Hi Brendan, I'm currently installing Andersen windows on a project, they called for a 1/2-inch increase in the RO. Like Malcom said, framing needs to be on or there will be a struggle to level the window. I used to just use spray foam to insulate around the windows, back then I would make sure I increased the RO so there was more room for the tip of the spray foam nozzle between the window and RO. Since I switched to backer rod and either tape or caulk, I usually just go with the window manufacturer's recommendation on RO size.
The framers were given the RO's from the lead general contractor. Some were as large as 2.5 inches over the window size. I think it was tougher on the guys installing the window than for me to air seal. I'm really liking the tapes for that purpose. We are still waiting on six exterior doors, I'm temp sealing those openings to perform the mid-build blower door test on the living quarters tomorrow. I'll be posting those results on IG.
Did you consider a liquid flash product? Would it have been just too hard to apply to a WRB with no solid backing, or would it likey not cure into one continuous piece with the WRB billowing in the wind (or both)?
I didn't consider a fluid applied or liquid flash product. I'd be a little nervous about using these products in the low temperatures we were dealing with during this portion of the build. A lot of the tapes were installed at the bottom of their suggested application temps, around 14°F. I did look up Prosoco's R-Guard system's application temperatures, it states that their system can be installed in below freezing temperatures, but curing will not begin until temps rise above freezing. We would have been setting windows in uncured liquid flashing, would have been messy. Under normal conditions, I think they would work fine but like you said, will they perform correctly and be durable when subjected to movement? That would be an interesting wingnut test.
Log in or become a member to post a comment.
Sign up Log in