

More Energy-Smart Details


Energy retrofits are always challenging. They are a delicate balance between what to keep, what to eliminate, and what to add. That’s what we were facing on this recent project. The existing structure had 2×4 walls 16 in. o.c. and a turn-down concrete slab foundation. We stripped the building down to the studs by removing the exterior fiber-board sheathing and interior gypsum board. With naked 2×4 walls and an exposed slab, we started the retrofit.
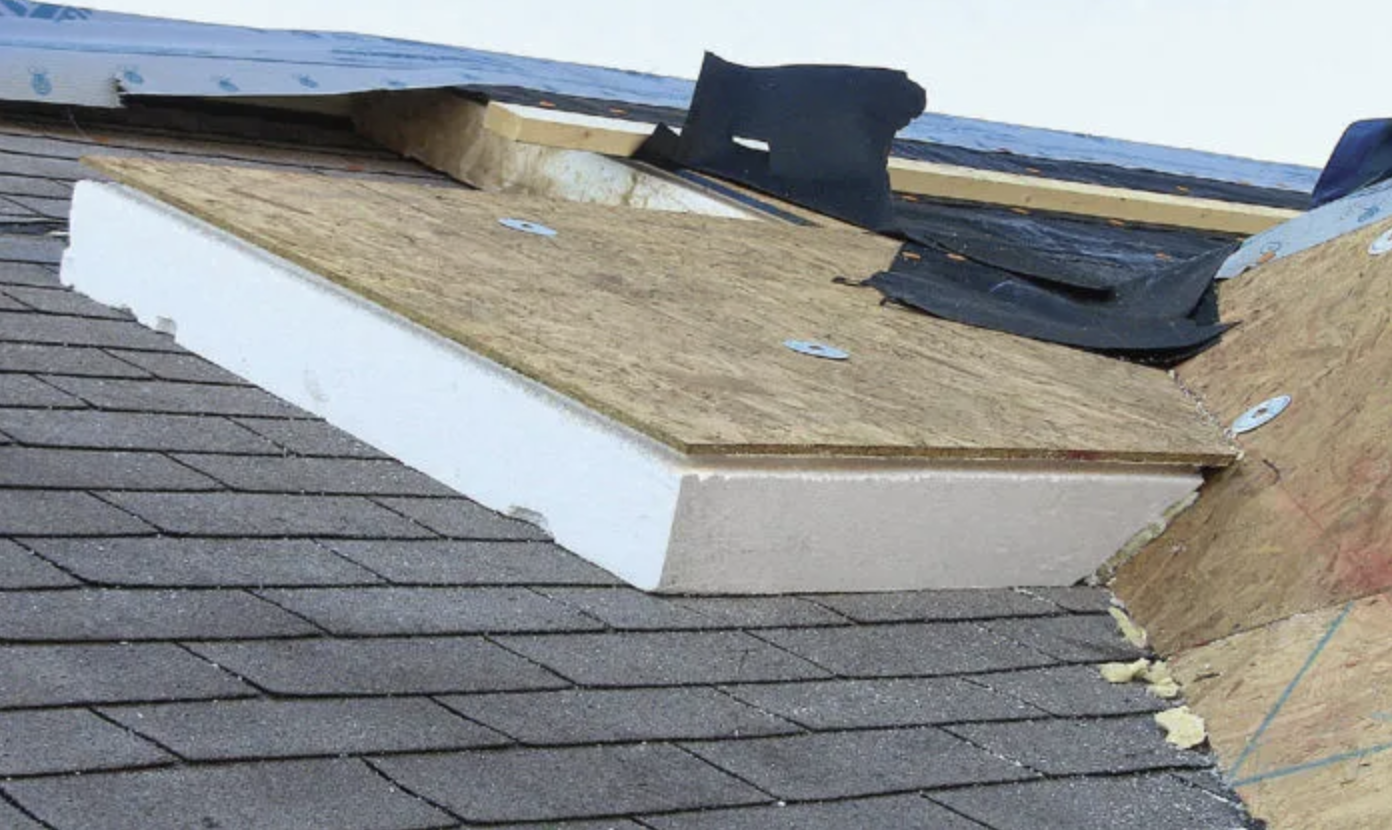
The first step was to insulate the slab, which was positioned significantly above exterior grade. We spec’d 2-in. polyisocyanurate rigid insulation. Because the existing slab is coupled to the ground temperature, which is most likely cooler than the desired conditioned temperature of the living space, there is a constant thermal drive for the room to attempt to warm the ground below. The polyiso provides resistance to that thermal drive.
The continuous nature of the polyiso insulation nearly eliminates thermal bridging across the floor assembly. (Note that the level of insulation here is appropriate for a moderate climate. For colder climates, 4 to 5 in. of rigid foam would be advisable.) On top of the 2 in. of rigid insulation, we added two layers of 3/4-in. Advantech floor sheathing. The second layer was laid perpendicular to the first layer with the joints offset by 2 ft., and the two layers were glued and screwed together to form a 1-1/2-in. “floating floor” assembly. (The Advantech allows for any type of finished flooring—hardwood, tile, carpet, etc.)
On the walls, we added new 7/16-in. ZIP sheathing to the exterior framing. All the joints were cleaned, taped, and rolled. The ZIP is the primary air barrier. Outboard of that we installed 2-in. foil-faced polyisocyanurate rigid insulation to which we applied 1×3 wood furring strips in order to space the siding away from…
Weekly Newsletter
Get building science and energy efficiency advice, plus special offers, in your inbox.

This article is only available to GBA Prime Members
Sign up for a free trial and get instant access to this article as well as GBA’s complete library of premium articles and construction details.
Start Free TrialAlready a member? Log in


16 Comments
Any thoughts on the trade off between adding the insulation over the slab vs continuing it down the edge of the slab?
Continuing it down the edge of the slab doesn't solve for heat loss to the ground.
This looks like a good solution all around and I really appreciate the level of detail provided. I'm curious about two things.
One question is the 2x4 blocking at the base of the drywall. It seems like that would add some minor thermal bridging at a corner that is a bit of a thermal weak point anyway, and I'm not sure what function it serves. Is it to anchor netting for blowing in cellulose? Or to facilitate detailing the drywall as a secondary air barrier?
My other question is that I think some people avoid polyiso in direct contact with a slab for fear of moisture wicking into it. Is that more of a concern in a basement and less of a concern with a slab that is at or above grade? Or is it a case-by-case decision based on whether it seems like there have been moisture problems in the past?
The blocking at the base of the drywall is solely there because the builder wanted it for base board attachment.
As for the polyiso, it is a case by case, measured against water risk
Alexandra,
A question recently came up ab0ut rain-screens in the comment section of your last blog. Do you worry much about venting the top of rain-screen cavities?
I just worked out a similar detail yesterday for existing detached garage to be converted to an ADU. Existing curb & 2x4 wall assembly with stucco to remain. I was able to get the floor assembly up enough for floor finish to cover the curb.
Because the slab slopes to previous garage openings, I've included a self leveling compound as well as vapor barrier over concrete prior to XPS foam insulation.
Interested in any feedback.
Your detail has a lot more thermal bridging than at the corner than the one in the article, through concrete which is much more conductive than wood. The results will be cold baseboards, increased heating energy consumption, and possible mold problems in those corners. Raising the floor more, similar to what's in the article would be the best solution, but if you can't do that, some exterior insulation would help.
Also, conventional Foamular XPS has huge climate impact, way beyond the other materials that people worry about when they get into worrying about embodied carbon. If you must use XPS, Owens-Corning now has an "NGX" version with only 10% of the impact of their conventional one and that can be special ordered anywhere in North America. Graphite-loaded EPS or polyiso are even better, but no matter what, don't specify conventional XPS.
Hey Charlie, thanks for the input. Just saw this now.... Agree with all you've said. Thanks!
"(The Advantech allows for any type of finished flooring—hardwood, tile, carpet, etc.)" It's been years since I checked, but the Tile Council of America used to only approve plywood subfloors. Is OSB now approved?
I’m retrofitting an existing slab that looks to be overall in good shape. Should I worry about using a self leveler or is that not a concern?
"To deal with the exposed edge of rigid insulation, we applied a 2x continuous treated wood block." Why can't the edge be exposed?
Charles,
For both mechanical protection against damage, and to stop pests gaining access.
It also provides backing for the vent at the base, and a level surface to start the exterior insulation and rain-screen furring from.
Did you remove the previous exterior wall sheathing or did this house not have any sheathing other than the siding? If it didn't already have siding, did you consider using Zip-R sheathing instead of the exterior polyiso?
Regarding raising the floor with insulation and Advantech, did any windows now become close enough to the floor causing you to have to replace glass with tempered glass? I presume this may be more of an issue in colder climates where the insulation would be thicker. I forget if it's 18" or 24" from the floor.
Thank you.
In a colder climate, would you be concerned about frost penetrating under the slab and causing it to heave?
A few questions about your assembly and some possible modifications to address my needs. I have a similar wall assembly but I am on a raised foundation:
- If I applied a WARB and spray foamed from crawl space with closed-cell foam and then did Aerobarrier from the interior to the existing flooring (T&G boards) could I get an improvement in airtightness that is comparable to replacing the subfloor with Advantech or some other subfloor?
- Regarding the wall exterior sheathing - what kind of disadvantage is there to keeping existing sheathing (uncertain on type - could be T&G or plywood sheets), applying a fluid applied WARB, and doing Aerobarrier? Will this setup help cover the airtightness effectiveness gap, if any, relative to replacing the exterior sheathing completely?
The above thinking is to reduce the waste I would generate from the project - assuming existing subfloor and exterior sheathing are in good condition, my thinking is that I continue using existing and use available systems like the ones identified to improve them rather than generate so much waste from what are basically good materials. Is this thinking flawed?
A few more questions:
- For the rain screening, how do you do ventilation at the top for the air gap on such a retrofit?
- What is the function of the acoustic sealant? is it only on the bottom sill or also the vertical 2*4s?
- Can you use 2” Rockwook instead of the poly-iso?
- You show the 5” screw to secure the furring through everything into the framing, but none are shown for the insulation - what are you specifying for this? Does it go directly into framing or is supported by the sheathing?
- you show 1*3 furring strips instead of 1*2 furring strips - are there any performance advantages of the larger strips, or is it for easier siding install?
Thanks for the article Alexandra. I found it when I was searching for an answer to my question regarding top of slab insulation in a remodel in Taos NM (Zone 5B).
Figured I would turn to the hive mind to help me try and solve this problem.
I am using BEOpt V2.8.0.0 to model a semi deep energy retrofit of a home my wife and I recently purchased. I was quite shocked to find when I added insulation to the top of the slab that it dramatically increased my loads not met (Hrs/year) with the same sized equipment (24,000Btuh minisplit for a single story 1200sf house). BEOpt doesn’t have a way to add “insulation” to the top of the slab so I used the Foundation Floors>Carpet input which allows you to specify the R-value of the carpet pad.
In the attached graph:
Point 1 is an uninsulated slab
Point 2 is 100% top of slab R-10 insulation
Point 3 is 100% top of slab R-20 insulation
Point 4 is 4ft R-20 vertical insulation on the exterior of the slab (no top of slab insulation)
Point 5 is 4ft R-20 vertical insulation on the exterior of the slab and 100% top of slab R-10 insulation
Point 6 is 4ft R-20 vertical insulation on the exterior of the slab and 100% top of slab R-20 insulation
I assume the increased loads not met have something to do with de-coupling the slab (thermal mass) from the interior space but I’d love for someone to give me a sanity check that I am modeling this correctly and, if so, does it make sense to insulate the top of the slab at all?
Is using the carpet input as a way to model top of slab insulation a reasonable approach?
I ran a second case with just 40% top of slab insulation (approximately the same area that would be covered by 4ft of insulation around the inside perimeter of the house. While the model doesn’t know what the exact location of this insulation is the Loads Not Met numbers were lower but still significant and followed the same pattern of the higher the R-value of the top of slab insulation the higher the Loads Not Met hours.
Any insight into what’s going on here would be MUCH appreciated!!!
Log in or become a member to post a comment.
Sign up Log in