

Editor’s note: This is one in a series of blogs detailing the construction of a net-zero energy house in Point Roberts, Washington, by an owner-builder with relatively little building experience. A list of Matt Bath’s GBA articles can be found at the bottom of this page. You’ll find Matt Bath’s full blog, Saving Sustainably, here. If you want to follow project costs, you can keep an eye on a budget worksheet here.
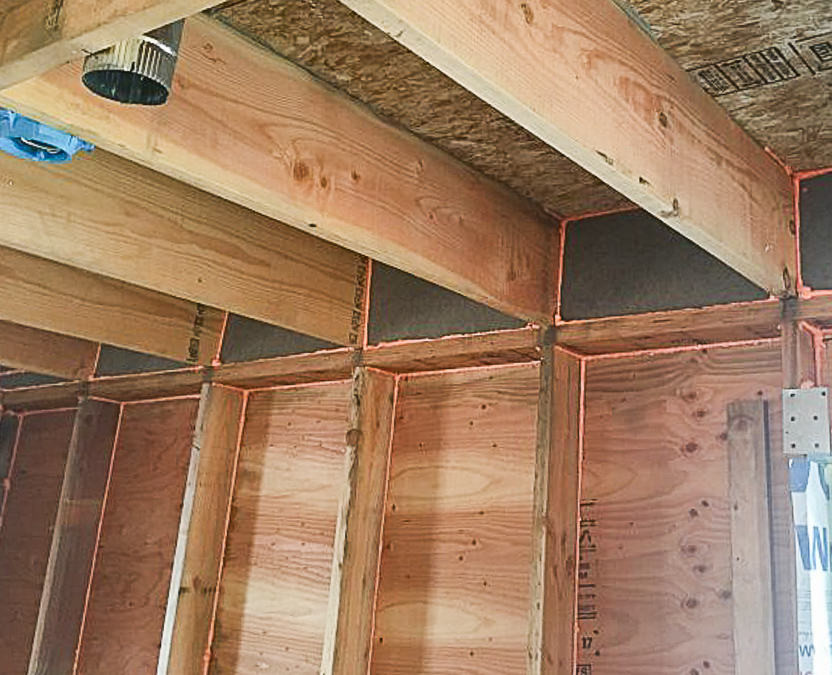
After passing the HVAC and rough framing inspection, I now had permission to close in the walls, and the first step was to make sure that I had minimal air leakage. Air in motion is quite efficient at transferring heat and moisture, both of which I want to have tight controls on, so it is very important to ensure that air can’t move through the walls of the house.
I applied a bead of spray foam around the perimeter of every stud bay, at the seam between the framing and the exterior sheathing, and also inside any holes where wires or plumbing penetrated the perimeter of the stud bay.
I also applied caulk to any openings in electrical gang boxes. You may not think about it when you look at them, but every single outlet and light switch in your house is a potential spot for air to move heat out of a room, or move dangerous moisture inside a wall assembly. Every place the wires exit those switches and receptacles must be sealed with caulk.
The lower 16 inches of the attic also had to be sealed since this is the part of the attic that will contain the insulation. The loose-fill cellulose insulation that I will be using in the attic performs by trapping air, so it will perform much more efficiently if I limit air movement through it as much as possible.
The rim joist between the first and second stories of the house must be sealed as well. I fit some pieces of polyisocyanurate rigid foam between the joists, then foamed around the edges. Then I repeated the process so there were two layers of rigid foam.
Doors also have potential for air leakage. I inspected all the doors for a nice tight seal between the door and the weatherstripping. On one door I added some paper shims behind the hinges to push the door towards the opposite jamb and reduce the gap between the door and the jamb. This moved the door into better contact with the weatherstripping. For the corners of the doors, you can buy small foam pieces that help cover tiny holes between the door and the corners of the jambs.
Completing the conditioned attic
I had already installed the flooring for the conditioned portion of the attic when I installed the ductwork. Now it was time to throw up some walls and perform air seal work. The conditioned attic must be fully insulated and air-sealed, just like the rest of the conditioned space of the house.
First, I cut four sheets of drywall to fit the four walls of the conditioned attic and maneuvered them up through the trusses. This was no easy task, and if I had to do it over again I would install the drywall before I installed the ERV and ducts. But I made it work. I screwed the drywall to the framing, and then used canned spray foam to seal the tiny gaps between the sheets of drywall from the outside.
I also sealed any cracks in the plywood flooring of the attic from below. Then I sealed penetrations for the lighting, ducts, electrical cables for the ERV and steamer, and the water line and drain line for the steamer.
Hanging drywall on the ceiling
The walls and attic were now air sealed. The only part of the conditioned space of the house that wasn’t yet sealed was the second-story ceiling, and I did that with drywall and spray foam.
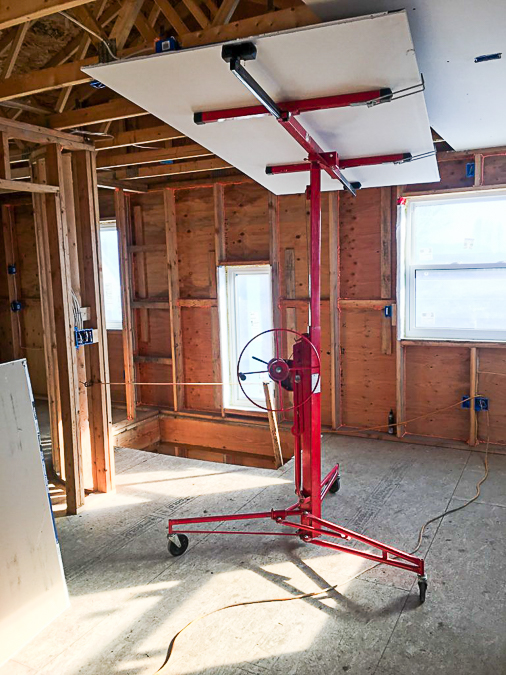
The drywall is secured to the bottom chords of the roof trusses with 1 1/4-inch coarse-thread drywall screws. The drywall is attached perpendicularly to the trusses, with staggered seams to improve strength. I lucked out in having a neighbor offer me use of his drywall lift so I didn’t have to buy one of my own. Installing 8-foot sheets of drywall solo is possible with a little creativity, but the lift allowed me to use 12-foot-long sheets so I had fewer joints to tape.
One at a time, I lifted the sheets up to the ceiling and screwed them to the trusses. It is important that drywall screws are installed perfectly flush to create a nice smooth surface. I bought a drywall screw gun to help with this. The bit has a part that stops the screw from turning as soon as it is flush with the drywall.
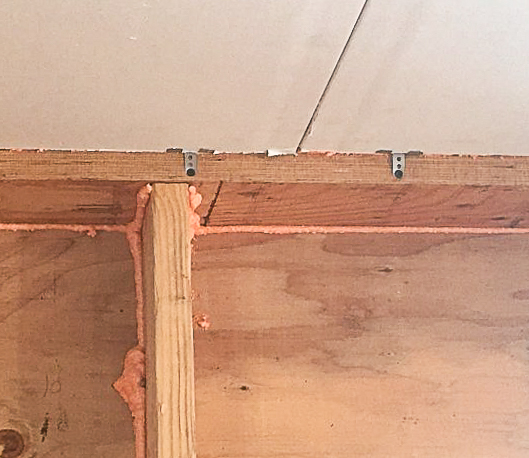
Drywall must be attached on all four edges. This becomes a problem in many places because not every sheet ends on a truss. Many installers solve this problem by nailing up more wood, and then screwing the drywall into the wood. That wood is using up space in the attic that should be filled with insulation. I used metal drywall clips instead. These are attached to the edge of the sheet and screwed into the top plate of the wall. The screws will be covered by the drywall that we will hang on the walls.
Before the last drywall sheet was hung, I went up in the attic and used spray foam to air seal all of the edges of the drywall to the top plates of the walls, as well as all the seams between the sheets and around electrical gang boxes.
Next, I cut out a 22-by-30-inch rectangle of sheathing in one of the gable ends and attached it with a couple of hinges. This will swing inward to allow me access to the unconditioned part of the attic. Attic access points are notorious for air leaks, so putting the access on the outside removes that issue. I’m not worried at all about air leaking from the outside to the unconditioned space of the attic. The only worry is air leaking from a conditioned (heated or cooled) space to an unconditioned space.
The access point is just underneath the roof overhang, so it is well protected from rain, but just in case there is wind-driven rain, I added some weatherstripping around the perimeter of the opening to ensure a good seal between the water-resistive barrier (WRB) of the hatch and the wall. It will also be protected by siding.
With the access door complete, I could now install the final sheet of drywall, totally and permanently closing off the attic from the rest of the house. I entered through my access hatch and used spray foam to air seal the last sheet of drywall.
When I closed the access door, the attic was completely dark and I could quite easily use spray foam to seal any holes in the spray foam where light was coming through. The light shining on the plastic and spray foam gives them each a neon look. I crawled around the perimeter of the attic, checking out every seam. The conditioned space of the house was now completely air sealed.
The blower door test
I used a relatively simple device called a blower door to check for any weaknesses in the air barrier. The blower door consists of a large fan, a metal support to secure the fan inside a door frame, two small air hoses, and a manometer.
Preparation for a blower door test begins with temporarily sealing up any openings like ducts and conduits. I used some scrap packing foam and tape to cover all of the ERV ducts and the electrical conduit. Next, I assembled the door frame and fan assembly and connected the power to the fan. One of the air hoses runs out a small hole in the blower door mount to the exterior where it is placed inside a bag to protect it from wind. The other end is plugged into the manometer. The second hose runs between the blower door fan and the manometer.
The first step in running the test is called establishing a baseline pressure measurement. The manometer measures the pressure from the hose outside to get an idea of the outdoor air pressure. This will be subtracted from the measured indoor pressure, so a blower door test run in Colorado can be compared to a blower door test in New Orleans, even though they have very different air pressures. Next, the fan is turned on, which begins forcing air out of the house. The standard blower door test creates a pressure difference of 50 Pascals, which is a pretty powerful negative pressure in the house.
The manometer begins to measure the amount of air that is being moved out of the house. If the fan doesn’t need to work very hard to maintain the 50 Pascal pressure difference, the air barrier is working well. If the fan has to run faster to maintain the pressure difference, that means air is leaking into the house from the outside. This additional air must be pushed out by the fan to maintain the pressure difference, which is why the fan runs faster.
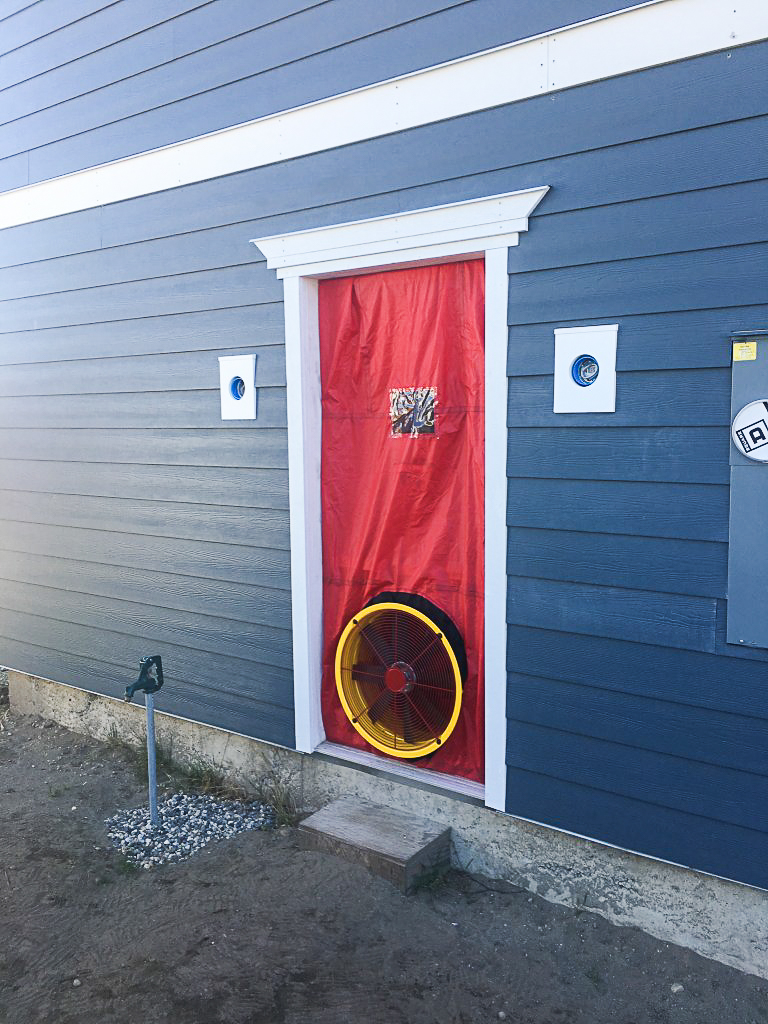
The manometer measures the amount of air flowing out of the house and through the fan in cubic feet per minute (CFM). This number is displayed on the manometer and will fluctuate as wind from outside alters the pressures acting on the house. The manometer can alternatively display the units of the air rushing out of the house as air changes per hour (ACH). This is a measure of how many times all of the air inside the house is drawn outside by the fan per hour. A higher CFM will remove more air from the house resulting in a higher ACH. (Results are typically reported as the number of air changes per hour at a pressure difference of 50 pascals, or ach50.)
My first blower door test gave me an average of 1.8 ach50, which was an excellent number considering that anything under 3 is considered to be pretty airtight. I was disappointed, however, as I was hoping to attain the Passivhaus standard of 0.6 ach50. I kept the fan running while I had some friends walk around the house with special smoke pencils. Watching the smoke curl up the walls, you could easily spot the leaks wherever the path of the smoke changed. We spotted quite a few minuscule leaks all around the ceiling perimeter, so I got back in the attic and worked on sealing them up.

After crawling up in the attic and doing a few more rounds with a can of spray foam and sealing up a few other small holes we found, the number dropped to 1.4 ach50. That’s not as low as I wanted, but I had to keep in mind that insulation and drywall will lower air infiltration as well. I was satisfied with the results and ready to move on to the next step in insulating.
Installing dense-packed cellulose
While cellulose isn’t the top-performing insulation (in terms of R-value per inch), it definitely gives you the most bang for the buck. That means less money up front, but also less money over the life of the house in heating and cooling costs. Additionally, most cellulose consists predominantly of recycled materials (mine advertised “up to 85%”). So when it comes to “saving sustainably,” you can’t do much better than cellulose insulation.
Cellulose insulation consists of mostly shredded, recycled paper (usually newsprint) treated with a fire-retardant (usually borate). It is predominantly installed in attics because it is cheap, easy to install, and effective. All you have to do is blow it in with a machine like a reverse vacuum and let gravity allow it to settle.
For walls, however, batts are still the most commonly installed form of insulation. They don’t perform nearly as well as cellulose but installation is much easier. The other alternative for wall insulation — one which is especially popular in the greater Vancouver area where I am building — is spray foam. Builders like closed-cell spray foam because it can be installed in tight spaces like cathedral ceilings. It also has a high R-value per inch, making it easy for builders to meet the energy codes of British Columbia. However, there are two main problems with spray foam. First, it is extremely expensive. Second, most spray foams use hydrofluorocarbons as blowing agents. Some have been reported to off-gas, and all types of spray foam are nearly impossible to remove after installation. In other words, foam isn’t very sustainable.
So why is cellulose more difficult to install in walls? Well, while gravity works in a good way for blown-in cellulose in the attic, it doesn’t work so well in the walls. Over time, gravity works on the cellulose in the walls, and if you aren’t careful, you can be left with completely uninsulated sections at the top of the wall. There are two ways to combat this. The first is to moisten the cellulose and spray it into the wall. The moisture activates the adhesives found in the cellulose and it sticks together even after it dries. This is the most effective way to install cellulose, but it is also the most difficult as the moisture content needs to be just right. The second way is to pack it in so tightly into the wall that it won’t move hardly at all, even with gravity acting on it for years.
Helping cellulose stay put
In order to prevent the cellulose from falling out of the stud bay while you are packing it in so tightly, fabric is stapled to the studs. This completely encloses each stud bay so you can pack the cellulose in tightly without worrying about it coming out. The fabric is attached to the studs with staples, and the fabric manufacturer recommends using a rapid-fire stapler, which is an immensely enjoyable tool to operate. Unlike an ordinary power stapler, there is no need to press the stapler to the wall to fire it. All you need to do is squeeze the trigger. This makes it a relatively dangerous tool, but it makes installation of the fabric a cinch.
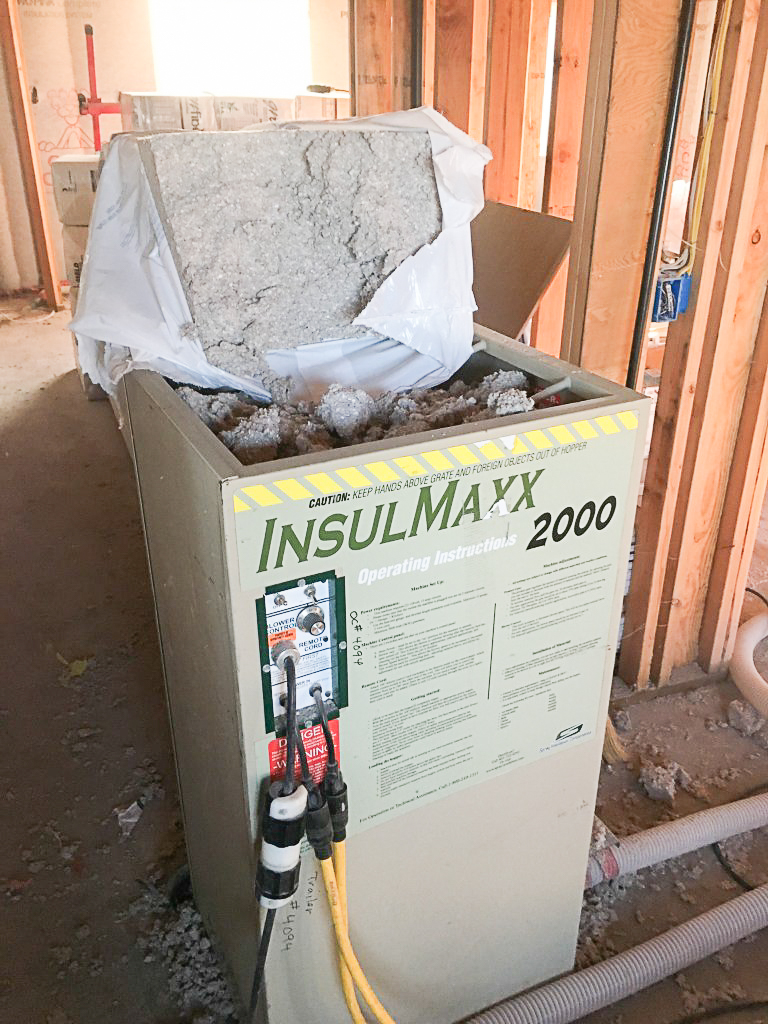
With the fabric stapled tightly to the studs, it was time to blow in the cellulose. While searching for a dense-pack blower to rent, I was extremely fortunate to have found the Bellingham Performance Center. Not only did they rent me the blower door, rapid fire stapler, and dense-pack blower, they also gave me a ton of free advice. A huge shout-out to Chris Clay and the team at BPC! The blowing machine they rented me was the perfect size for my house. I was able to wheel it inside and position it in right in the center of my 175 bags of insulation.
One person is positioned at the machine’s hopper loading the bales, and two other people are required at the other end of the hose. One person cuts a small slit towards the center of the stud bay and sticks the hose in all the way to the bottom while the other person adjusts the remote controls for the machine. Once the hose is in position, the blower and agitator are switched on. The blower powers a fan that moves air through the hose, while the agitator pushes the cellulose from the bottom of the hopper into the hose. The hose is moved from one side of the bay to the other until the fan starts to whine, signaling that it doesn’t have enough power to push more cellulose into that section. At this time the hose is pulled up a little and the process is repeated. When the bay has been insulated up to the slit, the hose is turned upwards to blow the top half of the stud bay.
Once the entire stud bay has been filled, the fan and agitator are turned off and the hose is withdrawn. Heavy metal rollers are run down the center of the stud bay to compress the insulation even more. It is important to feel around for any areas of the stud bay that are a little short on insulation. If necessary, make another slit in that location and blow in some more insulation until a mattress-like firmness can be felt consistently across the entire stud bay.
I really can’t imagine how I could have possibly done this all on my own. A huge shout-out to my father-in-law Jose, who was doing the thankless job of manning the hopper, and to my friend Michael, manning the remote.
Loose-fill in the attic
Blowing cellulose into the attic is one of the easiest DIY projects a homeowner can do to decrease heating costs. There is basically zero prep work involved. You just go down to your local big box store and buy some cellulose, and they will usually let you use the blower machine for free if you buy at least 20 bags or so. Have a friend load the bags of cellulose into the hopper while you point the hose into the attic and turn it on. It really is that easy to decrease your heating bill.
I marked the roof trusses 16 inches up from the bottom with a black marker. When I blew in enough cellulose to hit the mark, the insulation would have an R-value of 60.
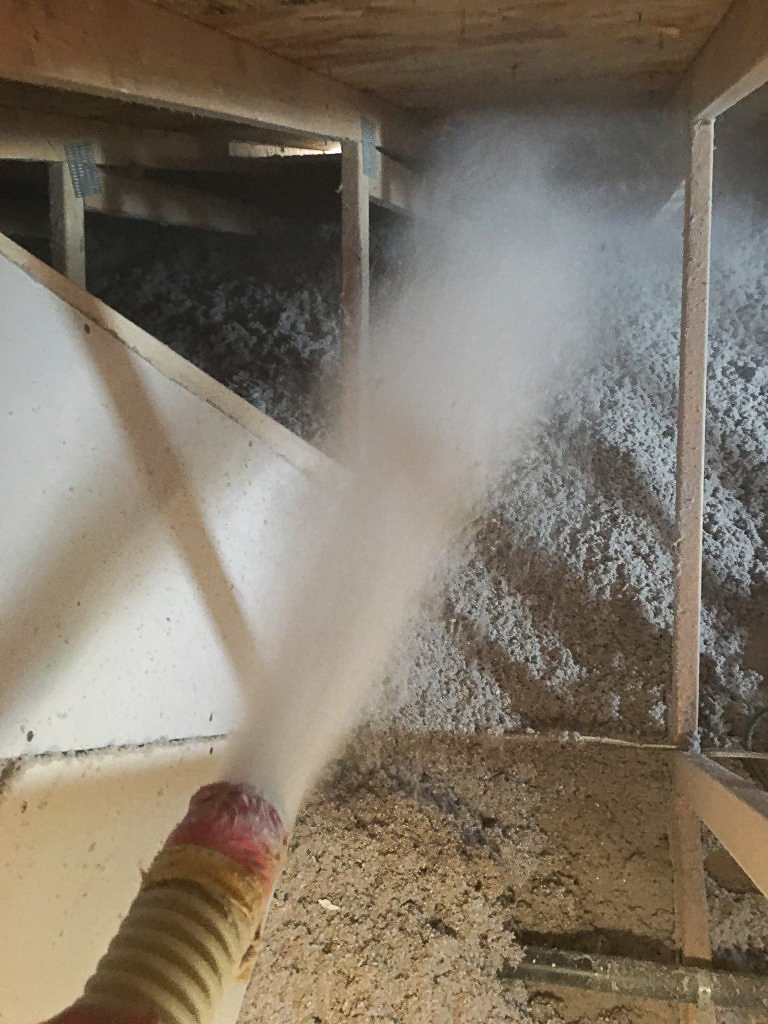
The baffles I built before I installed the roof prevented the cellulose from blocking the flow of air through the soffit vents.
Although it is a slow and dusty process, insulating an attic to R-60 with loose-fill cellulose is an easy and satisfying job. This was the last step in insulating the house, and when you add it to the mineral wool insulation under the slab, the exterior continuous polyisocyanurate, the polyiso and foam on the inside of the rim joists, the extensive air sealing, and the dense-packed cellulose in the stud bays, I am extremely confident that my house is now one of the top five most insulated houses in town.
If my calculations are correct, the only heating source I will need to keep my house at a comfortable temperature year round is a Fujitsu 3/4 ton heat pump which costs less than $1,600 and has a yearly operating cost of about $150.
Weekly Newsletter
Get building science and energy efficiency advice, plus special offers, in your inbox.


11 Comments
>"My first blower door test gave me an average of 1.8 ach50, which was an excellent number considering that anything under 3 is considered to be pretty airtight."
1.8ACH/50 is a decent starting number, but rather than "..pretty airtight", "...anything under 3..." only means it's code-legal, since that's the current code maximum in the IRC. Anything OVER 3 would be a code violation.
>"... the only heating source I will need to keep my house at a comfortable temperature year round is a Fujitsu 3/4 ton heat pump which costs less than $1,600..."
When the cost all of the other necessary hardware and installation labor you're probably looking at about twice that in competitive bidding, fully installed & commissioned. While DIY installation is possible, it's not necessarily "worth it" to end up with an unwarranteed and possibly faulty installation. Incidental refrigerant releases or leaks have an fairly high environmental impact, and are more likely to occur with newbies doing their first-and-only installation than with pros.
Even with DIY, the additional items are going to amount to several hundreds more (line set, disconnect box, stand or wall bracket, not to mention special tool purchases). And I suspect he's looking at the price on ecomfort's website, who will not ship to Canada.
To buy the right equipment, get the EPA certification for handling refrigerants usually adds up to more than what a competitive professional installation would run. Some DIYers will find some place to rent or re-sell the equipment, but it's a lot of screwing around.
I thought Point Roberts was wholly on the US side of the border on that peninsula (?). That presents a whole host of cross-border logistical issues that I never have to deal with, but to be sure online vendors should know ahead of time how to sort those out. Is it possible to ship from the US through Canada to another US location without passing customs (twice)? Liberty Wholesale Group has cheaper pricing on 9RLS3s than eComfort (by a few hundred USD), but whether they'll ship to ZIP code 98281 isn't entirely clear.
I see now where it says he's in Washington. The references in the article to the BC building codes and Greater Vancouver made me think that's where he was.
I have personally installed 6 minisplits.
EPA certs may be needed to purchase refrigerant, but usually you do not need to do so[I haven't]
I paid a certified tech to do the leak check, pump down and startup.
Not all are willing to do it, so it is helpful to 'know a guy'
The basic problem with having a professional install, is AC installers view minisplits as a threat. They charge as much to buy and install a minisplit as to pipe your house with standard air, negating half the point in a minisplit.
There is no point in tolerating that noise.
Install the mechanicals yourself. It is basic carpentry. If you are building new, you have an electrician onsite, so incremental cost there almost zero.
A good tech probably will want to reflare the lines, nitrogen pressure test and evac.
I have yet to have a unit fail, certainly not under warranty. For what all the local HVAC people want for an install, I would be better off buying a spare than paying the markup
Two general questions:
Does it make sense to air-seal each stud bay from the adjacent ones if the air-barrier is either the sheathing or drywall?
As you can not get at the partition wall top-plates where they are covered by the bottom chord of the trusses, wouldn't it be better to use gaskets on the top plates from below?
I wish there was a temporary guard around that opening in the floor. Two weeks ago I attended the funeral of a builder I'd known for thirty years who fell through an unprotected stair opening.
>"Does it make sense to air-seal each stud bay from the adjacent ones if the air-barrier is either the sheathing or drywall?"
If the cavity fill is air permeable, yes. If it's spray foam, not so much.
I understand doing a blower door test before insulation, or after drywall is taped, but not when Matt did it.
What is that floor opening and window next to it for?
He did do it before insulation. I'm curious to see how much difference the insulation and drywall makes, assuming he tests it again. I never tested mine post drywall, but I was already at 0.22ACH and my curiosity wasn't enough to justify the $400 for a second test.
I can only assume it's the stair opening. It does look small, but he's got a spiral staircase in the plans which might explain that. I would have thought a semicircular or three quarters circle opening would be appropriate if not outright required for a spiral staircase, but I don't know.
It's the foaming of the drywall that I don't understand. Surely those seams will be taped?
>"It's the foaming of the drywall that I don't understand. Surely those seams will be taped?"
And we've never ever seen drywall tape fail, right? ;-)
Housewrap tape or even polyurethane foam probably would have worked better on the seams for air sealing redundancy than can foam. Can foam is more appropriate for larger gaps than that.
Log in or create an account to post a comment.
Sign up Log in