
Image Credit: Images #1, #2, #5, and #6: Carl Villanova
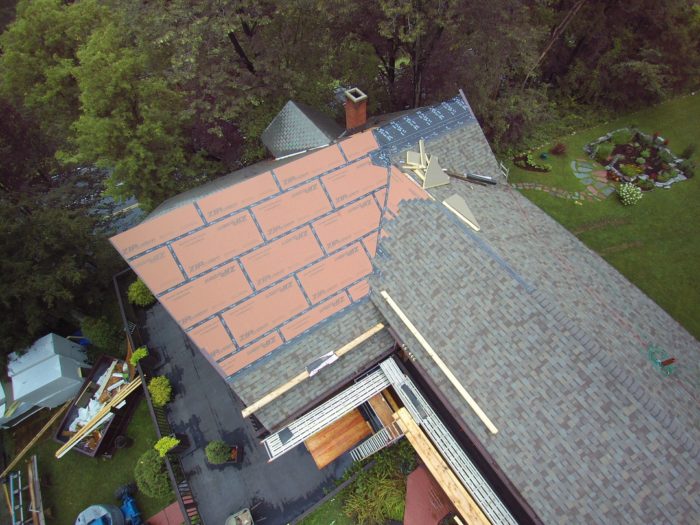
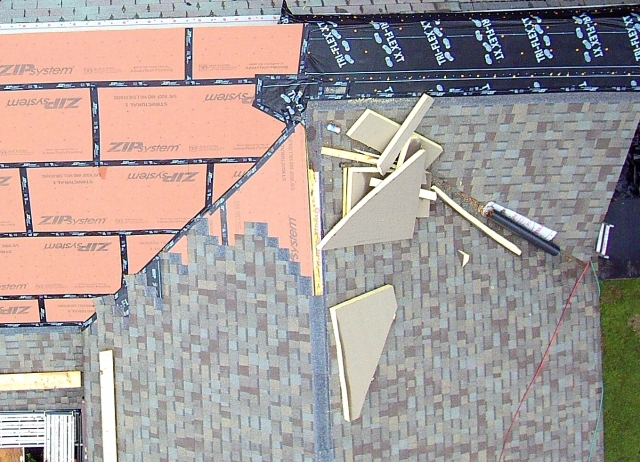
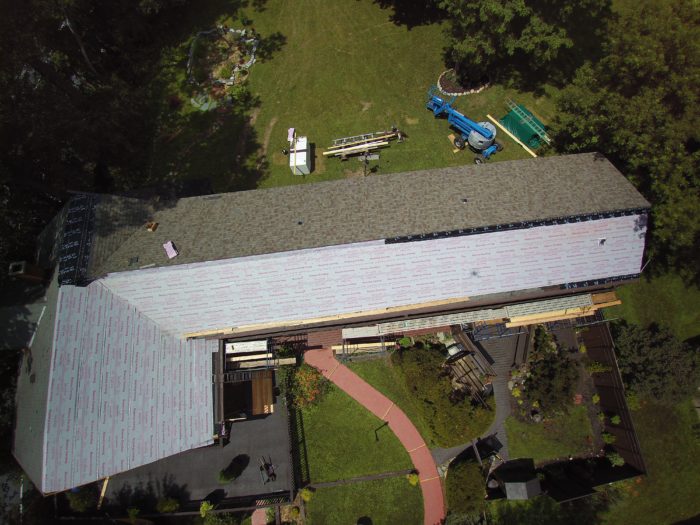
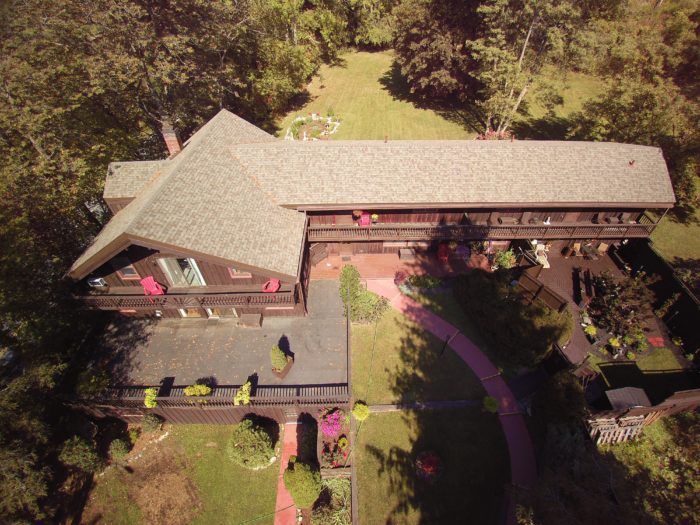
Image Credit: Images #1, #2, #5, and #6: Carl Villanova This drone photo shows half the roof covered with the light-colored roofing underlayment (Owens Corning Deck Defense). The rest of the roof is already shingled. The gaps between the polyiso sheets were filled with canned spray foam.
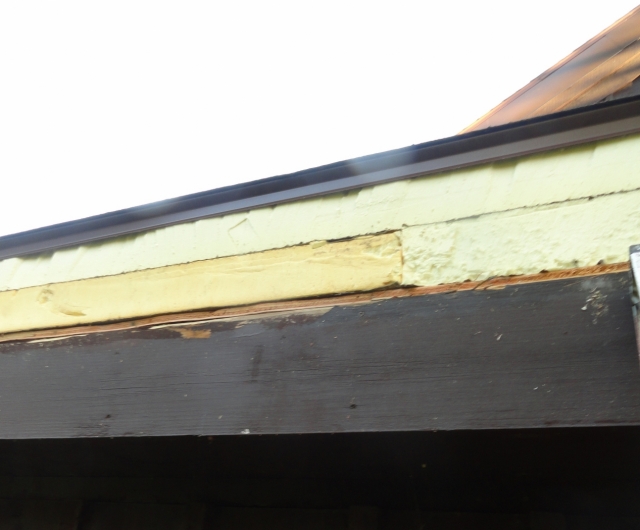
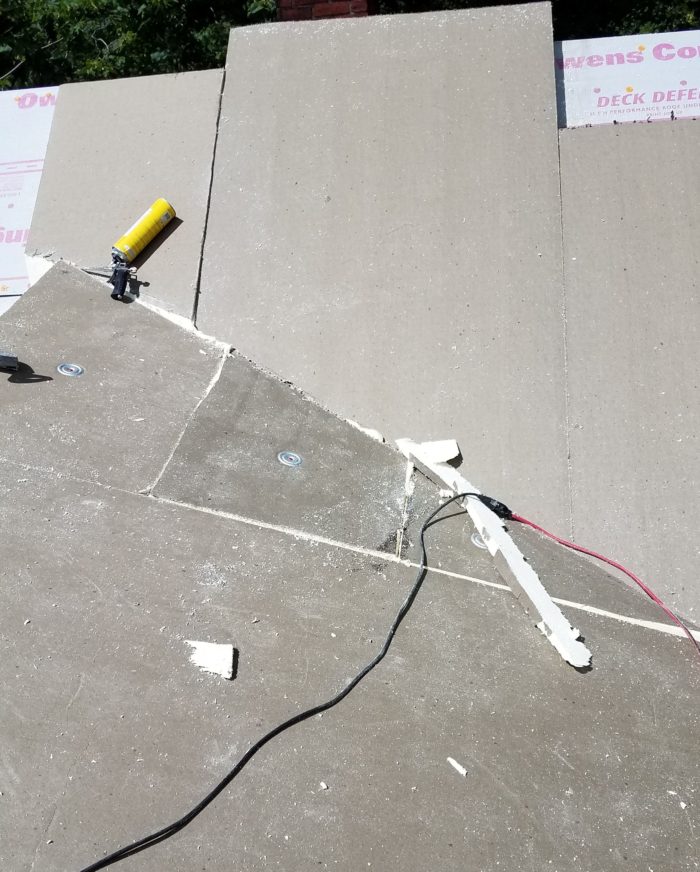
Image Credit: Images #3 and #4: Gregorio Messina After the gaps between the polyiso sheets were sealed with canned spray foam, the cured foam was trimmed and the seams were sealed with Zip System tape. The asphalt shingle roofing job is complete. The roof is now well insulated and is completely protected by new asphalt shingle roofing.
More Guest Blogs


Because of improved product and installation methods, techniques to build new or remodel existing homes have advanced dramatically in the past few decades. In 2017, I used one of these innovations — continuous exterior insulation — to solve ice dam and heat loss issues of my seven-unit apartment building located in Pownal, Vermont.
Regular ice dams and leaks
In 1996, my significant other Rich and I purchased a building that had been a motel and remolded it into a seven-unit apartment building. At that time the asphalt shingle roof was fairly new.
The original structure was a house built in the late 1800s; then in the 1960s a two-story attached motel wing was added.
Given that the property is located in snowy Vermont, certain areas of the roof required raking after each snowfall to prevent ice dams. Even so, several years ago the 4,250-square-foot roof began experiencing consistent ice dams leading to leaks. We made emergency repairs, but a permanent fix was vital.
In addition to air leakage, five factors contributed to the water entry problems:
1. The age and quality of the shingles
2. Sloppy installation of the roofing
3. Failing valleys
4. Lack of any roof overhang on the west side of building, and
5. Insufficient insulation.
While various roof areas were affected by occasional ice dams, a particular second-floor apartment suffered repeated damage. Ice melt originating from the roof dripped through the attic and leaked next to a light fixture.
Another serious issue occurred with a first-floor apartment. With the “right” weather conditions, water puddled above all the west-facing windows and dripped inside. (Only heavy towels laid across the sills saved the interior.) This situation occurred because the roof lacked any overhang — precipitation seeped down from the edge of the roof between the sheathing and siding. Areas of the window sills, siding, and sheathing were rotted.
While it was clear that we needed new roofing, it was not clear to me at first which products or techniques would best fit our needs and budget. The solution finally came down to two choices.
The first solution: a standing-seam metal roof
Installation of a standing-seam metal roof was appealing because a standing-seam roof is long-lasting and good-looking, and because photovoltaic (PV) panels are easily attached to clips that can be clamped to the standing seams.
But because the building faced southwest, installing PV would require the removal of four 75-foot-tall pine trees. To be worth the substantial investment, we would need enough PV panels to cover almost the entire front side of the roof.
The estimate to install a 4,250-square-foot standing-seam metal roof was $60,000. And that price did not include insulation, PV panels, or the repair of any extraordinary problems that might be uncovered beneath the existing shingles. And there was no guarantee that a metal roof without additional insulation would prevent future ice dams.
It was imperative for us to find a solution to prevent ice dams — a solution that didn’t involve climbing any more 16-foot ladders in winter to rake snow off the two-story roof.
The second solution: Continuous exterior foam insulation
I first heard about high R-value unvented compact roofs from Dr. Joseph Lstiburek, the founding principal of Building Science Corporation. Joe is known for his skill at explaining the whys and wherefores of building science. He is the smartest, most entertaining building expert I’ve ever heard.
At a conference some 15 years ago, Joe described the technique of wrapping a building’s exterior with rigid insulation to prevent thermal bridging. The method includes the installation of a “drain plane” (rainscreen gap) to help the siding dry out. Immediately and successfully I began using that technique. Then last year, after hearing about Joe’s roof experience with his own home, I became convinced that insulation placed above the roof sheathing would save energy and prevent ice dams.
Like so many older buildings in the northeast, my building’s basic structure — its shallow framing — contributed to the ice dams. The attic lacks sufficient space to install adequate insulation, especially near the eaves. Because of air leaks, warm air rises from the heated living space below and passes through the attic causing snow to melt. Low outdoor temperatures cause the melted snow to freeze.
Depending on weather conditions, this scenario may repeat itself. When temperatures rise, the ice melt can find weak spots, causing water leaks in living space.
I called a number of general contractors to hear about their experiences using continuous rigid foam insulation above the roof deck on a sloped roof. (Commercial roofers have successfully used this approach for years on low-slope roofs.) Of the people I called, only two — a G.C. from Long Island and a building inspector from Massachusetts — had used this method. Both are now enthusiastic advocates of this approach. Hearing their successful stories (in addition to Joe’s) convinced me.
The virtues of continuous exterior foam insulation above the roof sheathing — preventing ice dams and reducing heating and cooling costs — were more important than the reduction in my electricity bill that might accrue from installing a PV system. (I could not afford both types of retrofits.)
I chose polyisocyanurate
To proceed, I needed more information about available products and the best procedures.
The first product I was anxious to specify was the insulation. The amount of insulation required depends on climate zone. In Vermont (Climate Zone 6), the code calls for roof insulation with a minimum R-value of R-49.
I came across information about 4-inch-thick polyisocyanurate (ISO 95+ GL) manufactured by Firestone. The product had the highest R-value per inch I’d yet encountered. The 4-inch-thick product was rated at R-23.6, so the R-value of two layers would be R-47.2.
I was psyched; I could easily achieve my objective. (The existing attic insulation was a meager R-20.) The cost of two layers of 4-inch polyiso for the 4,225 square foot roof (252 pieces) was $11,206.
According to the Polyisocyanurate Installation Manufacturers Association (PIMA), “Polyisocyanurate foam (polyiso) is a rigid board insulation formed in the factory between two facers. The facers provide stability, control the foam thickness, and most importantly, provide compatible surface attachment. The majority of the facers used in roofing are fiberglass reinforced. Polyiso has a high R-value, is lightweight, fire-resistant, and user-friendly. Polyiso is compatible with most roofing system applications and is the most widely used insulation product in the roofing industry. While having the highest R-value of any of the insulation products, polyiso does face some long-term thermal loss. When designing a roof specification one should always use aged R-values.”
A high-R roof assembly with exterior rigid foam
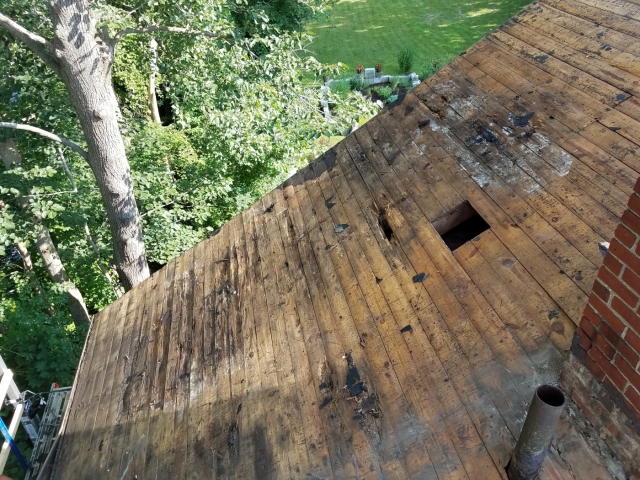
(1) All existing asphalt shingles were removed; many sections had three or four layers. The condition of at least 50% of the original sheathing was abominable. The bad sheathing was replaced with 5/8-inch CDX plywood.
It seems that prior roofing problems (before the installation of the new roof in the 1990s) were “fixed” by adding additional shingles. Half the original sheathing had delaminated, was rotten, or had actual holes.
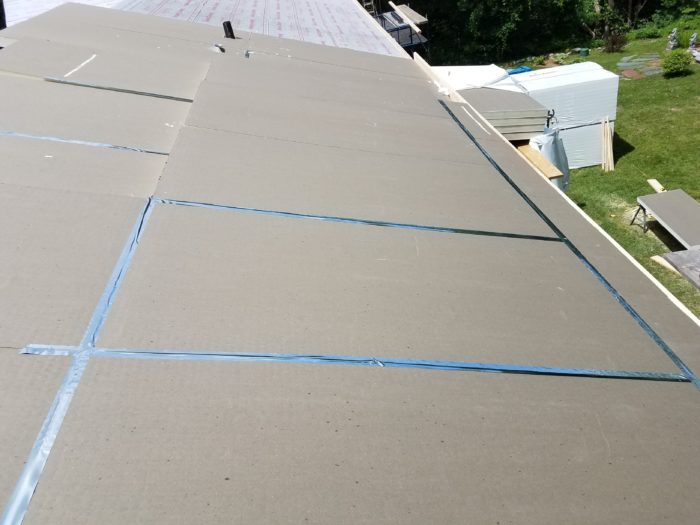
(2) A synthetic roofing underlayment, Owens Corning Deck Defense, was applied over all of the sheathing (see Image #2, below).
(3) A new 2×10 fascia, high enough to accommodate the insulation, sheathing, and roofing material, was installed at the perimeter of most of the roof slopes. The fascia was toe-nailed to the joists.
(4) Workers installed two layers of 4-inch polyiso (4’ x 8’ sheets of Firestone ISO 95+ GL). The second layer was installed with staggered joints. The polyiso sheets were easily installed working from the fascia up. All gaps were with filled with minimal expanding canned spray foam. Seams were taped with Zip System tape (see Images #3 and #4, below).
(5) Because the roof was large, and because rain is a constant threat in Vermont, the project proceeded in sections. To keep the polyiso dry, tarps were used to cover sections that were not yet completed.
(6) All penetrations like vent pipe were air sealed with minimal expanding canned spray foam.
(7) The polyiso was covered with Huber 5/8” tongue-and-groove Zip sheathing. Long screws (12 inch heavy-duty screws from Firestone) were used to fasten the new sheathing through the rigid foam to the rafters. Workers found that the lines on the sheathing were useful guides to position the screws. Each 4’ x 8’ piece of sheathing required 33 of the 12-inch screws.
(8) The new Zip sheathing was covered with underlayment (Tri-Flex XT underlayment from GCP Applied Technologies). This underlayment is slip-resistant.
(9) At the perimeter of the roof, the exposed polyiso was protected with 24-inch-wide aluminum coil stock.
The coil stock is brown, like the building. The contractor bent the coil stock on site with a brake.
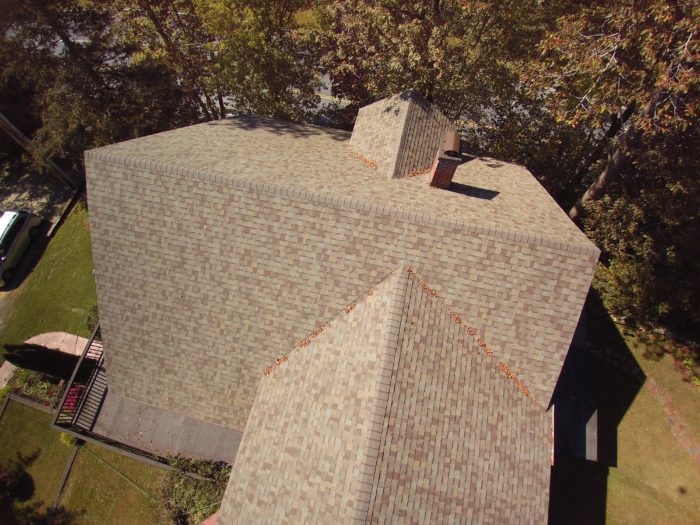
(10) The roofers installed the shingles (see Images #5 and #6, below).
Total project cost was $60,324
The project cost $14 per square foot.
Here are the cost figures for the 4,250-square-foot roof:
$1,584 5/8-inch CDX plywood to repair rotten sheathing
$1,202 Owens Corning Deck Defense synthetic roofing underlayment
$620 2x10x16’ spruce for fascia
$11,256 252 4’x8′ sheets of 4-inch Firestone ISO 95+GL polyiso insulation
$5,000 5/8-inch Huber Zip System roof sheathing (installed over the polyiso)
$200 Zip System tape
$3,000 12-inch-long Firestone heavy-duty screws (33 screws per panel)
$150 Minimal-expanding spray foam (in 12-oz. cans)
$3,000 GCP Tri-Flex XT roofing underlayment
$145 8-inch brown galvanized dripedge flashing
$300 Tri-Built aluminum coil stock
$4,000 Owens Corning Duration Driftwood asphalt shingles
$2,867 Rubbish removal
$25,000 Labor
$2,000 Miscellaneous
$60,324 TOTAL
Shingles plus 8 inches of polyiso cost the same as a metal roof without insulation
Adding 8 inches of polyiso insulation above the roof sheathing along with a second layer of roof sheathing and new asphalt shingle roofing cost the same as installing a standing-seam metal roof without any insulation. However, this high-R-value roof assembly should prevent future ice dams and reduce heating and cooling costs.
Because the roof configuration of the building includes cathedral ceilings, and since there are few roof penetrations, and since the crew took care with their installation, I did not include a vented air space (as some installers do) above the polyiso layer.
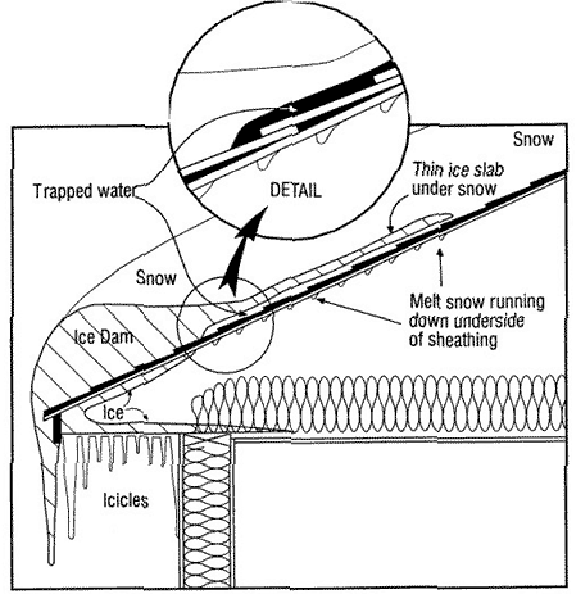
In a Fine Homebuilding article, GBA editor Martin Holladay wrote, “If you choose to install rigid foam on top of your roof sheathing, the foam has to be thick enough to keep the lower layer of roof sheathing above the dew point in the winter. If the foam is too thin, the roof sheathing will be cold, which can lead to problems with condensation or moisture accumulation.”
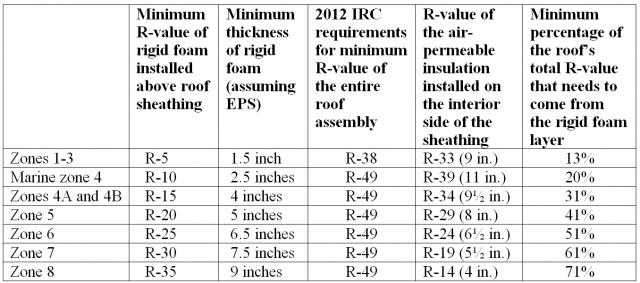
In an article published on the Building Science Corporation web site, Joe Lstiburek wrote: “Insulation Above and Below Roof Deck – The rigid insulation can be ‘anything’ above the roof deck. The main stipulation is the thermal resistance of this rigid insulation above the roof deck is based on [the ratios shown in] Table 1. The ‘air permeable insulation’ can be pretty much anything as well… just as long as the thermal resistance of this layer does not violate the ‘ratio.’ … This performance requirement is a ‘simplified’ ‘conservative’ approximation of all the historical experience and field work. Think of it as what it is…an “engineering coefficient”…..OK, more of an engineering equation providing boundary conditions…. not derived from first principles but derived from observed experimentation and field experience.
“Sloping Unvented Compact Roof — It is important to have an air barrier directly on the top of the structural roof deck and to have multiple layers of rigid insulation with the joints offset horizontally and vertically. It is not a good idea to only have one layer of rigid insulation due to convection.”
The ratio table in Lstiburek’s article is similar to the table shown in the GBA article titled Combining Exterior Rigid Foam With Fluffy Insulation (reproduced below).
No more ice dams
We had two priorities: to prevent ice dams, and to reduce heating and cooling energy costs.
As of this writing, the building has had no ice dams! We’ve had several snowfalls, and even though the roof was not raked, there haven’t been any icicles.
This winter the lowest temperature in the unheated attic space (in subzero windy weather) was 68°F. Typically, the attic temperature is even warmer: 70°F to 72°F. Clearly, the insulated roof reduces heating energy costs. We’ll be able to calculate the savings once the first heating season is over. We also intend to monitor the attic temperature throughout the summer.
Pauline Guntlow has a Massachusetts general contractor license. She designs and manages everything from kitchens to entire homes.
Weekly Newsletter
Get building science and energy efficiency advice, plus special offers, in your inbox.


34 Comments
Polyiso Costs?
Pauline,
Would you please verify your Polyiso cost. Polyiso tends to be the most expensive rigid insulation and your listed cost for the 4,225 sf @ R-49 seems unduly reasonable. In any case I am looking for a supplier of the same insulation you used here in MSP. Thanks again for a great article, all of the detail you have provided is most valuable. I have linked your article and have sent to 5 like minded, dedicated building professionals this morning.
Great project
Great project, and as Doug mentioned very useful to have a break-down of the costs and such a thorough description both of the process and thinking behind it.
Two small things:
- There is no mention of how the existing attic was air-sealed at the perimeter. Adding insulation above the roof deck is only effective if the attic is converted from a vented to an unvented one.
- I'm not sure the comparison between a standing-seam metal roof and the solution they ended up using really makes much sense. The metal roof wouldn't have solved the problems they were having. Similarly I don't see where PV comes into the equation at all. Solar panels could be mounted on both roof sand doesn't contribute to the solution either.
Edit: The specs call out a synthetic roof underpayment, and it is visible in one of the photos, but other clearly shows shingles being installed directly to the zip sheathing with no underlayment, or membrane in the valley. That would worry me.
Verifying Polyiso Cost
Hello Doug,
I purchased the polyiso from Allied Building Products in Albany, NY. The total cost including tax and delivery cost was $44.67 per 4' x 8' sheet, which equals $11,255.97. Actually I came across this Firestone product while I was in Albany picking up other material. While walking around Allied's Warehouse I spotted this huge pipe of thick insulation and started quizzing the attendant about it. Prior to this time I had searched for such a product - but had not found any with such a high R value.
Reclaimed goods are cheaper (and greener)
Reclaimed 4" roofing polyiso typically runs ~$20-25/sheet from multiple sources in MA, but it varies. I've seen 4" for less than $15, in near-perfect condition at times from smaller reclaimers. Three inch goods typically runs $15-20.
To hit IRC 2015 code-min on a U-factor basis (< U0.026, or R38.5 "whole assembly) takes only ~6", when factoring in the R-values of the structural roof deck, the nailer deck, the roofing shingles & felt, and the interior & exterior air films. At 8" it's significantly higher performance than code.
> It is important to have an
> It is important to have an air barrier directly on the top of the structural roof deck
In this design, the intent is that the Deck Defense underlayment provides the above air barrier?
If this is considered a combination of fluffy and rigid, then this quote might be a concern: "the rigid insulation above the roof sheathing, and the fluffy insulation below the roof sheathing — need to be in direct contact with the roof sheathing."
https://www.greenbuildingadvisor.com/blogs/dept/musings/how-build-insulated-cathedral-ceiling
Not important, but I didn't find anything in the manufacturer's information that indicated that either underlayment was vapor-permeable. Maybe I missed it.
Response to Jon R
Jon,
Thanks for your comment. As far as I can tell, you are right about the vapor permeance of the synthetic roofing underlayments mentioned in the article. Owens Corning Deck Defense is a vapor barrier -- it has a vapor permeance of 0.23 perm, as noted in my article on roofing underlayments (Synthetic Roofing Underlayments).
The published specifications for Tri-Flex XT make no mention of the product's vapor permeance. (When a synthetic roofing underlayment is vapor-permeable, the manufacturer usually brags about that fact.)
I have corrected the article.
Yours is an over-priced solution
Sixty thousand dollars to fix ice dams is preposterous. You fail to identify the cause, therefore go to extremes to treat symptoms. Poor performing insulation is the cause of ice dams, usually blown fiberglass. Blown fiberglass leaks warm air that melts snow, which in turn runs down the roof and freezes at the overhang.
The solution is as simple as the cause. Use quality insulation. I routinely rake the blown fiberglass away from the eves and then lay down a nice blanket of cellulose insulation covering the leaky fiberglass; sealing the warm air leaks allowed by inadequate fiberglass. End of story. Or you can do a lot of busy work with foam board and pretend you worked really smart.
Response to Larry Maloney
Larry,
Thanks for sharing your technique for addressing ice dams. Your approach is both cheaper and less effective than the approach used by Pauline Guntlow. In a house with insufficient space at the eaves for adequate insulation, there is no way to achieve R-40 or R-50 with cellulose.
This is a 7-unit apartment building, so the cost per dwelling unit for the fix was $8,617. Was that a good investment? The only person who can answer that question is the owner. Pauline is the owner -- and in this case, her answer to the question is an enthusiastic "yes!"
You wrote that Pauline "failed to identify the cause" of the ice dams. In fact she did; she wrote, "The attic lacks sufficient space to install adequate insulation, especially near the eaves. Because of air leaks, warm air rises from the heated living space below and passes through the attic causing snow to melt."
You wrote, "The solution is as simple as the cause. Use quality insulation." She did. (And by the way, using quality insulation is the second step to ice dam remediation. The first step is sealing air leaks.)
Multiple underlayment layers?
Can you explain the thinking on the first underlayment (Owens Corning Deck Defense)? I'd think each of the sealed layers of Polyiso (taped and penetrations sealed) would function as air barriers, and those plus the upper underlayment are all keeping moisture from making it down through the system. Is this just even more redundancy?
Polyiso
Just wondering about polyiso products. I have read that as temperatures decrease, it insulates less. This would be a major problem in areas where extreme temperatures are a problem like Ontario.
Response to Kingfisher Kate
Kingfisher,
I'm not sure I agree with you that it's a "major problem."
The outermost inch of polyiso is cold. But that outermost inch keeps the second inch a little warmer, improving its performance.
The innermost inch of polyiso is a room temperature, so it's performing very well indeed.
The middle-most inch is somewhere in performance between the innermost inch and the outermost inch.
With 8 inches of polyiso, I'd say the roof is performing well.
Remember, even if the outermost inch of polyiso is at 0 degrees F, it's not worthless. It's still performing at R-4 per inch or better -- at least as well as EPS.
For more information on this issue, see Cold-Weather Performance of Polyisocyanurate.
It works
Did this about 5 yrs ago in Minnesota. 4" of poly-ico under new sheathing with 3.5" of closed cell foam on under side of roof (2x4 rafters). Ice dams gone, vastly reduced heating and cooling. In addition the interior foam strengthened the whole roof structure in this 1940's house.
Response to User-6967540 (Comment #10)
Q. "Multiple underlayment layers?"
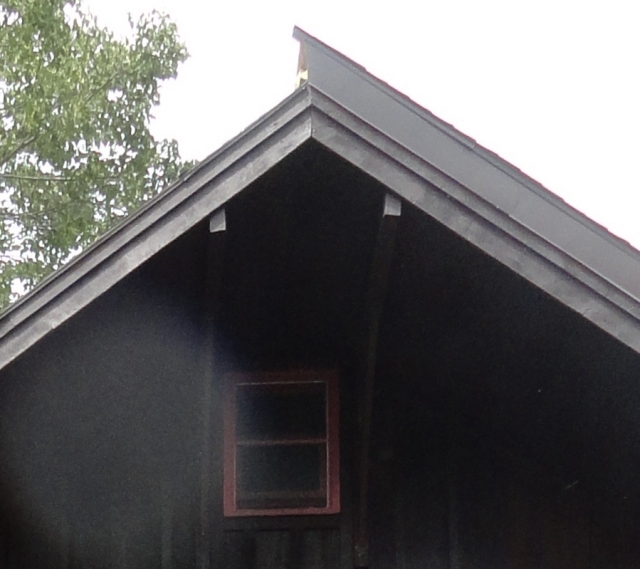
A. Some builders or owners might want to save money by omitting the lowest layer of underlayment. But it's a good idea to put an air barrier between the lowest level of roof sheathing and the rigid foam, because you don't want any interior air finding its way between the sheets of rigid foam. (Joe Lstiburek calls these air leaks "Complex Three Dimensional Airflow Networks." I just call them air leaks. To read more about Joe's barn roof, shown in the photo below, see "Complex Three Dimensional Airflow Networks.")
So, the lower layer of underlayment is an air barrier. The upper layer of underlayment is code-required -- building codes require the use of roofing underlayment under the roofing. (Arguably, on this job, the fact that Zip sheathing was used for the top layer of roof sheathing means that the top layer of roofing underlayment was unnecessary. But not every builder is convinced that Zip tape's adhesion is permanent.)
.
Not a problem at all @Kingfisherkate
Take a look at the curve for generic 2lb roofing polyiso on page 2 of this document, where Dow downplays the performance of their polyiso competitors:
http://msdssearch.dow.com/PublishedLiteratureDOWCOM/dh_098a/0901b8038098a015.pdf?filepath=styrofoam/pdfs/noreg/179-00263.pdf&fromPage=GetDoc
At a mean temp through the foam layer of 0F/-18C it's still running about R4.3/inch. If polyiso is the only insulation in the stackup and it's 20C indoors, the only time it drops to even that R4.3/inch is when it's -56C outside. How often does that actually happen?
Even in a somewhat cooler location like Kenora Ontario the mean outdoor temperature during the coldest weeks of January is about +5F/-15C:
https://weatherspark.com/m/146165/1/Average-Weather-in-January-at-Kenora-Airport-Canada#Sections-Temperature
At -15C outdoors, 20C indoors the mean temp through the foam would be +2C/+36F, a mean temperature at which the generic polyiso is performing at R4.7/inch. And that's during the coldest weather.
The example producte for that curve peaks at fairly low R5.5/inch @ 55F/+13C through the foam- most current polyiso does better than that, testing at R5.7-R6/inch @ 75F mean temp, a mean temp at which the example product only musters R5.2/inch.
The curves will be slightly different from vendor to vendor, product to product, but for most current offerings assuming ~R5/inch seasonal average performance for just about any location in Ontario isn't a stretch. Yes, that is lower than the labeled performance, but the derating for temperature doesn't take hard math. At 8" the roof in this article would be performing at better than R40 "whole-assembly" even in places as cool as Kenora, and will do better than that in it's balmy Vermont location.
Of course you COULD spring for the Dow Thermax polyiso, and get R6.7 inch performance out of it rather than R4.7 in January in Kenora. :-)
External Rigid Roof Insulation
If anyone knows of any builders or roofing companies doing this work in the Washington, D.C. area, it would be greatly appreciated. I have explained this approach to many clients, but know of no one who is doing this type of work. I have tried to talk several roofing companies into offering this service, but so far no takers. I know one person who just took his whole roof off and put on a SIPs roof, but that is pretty pricey.
must have missed something?!
If the first image of building construction shown represents THIS apartment building then I am truly confused. Confused why no one else jumped on the likely simplest and least expensive solution for ice dams-- spray on foam at outer perimeter of existing attic above ext walls and partially into area above conditioned space.
Confused why, with the whole attic already having insulation above the rooms this area could possibly be at 68 to 72F with subzero outside temps. What? are they purposely heating the attic to be occupied or is there simply zero insulation above the "conditioned" spaces??!
Confused because there is no addressing what must be a huge amount of air leakage from the conditioned space with almost no air flow UNDER the roof to move the leaked conditioned air away to attic vents.
With a spray foam nozzle it seems to me a much easier and less expensive solution to this problem for many reasons: tool is small enough to allow operator plenty of standoff distance to work foam into small spaces above ext walls, it fills all the air leaks with an air tight seal, high insulation value, negates need for roof top insulation and apparently a LOT of labor cost.
Regardless, they probably STILL needed a new roof, so that is just an outright cost they had to pony up for regardless of the ice dam solution.
I remain confused.
For future builds of similar
For future builds of similar systems, I'd consider taped sheathing or a fully adhered membrane for the critical air barrier below the insulation.
With (I think) this attic being semi-conditioned space, I'd monitor relative humidity there.
Response to Schreib77 (Comment #17)
Schreib,
There are several reasons why it might make sense to install 8 inches of polyiso on the exterior side of the roof sheathing instead of trying to solve the ice dams by installing spray foam near the eaves.
1. In an older building with several additions, access to the area near the eaves can be difficult or almost impossible.
2. The available height for insulation near the eaves is often too little to get enough R-value, even with spray foam -- especially if ventilation baffles are needed to ventilate the attic.
3. Older buildings often have hidden air pathways that are hard to locate. If these air leaks are under a layer of existing (older) insulation, you need a skilled and experienced work crew to locate and seal all the air leaks. Even with an experienced crew, it's easy to miss a few air leaks.
Roof deck air barrier
This blog gave me a better understanding for insulating above the roof deck. The only question I have is about the roof deck air barrier. From the photos, it appears the Owens Corning Deck Defense is installed much like roofing underlayment, from the eave to the peak. I was taught that the air/vapor barrier needs to be continuous. It would seem to me there would be a break at the eave between the top plate and the bottom of the roof deck. Was this area addressed during the re-roof?
Response to Randy Williams
Randy,
Perhaps Pauline will post a comment about air sealing the attic and maintaining a continuous air barrier.
You're right, of course. Your comment is similar to Malcolm Taylor's first point in Comment #3. If anyone wants to follow Pauline's lead, converting a vented unconditioned attic into an unvented conditioned attic, you have to pay attention to air barrier continuity. That means that you need to develop a plan to connect the wall air barrier with the roof assembly air barrier, and you need to address air leaks at the gable walls of the attic, if any.
Other Suitable Rigid Insulations
What other rigid insulation could be used for sloped roofs to bring roof R-values to code or beyond. Extruded or expanded polystyrene? The low cost polyiso featured may not be available in all areas. I would be slightly concerned about water absorption on the raw ends of the polyiso sheets. A mastic of some type on those unfaced ends, especially near the eaves, might be good insurance.
Solving An Ice Dam With Exterior Rigid Foam
Hello Randy and Martin,
Yes, it’s extremely important to pay attention to air barrier continuity. Obviously building new is so much easier. But in this case we did the best we could including:
1.Removed all siding on the west wall and gable; insulated over sheathing with ROXUL R23. There were two reasons for using ROXUL – to establish continuity between side walls and roof, and to reduce road noise on that side of the building.
2. The wall between the newer section and the original building was stripped from the inside, sealed with spray foam, and insulated.
3. As the crew replaced some old roof sheathing near the east side gable they observed the poor condition of fiberglass batt’s on interior gable wall. That material was removed, framing air sealed with foam, and gable wall insulated from the interior with ROXUL.
4. Twelve inch high pieces of ROXUL were also used along the edge of the roof between each rafter.
Although not perfect – this retrofit works – no snow raking, no ice dams, and my attic office is 72 degrees.
A response to Dana Dorsett’s comment, “Reclaimed goods are cheaper and greener”. Actually, I looked into such products Dana, but was reluctant because the edges can be damaged and corners ragged. I felt the time it would take to pay the crew to “fix” the sheets might be spent in salary. But definitely would consider for a different project.
Response to Doug McEvers
Doug,
Polyiso is the mostly commonly used roofing foam, although there are no technical reasons why you can't install EPS or XPS on a roof.
As you may know, green builders generally avoid the use of XPS because XPS is manufactured with a blowing agent that has a high global warming potential. More information here: Choosing Rigid Foam.
On Pauline Guntlow's building, the edges of the polyiso are protected by 2x10s or metal flashing (or both), so there is no reason to worry about moisture absorption.
Reclaimed foam damage is generally pretty small. @ Pauline
I've seen projects where the reclaimed foam looked nearly new at well under $20/sheet, with more than 85% of the sheets pretty much blemish-free. The commercial foam reclaimers definitely understand how important it is to protect the corners. Even sheets with 1-2 dinged corners can be used for the valleys or cut gable end pieces without spending a lot of labor sorting them. Buying 10-15% more than is necessary allows you to set the truly damaged sheets aside, to be uses somewhere else, maybe by someONE else. (Habitat for Humanity and other places will usually pick it up if it's more than just a couple sheets.)
Question on Ice Dams
We have a 8 yr old (we think) well-insulated house, but have a limited area of occasional ice dam formation in one spot on a north facing overhang/valley.
We suspect it would be really difficult to access that particular spot of the attic inside.
Is there any reason why using "slip sheets" of steel roof along the bottom 3 ft of roof wouldn't be the most cost-effective solution?
Thanks for a really interesting article and set of comments.
Response to Richard and Miranda Menzies
Richard and Miranda,
In northern New England, roofers are very familiar with your approach. You often see 4-foot-wide bands of standing-seam metal roofing (or other types of metal flashing) at the eaves of homes that are subject to ice dam problems. This method was generally abandoned after the Grace Company introduced Ice & Water Shield to the market in the late 1970s.
In general, installing Ice & Water Shield or wide metal flashing at the eaves can relieve some ice dam problems. While it usually doesn't stop ice formation, it reduces the chance of a leak reaching your ceiling. If the ice dam gets big enough, you can still end up with a ceiling leak.
The most long-term solutions involve air sealing improvements and improved insulation. But homeowners with ice dam problems make compromises all the time, and often resort to inelegant solutions like wide metal flashing or electric heating cables.
Cheap Insurance
I would recommend running the ice and water shield (on new construction) farther up the roof than typically called for by code, starting at the eave line. I think MN code calls for 18" up from the exterior wall top plate. To this I will add another 36" width of ice and water membrane. I also run a 36" width under all metal valleys before laying the roofing. Ice and water is a valuable material when working the tricky flashing areas, saddles, etc.
This Is So Timely
Thank you, Pauline
I have been doing Ice dam remediation this winter for my neighbor and now others are interested. My method has been to work from the inside (recent new roof) using a dedicated air space, fiberglass (recycled) and polyiso on the warm side to negate thermal bridging, add r-value and provide an airtight layer.
The next project will be roof over as you have so nicely described. Thank you for providing the costs for the project as this information is so often lacking in case studies.
More On Roofovers
In thinking about this project over the weekend something else comes to mind. I did not see anywhere mentioned the calculation for snow loads on this roof both pre and post for the work done. Clearly some weight was added to the existing roof framing with the insulation and extra decking material. This may be balanced out by the layers of existing roofing removed before starting the reconstruction. However, previously this roof routinely had snow removed when needed and also the shedding of weight due to the heat loss through the thermally deficient roof assembly. A well insulated and air sealed roof assembly will maintain uniformly all of the snow that has fallen for a given winter season short of wind blown removal and occasional thawing cycles.
Water content of snow is a big factor in roof snow load calculations and it seems the water content of snow may be higher on a percentage basis than years ago due to the increased water vapor in the atmosphere. Snow load tables may have to be updated to reflect the possibility of additional weight due to water content.
My thanks to Pauline for her bravado in posting with great detail the work and the results of her project. Thanks also to Dana for mentioning recycled insulation as a way to build greener and more cost effectively. Return on investment can be greatly increased for energy efficient retrofits by doing some homework and sourcing previously used building materials, not to mention the decreased carbon load.
Great description and analysis
Pauline, Thanks for the great write up. You analysis is very helpful for anyone considering doing this. The best follow up in the future will be an analysis of your heating fuel usage (i.e. in btu/HDD or gallon/HDD) before and after. If you want me to do it, just get me the fuels deliveries for a couple of years.
Ratio table of exterior to interior
I live in a ranch house in zone 5 and I am interested in doing this for the sake of airsealing because I have some minor air leakes. I have 12 to18 inches of cellulose over most of the ceiling except over outer walls. From the discussion, I understand the need to extend the air barrier at the gables to the wall top plate and to insulate the gable walls. I don’t think I can go back up in the attic and swim through all that cellulose and effectively apply an vapor barrier.
Would one rake 41% of the present interior ceiling insulation and add that amount to the exterior with foam? Or does one take 41% of the R49?
Response to Mark Dahlhoff
Mark,
If your attic floor already has 12 to 18 inches of cellulose, and you have some "minor air leaks," the most cost-effective approach to your situation would be to locate and seal the minor air leaks. A blower door and an infrared camera might help; in some cases, a theatrical fog machine can be used to help find leaks.
You also mention the possible need for a vapor barrier -- but there is no reason (neither a building code requirement or a practical reason) to install a vapor barrier. What you need is an air barrier.
Installing a thick layer of rigid foam on the exterior side of your roof sheathing, along with a second layer of sheathing and new roofing, is expensive. I doubt whether it's the best way to go in your case.
If you do decide to install exterior rigid foam in Zone 5, at least 41% of the total R-value of the roof assembly (not including the cellulose on the attic floor) needs to come from the rigid foam. The remaining 59% of the total R-value of the roof assembly would come from new insulation installed between your rafters; this new insulation would have to be in direct contact with the roof sheathing. You would need to remove the existing cellulose insulation on your attic floor if you went this route, which is a big job. It's easier to just find and seal the "minor air leaks" than it is to do as you plan.
We would like to use this method on our home. We live near Chicago, Illinois. I have not been able to find any contractor in our area who has used this method before. Please help me get in touch with a contractor from any area who has successfully used this method and would be willing to do the job for us or help us make sure we do the job correctly. Thanks.
Rebekah,
I suggest you read this article: "I Can’t Find a Contractor to Do That."
Log in or create an account to post a comment.
Sign up Log in