

Image Credit: All photos: Michael Trolle
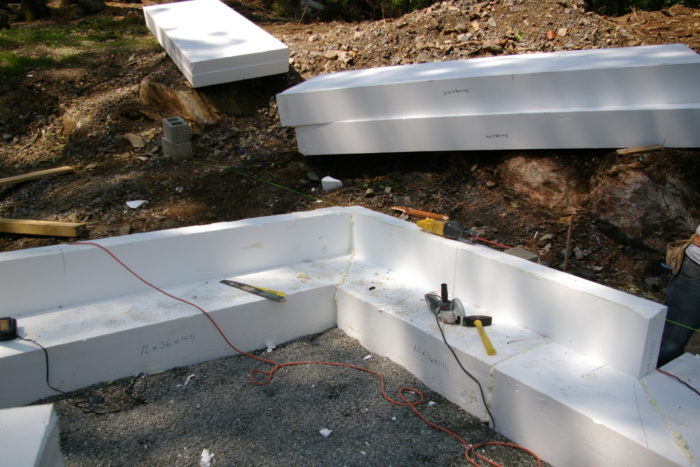
Image Credit: All photos: Michael Trolle A second layer of polyiso, this one 3 1/2 inches thick, caps the first and drastically reduces thermal bridging through the wall framing. Furring strips will support the siding and create a ventilating air space between the polyiso and siding. A corner detail of the EPS slab insulation shows the upright 6-inch-thick perimeter walls where they meet the 12-inch-thick base pieces. The area in the foreground covered with crushed rock will get a 12-inch layer of EPS before the concrete slab is placed. The EPS in the middle of the floor was extra material the author had on hand. Instead of filling the entire cavity with concrete, he used some of the rigid foam. The floor slab was poured on top.
More Guest Blogs


Editor’s note: This is the second installment in a series of blogs by Michael Trolle about the construction of his Passivhaus home in Danbury, Connecticut. The first part was published as “Building My Own Passive House.”
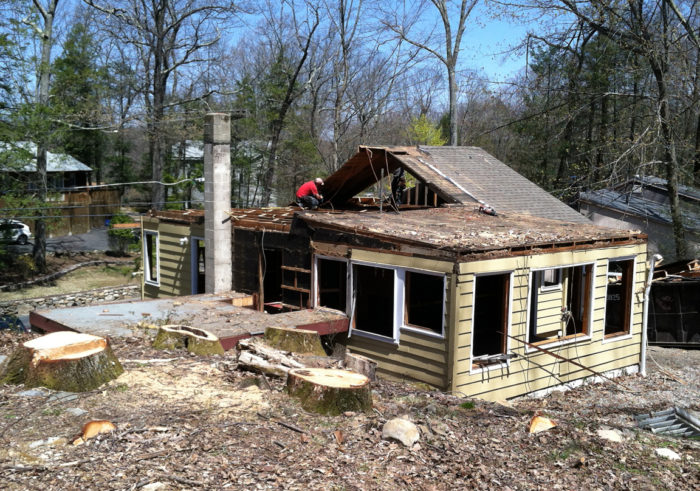
The project began with the demolition of the existing cottage. As a builder, I should be immune to feeling badly about taking down an old house, but I find it painful to see sound building materials smashed up and hauled away. However, the reality is that working with the existing framing would have cost more, and achieving airtightness would have been harder.
One consolation is that 90% or more of the materials are recycled in some way. This is down-cycling, of course, as the materials in their current form have no market value.
I kept only the concrete block foundation and the framed floor above it. In retrospect, I doubt that I should have kept either. The block foundation was never waterproofed and has no footing drain so it will always be somewhat damp. This led to a damp floor deck above during construction which required care to prevent mold.
Also, the floor framing wasn’t completely square and was structurally insufficient without reinforcement. The bottom line is that it would have been easier, and perhaps even cheaper, just to have started from scratch.
Expanding the footprint
I expanded the footprint of the house to the rear and side of the old foundation. I chose to go with a frost-protected shallow foundation. Unlike traditional foundations, this type does not require footings down 42 in. to frost depth.
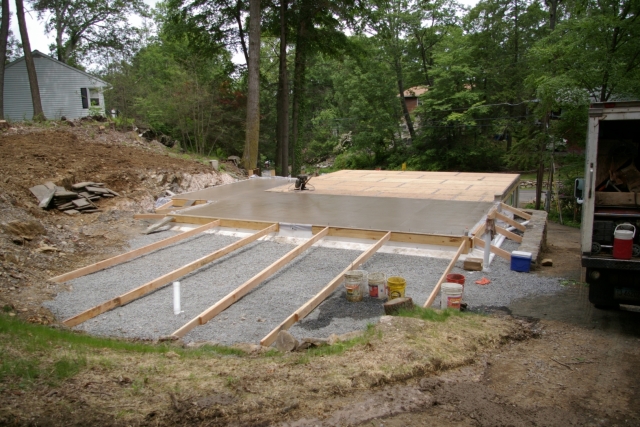
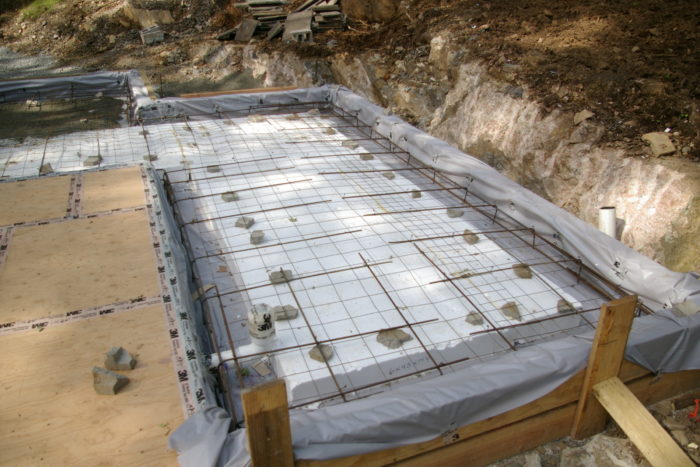
The installation began with a 6-inch layer of crushed stone, followed by a 12-inch layer of expanded polystyrene (EPS) rigid foam insulation, with short EPS stem walls around the perimeter forming a shallow basin that is filled with concrete. The EPS isolates the concrete from the ground and the outside air, which prevents thermal bridging (heat loss through structural materials that don’t insulate well, like concrete).
The addition was then framed directly above the concrete slab. The insulation not only prevents heat loss to the ground, but also heat loss from the ground — which is 50-55 degrees year round — to the ambient air. That’s why traditional footings down 42 inches aren’t required.
Three layers of insulation in exterior walls
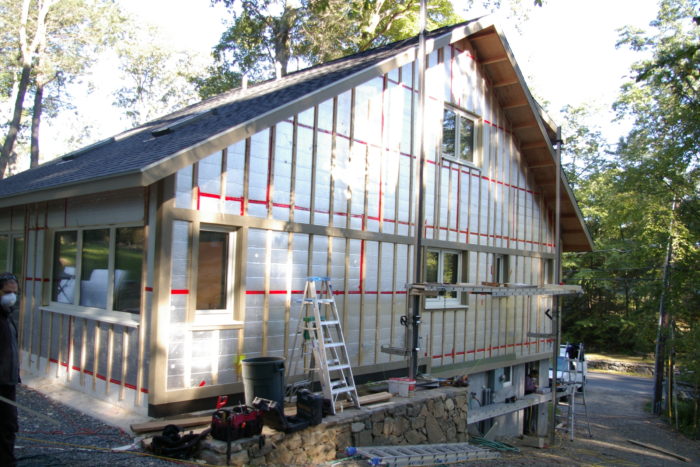
The walls were framed with 2×6 studs to create 5 1/2-inch cavities for insulation. The studs are spaced 24 inches apart, instead of the normal 16 inches. This wider spacing means there is less wood and more insulation in the wall assembly. (The roof is framed with engineered trusses, which are structural wood assemblies manufactured off-site. I’ll have more about that in the next part of this series.)
I used three layers of insulation in the exterior walls. The first is installed between the 2×6 studs. These cavities are filled with cellulose, an insulation product made from recycled newsprint and cardboard (and a favorite of many green builders). The interior face of the studs is covered with a tough, non-stretch fabric, which was stapled to the studs so as to be drum tight. The cellulose was blown into the walls at high pressure, ensuring that the insulation stays in place permanently. The R-value of this installation is 20 and meets the code standard for an exterior wall all by itself.
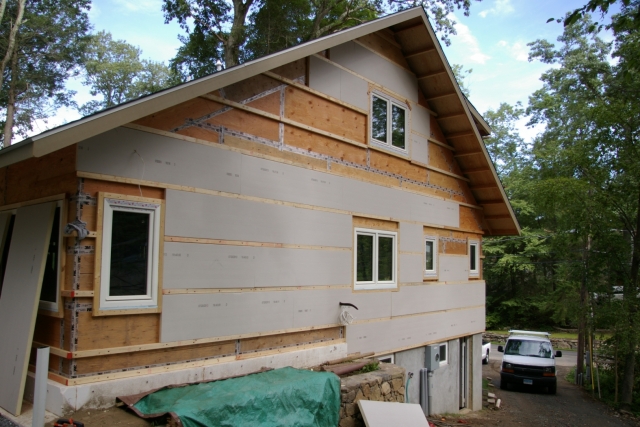
Outside, the plywood sheathing joints were sealed with 3M All Weather tape to make the walls airtight. (I’ve since switched to Tescon Vana tape.) Then 2 inches of polyisocyanurate (polyiso), a rigid foam board insulation product, was installed between 2x3s (plus strips of 1/2-inch plywood) that run horizontally and are fastened to the wall studs with Timber Lok screws (see photo above).
The final layer of insulation, 3 1/2 inches of polyiso, was installed continuously over the first (see Image #2 at the bottom of the page). The two layers of polyiso together virtually eliminate thermal bridging, or “heat bleed,” through the framing.
Finally, 1×3 wood strips were screwed on with Timber Loks through the 3 1/2-inch layer of polyiso into the 2×3 studs. The 2x3s are necessary because the siding is heavy and can’t be installed over the full 5 1/2 inches of polyiso. The exterior siding was then nailed to the wood strips, with a 3/4-inch drainage plane between the polyiso and the siding to ensure drying and durability.
The overall R-value of this assembly is roughly 55, much higher than the code minimum of R-18 for this type of wall.
Extra insulation is worth the cost and effort
Why build a wall that is insulated to an R-value three times the building code minimum? Well, it cost my family about $200 worth of electricity to heat the 1,650-square foot house this winter, with the interior temperature at 70 degrees, day and night. A high level of comfort was assured because the interior surface temperature of the floors, walls, and roof was the same as the room air temperature, and air leakage was non-existent.
It’s a night and day comparison to conventional code-based construction.
Here’s a link to Part 3 of this blog series: Building an Airtight Envelope.
Michael Trolle is a co-founder of BPC Green Builders, in Wilton, Connecticut. This post, and the ones to follow, were originally published in slightly different versions at The HomeMonthly.com but also are available at the BPC Green Builders website. On October 7, 2015, BPC Green Builders was named Grand Award Winner in the Custom Home category in the Department of Energy’s Housing Innovation Awards.
Weekly Newsletter
Get building science and energy efficiency advice, plus special offers, in your inbox.


2 Comments
Michael
You wrote:
"The bottom line is that it would have been easier, and perhaps even cheaper, just to have started from scratch."
Unfortunately, that's been my experience too. It goes against the grain, but very often salvaging what you can and starting from a clean sheet is the best approach.
Tear Down
Interesting. I do commiserate with the harsh choices. I have done it both ways. We built an almost-passive house in Italy on the footprint of an old farmhouse. The cost of having to refurbish this house would have been astronomical. We tore it down and used the rocks (round river rocks, of no value) as fill for the decks and foundation. Case 2, a project we are working on now. We are restoring (with deep energy retrofit) an 1902 Victorian red brick in Stratford, Ontario. This house is a 2 story red brick on a rubble foundation. In this case the walls and foundation have huge value, so no teardown. We are stripping the inside back to brick so we can insulate and re-frame. The floors are a mess (I call it the "wave"), so they are coming out too. So basically, a house in a house. Best of luck on your project!
Log in or create an account to post a comment.
Sign up Log in