Image Credit: Eric Whetzel
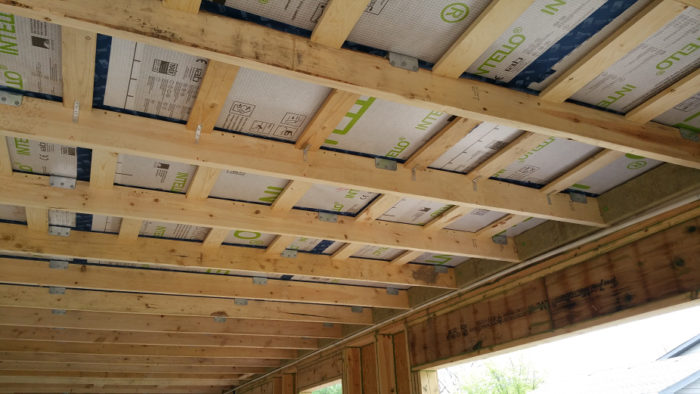
Image Credit: Eric Whetzel We installed all of the Simpson Strong-Tie brackets on the ceiling before raising any of the 2x6s. To help create the service core, two 2x6s were set on edge on top of the top plate, leaving a cavity toward the inside. Placing a strip of mineral wool insulation in this space helps keep the thermal barrier intact. Pieces of 1x4 installed between the 2x6s will prevent the Intello membrane from sagging beneath the weight of 2 feet of blown in cellulose that's going into the attic. Slits in the air barrier allowed water to drain through. Once the roof was shingled, the cuts could be repaired with tape.
More Guest Blogs


Editor’s note: This post is one of a series by Eric Whetzel about the design and construction of his house in Palatine, Illinois, a suburb of Chicago. The first blog in his series was called An Introduction to a New Passive House Project; a list of Eric’s previous posts appears below. For more details, see Eric’s blog, Kimchi & Kraut.
A design goal for the ceiling was to keep mechanicals, like HVAC and electric, on the conditioned side of the ceiling air barrier. By doing this, we avoid having to insulate any ductwork for HVAC, or air sealing and insulating around ceiling lights. In effect, we completely isolate the attic, making its sole purpose (apart from ventilating our “cold roof” assembly) holding our blown-in cellulose insulation. (This setup makes it much easier to air seal the ceiling and get the insulation right — at least based on the projects I’ve read about.)
In order to do this, we created a service chase, or service core, using 2x6s set on 24-inch centers. In addition to serving as a space to safely pass mechanicals through, the only other job for the 2x6s is to hold up the ceiling drywall. The roof trusses, directly above each 2×6, are still carrying the load of the roof and stabilizing the perimeter walls.
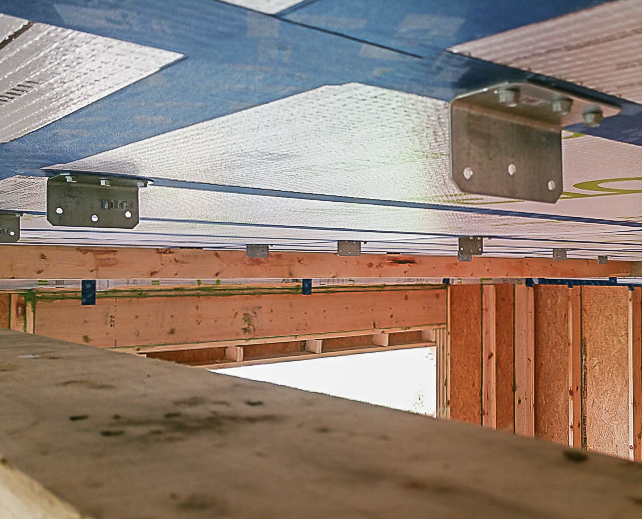
To attach the 2x6s to the roof trusses, we used brackets made by Simpson Strong-Tie and Simpson SDS fasteners.
We installed the brackets first (see Image #2 below) before raising each 2×6 up and fitting it. Since the brackets were directly attached and under a roof truss, we were able to keep the 2x6s fairly straight, even when the board itself was less than perfect.
A feisty robin kept trying to set up a nest on our partition wall. (Our windows and doors aren’t in yet.) Apparently she believed we had created an elaborate birdhouse just for her. It took almost a week before she finally gave up — but not before starting multiple nests in multiple spots along the wall.
Maintaining the thermal layer
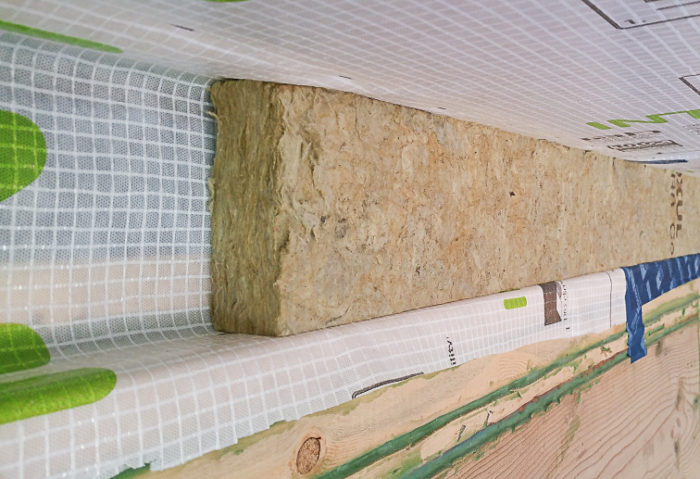
Along the outside walls, at the top of the wall assembly, there was a gap that we filled with strips of mineral wool insulation (see Image #3 below). This meant there will be no break in our thermal layer going from the blown-in cellulose insulation in the attic to the monolithic layer of Roxul Comfortboard 80 (2 inches plus 2 inches) that will be on the exterior side of the Zip sheathing.
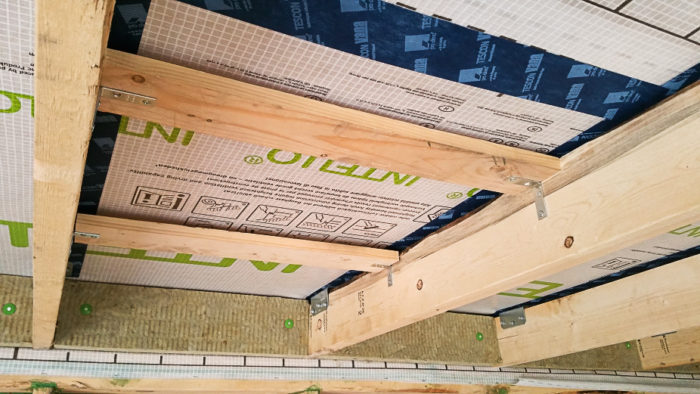
Once the 2x6s were up, we had to install pieces of 1×4 between them in order to prevent the 24 inches of blown-in cellulose that will be going into the attic from causing the Intello air barrier to sag (see Image #4 below).
The plans called for the 1x4s to be installed right after the Intello but before the 2x6s, which would have been a lot easier and quicker. Unfortunately, the general contractors we fired installed the interior walls too high, making this impossible. We had no choice but to methodically cut each 1×4 to fit between each set of 2x6s. My friend OB was nice enough to help me get it done.
At first, we used “L” brackets to attach the 1x4s to the 2x6s, but this proved too time-consuming and too expensive. After experimenting with a finish nailer (too easy to miss and penetrate the Intello), we eventually settled on Deckmate screws, driving them in at an angle into the 2x6s. It was definitely a laborious process, but eventually we got into a rhythm and got it done, although we wouldn’t recommend doing it this way — way too time-consuming.
We tried to keep the 1x4s about 16 inches apart, which should prevent any significant sagging in the air barrier from occurring. (I’ll post photos once the cellulose has been put in the attic.)
In trying to avoid puncturing the Intello, I would hold a couple of fingers on the back side of the 2×6, feeling for any screws that would come through on a bad angle. A couple of times I drove a screw too quickly and paid the price.
Maintaining the Intello after installation
Unfortunately, there was a delay in getting shingles on our roof, due in large part to our first, disorganized plumber (again, more on this later). Consequently, we were in the awkward position of having our ceiling air barrier and service core all set up, but every time it rained we still had a leaking roof. In most areas, it wasn’t a big deal, but in about a dozen spots rain would collect and, if heavy enough, it would cause a bulge in the Intello. To relieve, and ultimately to avoid, this pressure, I cut small slits in the Intello where the rain would consistently collect.
I marked the slits with a red marker so I could find them later. Once the shingles were finally on, I went back and found all of these slits and taped over them with the Tescon Vana tape (see Image #5 below).
We also found a couple of weak spots in the Intello as we installed it, and even later, during the installation of the service core. These spots were marked as well, and they, too, got covered with the Tescon Vana tape just for added insurance against air leakage.
After having to fire our general contractors, we couldn’t have kept the project going without the help of family and friends. As awful as some aspects of the build have been, it’s been heartwarming to find people willing to help us see the project through to the end (much more on this later).
Weekly Newsletter
Get building science and energy efficiency advice, plus special offers, in your inbox.


12 Comments
Eric
Boy that's a lot of work - and like all your previous posts, meticulously done. I'm still not sure that in most cases a service cavity under the whole roof is necessary.
Ducting occupies such a small area of the ceiling, and electrical servicing can be well sealed. Looking back now, do you think you could have achieved something similarly effective with bulkheads and selectively dropped ceilings? Your situation yields something much better than the 3 1/2" service cavities some projects here have featured, but even at 4 3/4" it still limits what ducts can be accommodated.
SIPS
That was well done but I bet 90% of all contractors would NOT do such detail work or charge thousands of dollars extra to do it.
Wouldn't a SIP roof do the exact same thing but in a quicker and less expensive way?
A SIP roof isolates all the mechanical within the thermal envelope and one just has to seal the SIP joints with tape. A lot less labor than what occurred above.
SIPs cost more upfront than a traditional roof but trying to seal a tradition truss roof system is lot more labor intensive which then costs money.
No doubt, the above is well executed but just from my experience in the construction trade, 90% of all contractors will not do it properly or will charge an arm and leg in an attempt to do it. Which they may or may not succeed but try they will on YOUR dime.
Plenty of recent studies show QUALIFIED builders are harder and harder to come by. The few that exist are so busy and charge high rates, probably rightly so, since they are good at what they do. Sometimes introducing building techniques like roof SIPS can work, as long as the joints are taped and the roof above is allowed to dry/vent, then the cons of SIPS is circumvented.
Reliable help
Eric's problems and Peter's comments bring up an interesting point. Given that at present, and perhaps for some time to come, it is difficult to get contractors to perform the air-sealing and detailing necessary for a high-performance house to function well, shouldn't we be specifying more forgiving building assemblies that are easier to build, or that will perform well if not built perfectly?
I guess where i differ from Peter is his suggestion that the alternative might be SIPS. They represent a technology that perhaps more than any I can think of relies on workmanship for their success.
Service Cavity or SIPS
Thanks for your comments Malcolm and Peter!
Early on we moved away from SIPS based solely on things I had read. If memory serves, most rely on foam for insulation, and it seems like the Passive House and even Pretty Good House movements are moving away from foam (for environmental and long-term performance reasons). And a second issue with SIP construction, as Peter points out, is cost. Finding someone competent in their installation would've been another impediment to their use, at least for us.
As with most things construction related, a great deal depends on who is doing the installation. In our case, the process would have been much more straightforward had we been able to install all of the 1x4's before putting the 2x6's in place. Unfortunately, the pair of GC's we fired made that impossible.
I went with the service cavity idea based on projects I had seen on the 475 HPBS website, along with Hammer and Hand projects that utilized a similar strategy. Once SIPS had been eliminated as an option, the service cavity seemed like the straightforward choice.
As far as bulkheads, we did consider them, but personally I don't like them. In fact, it's one of the few instances where I disagree with Sarah Susanka and her Not So Big House philosophy. Where she finds the use of changing ceiling heights aesthetically pleasing, while also being useful, for some reason I find them distracting, even when they're limited to runs along the perimeter of a room. Having said that, even I went with a lowered ceiling height in two showers because I thought it would look cooler (more aesthetically pleasing if you like). But in main areas I like seeing the same height throughout for some reason.
In terms of mechanicals themselves, the electricians didn't seem to mind dealing with the service cavity. Apart from a couple of plumbing vents, nothing else ended up in the cavity. From the outset I assumed the 3" Zehnder tubing would be snaked through the 2x6's, but once we (my wife and I) were ready to install the Zehnder tubing and started to map out each line, we quickly realized what a royal PITA all the cuts were going to be, in addition to trying to stay out of the way of all the electrical conduit (a story for an upcoming blog post).
Looking back, with the right people in place, I still like the service cavity idea, and would do it again, but with more realistic expectations regarding its usefulness.
Thanks Eric
Reminds me of what one of my co-worker's father once said to me:
If ifs and buts were candy and nuts, we'd all have a merry Christmas!
Would be interesting to
Would be interesting to compare Intello to taped OSB (which wouldn't require the 1x4s).
Armchair quarter backing on Monday morning
Eric,
Well done detailing and overcoming obstacles! A few questions:
If your interior walls had been framed to the correct height, was your installation sequence going to be full length 1x4s fastened perpendicularly to the trusses, then the 2x6s? (I'm assuming you intended for the partition walls to be about 6½" below the trusses?)
Even with the partition walls being too tall, could the 1x4s still be installed prior to the 2x6s? Where interior walls interrupted them, they could be toe screwed/nailed to the top plate or blocking of some sort added to the wall to aid in fastening? This method for strapping ceilings (without an air control layer) is still employed on the east coast; drywallers get crabby about not having a 1x3 to attach drywall versus an 1½" ceiling joist. They fasten to studs all day long but balk at ceiling joists or rafters. Another case of, "We do it this way because this is the way it's always been done!" *sigh*
Clever use of the SST brackets!
Sequencing
Mark,
Yes, ideally that would have been the sequence: "full length 1x4s fastened perpendicularly to the trusses, then the 2x6s".
I like your idea of 1x4's first, even with our situation, and then figuring out some way, with blocking perhaps, to install the 2x6's. To be honest, it didn't occur to me, or anyone I asked for advice. It would've meant giving up a bit of ceiling height, but certainly at the time that would've seemed like a small sacrifice to make.
It's funny, I wasn't aware of the East coast tradition of 1x3's prior to ceiling drywall until I went to install my Zehnder unit and looked at all their online videos and noticed the 1x3's in the background. I assumed something Passive House related was going on, but after looking around online, learned it was "an East Coast thing".
service drilling
"we quickly realized what a royal PITA all the cuts were going to be"
How so? They make great tools for that these days, you just need a 3-5/8" Milwaukee Big Hawg hole saw and an angle drill. I have a 6-1/4" one I used to hide 6" HRV ducting in fir joists, cut like buttah.
And what was the deal with the plumber delaying the shingles?
Reply to Eric #8
Always glad to offer advice after the fact. This is almost a case of Cunningham's Law, almost...
I have exhausted all of my arguments trying to convince drywall subs to hang ceilings and "slopes" (their term for anything not level or plumb) without strapping. They simply claim it produces a flatter result and it's always done this way. Hand them an article by Myron Ferguson and they come up with a laundry list of why "That guy's way will make it crack and joints will show."
For anyone wondering why ceilings were historically "strapped" perpendicularly to the ceiling joists or rafters, it did actually flatten the plane prior to plaster or drywall. Rough sawn lumber was delivered green so it shrank differentially or was not milled consistently in the first place. Carpenters would notch wider framing members or shim down narrower ones to create a flat plane with 1x3s.
service drilling
Zac,
Individual holes weren't the problem, it was the quantity of holes that was daunting. There was also some concern about the structural integrity of the 2x6's with all these 3" holes in them, even though the 2x6's really only have to hold up the ceiling drywall.
In the end, running our Zehnder tubes through walls rather than snaking them through the 2x6's on the ceiling meant a lot fewer holes to drill, along with much shorter tube runs from the respective rooms and the main unit (dramatically shortening installation time). I'll document the details in a future blog posting.
We ended up using a DeWalt joist/stud drill for making our holes in the framing in preparation for the Zehnder tubes. The thing was amazing (even my wife got in on the fun), until it died one hole short of finishing the job. Then we switched to a traditional hole saw to finish (big difference in performance to be sure).
The plumber was disorganized/incompetent. He didn't cut his holes and get his radon/waste stack pipes on the roof until the roofers were literally installing the shingles. He also showed up with cheap flashing boots for the pipes. The roofers looked at them and laughed before installing their own. Obviously I regret not firing him sooner.
Great work great unique thinking
But it’s it really even worth it.
Log in or create an account to post a comment.
Sign up Log in