

Image Credit: Anonymous
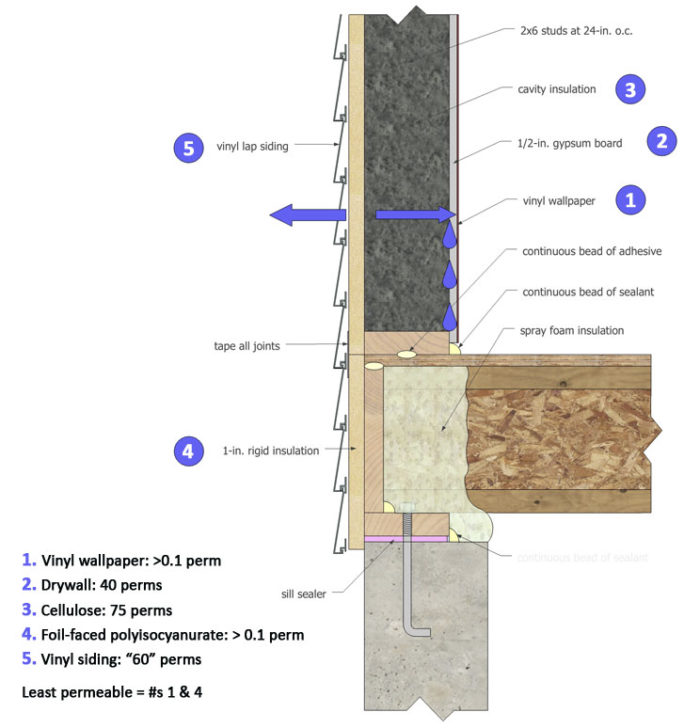
Image Credit: Anonymous Example 1:This wall can dry in and out. Interior moisture can dry inward and water that gets behind the siding can drain and dry because of a vented air space. Example 2: This assembly has little to no drying potential in either direction and presents a real moisture problem potential, almost regardless of indoor and outdoor conditions.
More Building Science


Today’s walls, roofs, and floors are better insulated, tighter, and made with a much greater variety of components than they used to be, making them a lot more susceptible to moisture problems when they get wet. Compared to the old days, today’s walls and ceilings are more complicated and can be very slow to dry.
Poorly crafted building codes are blamed for many examples of confusion, and the confusion over vapor retarders and vapor barriers is no exception. To design and build energy efficient and durable building assemblies, following the code is not enough. We need a new approach — such as the vapor profile.
What is a vapor profile?
A vapor profile is an assessment of the vapor permeabilities of each component in a building assembly (a wall, ceiling, or roof). This assessment determines the assembly’s drying potential and its drying direction. The vapor profile shows whether the building assembly protects itself from getting wet and how it dries when it gets wet.
“Moisture profile” might be a better term than “vapor profile,” because winning the moisture battle means keeping track of all phases or expressions of water. But vapor profile ties the term to “vapor retarder” and “vapor barrier,” terms that focus on that one layer and whether that layer restricts wetting by vapor diffusion. Vapor profile is about all layers and is as much about drying as it is about wetting.
Four steps to a vapor profile
Examining the vapor profile is a 4-step process:
1. Determine the vapor permeability of each component
This can be a lot more difficult than it sounds. Various building product manufacturers are not consistent in the ways they measure and report vapor permeability. Different standardized tests are used for different products. Also, the vapor permeability of many building materials is not constant — it can change as the material’s moisture content rises or falls.
Make sure that you get numbers for every material or component in your assembly, and obtain the actual test used and units reported. A good start is the Building Materials Property Table from BSC.
2. Identify the least vapor permeable component(s)
It’s important to identify the component or components that most restricts the wetting and drying potential of the assembly. To understand the robustness or sensitivity of the assembly to moisture accumulation, it’s important to know how many low-permeance materials there are, and where they are located.
I suggest following the vapor retarder class system established by Joe Lstiburek of Building Science Corporation:
Class I Vapor Retarder (vapor barrier): less than or equal to 0.1 perms
Class II Vapor Retarder: less than or equal to 1 perm and greater than 0.1 perms
Vapor III Vapor Retarder: greater than 1 perm but less than 10 perms
This classification is based on results from ASTM E-96 A (the dessicant or dry cup method). Any material greater than 10 perms is considered vapor permeable.
NOTE: The next two steps are not really sequential; you consider them together because they tell you about how to keep things from getting wet and also about letting them dry when they do get wet.
3. Assess the extent and direction of vapor drive
You need to consider the following:
a. Outdoor conditions, including temperature and relative humidity. It’s important to know how extreme and sustained the expected temperature differences are (with respect to the building interior). For more information, see Climate Consultant 4.
b. Indoor conditions — Interior moisture loads, interior setpoints and the type and extent of space conditioning (active heating, cooling, humidification and dehumidification, ventilation).
The question you are trying to answer is: Do I need a vapor retarder somewhere in the assembly to restrict the movement of vapor INTO the assembly?
4. Assess the moisture storage capacity and drying potential of the assembly
The next question you are trying to answer is: Do I have at least one way for vapor to GET OUT of the assembly?
An assembly with two vapor retarders or barriers on opposite sides of the assembly means that there is little to no drying potential in either direction. That can be a real problem brewing unless you design and detail for extraordinary moisture management protecting this assembly from wetting.
Example 1 – an acceptable vapor profile
In this example, we have taken a representative GBA wall construction detail and assigned actual materials for each component of the assembly.
[Click to enlarge]
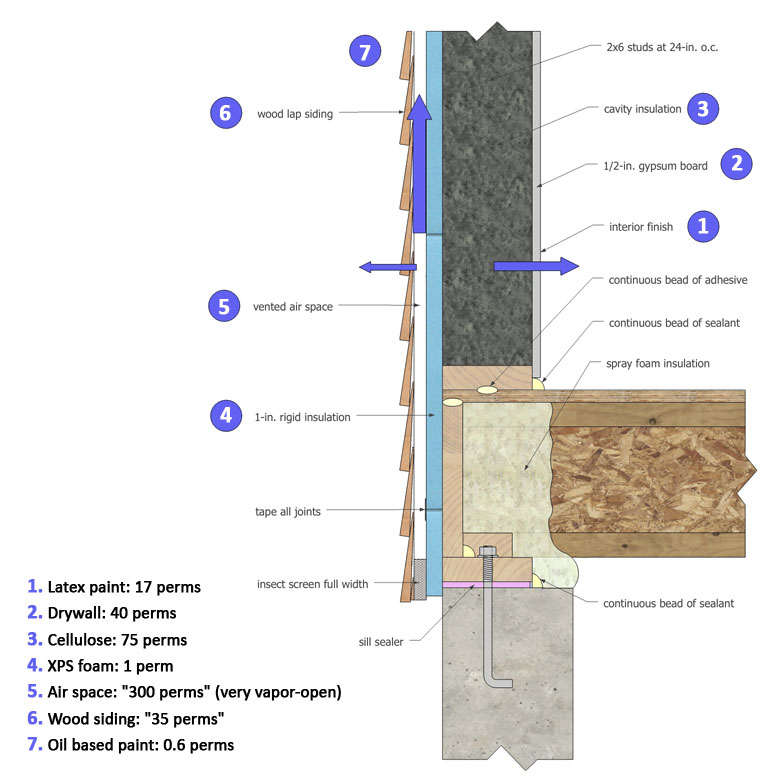 This wall can dry in OR out.
Step 1: Assess vapor permeabilities
How do you determine the vapor permeability of your building materials?
In this example, all of the numbers came from the BSC table mentioned earlier.
Note that two numbers are in quotes. In the case of the air space it means that vapor moves so freely in air that it is as vapor permeable as it gets.
In the case of wood siding, the quotes indicate an “equivalent” vapor permeability. This means that although the lab test of a piece of wood siding (pine, in this case) may yield a vapor permeability of around 2.5 or so, all the gaps between the installed wood clapboards in a wall assembly permit enough air circulation in between clapboards that the effective permeability is MUCH higher (35).
NOTE: If you can’t find the numbers you need in this table, you will have to search the Web or contact the manufacturer and tell them you need this information or you can’t use their product. That should get their attention.
Step 2: Identify the least permeable component
After you have all the numbers, it is pretty easy to pick the one, or maybe two, most restrictive layers in the wall assembly, in terms of vapor permeability.
Note that 1 inch of XPS insulation at 1 perm is NOT vapor impermeable. However, it is the most restrictive, which means that MOST drying will take place to its interior or exterior. Also note that the near vapor impermeability of the oil-based paint is managed or overridden by the air space and the functional or equivalent vapor permeabilty of the wood siding as installed (with lots of little air gaps).
Step 3: Assess the vapor drive(s)
We don’t know what the interior and exterior temperature/relative humidity regimes for this assembly are; we have not picked a location or interior conditions — but…
Step 4: Assess storage and drying capacity
…since there is such great drying potential on either side of the XPS, this assembly is well-suited to a wide range of climatic, site, and interior conditions.
Example 2 – An unacceptable vapor profile
In this second example, we have another representative GBA wall construction detail and again assigned actual materials for each component of the assembly.
[Click to enlarge]
 This wall can only dry to the outside. It is more risky.
Step 1: Assess vapor permeabilities
Again we have taken vapor permeability numbers from the BSC Building Materials Property Table.
Step 2: Identify the least permeable component
We have two layers that are essentially vapor barriers, stopping all moisture from getting INTO and OUT OF the wall assembly. And the problem is that the two layers encase much of the building assembly.
Steps 3 and 4: Assess the vapor drive(s), storage, and drying capacity
Even without assessing the vapor drives, this assembly is likely to be a problem in ANY climate or interior conditions. If (or rather when) this assembly gets wet, it has very little drying potential. It would take nearly perfect design and construction details and very little moisture drive to keep this assembly from failing.
Let’s look more closely at Step 3 (keeping the assembly from getting wet) and Step 4 (letting it dry when it gets wet). If at all possible, we want to change one of the two restrictive layers to give the assembly more drying potential. But which one?
If this building is located in the hot-humid south, where the prevailing vapor drive is from the outside in, it is probably better to keep the foil-faced insulation and lose the vinyl wallpaper.
If this building is located in the far north, where the prevailing moisture drive comes during the winter from the inside, we might want to pick a rigid insulation product that is more vapor-permeable.
Moisture analysis beyond vapor profiling
The examples look at two extremes; we didn’t really assess the vapor drive and moisture storage capacity of the various assemblies.
The vapor profile method is qualitative. It is quite possible that you want a more definitive analysis, because you really don’t know how the assembly will perform in your climate, at your site, with your interior conditions.
For a more exacting answer to this question, you have two options: consult with a building scientist who has enough practical experience to review your design and weigh in with an expert opinion; or turn to a more quantitative analytical tool.
The tool that many building scientists use is a software program called WUFI (a German acronym based on the Fraunhofer Institute for Building Physics, where the program was first developed). The software allows you to specify your assembly, pick your local climate and interior conditions, and then run a four-year analysis to see how the assembly handles moisture, wetting, and drying.
WUFI tends to be a conservative tool (it “fails” assemblies and conditions more often than real-world experience suggests), and so is often more useful in the hands of experienced building scientists than lay folks like builders and architects.
A closing note
I am not sure where the term “vapor profile” came from. I learned to use the term during my time at Building Science Corporation when I was trying to document the way in which Dr. Joseph Lstiburek assesses buildings as part of a Building America project.
Weekly Newsletter
Get building science and energy efficiency advice, plus special offers, in your inbox.


92 Comments
Too Simplistic
Such "vapor profiles" consider only the vapor permeance of an assembly's layers, and not the hygroscopicity (moisture buffering), hygric redistribution (liquid diffusion), and capillarity of elements.
To suggest that a 1 perm exterior foam layer will allow drying to the exterior is like saying that R-38 insulation will allow heat flow to the exterior. It may not allow vapor diffusion at a rate sufficient to prevent moisture accumulation and damage. And, since the entire purpose of the "outsulation" is to keep the sheathing warm, it also keeps the sheathing in the danger zone for mold and decay fungi growth for much of the time.
And it doesn't require condensation (dew point) temperatures to raise the equilibrium moisture content of sheathing to the danger zone. Persistent high relative humidity will do that as well. 80% RH is sufficient to encourage mold growth, and 90% RH is enough to give decay organisms a head start (in each case below the dew point). With materials like OSB that don't adsorb moisture well (don't allow hygric redistribution), the surface moisture content is higher than the interior moisture content and mold germination and growth is more likely in warm conditions.
MEWS studies in Canada have demonstrated that, once wetted, a wall assembly with exterior foam does not dry out. Depending on the amount of moisture and the strength of moisture and temperature gradients, a low-perm layer is as good (or bad) as an impermeable layer in terms of drying potential.
Bottom line: you can't fool Mother Nature. Water is the most common substance on earth and it moves with great power. Go with the flow and you'll always be better off than trying to resist the river.
Improved Graphics
This type of Grahic that is drawn "to scale" and where the viewer can easily recognize the materials is a very good step in the right direction.
Nice
A suggestion for graphics
A minor criticism
Perhaps the elements should not be so "perfect" with perfectly square edges.
They still look like what Straube calls the "AutoCad 2x4"
Real lumber is not perfect and is often slightly warped.
Warped?
"Real lumber is...often slightly warped."
I would say, rather, that the use of unreal lumber ("engineered" products, steel and petrochemicals) is more than slightly warped.
Fair Enough
I should have said Building Materials are not perfect.
I have noticed that Poliiso panels(among other materials) are often crushed, warped dented and dinged.
The point is that they do not really "fit together" as typically shown in Architectural Drawings.
Robert: Too simplistic
If vapor profiles are too simplistic, than what of vapor barrier and retarder rules of "warm in winter" locations? The vapor profile is a useful way of gross-assessing drying potential by looking at all layers of an assembly, rather than focusing on just the wetting potential of low permeability layers and ignoring the need for drying potential.
Example 1 does not show significant drying THROUGH the low perm XPS exterior insulation, but from there outward, and from there inward. Robert, I am not familiar with the MEWS study you cite, which focused on or included exterior rigid insulation. I looked a bit on the web and did not see it; could you provide a cite? Thanks - Peter
MEWS
I found several MEWS (moisture management for exterior wall systems) references using the search term “MEWS Canada insulation” in Google. It will take some time to review the material. The “Final Report from Task 8 of MEWS Project” can be found here http://www.eifscouncil.org/images/EIFS%20Mews.pdf .
Plywood?
It is ridiculous to publish this detail without showing any exterior plywood (or OSB) sheathing. It completely disregards the structural requirements of the wall and only focuses on ventilation/insulation. If anyone builds their house this way expect suits to follow when the studs buckle and wall collapses. Either that or the builder will laugh at you for proposing such an foolish design.
Response to Engineer
Dear Engineer,
Believe it or not, thousands of homes have been successfully built without exterior plywood or OSB sheathing (or with only a few sheets of plywood or OSB, usually at the corners of the building). Such foam-sheathed walls are braced with traditional let-in bracing or with metal strapping with an L-profile (for example, Simpson RCWB).
To learn more about bracing foam-sheathed walls, read
IRC Wall Bracing, a document published by the Foam Sheathing Coalition.
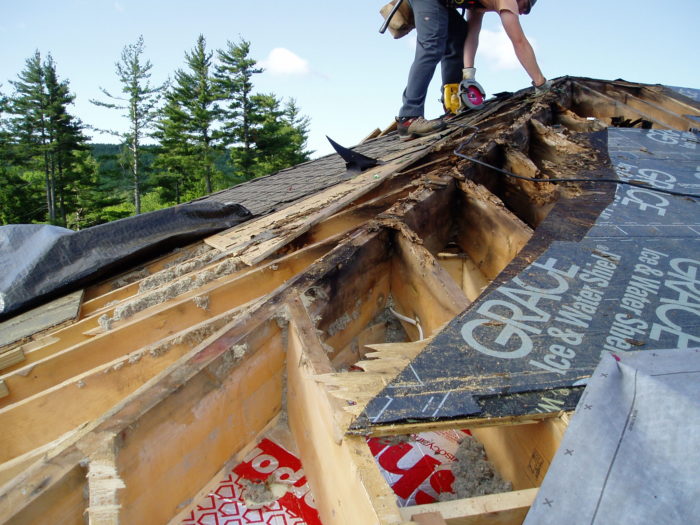
What is the story regarding the photo examples?
Maybe I'm missing something, but there is a very interesting photograph of a real moisture problem headlining this story, but then no mention of it specifically.
Given the considerable disagreement over the correct way to build in various climates, I tend to trust the real world examples such as the photograph shown, and view the drawn examples as applied but unproven theory.
So - what caused the roof to rot in the photos? What mistakes were made and how were they corrected?
It certainly appears to me that the hip roof was unvented. Puncturing the foil-faced foam to install can lights in what appears to be an inadequate roof depth (for insulation - I am guessing a northern latitude from the trees in the background) was only one mistake. And what type of room was below? I am guessing a bath?
It's examples like these (I am refering to the photos - the story itself is just a theoretical discussion) that make me worry about "hot" roofs in cold climates. Once moisture finds its way in, it never finds its way out.
Rotted hip rafters
The rafter space above the insulation must be vernted. On a hip roof the hip rafter must be cut for ventilation with at least a 2x4 inch long cut in the top of the hip between each rafter space. I do this on all my jobs here in Maine. I size the rafters so the cutout does not effect the structural requirement.
It look like the space between the raters in the photo was filled with cellalose insulation. I would never do this. The space abave the insulation must be vented.
I also cut 2x4 vents in the rafters above and below skylights so the ventilation can move up and around the skylight block.
Ventilation above the insulation is always required.
I would never put rigid insulation on the outside wall. I put in on the inside to stop the moisture. It is a good idea to vent the wall on the outside but adds so much to the cost that often this is not done.
Clarification
I have a question regarding the "two competing vapor barriors"- I understand the reference to the Foil-faced polyisocyanurate rigid insulation on the interior of the cathedral ceiling and the roof membrane, but what part does the Ice and Water shield play in this example? And of course, the point that SteveP makes with respect to the unvented ridge.
Response to James Schildroth
James,
Your statement, "Ventilation above the insulation is always required," is incorrect. The International Residential Code (in section R806.4) explains the requirements for unvented roof assemblies.
Such unvented roofs are perfectly legal and work well, as long as they are properly detailed according to the requirements of R806.4.
Dew point within the wall?
I've been trying to get a handle on the use of foam in wall construction- thickness in particular. According to calculations I've done using a BSC calculation method, the "acceptable vapor profile" section you show with just 1" of rigid insulation would result in a temperature at the inside face of the foam that is below the dew point. The article from which I got the calculation method is at http://www.coastalcontractor.net/article/123.html
Here in Akron, Ohio, it appears to me that I need to use at least 2" of rigid XPS to have the interface temperature high enough. This is important to me, because at this thickness there are more detailing challenges to deal with (and sell contractors and homeowners on) than at 1".
Is it, or is it not important to determine the interface temperature when you are designing a wall section? Why?
Response to CW
CW,
Roofs covered with asphalt felt and asphalt shingles experience some drying to the exterior. This limited drying is facilitated by the wind and by daily temperature changes, especially on sunny days; these temperature changes create a pumping action resulting in a little bit of air exchange. Once it gets damp, plywood sheathing (or OSB sheathing) is somewhat permeable to diffusion.
If a roof is entirely covered with Ice and Water Shield, it is unable to dry to the exterior.
Response to Hallie Bowie
Hallie Bowie,
Your point is well taken. While the article notes that this "assembly is well-suited to a wide range of climatic, site, and interior conditions," the wide range of climatic conditions does not include cold climates. In cold climates, thicker foam is required to avoid condensation within the wall.
In addition to using the vapor profile technique, designers also need common sense, experience, and the guidance of code requirements (for example, Table N1102.5.1 in the 2007 Supplement to the International Residential Code). Moreover, designers must follow the advice provided by experienced building scientists.
RE: Too Simplistic
Mr. Riversong I don't think you are understanding the detail correctly. The detail is pointing out drying to the exterior but that drying effect is not vapor moving through the 1 perm XPS. This detail shows a vapor control layer that prevents the passage of vapor from the exterior to the interior and vise versa. The idea here is that (on the exterior side) any vapor or moisture that gets through the cladding will be allowed to dry within the airspace between the cladding and the xps and escape from the wall assembly. Vapor on the exterior stays on the exterior. On the interior side, what very minimal vapor (we don't typically ssee more than 40%RH in the interior of a building) may find it's way in can find its way out to the interior because you do keep vapor permeable materials on the conditioned side of the vapor control layer (the xps).
The whole idea here is that vapor diffusion does not happen through the xps thus protecting the sheathing, studs, cavity insulation and gypsum board from the dangers of moisture and mold.
cold climates not included in "wide range"?
Martin,
I'm a little dismayed that GBA would publish a detail like this without making it clear that it isn't appropriate for cold climates. Akron is cold, but not very cold. It's my impression that a great deal of the country has winter temperatures similar to or colder than ours.
I am a licensed architect, and I've been paying more attention to building science issues than most of the architects and builders in the area. I've generally found GBA to be a good way of accessing "advice provided by experienced building scientists". I suspect I'm not the only one tempted to use an "off the shelf" detail that to all appearances seems appropriate for our climate. Please, please, please make it clear in which climates your details may be used!
wall construction
Interesting article. I have been looking for a definitive drawing of a functional wall profile for a while (rebuilding an 80 year old house)
As a professional plumber I am used to installing products and systems engineered to function (though some fail - polybutylene for instance)
Seems the wall design business is a bit different - no offence, but you guys seem to make it up as you go along(?). My question - what kind of nails do you use to nail the lapped siding into the air gap between the siding and the foam? if you are using vertical battens (over the studs / on top of the foam?) how do you produce a stable wall?
I agree - too many variables
The comments here are very interesting but without context (regarding location) can be confusing. A house in Maine, for example, can see driving rains followed by temperatures below minus 30F (with huge changes in RH) in a 24 hour period. I don't think this is likely in Arizona (generally :-)
But I will go back to my original question - what's the story on the roof in the photographs? This was a real roof on a real house that created a real problem for the owner (and no doubt the original contractor). What went wrong? How could the information in this story have prevented it? Why don't the diagrams relate to the roof that is refered to in the e-mailed link to this story?
Or is it just a "filler" picture? If it is, I must say it's more interesting (no disrespect, I just mean I find real world examples more interesting) than the theoretical examples given (note to self - avoid using vinyl wallpaper on all exterior walls).
I now suspect an over-zealous editor has "hyped-up" this item with an unrelated set of photos and e-mailed an "attention-grabber" headline that has nothing to do with the contents.
Vapour Barriers - rotting roof
The recent article by Peter Yost on vapour barriers, in particular to roofing systems, does not address the simple fact that any roof system has to breathe, no matter what the design. It has been a policy of CMHC in B.C. for over 30 years that air flow between the top of the insulation and the membrane roof has to have at least 4 inches of clearance to keep a constant air flow through the attic or rafter space and vented at both ends. In the picture of the 10 year rotton roof, all that had to be done for that vaulted roof to last a lifetime was to strap the roof to allow sufficient air flow accoss the rafters and an air vents on the ridge to accomodate the exit of air entering under the soffits. A further vapour barrier would have caused more problems.
This same air flow theory that has been used for years on roof systems is the same as the new rain shield technology that is used on siding that is shown in this article. Today I still see so many roof designs being installed with no air flow allowance and people wonder why their roof leaks when it is the attic space sweating and dripping through the light fixtures.
It seems we have gone backwards in the design and building of our roofing systems compared those in the past, being mostly due to the more intricate roof designs now present on homes.
Hot roof
We are straying from the subject here, but readers should familiarize themselves with the "hot roof" concept which is an entirely unventilated roof design where all of the available space is used for insulation and then (hopefully) hermetically sealed.
I first saw this used over 25 years ago and the roof in question is still fine - despite having had water ingress (at a poorly-designed roof-chimney interface).
I recently built a timberframe using SIPs (structural insulated panels) and the roof is SIP panels laid on the timberframe slope. No ventilation and metal roofing applied directly to the panels. We're only four years into that experiment, though.
I would certainly be wary of using a contractor unfamiliar with the design. SIPs come straight from the factory, so barring gross incompetence in architectural design or installation, they should be an excellent solution.
Where art thou SIPs?
It seems to me that using SIPs for wall and roof systems solves many vapor problems, is very efficient structurally and insulation-wise, and if you use the kind with an OSB inside face, solves almost all blocking problems.
So how come less than 2% of new construction is done this way? I think stick framing is dead. I'm not looking back at sticks and super detailed foam systems when I can use a wall module that is lighter, stronger, and more wood efficient that stick and foam and reasonable low tech as well.
The only real downside for me is the cost/green-ness of the polyiso foam which I prefer. I expect this to improve however.
RSVP
Was that just entrapped vapor
Was that just entrapped vapor or was there a significant cyclical heat build up in the space at the apex assisted the damage? Looks like heat damage too.
Whilst asphalt shingles are not quite so common in the UK, we are advised to have a circulation gap underneath the sheathing of a shingle roof, its vapour barrier and the insulation space below, to allow the huge heat build up to vent free.
Black shingles over laid on timber sheating with 100mm of foil backed PU foam insulation and no vents to the cellular spaces formed by the rafters is asking for trouble IMHO. Black shingles fet too hot to touch. Manufacturer over here also advises that life expectancy is much less if no airlfow underneath shingles.
SIPs on roofs
One thing Joe Lstiburek has been saying for some time is that the best way to install SIPs on a roof is in two layers - to prevent moisture from getting into the joints between panels and rotting the OSB over time, as well as allowing some heat loss. This judgment was based upon his own experience with his remodeled barn and certainly substantiated by a number of real-life situations in the literature. His home is in a cold climate, which increases the potential problem.
I built a house almost 20 years ago using SIPs in a mixed-humid climate, and I can tell you that rule applies here as well. I suggest that the next time you have one of those frosty mornings that you take a look at the roof. If you can see an outline of the panels you very likely have air with moisture in it leaking into the joints from the interior of the house. When that moist air hits it's dew point guess what's happening? I love SIPs. I love ICFs even more. But though they may have fewer problems than most construction materials, the 2nd law of Thermodynamics applies to them also.
response to SteveP
Steve,
The problem I see with the rafter photo is the roof assembly was encapsulated with two vapor barriers. Both the foil facing on the interior polyiso insulation boards and the ice & water shield on the exterior of the sheathing are practically impermeable. As you suggested, any bulk moisture or water vapor that makes it into the assembly has no way to get out.
The most likely scenario is moist air escaped from indoors into the rafter spaces during the heating season and water then condensed on the cold inside surface of the roof sheathing. Since there would be very little means for water to evaporate out of that cavity it probably got wet and stayed that way for weeks or months at a time.
The question I find myself asking is: why in the world did they use Ice & Water Shield over what appears to be the entire roof? That is a waste,overuse, and/or misuse of the material.
Even in a roof with little or no ventilation, if they had used a more permeable roofing felt or synthetic underlayment it likely would have been many more years before a moisture problem manifested itself. Don't get me wrong, it would still be a poorly detailed roof without ventilation but it wouldn't have been shot in ten years. Alternately, continuous ridge and soffit ventilation would have forestalled the day of reckoning. In either case, the roof was doomed by the double vapor barrier. The really could not have picked two worse materials to put together on that roof. As a result, I doubt any typical ventilation scheme would have kept those rafter cavities dry.
Another response to Hallie Bowie
Hallie Bowie,
Since this is Peter Yost's blog, it's best if he responds to your concerns. He's now on vacation, but he may be able to post a response to some of the questions posed here within a few days.
Ice/water shield on entire roof
I have a "California" style ranch home in NJ.
It has a cathedral ceiling through out the house (no attic/loft), the roof is a
4 pitch, the roofing company put I & W shield all the way to the ridge.
It does have continual soffit vents all around , it did not have a ridge vent w/ old roof before , but
I had them install one after everything I've read (condensation, need air movement, etc.).
I also have 7 1/4 inch rafters and there
is a 3 1/2 inch layer of fiberglass insulation on top of the sheetrock ceiling.
So, my question would be since my old roof had felt and no ridge vent and now that I have I & W with a ridge vent, I'm seeing many responders say I & W all the way up is not a good idea, can I
expect moisture problems in the future ?
The roofers said there shouldn't be a problem.
Response to Bert
Bert,
Whether or not you have a problem will probably depend on whether your drywall ceiling has proper air sealing details (no recessed can lights, proper air sealing of partition top plates and electrical penetrations, etc.). With excellent air sealing details, you may be okay. If your ceiling is leaky, you could easily have problems.
Your biggest problem is the fact that your New Jersey house has only 3.5 inches of fiberglass insulation -- probably performing at R-11 or worse -- in a climate zone where the building code calls for a minimum ceiling R-value of R-38.
When you re-roofed, you missed a rare opportunity to bring your ceiling up to code. You could have installed rigid foam insulation between your old roofing and your new roofing; now it's a little late for that.
Rigid foam-XPS-EPS ?
It is o.k. to totally fill that cavity w/ a rigid foam (w/o the foil backing) ? I didn't realize that would be
acceptable because everyone always says no, you must have some type of air flow throughout the
rafters to remove moisture/condensation.
I ask because I do plan to replace existing sheetrock in the house, room by room.
Somewhere in the back of my mind, I remember Tom Silva doing something like you are
recommending on one of his TV shows.
So it would be acceptable to fill the cavity w/ rigid foam w/ no foil (which of the foam types do you think would be best ?). Then I can just cover w/ 1/2 sheetrock and paint ?
TIA.
Response to Bert
The requirements of unvented roof assemblies can be found in Section R806.4 of the International Residential Code. The best way to detail such a roof is with rigid foam on top of the roof sheathing. That way the insulation addresses thermal bridging through the rafters.
I don't recommend insulating between your rafters with rigid foam. The only insulation I would recommend in your case would be closed-cell spray polyurethane foam. In addition, you should consider installing a layer of rigid foam under the bottom of your rafters to address thermal bridging.
Read more here:
https://www.greenbuildingadvisor.com/green-basics/insulating-roofs-walls-and-floors
https://www.greenbuildingadvisor.com/green-basics/vented-or-unvented-attic#About%20conditioned%20attics
Unvented cathedral ceilings
I suggest that anyone who wishes to do this read the following:
http://www.buildingscience.com/documents/reports/rr-1001-moisture-safe-unvented-wood-roof-systems/view?searchterm=Insulated%20roof
Use of the roof photo
Sorry for how this ended up. I added this photo as a bit of an afterthought (and had it as photo number 3) and it had a different caption. I wanted to drive home the point of how application of the vapor profile concept can work, or not, in the real world. I did not mean to sensationalize, but to drive home a point.
So here are the full details.
The roof was designed and built as a hot or unvented roof assembly. The two inches of foil-faced PI rigid insulation on the underside of the assembly was to super-insulate the roof without oversizing the roof rafters. The roof cavity insulation was cellulose. It is not uncommon in many parts of the Northeast to install a roof membrane not only on the eaves as the code requires but the whole roof. This is true on all roofs but particularly low-pitched roofs such as this hip roof.
The wire running up the hip rafter is a big clue here; it's pretty much where the damage starts. Air leakage from can lights not properly sealed let very moist warm air into the roof framing cavity, which had no drying potential with the roof membrane on exterior and the foil-faced insulation on the interior.
I say very moist warm air because this home had a fairly large green house, which resulted in pretty high interior relative humidity (RH) year round. I can't tell you what the wintertime interior RH was, but probably at least 50%. This certainly aggravated the situation.
This could have been a wall; just happened to be a roof. As Martin has stated, unvented "hot" roofs are acceptable and work just fine, just as unvented "hot" walls do. But they must be meticulously air sealed because unlike vented or "cold" roofs, they are less forgiving. And like all assemblies, they need drying potential in at least one direction.
When this roof was redone, it was meticulously air sealed with cavity closed-cell spray foam with an air space on the underside of the roof sheathing and venting at the soffit and ridge. The remodeler changed the roof to a vented system not because an unvented "hot" roof would not have worked, but because the homeowners wanted a belt and suspenders approach, not surprisingly. And they won't be running their interior RH in the winter above 30%, I can assure you.
NOT a wall assembly for all climates
Hallie, I apologize and you are absolutely right about getting the details correct on GBA, all the time. We work hard at GBA to get the details and the building science right and I let you down on this one.
The use of the dewpoint method you cite is a good approximation of what works for combined exterior and cavity insulation to avoid the dewpoint on the first condensing surface in the wall assembly. For all of the cold climate details in the GBA construction detail library, the exterior insulation is 1 1/2 inches thick for 2 by 6 walls, not just 1 inch. That was so either XPS or polyiso would work, since the GBA construction details don't specifiy the type of rigid insulation.
A follow-up blog on the dewpoint method as a companion to this one is a good idea, and one on which I will work when I return, if Martin is not already working on one as we speak!
On minimum foam thickness
Hallie and Peter,
According to IRC Table N1102.5.1, the minimum foam thickness for 2x6 walls in climate zones 7 and 8 is R-15. In other words, you need more than 2 inches of polyiso, or at least 3 inches of XPS.
The wall details in the GBA construction library show foam insulation that is too thin for a 2x6 wall in a cold climate.
SIP and vapor profiles
Structural insulated panels make a terrific high performance building envelope. But with an exterior and an interior face of OSB, they are not exactly the best example of an assembly with good drying potential in at least one direction.
That is why all of the GBA SIP details in our construction detail library have both a vented air space and meticulous air sealing as part of all wall and roof details. And it is why Winter Panel, the SIP company who originally created all of the details, insists that all SIP details have designed drying to both the exterior and interior of their panels as well as mechanical ventilation for interior humidity control in homes built with SIPs.
GBA details with rigid insulation and a vented air space
All of our GBA construction details have rigid exterior foam insulation, which require an alternative form of shear resistance, as Martin has stated. And they also all have a vented air space with either furring strips or spacer mesh creating that space. With the former you fasten claddings to the furring strips and with the latter you use longer fasteners to studs.
We should not assume these elements in our details outside of the library where they are explained in context. Thanks for raising the issue for other readers.
Why roof in photo rotted
Not to beat a dead horse here, but I suspect that the cause of the rot shown in the photo is more related to dewpoint conditions than to the presence of both inside and outside vapor barriers.
If the light cans were indeed the culprits for letting the humid air into the roof assembly, presumably the vapor would be just as free to leave the assembly through those very same orifices to dry the assembly. The light cans do not act like "moisture diodes" allowing water vapor travel in only one direction! To create the damage seen in the photos, there must have been an extreme humidity condition in the house (as explained by Yost) and the water vapor must have reached a cold surface and heavily condensed inside the roof assembly. This rot would have occurred irrespective of whether there was foil-faced ("vapor barrier") board insulation on the interior surface.
(You may be able to argue that less damage would have occurred if the plywood had been able to dry to the exterior during the summer months without the ice shield, but not a lot of drying can take place through asphalt shingles and felt, so I do not think the ice shield was a major actor in this play.)
seizing on a throwaway comment
I start with two apologies...one is for typing poorly as one finger is bandaaged. The other is picking on a side point.....however it does point up a failure that needs addressing. Peter Yost wrote "WUFI tends to be a conservative tool...[]...and so is often more useful in the hands of experienced building scientists than lay folks like builders and architects." If the people designing and building are considered incompetent to understand what they are doing, even if that group is further limitrd to those interested enough to follow discussions such as these, then retreating to the ivory tower among the cognoscenti does nothing to further the cause of actually improving the built environment. There's already a problrm of having a gap between builders and architects, creating a further division with building scientists on yet another side does no one any good.
can we not find a way in which those with the bent/resources to do in-depth research have a way of communicating the results of their work to those who would use it which does not invovle hiring cadres of specialists for every project?
Great info
Nice to get all the details on these failures - you can never have too much information.
Has anyone started to see moisture-related failures in SIP construction?
Moisture-related failures in SIP construction
Steve P,
The answer is yes:
http://www.greenbuildingtalk.com/buildcentral/sip/2001-10_juneau.pdf
Guidance on unvented roof assemblies
To address all of the variables for unvented roof assemblies is no small task. Fortunately, with support from Building America, BSC has developed an excellent resource: http://www.buildingscience.com/documents/reports/rr-1001-moisture-safe-unvented-wood-roof-systems. Allow some time for digestion; this is a pretty technical resource on this topic.
layperson trying to make sense of it all ...
OK, so hopefully this is an easy one for you experts. I'm building a home in the Salt Lake City area, so zone 5 I believe? (Heating climate, mostly dry with a few good snowstorms each winter.) The house is framed with 2x6s, and we just finished insulating with 1" closed cell foam and blown-in fiberglass. There will be no exterior insulation, just Tyvek and then stucco, stone, or brick.
Code here required plastic vapor barrier be put up, which they've now done and we passed our inspection. So from all I'm reading here, I'm thinking I need to get over to the house before they put up drywall and pull all that plastic down. Is there any reason not to do this?
Incidentally we're also finishing the basement, and I already pulled the plastic off those walls, even though we only insulated with blown-in fiberglass, no foam. I just figured there's no way that wall is drying to the outside, since the outside ground is wet. Any input will be greatly appreciated!
Response to Tyler
Tyler,
Your local code probably requires an interior vapor retarder, but I'm fairly certain it doesn't require polyethylene. Most building inspectors will be satisfied if you tell them that you are using kraft facing, MemBrain, or vapor-retarding paint as your vapor retarder.
Yes, you should remove the interior poly before the drywall is installed.
Blown-in fiberglass is a poor choice for insulating basement walls. It would have been better to install rigid foam between the concrete walls and the stud wall. If your basement is very dry, you might be okay; cross your fingers. You were certainly correct to remove the basement wall poly.
Response to Tyler's "easy" one
Wish it were an easy one, Tyler!
For a "flash-n-batt" wall insulation such as yours, the interior surface of the closed-cell foam is the first condensing surface (the first place within the cavity that moisture could condense if driven into the cavity from the interior).
If you don't have any vapor retarder, then the R-value relationship between the air- and vapor-permeable fiberglass and the thin layer of closed-cell foam determines if the closed-cell foam "flash" warms the cavity enough in winter to keep its interior surface (the first condensing surface) above the dewpoint during the coldest months of the year. This means you need to do a "dewpoint" test, referred to in an earlier comment.
And when you do a "dewpoint" test, an important variable is the interior relative humidity during those same months (something over which you have control, by the way).
So, you can do a dewpoint test or you can tear down the poly (because it is essentially a barrier, not a retarder) and put up a vapor retarder per Martin's recommendations, or you can keep your interior relative humidity at around 25% during the coldest winter months, each of which will prevent interstitial condensation in your walls.
Martin and I definitely need to do a blog on how you conduct dewpoint tests, their use and limitations.
Hope this helps, even though it is not likely as easy as you had hoped.
Further information for Tyler
Tyler,
1. Don't install stucco over Tyvek; you need at least 2 WRBs under stucco, and, if possible, a dimpled WRB or some type of air space or drainage space.
2. Remember that OSB is the most vulnerable available sheathing. When I interviewed Joe Lstiburek on the topic of flash-and-batt, this is what he said: "Flash-and-batt is not a problem on plywood or gypsum sheathing, which are more vapor-open than OSB. OSB is the only sheathing of consequence [in other words, the only sheathing type to worry about] if the spray foam is too thin in a cold climate."
Lstiburek's recommendation: "To be safe, use about 1 inch [of closed-cell spray foam] in climate zone 5, 1 1/2 inch in climate zone 6, or 2 inches in climate zone 7."
My final piece of advice: thick foam is always safer than thin foam. The thinner the foam, the lower you have to keep your indoor RH to stay out of trouble. Remember, you won't be the only person who ever lives in the building. The next occupant may maintain a higher indoor RH than you do.
thank you
Much appreciated, I took the plastic down today just as the drywall was being delivered. Also talked to my builder about the Tyvek behind stucco. He and the brickmason who happened to be there both thought I was nuts when I told them about the 2 WRBs. They assured me that the stucco guys will follow manufacturer recommendations, that the inspector will make sure of it, and that ... wait for it ... they've never had a problem. We seem to have these conversations a lot.
So now that the vapor barrier is gone, do you think I should be talking to him about using a vapor retardant primer on the walls?
Response to Tyler
Tyler,
Yes.
Owens Corning Cutured Stone Over Tyvek HomeWrap
We just did a house addition in upper New York state. Stud walls with Advantech sheathing. Tyvek HomeWrap was put over all the sheathing. Top 2/3 is vinyl siding. Bottom 1/3 is cultured stone. I noticed the mason just attached the wire lath right over the Tyvek HomeWrap and then put on the coats of mortar before the stone. The top sill stones all around were glued on with Titebond subfloor adhesive. There is no flashing on top of the sill stones. I have a couple questions: 1. Should the bottom row of vinyl siding be removed and galvanized flashing added on top of the sill stones so water does not get behind the lath and stones? Can I just use Tyvek tape and tape that flashing to the existing Tyvek? 2. I read that Tyvek will bond to the mortar and let vapor through rotting the sheathing. Only the 1 layer of HomeWrap (not StuccoWrap) was put against the sheathing. On the interior we have kraft paper faced fiberglass batts. Will the Advantech sheathing dry enough with this? Anything else we should do? How many years should the current stone wall approach last without problems? Should we have all the stone removed and start over? If so, what is the correct wall assembly? Thank you.
Response to John
John,
You need to contact a consultant quickly. I strongly recommend that you contact the Building Science Corporation in Somerville, Mass. If you end up paying these consultants several hundred dollars, it will be money well spent.
You may also need a lawyer soon.
Cultured stone over one layer of Tyvek over OSB with fiberglass batts in the studs is a recipe for disaster. Your OSB could turn to oatmeal in just one or two years.
Of course you need flashing between the vinyl siding and the cultured stone, but the flashing won't save your wall.
Done correctly, your wall requires foam sheathing to stop inward solar vapor drive. It also requires at least two layers of WRB, ideally over a three-dimensional drainage mat.
Get an experienced consultant -- not just a local home inspector, but someone from BSC -- to inspect your home as soon as possible. Good luck.
[John: Jump to "Page 2" for more comments, including at least 2 more comments on your question.]
More info for John
John,
In addition to the consultants at BSC, an expert who is very familiar with cultured stone problems is:
Mark Williams
Williams Building Diagnostics
mwilliams [at] wbd.cc
Mark lives in Pennsylvania. He should be able to help you or provide advice.
Other consultants for upstate NY
I second Martin's concerns. You need two layers with cultured stone, one to act as the bond break, the other to serve as the weather-resistive barrier. But it is really tough to give you complete advice in posted comment exchanges. There are lots of variables and you won't capture them all, nor can we anticipate them from afar, with no visuals.
BSC is the best, but often quite busy. Another option for you in upstate NY is Terry Brennan of Camroden Associates--easy to find them on the web and Terry is among the best as well.
Still more info for John
John,
Here's a YouTube video showing how to install manufactured stone veneer over plywood sheathing:
http://www.youtube.com/watch?v=O3TTRmk-2Uo
I'm not vouching for any commercial products or recommending every single aspect of this installation -- but this video includes the basics (two layers of WRB, followed by a three-dimensional drainage mat to create a draining air space, followed by metal lath and the adhered manufactured stone).
One thing I might change, though, is to recommend rigid foam sheathing instead of plywood sheathing.
Unvented Roofs
Peter - you pointed us to http://www.buildingscience.com/documents/reports/rr-1001-moisture-safe-unvented-wood-roof-systems
Can you comment on the phrase "It cannot seal the airflow through wood-to-wood joints: these
require alternate air sealing treatment and are not considered by the analysis in this paper" that is located on the bottom of the third last paragraph on pg 8. What does this mean?
Many Thanks
Sean's question about the BSC article and air sealing
Short answer is I am not sure. I THINK it means that partial depth spray foam leaves some wood-to-wood joints unaddressed and they must be handled separately, but I will email John Straube and see if he can clear up any ambiguity.
Once more on the vaper retarder primer
Hi again, a follow-up question on the new construction where I pulled down the plastic vapor barrier from all the walls. Again, the below grade walls are just blown-in fiberglass in stud cavity; above grade is 2" of closed cell foam in cavity and the rest of the stud bay filled with blown-in fiberglass. The plastic was just put up to meet code. (GC and insulator both insisted this was required here in Utah.) Passed inspection and then I removed it. I know, I'm a criminal.
OK, so I know you guys generally recommend a vapor retarder primer as a better way to meet code, but that's irrelevant in my case because inspection passed and drywall is up. So the question is, code aside, would you still do the vapor retarder primer or just let the walls breathe? Or would you do it in some areas and not others? Specifically, the basement walls/ceiling, above grade walls, and above grade ceilings? To complicate things a little more, I have open cell foam sprayed on the roof decking for a cathedralized attic insulation.
I'm revisiting this because I just got pricing from the painter today. Online sources were saying vapor retarder primer was about the same cost as regular, but not so apparently. His price is about 60% higher for this product, so I don't want to do it if it won't really help. Thanks!
Response to Sean Wiens
Sean Wiens,
I think it means air leakage between doubled framing members (for example, doubled rafters on either side of a skylight or chimney). These seams need to be sealed with caulk, the entire length of the doubled rafters.
Response to Tyler Leary
Tyler,
1. The paint on the basement wall is irrelevant. Paint it with whatever you want.
2. On above-grade walls and ceilings, I would use vapor retarder paint.
3. Open cell foam sprayed on the underside of the roof sheathing makes me nervous. Be sure to install vapor retarder paint on the cured surface of the foam. This is the most important place in the house for vapor retarder paint. Otherwise the roof sheathing will accumulate moisture over the winter.
4. I would install 1/2-inch gypsum wall board to cover the open-cell spray foam to reduce the fire hazard.
Wood to wood joints neat alternative sealing
Thanks Peter - let me know what you find out.
Martin - that does make sense if that is what they were meaning.
Subscribed to GBA today - this forum is great!
John in Upstate NY, and the roof picture
John,
First, I think you should have someone look at your cladding, but I wouldn't panic. I am in Rochester NY and have watched many of my builder customers (against my advice) apply stone just as you describe (or worse) since 1999. I believe the saving grace for this assembly is that:
1) Walls can still dry to the outside.
2) The stone is vapor open.
3) The stone is a reservoir, so the moisture doesn't just run into the wall.
In our area, this assembly appears to succesfully dry more than it wets. Thus moisture problems don't crop up like these folks are concerned. I know the folks at BSC and Terry Brennan well. Their cost may surprise you, but the peace of mind may be worth it. Unfortunately there is not much more local talent in NY.
Now, just wanted to point out to all that the picture at the article head is NOT a cathedralized roof. It is in fact a small, cramped, open attic space ABOVE the cellulose insulation layer. I have not seen this roof assembly fail if it is cathedralized (densepacked between drywall and roof sheathing). I realize it is supposed to, but they haven't yet that I know of. And I live under 1 right now.
The roof above created a condensing surface with the airspace above.
-Rob
Cultured stone details
John and Rob -
It's not as much the moisture performance properties of the stone as the mortar joints in these assemblies that are problematic. Wet one of these walls, and the mortar joints will wick lots of water through to the WRB in no time. And the mortar joints in cultured stone tend to be nice big fat ones!
That's what we worry about.
Response to Tyler Leary
I agree with Martin, with one caveat:
Figuring out whether you need a vapor retarder paint is largely based on one highly variable element, but one over which you have some control if you are the occupant - the interior relative humidity. Run your house high during the winter (45 - 50%) and you probably need the interior vapor retarder; run it low (25 - 30%) and you probably don't (I am talking about above grade but not your spray foam roof assembly). And I will always say "probably" when offering advice long distance; tough to nail the recommendations when we are not there to see the complete picture and all the details.
What about when you sell this house and others occupy it? By then you might have enough coats of paint that it will be equivalent to a retarder paint!
Lastly, if you just need the painter for his finish skills, buy the primer yourself and have at it.
To Peter
Hi Peter, I am fully aware of your concerns. I have been doing this work since 1999. I met your brother at ACI in 2000.
What I am saying is that despite the fact that the cards are stacked against this assembly, I am not seeing a high failure rate. Now, put this assembly above a questionable flashing, and I am getting those calls!
The other factor helping here may be of quantity. A narrow band of stone at the bottom of a wall may be a low enough moisture load.
Also, perhaps is the fact that kraft faced batts (tucked and stapled) popular here are not a great vapor barrier.
A good friend recently clad his entire (rather large) home as described above. He is only a few miles away, so I can kep a very close eye on it, and will be the first person he calls if there's a problem.
Rob Susz
Hi Rob - good to learn of our connection!
This sort of back-and-forth between researchers/writers and building professionals in the field is exactly where web-based forums shine--thanks for being part of our site, Rob.
Sean Weans unvented roof
Martin understood what I was trying to say. All the failures I have seen or heard about with unvented ccSPF have essentially all been due to failures to seal at joints: double rafters, double top plates, double ridges. The big ones are the multiple framing elements around dormers, double valleys or ridges. These need to be caulked, taped or gasketed (but I dont like gaskets I cant see and inspect and caulk is cheaper and better in this application).
Partial depth attic spray foam and additional air sealing detail
From John Straube:
"Yes, this is what I mean. The failures I have seen or heard about with unvented ccSPF have essentially all been due to failures to seal at joints: double rafters, double top plates, double ridges, and to a lesser extent butt joints between rafter and ridge/hop, etc."
Peter
Now that I think about it....
Peter - I work all over NY and now that I think about it I have only ever seen one house where the stone cladding was not done as described above.
It's a house where I spec'd the cladding. I used an ADS dimpled drainage mat product between the OSB and the stone. In this case real stone. I showed Joe a picture of it at their Seattle training and he almost wet himself with joy. He immediately asked for copies of the pictures.
I am going to start driving through some of the tracts I worked in in the '90s and see what their stone is up to.
-Rob
I heard Joe L talk a couple
I heard Joe L talk a couple of years ago regarding SIP faliures in Alaska. If I remember correctly was very small air leaks at the seams in the roof migrated to near the peak. Mositure condensed and caused rotting problems. I belive the solution was to provide ventalation/drying potential.
BSC has a study on hot roofs in LV and the temp differetial was minor.. I belive in the range of 5-10 degrees. I dont think hot roofs if constructed correctly should be a problem. It is in the details.
Washington DC Area Partial Spray Foam Roof Deck
Wow - just finished reading the "Moisture Safe Unvented Wood Roof Systems' study - incredible and timely! Thank you Messers Straube, Smegal and Smith and Building Science.
I would be interested in research and field experts' opinion on the following:
I am insulating an addition in the DC area - am I correct that I am in the Boston - 4A climate zone?
My reading of the results tell me that for my planned insulated roof deck (conditioned/unvented attic) I would need only 1" of closed cell foam finished with fiberglass/cellulose/batts to full rafter thickness - and a good air flow barrier to prevent air flow through this permeable layer of my 'flash and batt' roof deck (to prevent warm moist air moving to the condensing plane where the spray foam starts). Would this air barrier just be well-finished, sealed and caulked drywall or panelling preventing air flow from entering the permeable layer?
Would this mean that only 1" of ccSPF in a flash and batt system for the roof deck likely mean that condensation (that is a danger to my roof sheathing via mold or rot) will not occur?
A couple considerations:
1. I assume I would need to maintain reasonable interior relative humidity in the winter time - dealing with kitchen and bath moist air - but also wanting some humidity in the air for comfort (prevention of cracked hands etc.). Also I have radiant hydronic heating system with hot water running under the floor in tubes - so no forced air blowing around to help drive heated and moist air to the attic.
2. - my roof sheathing is 4/5 ply cdx not osb - will this not add another factor in my favor - as the cdx plywood would be much less susceptible to problems for the brief periods of higher moisture content?
3 - how does the moisture at the interior edge of the ccSPF layer actually reach the underside of the roof sheathing - wicking - since the ccSPF is impermable?
EXTERIOR STUD WALLS - In my stud bays above grade 1st and 2nd floors - I also want to do 'flash and batt'. With drywall and latex semi permable moisture and good sealed air barrier on the interior sides of these walls - what thickness would I need of the spray foam against the back side of the (also cdx) plywood sheathing. It seems like I wouldn't need R15 of ccSPF to prevent condensation - but perhaps 1/2" or 1" is enough? There just can't be a huge moisture drive from inside to out in the winter here - and for what there is it will dry to the inside with sunny, warmer days and seasonal changes. My outside wall construction is tyvek on the cdx plywood, then vertical luan plywood strips over which back primed yellow pine siding is nailed - so there is a drying gap or drainage plane and the siding doesn't sit on the tyvek.
Wouldn't winter time moisture and warm air drive much more an issue to the attic than to well painted and sealed drywall covered exterior walls?
Sorry so long. Any thoughts appreciated.
Response to Virginia
Virginia,
You are correct that you are in climate zone 4. However, Boston is in climate zone 5.
For anyone who wants to see the report that Virginia is talking about, it's here:
http://www.buildingscience.com/documents/reports/rr-1001-moisture-safe-unvented-wood-roof-systems
Q. "Would this mean that only 1" of ccSPF in a flash and batt system for the roof deck likely mean that condensation (that is a danger to my roof sheathing via mold or rot) will not occur?"
A. Yes, if you believe that a report based on computer modeling provides enough of a safety margin for you to sleep well at night.
As you probably know, your proposed roof assembly does nothing to address thermal bridging through your rafters.
thanks Mr. Holladay - follow up
Thanks. Yes the thermal bridging is an issue - stud walls and rafters - that needs to be dealt with. I am contemplating ripped strips of foam board on the inside face of all the framing members (that's going to be a pain) which the gypsum board will screw onto - which will be a thermal break between the wood and the drywall. Not as much R obviously as I would like - but a nice non thermal conducting break.
Attic:
So I will have 2" of ccspf in my attic on the underside of the roof deck - and finish with netted dense blown in cellulose - and a thoroughly sealed air barrier. Since the ccspf is on the underside of my cdx plywood roof sheathing - would I want to make sure there's no vapor barrier on the room side (only an air barrier) so if there is any moisture it can 'dry to the inside'? And since I'll have the 2" ccspf thickness the moisture would not condense (enough or for long enough to be a problem) in the winter in my Zone 4 DC area climate. And the study that I referenced even showed 1" might be enough. So I should be covered condensation wise.
2x4 frame walls main and second floor:
Similarly I'm doing ccspf plus batts/cellulose on the inside of my exterior cdx wall sheathing in my 2x4 frame addition walls. (exterior is back primed pine siding, onto furring strips holding the siding off of the tyvek then the cdx sheathing). Thus this ccspf will be a minimum of 1" in my stud cavities and finished with cellulose or meticulously placed batts - then drywall and regular primer/paint. Question - wouldn't I want (similar to the attic) just a well sealed 'air barrier' on the room side of these walls and not a vapor barrier.? Since the ccspf is a moisture barrier wouldn't I want these walls to be able to dry to the inside from the foam inward - and also dry to the outside from the backside of the foam/cdx plywood sheathing and outward through the tyvek and then siding with tiny gaps between laps. With air flow being the major vapor driver (as detailed in the study)- wouldn't a well sealed interior drywall/caulk/moulding/latex paint regime keep any moist air from getting into the walls (and thus eliminate moist air getting in) - and if any small amount of moisture does get in via diffusion it will be able to dry out to the inside (and benefit from drying with seasonal warming and my moderate zone 4A climate?
So if I use batts I would omit the kraft paper vapor barrier on the inside? (I guess the opposite logic is I need the kraft paper vapor barrier to prevent any moisture from diffusing into the wall. But with the kraft paper barrier - wouldn't that inhibit moisture from 'drying to the inside' if any does get in via an air leak?
This vapor barrier thing (and trying to avoid a 'double vapor barrier sandwich' has me chasing my tail a bit.
Thanks for any thoughts.
Second response to Virginia
Virginia,
Q. "Since the ccSPF is on the underside of my CDX plywood roof sheathing - would I want to make sure there's no vapor barrier on the room side (only an air barrier) so if there is any moisture it can 'dry to the inside'?"
A. Yes.
Q. "Wouldn't I want (similar to the attic) just a well sealed 'air barrier' on the room side of these walls and not a vapor barrier?"
A. Yes.
Q. "Wouldn't a well sealed interior drywall/caulk/moulding/latex paint regime keep any moist air from getting into the walls (and thus eliminate moist air getting in)?"
A. Yes.
Q. "So if I use batts I would omit the kraft paper vapor barrier on the inside?"
A. Not necessarily. Kraft paper is a vapor retarder, not a vapor barrier. Although kraft paper is unnecessary, it will do no harm. Some drying to the interior will still occur with kraft-faced batts.
Q. "But with the kraft paper barrier - wouldn't that inhibit moisture from 'drying to the inside' if any does get in via an air leak?"
A. Not significantly.
Excellent, Thankyou Mr. Holladay.
Are there any technical docs. or test data (in addition to the study mentioned above) that I could use with my building official to convince them of the code meeting performance of my hybrid insulation systems.
How can I support your organization and your much appreciated support for those of us trying to construct more efficient, longer lasting, and healthier houses in the field.
Third response to Virginia
Virginia,
1. One of the few manufacturers willing to support flash-and-fiberglass installations is Johns Manville, which has approved the technique for those installing closed-cell spray polyurethane foam followed by Spider blown-in fiberglass. If you need help convincing a local building official, you could ask advice from a Johns Manville rep; I suggest you speak to Eric Olson at 303-978-5280.
2. The best way to support GBA is to become a member by signing up for GBA Pro ! We welcome new subscribers.
To learn more, visit https://www.greenbuildingadvisor.com/join .
Spray foam in walls and roof, more outside insulation possible?
Hello,
first of all, great article. I'm particularly interested in this topic because we are step by step remodeling our ~1900 house. As we are gutting and remodeling each room, we spray-foam all wall cavities with 3" of foam. We have done the same to the whole roof, insulating between rafters (4"). The cold drafts moving through our living room from when we bought the house are a thing of the past now :-)
Probably next summer we will redo our roof, and sometime down the road we might replace the old vinyl siding. I have been thinking about whether we can add another inch of foam insulation from the outside as we can only put 3" of spray foam into the walls (they didn't use 2x6 back then ;-)
The potential problem I see is that both the walls and the roof have a layer of rough-sawn boards that make up the structural element of the walls. The walls then have a layer of vinyl siding on top of lead-painted clapboard on top of that layer of structural boards. The roof has shingles directly laid on top of the boards. Because the spray foam is "glued" to those boards, even if we wanted to, there is no way to remove them.
So if we install another layer of rigid foam board after removing shingles respectively the vinyl siding (if possible I'd try to avoid the expense of removing the old lead-paint clapboard), there would be wood and air spaces between two layers of non-permeable foam. Even before reading this article I was worried about that, if water (or moisture in general) got between those layers, it would have a real hard time to escape.
Does anybody have an idea or recommendation on how we could add more insulation from the outside without risking moisture problems down the road? If this is not practical, what type of sheet material could we lay on top of the original structural wall boards to provide a solid base for 1) roof underlayment and shingles on the roof and 2) housewrap and new siding? Should this sheeting material be spaced so that there is an air gap between it and the spray foam?
Thanks a lot,
Christoph
Response to Christoph
Christoph,
1. You forgot to tell us whether your walls have open-cell spray foam (which is vapor-permeable) or closed-cell spray foam (which is a vapor barrier).
2. In your case, I believe you can safely install rigid foam on the exterior side of your sheathing boards, as long as:
a. Your sheathing boards show no signs of water damage;
b. Your exterior foam sheathing is thick enough to keep the boards above the dew point (see Calculating the Minimum Thickness of Rigid Foam Sheathing);
c. You include a ventilated rainscreen gap between the rigid foam and the siding.
Response to Martin
Sorry, forgot to mention that. It's closed cell foam. We chose that after I read about issues where indoor humidity permeates through open cell foam, freezes near the outside wall and you get a big mess when temperatures get above freezing again.
Thanks a lot for your answer. Just for clarification, when you talk about sheathing boards, you mean those old rough-sawn boards that I described that make up the structural part of the outside wall. Interesting point about keeping the boards behind the ridgid foam board above the dew point. I just looked over the table. I guess it makes sense that a thicker wall with more interior insulation requires a thicker exterior foam sheathing because less heat escapes from the inside to warm the sheathing boards that are sandwiched in between.
Again, thanks. That helped a lot.
Another response to Christoph
Christoph,
Yes, those rough-sawn boards are called sheathing.
Before World War 2, most walls and roofs were sheathed with boards. After WW2, U.S. builders began switching to plywood, and in the 1980s, OSB reared its ugly head.
New Construction Asheville, NC
The amount of information out there is daunting to say the least! My family is just now getting over a bad mold problem that we encountered on our last home in South Carolina. As a result, my wife and I both have varying degrees of MCS and we've both been sensitized to Asperigillus. I won't get into the details of the past, but we are building a "healthy" home based on Joseph Lstiburek's book "Mixed-Humid Climates"
Due to recent posts and relevations on spray foam, I'm almost at the point of axing my initial thought of using open-cell foam throughout the wall cavities, roof decking, and basement walls. I could really use some help here. Current details:
1) Location - Asheville, NC area (Zone 4 I think, maybe 5)
2) 1700 SqFt on 1st and 2nd story above grade, another 700 SqFt in the finished basement.
3) Basement will have daylight on 2 sides.
4) Foundation drain wrapped in gravel, covered with filter fabric, beside the footer. Sandy fill on top, then backfill with dirt. I'd love to use coarse backfill but that would be another $5k according to my builder.
5) Delta Foundation Membrane over the footer (below the foundation wall) as a capillary break.
6) Foundation wall damproofed very well with spray on application. Drainage board over the application.
6a) Interior foundation wall covered with 1" XPS, then framed with 2X4 studs.
7) Lose gravel fill below slab, with a soil gas depresurization system (passive), rigid foam insulation over that, then vapor barrier, then slab.
8) 2X6 exterior framing.
9) Cement board siding over housewrap
10) Geothermal (3-ton), sized by an engineer as well as the HVAC technician. 2 X 300 ft wells.
11) Desuperheater for supplemental hot water heating
12) Whole house dehumidification and ventilation system for fresh air and humidity control (Ultra-Aire 100V)
13) All hardwood flooring
14) Asphault shingles over conditioned attic space.
15) Other green features that I can list if needed.
We've cleared the lot and poured the footers. I'm pretty happy with the foundation design and water mitigation strategies that are in place, but the wall assembly has me scratching my head. I was all set to use BASF Entertie, Open-Cell Spray-Foam for the wall cavities, the rafters, and the basement wall (was going to have 1" of XPS on the basement wall with 2X4 framing and open cell foam, then sheetrock).
Due to the large number of posts about Spray Foam off gassing and improper application, I think I've decided to axe that and follow Riversong's advice with Dense Pack Cellulose (National Fiber). I only want the stuff with Borate and no Ammonium Sulfate.
With that said, what would you reccomend for my wall assembly? No vapor barriers of course. I want a wall that can breath. We had no plans for a rain screen, but I could probably have them install one if needed over the wrap. Should I use foam on the outside of the wall structure? Is the Dense Pack insulation enough (similar R value to the open cell spray I might add). And finally, what about the roof deck and the basement. Can I (or should I) use cellulose in those areas?
Confused in NC!
Thank you all so much!
Mike
Response to Michael W.
Michael,
1. The best place to post your question is on GBA's Q&A page. That way the greatest number of readers will see you question and be able to respond. Here is the link:
https://www.greenbuildingadvisor.com/qa
2. There are a great many ways to build walls; no way is perfect, they all have advantages and disadvantages. I'm partial to 12-inch-thick double stud walls insulated with dense-packed cellulose, but I also like foam-sheathed 2x6 walls. You ask the question, "Should I use foam on the outside of the wall structure?" I'm tempted to say, "You certainly can," but it sounds like a trick question, since you also wrote, "No vapor barriers of course." Well, I guess that rules out rigid foam.
3. Now that you have decided not to use spray foam, you better add thicker rigid foam to the inside of your basement wall. The code minimum requirement in your climate zone is R-10. Of course, more is better.
Ski Chalet Insulation Questions
I am performing an energy retrofit of a 1960's vintage chalet near Kingfield, Maine with R-11 fiberglass insulated walls constructed of 16" OC 2"x4" with 3/4 " ship lap siding. I want to apply 6" of polyisocyanurate, staggered and taped, to the existing exterior siding. The outside winter temperature gets as low as -30 F. I want to avoid moisture problems caused by interior humidity condensing on the interface between the polyisocyanurate and the existing siding.
1. Will 6 inches be enough to avoid condensation under these conditions?
2. Should I add a permeable vapor layer between them to allow moisture to wick out? If so, what product should I use?
3. Should I just remove the interior insulation, re-cover the interior walls loosely, and let the sheathing stay near room temperature to avoid the condensation problem?
4. I plan to set the interior temperature back to 55 degrees at night and when I am not occupying the chalet for extended periods of time. Will 6 inches be sufficient to prevent condensation under those conditions?
Thanks in advance for any assistance that you can provide.
Interstitial moisture questions
Hi Tom -
The straightforward answer is you are most probably fine with your approach. Taking a look at both this vapor profile blog and Martin's on dewpoint calculations (https://www.greenbuildingadvisor.com/blogs/dept/musings/are-dew-point-calculations-really-necessary), the ratio of the total assembly R-value to the exterior insulation R-value is high enough to keep your first condensing surface in the assembly above the dewpoint most of the time. And all of the materials or building assembly components to the interior of the vapor impermeable PI rigid insulation have relatively high vapor permeability, so you have preserved drying to the interior for the assembly.
But of course in building science matters there is always the more complicated it-depends answer. The dewpoint method assumes you have a perfect air barrier and you have to assume some % of average interior relative humidity for those coldest months of the year to drive the calculation. So, some caveats and additional recommendations:
1. Make sure you create a continuous air barrier for the entire building envelope. The amount of moisture that can condense in your building assemblies as the result of air leaks can dwarf what you might get from vapor by difusion.
2. Monitor/maintain reasonable interior relative humidity during the winter in your chalet. Depending on the number of occupants and what type of spot and whole-building mechanical ventilation you have, a bunch of skiers can probably load this building up with moisture.
3. Maintain summertime drying conditions. You probably would not end up air conditioning this chalet for summertime use, but I would bet that just about every insulated structure in cold climates gets some condensation on first condensing surfaces inside building assemblies during the winter. But they dry out, often easily, so long as you have that directional drying, in this case to the interior.
Response to Thomas Dresser
Thomas,
You should be fine with 6 inches of polyiso. For more information on this topic, see Calculating the Minimum Thickness of Rigid Foam Sheathing.
You do not need to install a material to "wick out" moisture. However, it's important to be sure that your wall system includes a tight air barrier. Options include an air barrier at the drywall surface (using the Airtight Drywall Approach), at the sheathing surface (using taped housewrap, carefully detailed at windows and edges), or using the polyiso itself (with attention to caulking the foam in place and taping the seams with a compatible tape).
There is no need to remove the interior insulation.
Your proposed setback temperatures shouldn't cause any problems.
what is the point of the foil on the polyiso foam?
Can someone please explain to mean what the effect of the foil is on the polyiso. foam in the particular application of example 2?
I was taught in Thermodynamics that radiation only occurs in open space, so a radiative barrier (such as the foil on the polyiso. foam board) only works when it is "facing" an open space. In other words, through solid assemblies, conduction is the only heat transfer mechanism. If that is correct (which I have heard repeatedly from my professors), then it seems that foil-faced rigid foam boards (of any type - EPS, polyiso., etc.) hurt more than they help, because they often create an unintended vapor retarder on the wrong side of the assembly (or inside the assembly as I often see in Alaska, when people use foil-faced EPS inside their box headers).
Will the more experienced among us please clarify this situation?
Thank you.
Response to Lyle
Lyle,
First of all, Example 2 is an example of what NOT to do. So the wall assembly is being discussed to make a point. It is not being proposed as an example to follow.
Secondly, the foil serves two main purposes:
1. It is an air-impermeable facing that slows or stops the migration of blowing-agent gasses from the tiny bubbles inside the foam. This maintains the high R-value of the polyiso over time.
2. If it is installed adjacent to an air gap, the foil can raise the R-value of the adjacent air space and thereby slightly improve the thermal performance of the wall or roof assembly.
Many builders use foil-faced polyiso even when it isn't adjacent to an air space, because it is an environmentally friendly foam with a high R-value per inch. Polyiso with another type of facing would work equally well in such an installation.
Thank you Martin
Martin,
Thanks for your explanation. I did not know that the foil preserves the R-value through the life of the material. Thank you for that explanation.
I see a lot of foil-faced EPS up here. Does the foil maintain R-value through time for EPS, as it does for polyiso?
Also, if there already is a vapor retarder on the inside (such as poly - still the standard treatment in Fairbanks, Alaska), should I be concerned about foil-faced EPS in door and winder headers (or anywhere else INSIDE the wall cavity) potentially trapping moisture?
Thank you, as always, for your insight.
Response to Lyle Axelarris
Lyle,
Q. "I see a lot of foil-faced EPS up here. Does the foil maintain R-value through time for EPS, as it does for polyiso?"
A. No. The gas inside EPS is just air -- so there aren't any exotic blowing agents in the foam that need to be preserved.
Q. "If there already is a vapor retarder on the inside (such as poly - still the standard treatment in Fairbanks, Alaska), should I be concerned about foil-faced EPS in door and window headers (or anywhere else INSIDE the wall cavity) potentially trapping moisture?"
A. No, as long as the wall is designed to limit air leakage, and as long as there are no cold surfaces in the wall cavity. The usual cause of condensation problems in walls is air leakage. When moisture-laden exfiltrating air encounters a cold surface, condensation can occur. So, in a cold climate, you want a good interior air barrier -- for example, by following the Airtight Drywall Approach. And you don't want to use fluffy insulation like fiberglass batts to try keep cold wall sheathing warm, because such insulation doesn't limit air movement.
After months of reading dozens if not hundreds of GBA articles, I finally ran across this "ancient" one. For me this has by far been the most helpful article for understanding how to design a wall that is able to dry out should it acquire moisture from diffusion, air leaks or water leaks. And the Climate Consultant software (now version 6, not 4) gives probably more data than most of us would ever want or need, presented in interesting graphical forms that you might even print out in color and hang as art on your wall.
What was really helpful to me was having the two example cases including the nice diagrams. The two examples were significantly different which by contrast helped to illustrate the concepts more completely.
Of course reading all those other GBA articles prepared me to understand this one. Just saying that GBA has been very helpful for this weekend warrior.
Dennis,
Glad that you found an article that helped the information "click" for you!
in a wall, hardy siding, 3/4 gap, taped 2" foil iso, vapor open peal and stick OR ?? vapor closed peal and stick, plywood, cellulose in cavity, sheetrock / latex paint.
because the iso is vapor closed, if any water manages to get behind the foam, should the wrb be permiable or not
I have not been able to find any talk of the pros and cons of the type of wrb in this stackup
I forgot houston tx 2x6 studs 4" cellulose
My biggest concern is if water ever gets trapped behind the foam, such as a faulty or failed flashing job allowing excess water to get behind the foam, how to protect the sheathing
just thinking some type of drainable house wrap over the above peal and stick choices
suggestions ?????
Log in or create an account to post a comment.
Sign up Log in