
Image Credit: All photos: David Murakami Wood
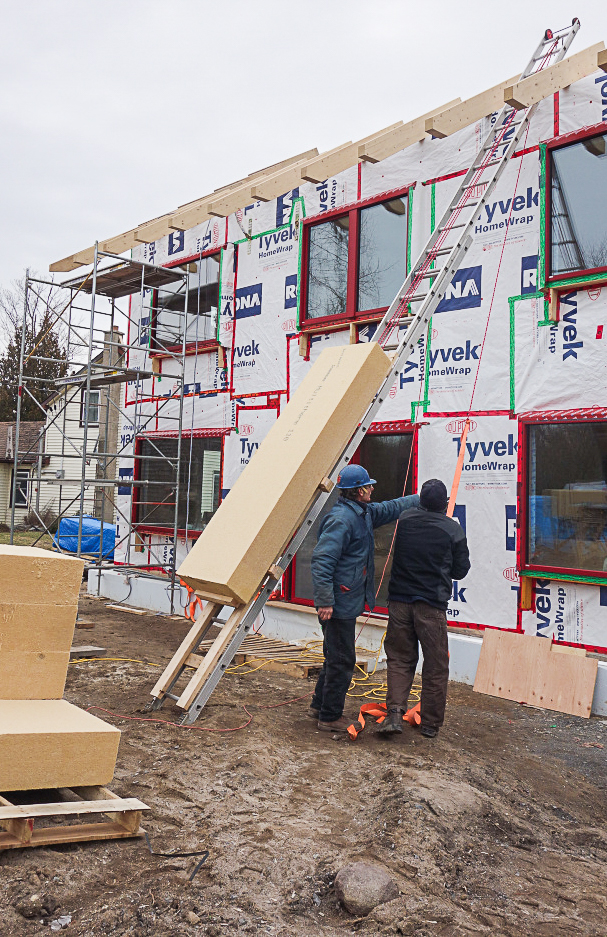
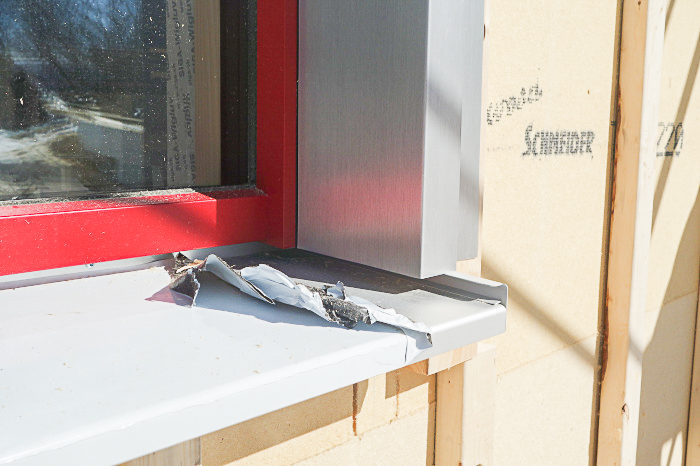
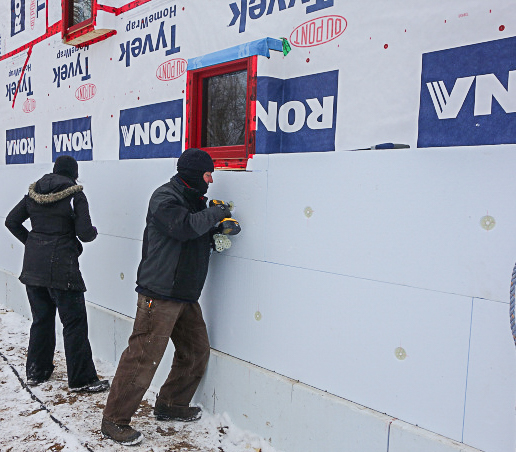
Image Credit: All photos: David Murakami Wood The position of each rafter was carefully mapped. Jigs help keep the pieces correctly oriented before they are attached to the cross-laminated timber roof panels with long screws. Getting insulation up to the roof called for a trolley. The heavy panels rode up a ladder on a site-built frame. Aluminum trim for the windows. Set roughly midway in an 11-inch layer of exterior insulation, windows were flashed with aluminum trim formed in a brake on site. Wall insulation is applied in two layers. An inner layer 9 1/2 inches thick is covered by a second layer 1 1/2 inches thick. Because the authors could afford to order only a single container of wood fiber insulation from Germany, they used some expanded polystyrene for the inner layer on the walls. Roof insulation is complete.
More Guest Blogs


Editor’s note: David and Kayo Murakami Wood are building what they hope will be Ontario’s first certified Passive House on Wolfe Island, the largest of the Thousand Islands on the St. Lawrence River. They are documenting their work at their blog, Wolfe Island Passive House. For a list of earlier posts in this series, see the sidebar below.
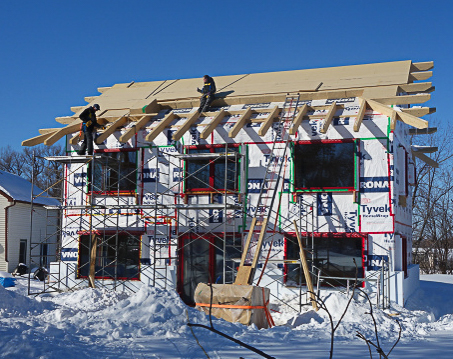
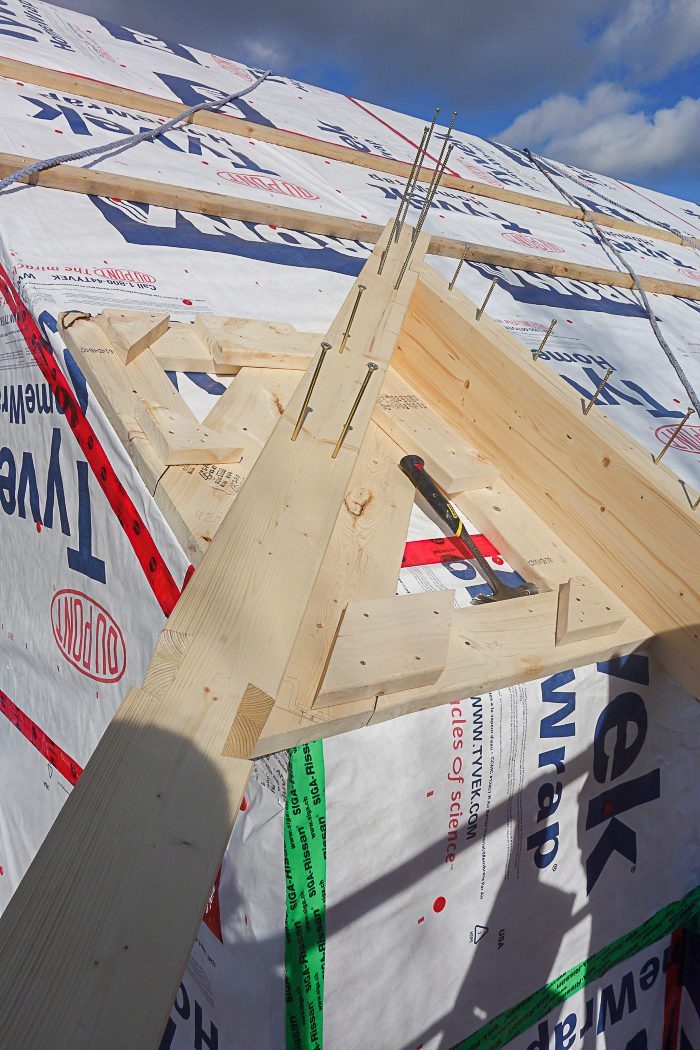
The roof of our new house, like the exterior walls, is made with cross-laminated timber (CLT) panels, so it doesn’t need any conventional framing. But we did need rafters at the perimeter of the roof to support the roof overhang, and the rafters had to be sanded and stained before they could be installed. In order to do that, we had to keep the temperature in the house above 10ºC (50°F), when it’s been down to -15ºC (5°F) outside, so the air heater inside has been vital. It’s somewhat ironic to think that keeping this temperature will be easy once we have the insulation on.
The roof overhang will shade the upper-story windows on the south side from direct summer sun — vital in preventing the house from overheating — while maximizing solar gain in the cooler months. Inside blinds don’t actually prevent summer overheating; while they act as a barrier to light, they still allow heat into the house. Outside blinds mean extra complications.
The veranda roof will do the same for the lower-story windows. The overhang also will make the roof area larger, enabling us to maximize our solar power generation (when we eventually fit the panels). Roof overhangs do many other useful jobs, however unfashionable they currently appear to be with architects who want their roof edges to be flush to the walls, largely for the sake of a “clean” look.
Given that we don’t need them to support anything more than the overhang, our rafters are short and are screwed into the CLT roof panels. The insulation will be cut to fit around them, and they will then be covered with an additional top layer of wood fiber insulation, then wide strapping, and finally the steel roofing. The strapping has to be sturdy enough to hold down the insulation as well as support the steel roofing and, eventually, the solar panels.
Adding insulation on the roof
The work was performed in February, during a warm spell — well above freezing — which means the crew has been able to get on with installing the rafters. While they were drying we also managed to wrap the whole house — finally — and just in time for what looks like very heavy snow and rain later this week.
In addition, with the house getting warmer, due to both the warm weather and the heating, the remaining water that had frozen inside the CLT structure after very heavy rains in January is coming out (for more on that problem, see the post from January 10, 2016). This is getting us closer to drying everything properly. Once that is done, we can put floors in.
We were expecting a return to more normal, and colder, temperatures as well as snow. But before all this hits us, the crew has had time to prepare for insulating the roof. This will need two things: cutting the wood fiber panels into the exact shapes required to fit in between the rafters; and devising a system for getting the heavy insulation panels where they are needed.
Both problems have been worked out. In particular, the crew managed to rig a combination trolley-pulley system using a ladder, that seems to work very well in getting the panels up to the roof (see Image #3, below). Now we just need some reasonable weather to get it done.
Exterior insulation is mostly wood fiber
For those who have been paying attention, you will recall that we are mainly using German-made Schneiderholz rigid wood fiber insulation boards. These are basically mashed up and reconstituted spruce and pine from sustainable sources.
They have an R-value of nearly 4 per inch, and we are using two layers on both walls and roof: a thick inner layer of 240 mm (9 1/2 inches) covered by a thinner outer layer of 40 mm (1 1/2 inches). The outer layer also has a coating that’s relatively waterproof. The whole wall/roof assembly will be over R-50 (that’s a real testable R-value, not a grand claim). The additional benefit of wood fiber is the relatively high thermal mass, which will make the house cooler in summer. This will be particularly important in the roof. Finally, it is also airtight but vapor-permeable.
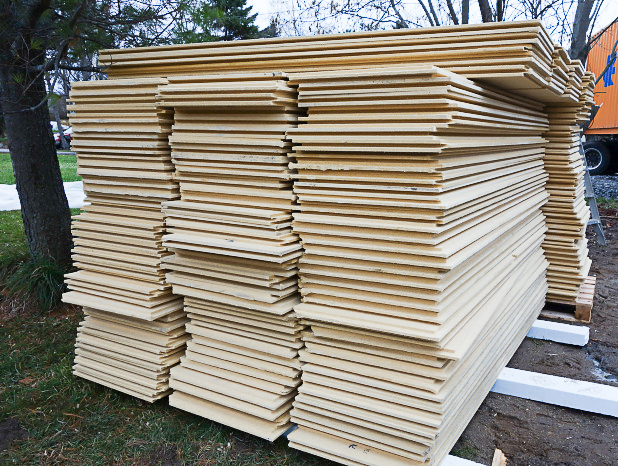
However, due to the logistics and costs of transporting such bulky material, it was only cost-effective to get a single 40-foot container of insulation shipped from Germany. This left us with a shortfall of some 50 square meters (about 540 square feet) in the inner layer. The question was what to use to make up the shortfall, and where it would go. We considered various options, including:
Buying more wood fiber insulation from a Canadian supplier. This was rejected because we are short of funds, and it would have cost about three times as much as from the German supplier, even including the costs of shipping. In any case, this would also be imported. We are left wondering, once again, why Canadian companies can’t (or don’t) make competitively priced, high-performing and sustainable wood-based products in a country which has so much timber.
Framing about two-thirds of one of the larger walls and using Roxul mineral wool batts or something similar. However, having specifically built a house that does not have conventional framing, it seemed silly to have to use it non-structurally for the insulation. We’d also had to have made Larsen trusses to avoid thermal bridging. It just seemed like a lot of extra time and effort. Note that we are not against Larsen trusses at all in general; they are a great solution if you are going to build a highly insulated stick-framed house.
More expanded polystyrene (EPS) panels, as we used in the foundation. EPS is not the most environmentally friendly substance, but its better than extruded polystyrene (XPS) and it actually has relatively low embodied energy because it is mostly air. It insulates very well (Type II has an R-value of near 4 per inch). Also, you can get EPS panels cut to the exact size you want, relatively cheaply. There are some disadvantages: it doesn’t have a high thermal mass compared to other materials and it is relatively vapor-impermeable (although still highly airtight). This would make EPS a bad choice for the roof, but using it as a base layer for the wall insulation, all around the house, would not be so bad, because the vapor would still be able permeate upwards through the whole of the rest of the walls and roof. Two rows of 2-by-8-foot panels 9 1/2 inches thick Styrorail, which provided our foundation insulation, would be enough to make up the shortfall.
So that’s what we decided to do. And it is so easy to work with, it was pretty much done in an afternoon. One potential issue was what to do if water was somehow trapped behind the panels, so to cope with that unlikely eventuality, we cut tiny channels in the base of the panels. And it isn’t at all affected by the snow which, right now, is rather important.
Window trim and wall insulation
Window trim might sound merely cosmetic, but it is very important in creating a watertight shell, and with this kind of construction it is even more complex and important than normal. Finishing the windows and the wall insulation are jobs that go together.
We might have installed the windows a while back but, really, that was only the first stage. With 11 inches of insulation butting up against the windows and extending out beyond them, there was substantial work to be done in coming up with and implementing the most waterproof and airtight trim. The best and most cost-effective solution turned out to be renting an aluminum bending machine (also called a “brake”) and using it to make our own custom trim from rolls of aluminum. The aluminum trim is fitted over a wooden outer frame. We went for a neutral color that matched the sills we’d already had made.
Despite what the windows may have looked like earlier in the process — and we installed them as far out as they safely could be — they will end up being set quite deeply into the fully insulated walls. There were two potential disadvantages to this. First, it would reduce the solar gain, but Malcolm Isaacs at Construction Maison Passive has done the calculations and we’re okay.
Second, we would see less of the lovely red window frames than we might otherwise have been able to. That turned out to be unavoidable where we have non-opening windows (i.e. four out of the five big ones on the south side), but otherwise the color will still be strong. Because we were able to bend the aluminum any way we wanted, Chris, our builder, has been able to eliminate the need for any extra siding trim (which tends to be much more expensive than siding itself) around the windows: the aluminum will serve multiple purposes.
The crew is now pressing ahead with both window trim and wall insulation, with the most difficult south side being done first. Here, not only do the insulation blocks have to fit around the largest windows and the biggest door, but they also have to fit around the supports for the porch roof.
Weekly Newsletter
Get building science and energy efficiency advice, plus special offers, in your inbox.


6 Comments
Roof framing
For a house with otherwise continuous insulation, don't the applied rafter tails represent a substantial thermal bridge?
Roof Framing
Possibly, Malcolm. The rafters don't bridge to the outside - they are covered by the outer layer of insulation - and we were advised that according the PHPP calculations, it doesn't make a huge difference. However I'm not entirely convinced - having portions of the edge of the roof which are essentially just over 14" of solid wood and only 1 1/2" of insulation must make some difference. So it's something I am going to be keeping an eye on. My instinct is to add some more insulation inside the CLT roof in the attic space under the rafters. The tight corners under the eaves are basically unusable for any other purpose anyway, so it wouldn't reduce the potential utility of the space up there by very much.
Rafter tails
David, I think Malcolm was referring to the rafters sticking out for the overhang, past the insulation. Those are the tails, which are completely open to the cold outside air. Adding some insulation to the underside, especially near the eaves sounds like a good idea, although where it is most needed is also where you have the least space available.
Rafter tails
Oh yes, of course... I didn't read it carefully enough. Interesting point. I will have to ask the rest of the team.
Timber thermal bridge
What's the compressive strength of this insulation? Would it be possible to place rafter tails overtop? I have a similar plan in mind and would like to use 12" of the high density roxul on the roof and then frame a structure of 4x4 pine overtop to support overhang
Rafter tails and thermal bridging
Okay, so I've had conversations with various people involved in the design and build. The short answer is that yes, the rafter tails are inevitably thermal bridges in a limited way. Remember that they will still have an R value of something like 1 / inch. There will be some points at which the distance between the inside of the CLT roof / wall and the nearest outside edge of the rafter that is exposed to the air is less than 20" and therefore the R value at those particular points is at most ⅓ of the R value of the rest of the roof / wall assembly. That's still far more than any window (even passive house standard triple-glazed windows), so we can get a bit too precious about some of this. The exact calculations are all included in the modelling of the building performance, and we can tell you in practice that the house can maintain a consistent internal temperature of 16-18ºC on the coldest days here in Ontario (-25ºC), with no supplementary heating input - so it works. Could it have been better? Yes. Undoubtedly. If we were starting again we probably wouldn't do it this way - we probably wouldn't do many things the same way. However, living in the house is a wonderful experience so we don't have any regrets. Could we do anything to make it better now? Yes, and we probably will - one thing, would be to add extra insulation to the most unusable parts of the triangular eaves inside the attic and we may well do that. In answer to Scott, I am not sure - we haven't investigated the structural / weight-bearing performance of Roxul, however that seems like a much lighter solution, provided the roof on top will be similarly light weight. I would also observe that I've seen a number of very good passive house designs that dispense with overhangs and using roofs for shading and base their shading strategy entirely on various kinds of blinds and louvres - see, for example, the architecture firm, G.O. Logic, of Maine.
Log in or create an account to post a comment.
Sign up Log in