

Image Credit: Energy Vanguard
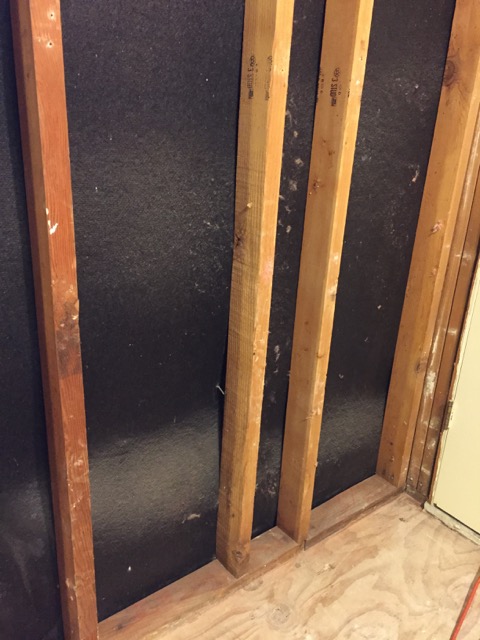
Image Credit: Energy Vanguard Lateral air leakage pathways show up on the fiberboard sheathing as places where the dust got caught on the surface.
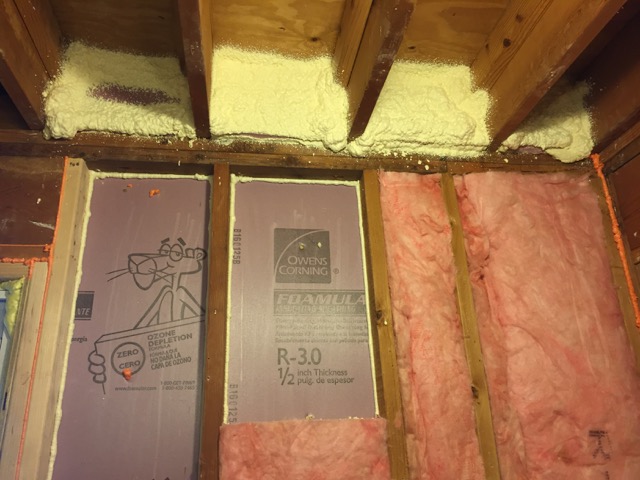
Image Credit: Energy Vanguard The upgraded wall has extruded polystyrene against the fiberboard and is sealed in place with spray foam. Inboard of the XPS I used unfaced fiberglass batts.
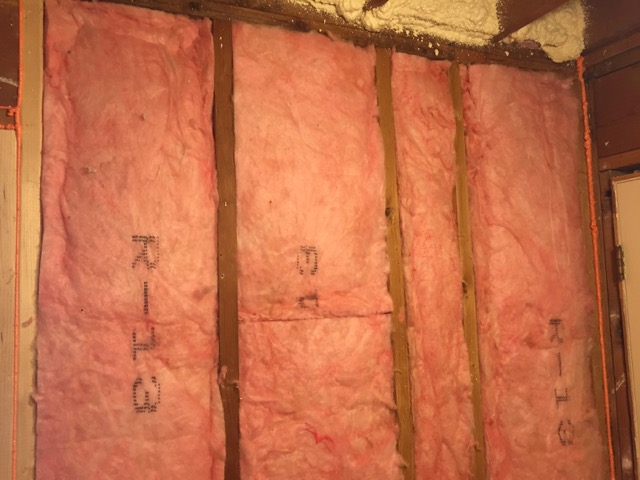
Image Credit: Energy Vanguard This is what fiberglass batts look like when installed to Grade 1 quality.
Image Credit: Energy Vanguard
More Building Science


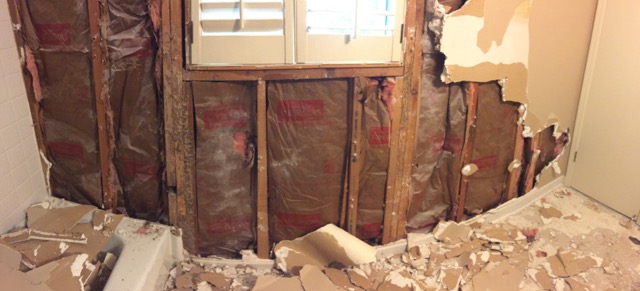
When I began remodeling my master bathroom last month, I found the exterior wall ripe for some serious improvement. It had a number of problems, and I was excited to find them.
It was worse than I imagined in some ways. The photo at right shows the wall partially opened up.
The problems
Yes, there was insulation behind the bathtub, but as usual, there was no interior sheathing on that section. Here’s a list of the problems I found:
- Termite damage. The studs on both sides of the window were eaten up and had to be replaced.
- Inadequate insulation. The wall had fiberglass batts labeled as R-7.4.
- Poorly installed insulation. I’d put a Grade 3 on the installation quality of those batts.
- Sheathing with a lot of air leakage. The asphalt-impregnated fiberboard sheathing wasn’t tight against the framing (see Image #2, below). As you can see, there was a lot of air movement in the cavities. (See my previous article on this air leakage.)
- Uninsulated band joist. No insulation or air-sealing at all here.
The fix
Image #3 (below) shows the approach I took. I couldn’t do anything from the outside because of the brick veneer, so my first objective was to eliminate the air leakage pathways in the sheathing. I chose to use the cut-and-cobble method and put extruded polystyrene (XPS) foam board in the back of each cavity. I sealed the pieces of rigid foam into place with one-part spray foam and a professional foam gun. I had to tack most of them into place to hold them there while the foam cured.
The reason I chose XPS instead of polyisocyanurate is its better drying capability. A half inch of XPS has a vapor permeance of about 2 perms, making it a Class 3 vapor retarder. Polyiso, with its foil facing, has a permeance less than 0.2, making it a Class 1 vapor retarder.
On top of the XPS, I installed unfaced fiberglass batts. I chose unfaced batts because the kraft paper facing is unnecessary in an above-grade wall in our location (IECC Climate Zone 3). The paper facing also makes it harder to install the batts well.
I installed the batts with minimal compression and so they completely filled the cavities. Yes, because of the 1/2″ of XPS in the cavity, they’re all compressed a little bit in depth. Because they’re friction fit against the studs, there’s a little bit of lateral compression as well. I still give myself a Grade 1 on the install, though. What do you think?
In the band joist, I used salvaged blocks of XPS held in place with a 2-part spray foam kit. That should cut the air leakage significantly — as well as the spider infiltration. Yes, I found spider webs in those joist bays over our master bath. Who knows how many generations of spiders have lived and died up there?
Some of the products I used here aren’t available from the big box stores. I bought both kinds of spray foam and the unfaced batts from my friend Rod MacKenzie at Green Building Resources in the Atlanta area.
The R-value improvement
I ran the numbers in my series and parallel heat flow spreadsheet. The original wall, with its R-7.4, Grade 3 batts, wasn’t very good. But it wasn’t as bad as it could have been. The Celotex sheathing has an R-value of 1.5. Plywood and OSB come in at about R-0.5, so that extra R-1 of continuous insulation does help.
Here are the numbers for the whole-wall R-value:
Before R-9.2
After R-13.9
That’s a 50% improvement in the R-value. Not bad.
As I described above, my fix also should cut the air leakage significantly for that section of wall. Unfortunately, I won’t be able to quantify that with before-and-after blower door tests. Our owners’ association had the floor of our building air-sealed and insulated with spray foam at the same time I was doing this work so any decrease I measure will be due to both changes in the air barrier.
The bathroom is close to being finished now, and I look forward to having it be much more comfortable and energy-efficient than it was before.
Allison Bailes of Decatur, Georgia, is a speaker, writer, building science consultant, and the author of the Energy Vanguard Blog. Check out his in-depth course, Mastering Building Science at Heatspring Learning Institute, and follow him on Twitter at @EnergyVanguard.
Weekly Newsletter
Get building science and energy efficiency advice, plus special offers, in your inbox.


11 Comments
why not use 2" of polyiso,
why not use 2" of polyiso, thereby making vapour permeance irrelevant by avoiding any concerns about dew point? I have a real hate-on for XPS after reading on this website about the global warming potential associated with the production and use of XPS foam. I see that in your blog you've cast some well-deserved skepticism on some people's calculations of the intensity of this GWP, but isn't it still better avoided if possible?
Already answered (@ Peter Rogers)
"The reason I chose XPS instead of polyisocyanurate is its better drying capability. A half inch of XPS has a vapor permeance of about 2 perms, making it a Class 3 vapor retarder. Polyiso, with its foil facing, has a permeance less than 0.2, making it a Class 1 vapor retarder."
In climate zone 3 where this is located there are no concerns about dew point, but overall drying capacity and moisture resilience still count. The Celotex sheathing is very moisture tolerant, but way too vapor open to keep moisture drives from the brick from affecting the cavity. A Class-III vapor retarder such as half-inch XPS still allows the bathroom to dry into the masonry cavity without allowing huge moisture diffusion entering when the sun hits wet brick, as happens with Celotex on it's own.
An inch of unfaced EPS would have been an arguably greener alternative to half inch XPS, but in the grand scheme of things half-inch XPS isn't a global warming disaster, and using it as a means to adjust vapor retardency down to class-III levels (rather than as a primary insulation layer) seems appropriate.
Response to Peter Rogers
Dana Dorsett answered your question better than I probably would have. (Thanks, Dana!) It's all about letting things dry in either direction if necessary. If you were doing something similar and wanted to avoid using XPS, you could take Dana's suggestion and use 1" of EPS.
By the way, I'll be presenting on the global warming impact of insulation at the North American Passive House Conference in Philadelphia in September.
Reply to Peter Rogers
2" reclaimed XPS is widely available and is greener than new polyiso and cheaper as well.
Why is drying in both directions good?
Please forgive me if this is basic knowledge that everyone in this field should know. Why do we prefer to be able to dry in both directions from the cavity as opposed to having a vapor barrier in the middle with the ability to dry one side of the barrier inward and the other side of the vapor barrier outward? It seems that the ability to dry in both directions implies the ability for vapor to pass through the wall. Is that desirable? A wall would dry faster if it can dry in both directions, but not very much faster if there is a vapor retarder in one direction.
Yes drying in both directions is desirable.
In US climate zone 3A the wintertime moisture drives are from the interior (and in a bathroom with shower, high spikes can occur), but in the summertime the primary moisture drives are from the exterior (and with brick cladding, extreme spikes can occur where sun can heat the brick.) Controlling the rate of moisture transfer with a vapor retarder blunts the extremes, but optimizes the year-round total drying capacity.
Can it be done in other ways, including true vapor barriers? Sure! But it's more resilient to allow drying in both directions, but at a controlled rate. Using 15+ perm (when damp) Celotex is often more vapor open than optimal, especially under brick clad houses that are air conditioned when the the interior finish is 3-5 per latex (or worse, <0.1 perm vinyl or foil wallpaper). But a vapor retarder on the exterior at roughly the same vapor retardency as the interior finish paint works just fine as a rate-controlled vapor flow-through stackup.
Even in climate zone 6 sheathing as vapor-open as Celotex can be problematic under brick veneers in air conditioned buildings compared to 0.5-5 perm plywood/OSB. Asphalted fiberboard like Celotex is often used as sheathing under brick cladding due to it's relative immunity to moisture- it doesn't rot even at high moisture content the way OSB & plywood can, but it's high vapor permeance doesn't protect the rest of the assembly from the high exterior moisture drives as well as OSB & plywood do, but most of the time it isn't a problem. But when a problem is spotted during renovation (as happened here), a cut'n'cobble foam remediation works.
In zones 5 & higher when there is no exterior insulation in the stackup for dew point control, fiberboard sheathing can offer much higher resilience than OSB or plywood (with caveats on air conditioning when the cladding is stucco or brick.) In zones 5 & 6 fiberboard sheathing is sufficiently flow through that it doesn't even need an interior side vapor retarder, as long as there is a rainscreen (including masonry cavities) or inherently back-ventilated siding such as vinyl & aluminum.
http://publicecodes.cyberregs.com/icod/irc/2012/icod_irc_2012_7_sec002_par025.htm
Great answers Dana and
Great answers Dana and Allison, thanks. I know very little about climate zone 3, but that makes sense about the benefits of two way drying, since the conditions can switch so dramatically.
Stephen, where do you usually get this cheap reclaimed XPS? I've never found any in my area.
Detail
I had in essence posed this same question a while back on the forums. Being in zone 6A with 2x4 framing, aluminium siding and 1x6 ship lap for sheathing. Would this same detail using the cut & cobble 1/2 XPS and and unfaced batt also work in this zone? (Minneapolis)
Not visible in my pictures is a walk in shower that will have one of the walls on the exterior. The walk in shower will of course have tile and will use the Schulter/Kerdi system on the walls pan. My concern is the vapor/moisture drive on the one exterior wall in the shower.
Any alternate detail would be appreciated or suggestions
Response to MS
MS,
If you are doing a cut-and-cobble job in a cold climate behind an impermeable shower wall, I would use cut-and-cobble foam for the entire stud depth (at least behind the tiled shower wall). Skip the fiberglass in these walls.
MartinFor the exterior walls
Martin
For the exterior walls outside of the walk-in shower area. Would replacing the kraft faced FG with unfaced FG and layer of MemBrain be advisable. Also for the ceiling above the shower, is blow-in cellouse ok? Or should the foam board be installed in this area as well?
For the FG with Membrain question, it's worth clarifying the house does have central air and is located in Zone 6a. Or would I simply be better served by just using some new Kraft faced FG
Response to MS
MS,
The difference in performance between kraft-faced fiberglass batts and unfaced fiberglass batts with MemBrain will be negligible. (Like MemBrain, kraft facing is a smart vapor retarder.) The most important factors for good thermal performance are (a) attention to air sealing, and (b) careful installation of the insulation to prevent voids.
Blown-in cellulose insulation is fine for use above your ceiling (even when the ceiling is above a shower).
Log in or create an account to post a comment.
Sign up Log in