
Image Credit: James Steacy / Ben Foster
More Green Building Blog


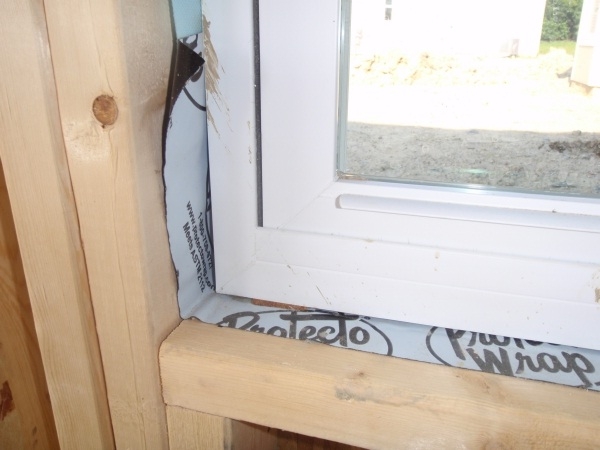
Readers are invited to identify as many installation errors they can spot in the attached photo of a window installed in the rough opening of a new home.
This is the latest in our ongoing series, “What’s Wrong With This Picture?” (To see two previous photos in the series, click the links in the box below.)
The photo comes from James Steacy of IBACOS (a Building America program partner in Pittsburgh, Pennsylvania).
How many errors can you find?
Steacy’s answers will be posted next week. In the meantime, post your comments below.
One interesting note: when we’ve published “What’s Wrong With This Picture?” articles in the past, GBA readers have always been able to identify more errors than were noticed by the photographers who submitted the photo.
By the way, “There’s a smudge of asphalt on the window frame that hasn’t been cleaned” does NOT count as a problem.
Click here to read the answers to our puzzler.
Weekly Newsletter
Get building science and energy efficiency advice, plus special offers, in your inbox.


11 Comments
Good question...
1. Its missing the sloped sill or pan sill and/or spacers.
2. It appears no space between the framing members and the window frame. It'll be hard to level.
Window
No air sealing between the window & the rough opening.
Common install job
I've replaced many windows that are installed like this one. Chances are there is a vapor impermeable tape on the exterior of the nailing flange. The main problem is that moisture tends to find its way down to the Protecto Wrap and eventually gets under it and to the interior. The result is rotten framing and wet insulation, sheathing, which can continue down through below levels. I've had to replace second floor joist due to windows installed like this one on the second floor. It's rare to see someone actually use molded corners or welded pans for windows, but it's the way to do it right.
Vapro Shield makes a great pre-molded corner that can be incorporated with pan detail. It's vapor permeable, so if moisture gets behind it it can drying out.
Siga makes a really nice vapor permeable tape, Wigluv, for the exterior. It also allows drying to the outside. Also, they have an interior air sealing tape, Corvum, that has a preformed 90 degree edge.
Not sure if builder plans to foam the tiny space between wrap and window frame, but it should be done before interior trim is applied.
too much framing
Not exactly the fault of the window installer, but there's no need for a king stud+trimmer+short trimmer under the sill. That's 3 studs where one could usually suffice.
I'd also like to see the WRB and the sill pan completely cover the depth of the opening, not just half the stud. Protecto wrap needs to be fully adhered, and installed without the little valleys that will allow water to pool.
All of the above and...
The Protectowrap should be shingled by another layer of something...
The vertical lap in the WRB
The vertical lap in the WRB is reversed, the install gap is too tight for me. the WRB doesn't extend fully into the framed opening. Too many jack studs.
ProtectoWrap
ProtectoWrap makes some very good products, but that one doesn't stick to OSB worth a #@&%.
Moistop is one US product that is acceptably sticky http://www.fortifiber.com/flashing.html
Install problems
Peel & stick:
- not adhering
- I don’t see the normal “V” piece applied to the bottom corner to seal this area sensitive area. The bottom corners are the most likely to leak.
- No sealant applied to stud corners to prevent air leakage (in addition to peel & stick).
Primary & secondary planes of protection
- No backer-rod or sealant applied to the interior air barrier
- Shims & Spacing: Can’t tell if shims are applied to support the product and to provide drainage.
Window Installation
- Window R.O. is too tight and will be difficult to air seal and insulate properly and will not allow for expansion/ contraction/ settling of framing and/or window
- Sill needs to be beveled (as simple as installing a piece of 6" cedar bevel siding before flexible flashing is installed) or a small interior water dam (1/2" x 3/4" shoe) could have been installed and flexible flashing placed over it if sill is not beveled
- Flashing is not lapped properly - WRB (if there is one) has not been installed over sill flashing properly on verticle framing
I have used and continue to
I have used and continue to use Protecto membrane flashing tape, it adheres well to all wood surfaces and is extremely flexible. The proper procedures to installing a window are specified in the window manufacturers installation guide and there you will find their desired method of installing house wrap and flashing tape.
I however do not agree with the industries standard practice, I prefer to cut the house wrap flush with the rough sill and lap the sides into the framing members, the top section receives two angled cuts and is then held up.
I then apply the protecto flashing membrane to the entire rough sill and extend up the jack stud approximately six inches.
The window is then installed, tacked in place and shimmed to the manufacturers specs. Once shimmed the window is completely fastened at all nail flange holes.
The nail flanges are then covered with membrane tape and the housewrap that was held up at the headjamb is taped in place.
I have done my installations this way foe years and have not seen any problems with my work which is mostly repeat customers.
Protecto wrap/ Forti-flash
I just left a comment in the "Answer" section of this piece.
I think using this product in the right way is MUCH better than some of the other alternatives like the "V" cut or butterfly piece that many people use. No cuts in the bottom sill flashing for me no matter how many layers or lap sequences.
I personally dont think its necessary for the flashing to extend all the way to the back of the opening on most "outie" windows. Windows dont leak at the inside jambs, they leak where the glass meets the frame and as long as the sill is sloped, the water should be directed out.
If the window has a mulled unit above, or if it is installed in a very windy location with little protection form overhangs then it can make sense to use extra labor and materials but most of the time its a waste to fully wrap the entire opening.
Log in or create an account to post a comment.
Sign up Log in